关于第一次考核+小组分享会的收获
标题
- 新的知识
-
- 三栏布局(五种方式)
- 双栏布局(两种方法)
- 圣杯布局
- 双飞翼布局
- 多列等高
- 上下固定,中间自适应
- 之前知识小总结
-
- 选择器部分
-
- 主要的简单选择器
- 更多的伪类选择器
- 更多的伪元素选择器
- 权重
- 关于内容水平居中,垂直居中
- 解决高度坍塌的四种方法
新的知识
三栏布局(五种方式)
对于三栏布局,首先要了解什么是三栏布局,即一行上面存在三个盒子,让三个盒子左右定宽,中间自适应宽度。
- 浮动实现三栏布局
这里是html部分
    <div class="container">
        <div class="left">我是左边那部分div>
        <div class="right">我是右边那部分div>
        <div class="center">我在中间div>
    div>
这里是css部分
.container{

            height: 200px;
            position: relative;
            width: 100%;
            text-align: center;
            line-height: 200px;

        }
        .left{

            width: 300px;
            height: 200px;
            background-color: yellow;
            float: left;
        }
        .right{

            width: 200px;
            height: 200px;
            background-color: red;
            float: right;
        }
        .center{

            background-color: lightblue;
            height: 200px;
        }
具体效果如图
用浮动实现三栏布局是最简单也最容易想到的一种方法,使用浮动实现有一点非常重要,就是代表中间部分盒子必须放在最后面,因为使用浮动实现三栏布局的原理是:在左右盒子左右浮动之后,他们脱离了常规流,而中间的盒子属于常规流盒子,他会无视浮动盒子,把常规流盒子直接顶开,所以中间那个盒子的覆盖范围是一整行,如下图所示
这种有一个小问题,就是当你把视口缩的比较小的时候,中间那个盒子的颜色很有可能会看不见,所以应该在container这个盒子中设置min-width,让盒子在小于那个宽度的时候下面自动弹出滚动条。
还要一个问题就是关于加载缓冲的,当盒子的排列顺序是这样的时候,用户使用的时候加载页面会按顺序加载,也就是说先加载我们看到的左边部分和右边部分,有可能会给用户带来不好的体验,所以存在问题
也可以给center一个overflow:hidde;触发了bfc,然后也会让中间宽度自适应
- 定位实现三栏布局
这里是html部分
    <div class="container">
        <div class="left">我是左边那部分div>
        <div class="center">我在中间div>
        <div class="right">我是右边那部分div>
    div>
这里是css部分
        .container{

            height: 200px;
            position: relative;
            width: 100%;
            text-align: center;
            line-height: 200px;
            min-width: 1000px;
        }
        .left{

            width: 300px;
            height: 200px;
            background-color: yellow;
            position: absolute;
            left: 0;
        }
        .right{

            width: 200px;
            height: 200px;
            background-color: red;
            position: absolute;
            right: 0;
            top: 0;
        }
        .center{

            background-color: lightblue;
            height: 200px;
        }
定位法也是容易想到的一种方法,因为是直接固定了盒子的位置,但有一个致命缺点就是他使用定位后直接就脱离了文档流(常规流),会不方便我们后面的页面内容书写
原理是让左右两个盒子分别绝对定位在左右两边,然后代表中间那部分的盒子即常规流盒子在排列的时候会无视非常规流盒子(static即相对定位盒子除外),所以他呈现的效果和浮动的类似
- table(表格)实现三栏布局
这里是html部分
    <div class="container">
        <div class="left">我是左边那部分div>
        <div class="center">我在中间div>
        <div class="right">我是右边那部分div>
    div>
这里是css部分
        .container{

            height: 200px;
            width: 100%;
            text-align: center;
            line-height: 200px;
            min-width: 1000px;
            display: table;
        }
        .left{

            display: table-cell;
            width: 300px;
            height: 200px;
            background-color: yellow;
        }
        .right{

            display: table-cell;
            width: 200px;
            height: 200px;
            background-color: red;
        }
        .center{

            display: table-cell;
            background-color: lightblue;
            height: 200px;
        }
这种方式主要用了table标签,即表格
原理是将container当成一个表格,然后container里面的元素都是他的table-cell即表格单元格,然后效果就目前来说挺好,但仍存在一个问题,就是左右中三个盒子是必须等高的。然后不存在和上面两种方法都遗留的问题,就是中间那个盒子其实是没有占据了一行的
- flex实现三栏布局
首先介绍一下flex属性:
他会让所有弹性盒模型对象的子元素都有相同的长度,且忽略它们内部的内容
flex: flex-grow flex-shrink flex-basis|auto|initial|inherit;

这里是css部分
.container{

            height: 200px;
            width: 100%;
            text-align: center;
            line-height: 200px;
            min-width: 1000px;
            display: flex;
        }
        .left{

            width: 300px;
            height: 200px;
            background-color: yellow;
        }
        .right{

            width: 200px;
            height: 200px;
            background-color: red;
        }
        .center{

            flex-grow:1;
            background-color: lightblue;
            height: 200px;
        }
html部分不变
让包裹整体的盒子变成一个弹性盒子,然后给center盒子一个flex-grow属性,让他的属性值为一,然后center盒子就可以相对于其他项目进行扩展,然后中间的盒子就会自适应
- grid实现三栏布局
css部分
        .container{

            height: 200px;
            width: 100%;
            text-align: center;
            line-height: 200px;
            min-width: 1000px;
            display: grid;
            grid-template-rows: 200px;
            grid-template-columns: 300px auto 200px;
        }
        .left{

            background-color: yellow;
        }
        .right{

            background-color: red;
        }
        .center{

            background-color: lightblue;
        }
html部分还和上面一样
这种方法通过让container成为一个网格,然后通过grid-template-rows来设置行高,也就是这个三栏布局整体的高
然后通过grid-template-columns来设置列宽,也就是在container里面其他三个盒子的宽
双栏布局(两种方法)
双栏布局即类似左边定宽,右边自适应
- float实现双栏布局
css部分
        .clearfix::after{

            content: "";
            display: block;
            clear: both;
        }
        .container{

            background-color: lightblue;
            width: 1000px;
            margin: 0px auto;
        }
        .aside{

            background-color: red;
            color: #fff;
            float: left;
            height: 300px;
            width: 300px;
        }
        .main{

            background-color: #008c8c;
            color: #fff;
            height: 300px;
            overflow: hidden;
        }
html部分
    <div class="container clearfix">
        <aside class="aside">
        aside>
        <div class="main">
        div>
    div>
通过使用左浮动让aside盒子在左边,main盒子是常规流块盒,会无视浮动盒子,把整个container占满,给main盒子加上overflow:hidden会触发bfc机制,然后让main盒子占据双栏布局的左边部分
- flex实现双栏布局
css部分
        .container{

            background-color: lightblue;
            width: 1000px;
            margin: 0px auto;
            display:flex;
        }
        .aside{

            background-color: red;
            color: #fff;
            height: 300px;
            width: 300px;
        }
        .main{

            flex-grow: 1;
            background-color: #008c8c;
            color: #fff;
            height: 300px;
        }
通过让整体的盒子变成弹性盒子,让main盒子相对于其他盒子进行扩展,然后得到双栏布局
圣杯布局
什么是圣杯布局?head和footer各自占领屏幕所有宽度,高度固定。中间的container是一个三栏布局。三栏布局两侧宽度固定不变,中间部分自动填充整个区域。中间部分的高度是三栏中最高的区域的高度。
如图

他有个优点就是center在前面,页面加载时会先加载center部分
        .clearfix::after{

            content: "";
            display:block;
            clear: both;
        }
        body{

            min-width: 1000px;
            text-align: center;
        }
        .head,.footer{

            height: 60px;
            width: 100%;
            background-color: red;
        }
        .container{

            overflow: hidden;
            padding-left: 200px;
            padding-right: 150px;
        }
        .col{

            position: relative;
            float: left;
            height: 300px;
        }
        .left{

            background-color: lightblue;
            width: 200px;
            right: 200px; /* 使用了相对定位,让盒子相对于自己原来的右侧的距离 */
            margin-left: -100%; /* 让盒子返回上一行,相对于盒子的左侧 */
        }
        .right{

            background-color: yellow;
            width: 150px;
            margin-left: -150px;
            left: 150px;
        }
        .center{

            width: 100%;
            background-color: #008c8c;
        }
right部分margin-left和left的设值也可以用margin-right:-150px;代替
这是html部分
    <div class="head">我是头部div>
    <div class="container">
        <div class="center col">我是中间部分
        div>
        <div class="left col">我是左边div>
        <div class="right col">我是右边div>
    div>
    <div class="footer .clearfix">我是最下面
    div>
双飞翼布局
圣杯和双飞翼布局在前面部分差不多,区别就是实现让main部分居中的方法不同,还有就是双飞翼布局没有用到相对定位,使用了一个新的父元素
css部分
        .container{

            overflow: hidden;
        }
        .col{

            height: 300px;
            float: left;
        }
        .left{

            background-color: yellow;
            width: 300px;
            margin-left: -100%;
        }
        .right{

            background-color: red;
            width: 200px;
            margin-left: -200px;
        }
        .center{

            width: 100%;
            background-color: #008c8c;
        }
        .main{

            margin: 0px 200px 0 300px;
            height: 300px;
        }
html部分
    <div class="container">
        <div class="center col">
            <div class="main">我是中间div>
        div>
        <div class="left col">我是左边div>
        <div class="right col">我是右边div>
    div>
圣杯和双飞翼都有的一个优点是具有较好的兼容性
多列等高
- flxe法
css部分
        .container{

            display: flex;
            text-align: center;
            width: 1000px;
            margin: 0 auto;
        }
        .left{

            background-color: yellow;
            flex-grow: 1;
        }
        .right{

            width: 500px;
            background-color: red;
        }
- 负margin法
css部分
        .clearfix::after{

            content: "";
            clear: both;
            display: block;
        }
        .container{

            text-align: center;
            width: 1000px;
            margin: 0 auto;
            overflow: hidden;
        }
        .aside{

            float: left;
            width: 300px;
            background-color: yellow;
            height: 10000px;
            margin-bottom: -9990px;
        }
        .main{

            background-color: red;
            color: #fff;
            overflow: hidden;
        }
html部分
    <div class="container clearfix">
        <div class="aside">div>
        <div class="main">div>
    div>
利用负margin实现登高,给包括其他盒子的大盒子加一个overflow:hidden;还利用了伪元素选择器after
如图

给container加overflow:hidden;会让侧边栏多余的部分溢出隐藏,然后出现等高效果
上下固定,中间自适应
- 绝对定位
css部分
        body{

            padding: 0px;
            margin: 0px;
        }
        .head{

            position: absolute;
            height: 60px;
            top: 0px;
            width: 100%;
            background-color: red;
        }
        .footer{

            position: absolute;
            background-color: lightblue;
            height: 60px;
            bottom: 0px;
            width: 100%;
        }
        .main{

            position: absolute;
            width: 100%;
            top: 60px;
            bottom: 60px;
            background-color: black;
        }
- flex实现
        html,body{

            padding:0;
            margin:0;
            height:100%;
        }
        .container{

            display: flex;
            flex-direction: column;
            height: 100%;
            width: 100%;
        }
        .head{

            height: 60px;
            background-color: red;
        }
        .footer{

            background-color: lightblue;
            height: 60px;
        }
        .main{

            flex: 1;
            background-color: black;
        }
flex-direction: column;把盒子定义方向变为竖排
一定要注意让body元素的高度为100%
之前知识小总结
选择器部分
主要的简单选择器
1.id选择器:选定确定的id的元素
#test {

    text-indent: 2em;
    line-height: 2;
}
<p id="test">Lorem ipsum dolorp>
2.元素选择器:直接选定某类元素
a {

    color: blue;
}
3.类选择器:使用class属性(仅为类选择器服务),每一类均有不一样的名称,在style中,以.+名称表示那个选择器,如果想同时使用两个类选择器,只需要在class的“”里面用空格隔开
<p class="red">
        Lorem ipsum dolor sit amet consectetur adipisicing elit. Id sit fugit officiis ullam aut quisquam quis, labore itaque veniam laborum officia, soluta odio nostrum sequi hic non architecto harum! Similique.
p>
.red {

    color:red;
}
要是两个类选择器表示的是一个元素,那就中间不能用空格隔开
- 通配符选择器
*,表示选中所有元素
- 属性选择器
根据属性名和属性值选中元素
选中所有具有某个属性的元素
[href]{

    color: brown;
}
单独选中可以这样做
···css
[href=“https://sina.com”]{
color: crimson;
}
···
- 伪类选择器(一般与a元素相关)
选中某些元素的某种状态
link:超链接未访问时的状态
visited:超链接访问过后的状态
hover:表示鼠标移动上去的状态,一般与其他选择器连用
/* 表示选中鼠标悬停时的a元素变色 */
a:hover{

    color: red;
}
active:表示鼠标点击时的状态
如果四个状态都要写,那就必须按照link,visited,hover,active的顺序书写
- 伪元素选择器
通常生成并选中某个元素内部的第一个子元素或最后一个子元素
使用时要有两个== :: ==
before,after使用时相当于在元素前面和后面加了一个新的子元素,存在他们独有的属性content,该属性表示子元素的文本内容。
如例子
span::before{

    content:"《";
}
span::before{

    content:"》";
}
更多的伪类选择器
- first-child
选中第一个子元素,会受到其他类型子元素的干扰元素,因为这个强调第一个子元素
如果前面加上一个元素选择器,那就表示选中第一个子元素且子元素为那个元素选择器所表示的元素
一个子元素:指相对于任何元素或者是html的子元素都可以是被选中的子元素
first-of-type:和其他元素配合使用的时候表示选中子元素中第一个指定类型的元素不理会其他元素
- last-child
具体使用方法和first-chlid一样,也有last-of-type
- nth-child
选中指定的第几个子元素,选中的可以是变量,例如可以表示为2n+1(即odd)即选中奇数,表示2n(即even)即选中偶数
假如和元素选择器搭配使用,那就表示个数要符合伪元素所表示的个数,且在计数时要考虑其他元素的存在
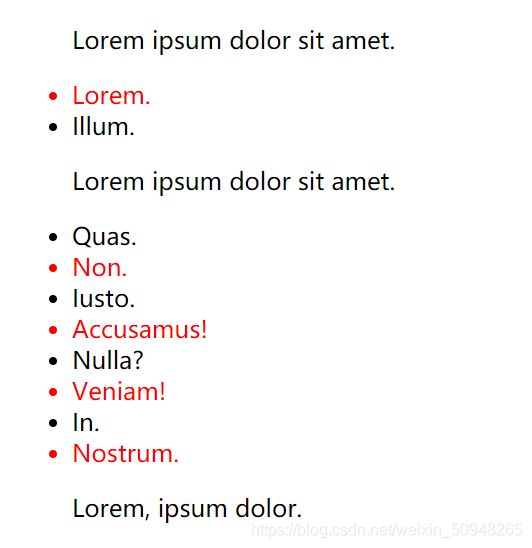
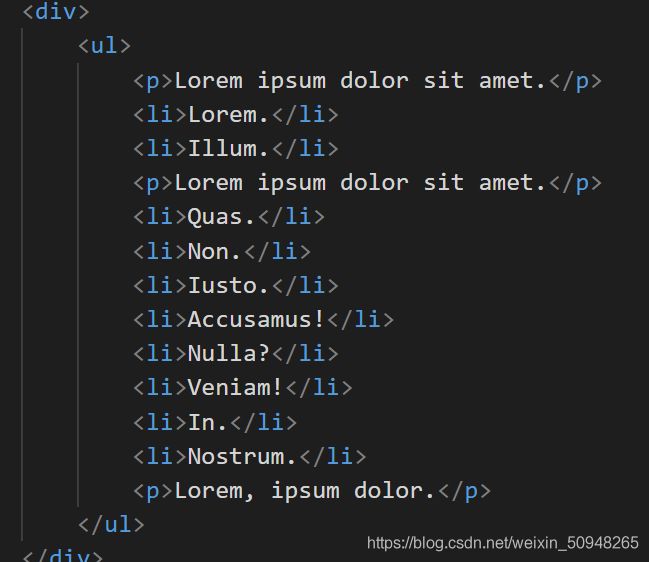
li:nth-child(even){

            color: red;
        }

此时被选中表示选中元素在排序中是偶数,且是li元素
可以做到隔行变色的效果
- nth-of-type
选中指定的子元素中的第几个某类型的元素只关注指定元素的第几个,无视其他元素的存在
伪类选择器和伪元素选择器最大的区别就是伪元素选择器使用时相当于创建了一个新的box
- focus
表示所有元素聚焦时的样式
outline: -webkit-focus-ring-color auto 1px;
outline,表示外边框,第一个是颜色,auto表示外边框的style是自动的,而不是实现实线或者其他,当设为auto之后,后面的1px就没有用
outline-offset表示外边框的偏移量,可以为正也可以为负
- checked
表示单选或多选框被选中的样式
更多的伪元素选择器
- first-letter
选中元素中第一个字母(不是第一个单词)或者第一个字
如果选中内容前面有标点符号,如果符号和文本内容直接没有空格,那连着文本内容前面的所有符号和该被选中的部分都会被选中,要是存在空格,就都不会被选中
- first-line
选中元素中第一行的文字
- selection
选中被用户框选的元素,设置宽高无效
p::selection{

            color: red;
            background-color: lightblue;
        }
权重
属性值的计算过程
-
确定声明值:参考样式表(包括作者样式表、浏览器默认样式表等)中没有冲突的声明,作为css的属性值
-
层叠冲突:对样式表中有冲突的声明使用层叠规则,确定css属性值
- 比较重要性
- 作者样式表中的!important样式 一般不建议加!important.
- 作者样式表中的普通样式
- 浏览器默认样式表中的样式
- 比较特殊性
- 千位:如果是内联样式,记1,否则记0
- 百位:等于选择器中所有id选择器的数量
- 十位:等于所有选择器中所有类选择器,伪类选择器的数量
- 个位:等于选择器中所有元素选择器,伪元素选择器的数量
- 比较源次序
代码靠后的胜出
-
使用继承:对仍然没有值的属性,若可以继承,则继承父元素的值
-
使用默认值:对仍然没有值的属性,使用默认值
关于内容水平居中,垂直居中
-
内联元素水平居中
利用text-align: center可以实现在块级元素内部的内联元素水平居中。此方法对内联元素(inline), 内联块(inline-block), 内联表(inline-table), inline-flex元素水平居中都有效。 -
常规流块盒水平居中
通过把固定宽度块级元素的margin-left和margin-right设成auto,就可以使块级元素水平居中。 -
单行内联(inline-)元素垂直居中
通过设置内联元素的高度(height)和行高(line-height)相等,从而使元素垂直居中。 -
通过绝对定位实现居中
通过绝对定位元素距离顶部50%,并设置margin-top向上偏移元素高度的一半,就可以实现垂直居中了。
固定定位是绝对定位的特殊情况
解决高度坍塌的四种方法
-
给父元素一个固定的高度
(不建议使用,不够灵活) -
给父元素添加属性overflow:hidden;
缺点:当子元素有定位属性时,设置 overflow: hidden; 容器以外的部分会被裁剪掉。可能会和我们想得到的预期效果不一样 -
给父元素设置伪元素选择器,并设置常用的清除浮动的样式,然后after就会把盒子撑开
-
在子元素的末尾添加一个空的 div ,并设置相应的清除浮动样式


