SpringCloud学习笔记【一】:多模块聚合工程基本环境搭建
文章目录
-
- 建立父工程,完成环境搭建
-
- IDEA快速创建Maven工程,偏好设置
- 修改pom.xml
- dependencyManagement和dependencies的区别
- Maven如何跳过单元测试
- Maven将父工程发布到仓库
- 建立子模块,快速启动
-
- 建立子module
- 改子模块的pom.xml
- 编写yml
- 编写主启动类
- 编写业务类
- 创建consumer模块
-
- 使用RestTemplate进行服务调用
- 重构,提取相同部分代码
-
- 新建模块 cloud-api.commons
- 打包发布到本地仓库供其他模块引入
- 引入依赖
- 总结
本篇文章暂未涉及微服务的内容,只是利用Maven构建多模块的聚合工程,后续相关的微服务示例均会在本文代码样例的基础上进行修改。
建立父工程,完成环境搭建
IDEA快速创建Maven工程,偏好设置
- 创建聚合工程,选择maven工程,父工程创建。
- 设置字符编码:File->Settings->Editor->FileEncodings->
ProjectEncoding:UTF-8 - 注解生效激活:File->Settings->
Build,Execution,Deployment->Compiler->AnnotationProcessors->Enable annotation processing - Java编译版本升级为8:Compiler->JavaCompiler->
Target bytecode version改为8 - FileType文件过滤:Settings->Editor->File Types->选择添加的
Ignore files and folders
maven仓库: https://maven.aliyun.com/mvn/guide
修改pom.xml
修改打包方式:
<packaging>pompackaging>
使用properties统一管理jar版本
  <properties>
    <project.build.sourceEncoding>UTF-8project.build.sourceEncoding>
    <maven.compiler.source>1.8maven.compiler.source>
    <maven.compiler.target>1.8maven.compiler.target>
    <junit.version>4.12junit.version>

  properties>
使用dependencyManagement管理版本
  <dependencyManagement>
    <dependencies>

      <dependency>
        <groupId>org.springframework.bootgroupId>
        <artifactId>spring-boot-dependenciesartifactId>
        <version>2.2.7.RELEASEversion>
        <type>pomtype>
        <scope>importscope>
      dependency>

      <dependency>
        <groupId>org.springframework.cloudgroupId>
        <artifactId>spring-cloud-dependenciesartifactId>
        <version>Hoxton.SR9version>
        <type>pomtype>
        <scope>importscope>
      dependency>

      <dependency>
        <groupId>com.alibaba.cloudgroupId>
        <artifactId>spring-cloud-alibaba-dependenciesartifactId>
        <version>2.2.1.RELEASEversion>
        <type>pomtype>
        <scope>importscope>
      dependency>

    dependencies>
  dependencyManagement>
dependencyManagement和dependencies的区别
Maven使用dependencyManagement元素来提供了一种管理依赖版本号的方式,通常会在一个组织或项目的最顶层的父POM中看到dependencyManagement元素。
使用pom.xml中的dependencyManagement可以让所有在子项目中引用一个依赖而不用显式列出版本号,Maven会沿着父子层次向上走,直到找到一个拥有dependencyManagement元素的项目,并使用其中的版本号。
需要注意的是:
- dependencyManagement中只是做了声明,并没有真正引入。
- 子项目需要显式引入依赖,如果不引入当然就不会从父项目中继承。
- 如果子项目引入的jar指定具体的版本,便引入该指定版本的jar,不会继承。
例如:如果在父pom中这样定义:
  <dependencyManagement>
    <dependencies>
      <dependency>
        <groupId>mysqlgroupId>
        <artifactId>mysql-connector-javaartifactId>
        <version>8.0.18version>
      dependency>
    dependencies>
  dependencyManagement>
那么子项目中添加该依赖的时候,就不用指定版本号:
    <dependencies>
      <dependency>
        <groupId>mysqlgroupId>
        <artifactId>mysql-connector-javaartifactId>
      dependency>
    dependencies>
好处在于:如果多个子项目使用同样的依赖,那么在升级依赖版本的时候,只需要更新顶层父容器的依赖即可。如果某个子项目需要另外的版本,指定不同的version即可。
Maven如何跳过单元测试
Toggle ‘Skip Test’ Mode
Maven将父工程发布到仓库
$ mvn:install
父工程主要用来管理依赖的版本,不进行编码,故src目录可以直接删除。
建立子模块,快速启动
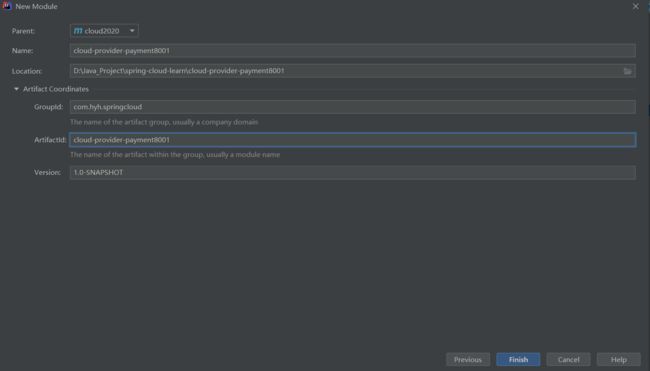
我们新建一个cloud-provider-payment8001模块,作为服务的提供者,提供查询添加的接口。
建立子module
选中父module名,右键新建module,默认继承父工程。
ok,新建完成之后,我们的父工程已经发生了微妙的变化:
  <modules>
    <module>cloud-provider-payment8001module>
  modules>
改子模块的pom.xml
这里主要式引入依赖
<dependencies>
        <dependency>
            <groupId>org.springframework.bootgroupId>
            <artifactId>spring-boot-starter-webartifactId>
        dependency>
        <dependency>
            <groupId>org.springframework.bootgroupId>
            <artifactId>spring-boot-starter-actuatorartifactId>
        dependency>
        <dependency>
            <groupId>org.mybatis.spring.bootgroupId>
            <artifactId>mybatis-spring-boot-starterartifactId>
        dependency>
        <dependency>
            <groupId>com.alibabagroupId>
            <artifactId>druid-spring-boot-starterartifactId>
        dependency>

        <dependency>
            <groupId>mysqlgroupId>
            <artifactId>mysql-connector-javaartifactId>
        dependency>

dependencies>
编写yml
在resources目录下的application.yml中编写配置:
server:
  port: 8001

spring:
  application:
    name: cloud-payment-service
  datasource:
    type: com.alibaba.druid.pool.DruidDataSource            # 当前数据源操作类型
    driver-class-name: com.mysql.cj.jdbc.Driver       # mysql驱动包
    url: jdbc:mysql://localhost:3306/db2020?useUnicode=true&characterEncoding=utf-8&useSSL=false&serverTimezone=GMT%2B8
    username: root
    password: 123456


mybatis:
  mapperLocations: classpath:mapper/*.xml
编写主启动类
@SpringBootApplication
public class Payment8001Application {


    public static void main(String[] args) {

        SpringApplication.run(Payment8001Application.class,args);
    }
}
编写业务类
从Controller到Service到Dao层,一顿操作就完事,也就是CRUD那套,就不赘述了,具体的可以参照:Spring-cloud-learning的v1.0标签,我们一起从零学习SpringCloud。
创建consumer模块
我们需要创建cloud-consumer-order80,作为消费者,目的是远程调用cloud-provider-payment8001模块提供的接口,我们能够想到比较简单的做法,就是使用RestTemplate。
使用RestTemplate进行服务调用
RestTemplate提供了多种边界访问远程HTTP服务的方法,是一种简单便捷的访问Restful服务的客户端模板工具集。
@Configuration
public class ApplicationContextConfig {


    @Bean
    public RestTemplate restTemplate(){

        return new RestTemplate();
    }
}
@RestController
@Slf4j
public class OrderController {


    private static final String PAYMENT_URL = "http://localhost:8001";

    @Resource
    private RestTemplate restTemplate;

    @PostMapping("/consumer/payment")
    public AjaxResult create(@RequestBody Payment payment) {

        return restTemplate.postForObject(PAYMENT_URL + "/payment", payment, AjaxResult.class);
    }

    @GetMapping("/consumer/payment/{id}")
    public AjaxResult getPayment(@PathVariable("id") Long id) {

        return restTemplate.getForObject(PAYMENT_URL + "/payment/" + id, AjaxResult.class);
    }

}
重构,提取相同部分代码
新建模块 cloud-api.commons
主要存储可复用代码,如一些常用工具类。
打包发布到本地仓库供其他模块引入
$ mvn clean install
引入依赖
        <dependency>
            <groupId>com.hyh.springcloudgroupId>
            <artifactId>cloud-api-commonsartifactId>

            <version>${project.version}version>
        dependency>
总结
本片文章为《尚硅谷SpringCloud教程》的学习笔记【版本稍微有些不同,后续遇到bug再做相关说明】,主要做一个长期的记录,为以后学习的同学提供示例,代码同步更新到Gitee:https://gitee.com/tqbx/spring-cloud-learning,并且以标签的形式详细区分每个步骤,这个系列文章也会同步更新。

