Java多线程游戏仿真实例分享
这是一篇学习分享博客,这篇博客将会介绍以下几项内容:
1、如何让一个程序同时做多件事?(多线程的创建、多线程的应用)
2、如何让小球在画面中真实地动起来?(赋予小球匀速直线、自由落体、上抛等向量运动)
3、多线程游戏仿真实例分享(飞机大战、接豆人、双线挑战三个游戏实例)
- 涉及的知识点有:多线程的应用、双缓冲绘图、小球的向量运动、游戏的逻辑判断、键盘监听器的使用、二维数组的使用、添加音乐效果等
游戏效果:
怎么样?如果觉得还不错的话就请继续看下去吧!
热身
第一步:创建画布
- 心急吃不了热豆腐,我们先从最简单的创建画布开始。
首先我们创建一个窗体,然后设置一些参数,从窗体中取得画笔,尝试在画布中心画一个图形,以下是参考代码:
import java.awt.FlowLayout;
import java.awt.Graphics;
import java.awt.event.ActionEvent;
import java.awt.event.ActionListener;

import javax.swing.JButton;
import javax.swing.JFrame;

public class Frame {

	//声明画布对象
	public Graphics g;

	//主函数
	public static void main(String[] args) {

		//创建Frame类,然后运行showFrame函数
		Frame fr=new Frame();
		fr.showFrame();
	}

	//编写窗体显示的函数
	public void showFrame(){

		//创建窗体
		JFrame jf=new JFrame();
		jf.setTitle("小球演示");//设置窗体标题
		jf.setSize(900,900);//设置窗体大小
		jf.setDefaultCloseOperation(3);//设置点击窗体右上角的叉叉后做什么操作,这里的3代表点击叉叉后关闭程序
		jf.setLocationRelativeTo(null);//设置窗体居中显示
		FlowLayout flow=new FlowLayout();//设置窗体布局为流式布局
		jf.setLayout(flow);

		Mouse mou=new Mouse();//创建监听器对象

		JButton jbu=new JButton("START");//创建按钮,按下按钮后可以在画布中间画一个圆
		jbu.addActionListener(mou);//为按钮添加事件监听器
		jf.add(jbu);

		//设置窗体可见
		jf.setVisible(true);

		//从窗体获取画布
		g=jf.getGraphics();
	}

	//创建内部类监听器(也可以重新创建一个文件编写该类)
	class Mouse implements ActionListener{

		//重写按钮监听方法
		public void actionPerformed(ActionEvent e){

			//按下按钮后会执行这里的代码,下面这条代码指的是在画布中心画一个圆
			g.fillOval(300,300,300,300);
		}
	}
}
- 我们可以试着运行一下,出现以下图片所示效果第一步就成功了。
第二步:让小球动起来
- 用一段循环代码重复地画小球,每次循环让小球偏移一点距离
我们在上述代码中的监听器类Mouse的按钮监听器方法actionPerformed(ActionEvent e)下加这样一段代码
//重复画100次小球,每次横纵坐标分别加1
for(int i=0;i<100;i++){

	g.fillOval(300+i,300+i,30,30);
	/*下面这段代码的意思是每执行一次循环,系统暂停30毫秒,否则画的
	太快我们就观察不到小球在动了*/
	try{

		Thread.sleep(30);
	}catch(Exception ef){

	}
}
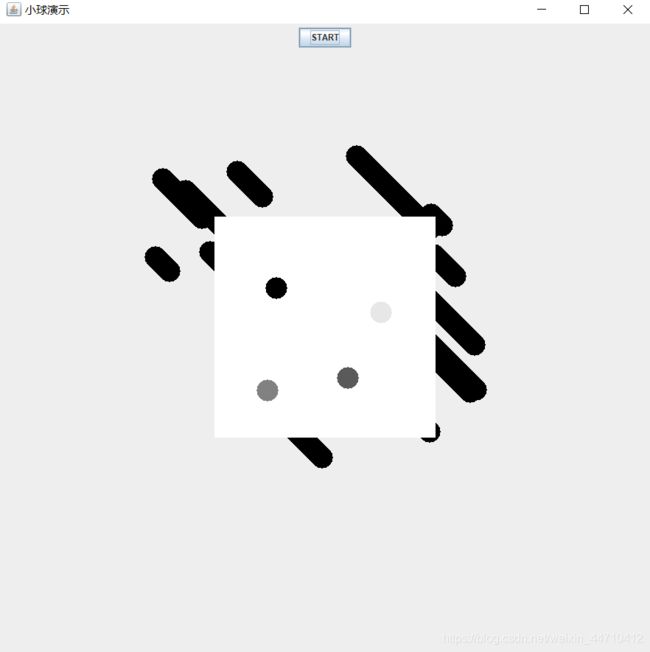
- 运行程序并点击START按键后,我们可以看到一个圆往右下角方向缓缓移动了一段距离,并且留下了痕迹。同时我们还可以发现,每次点击START键后,START键会保持被按下的状态,直至整个绘制小球的循环代码执行结束后才会弹起。这是因为我们现在写的程序只有一个线程在运行,所以只有当前任务执行完后按钮才能重新接收响应。想要解决这一点,可以利用下面将要讲到的多线程的原理。

那么,热身结束,下面让我们一起进入多线程的世界吧!
一、如何让一个程序同时做多件事情?
创建线程对象
- 创建线程对象我们需要用到Thread类,该类是java.lang包下的一个类,所以调用时不需要导入包。下面我们先创建一个新的子类来继承Thread类,然后通过重写run()方法(将需要同时进行的任务写进run()方法内),来达到让程序同时做多件事情的目的。
import java.awt.Graphics;
import java.util.Random;

public class ThreadClass extends Thread{

	public Graphics g;
	//用构造器传参的办法将画布传入ThreadClass类中
	public ThreadClass(Graphics g){

		this.g=g;
	}
	public void run(){

		//获取随机的x,y坐标作为小球的坐标
		Random ran=new Random();
		int x=ran.nextInt(900);
		int y=ran.nextInt(900);
		for(int i=0;i<100;i++){

			g.fillOval(x+i,y+i,30,30);
			try{

				Thread.sleep(30);
			}catch(Exception ef){

			}
		}
	}
}
- 然后我们在主类的按钮事件监听器这边插入这样一段代码,即每按一次按钮则生成一个ThreadClass对象
public void actionPerformed(ActionEvent e){

	ThreadClass thc=new ThreadClass(g);
	thc.start();
}
- 在这里我们生成ThreadClass对象并调用start()函数后,线程被创建并进入准备状态,每个线程对象都可以同时独立执行run()方法中的函数,当run()方法中的代码执行完毕时线程自动停止。
加入清屏功能,让小球真正的动起来
- 从上面的画图示范我们可以看出,小球在移动过程中是留下了轨迹的,那如果我只想看到小球的运动,不想看到小球的轨迹怎么办?
- 很简单,我们只需要每次画新的小球之前先给整个画布画上一个大的背景色矩形,把原来的图案覆盖即可。
让我们试着把run()方法中的代码改为下面这样:
public void run(){

	//获取一个随机数对象
	Random ran=new Random();
	//生成一对随机的x,y坐标设为小球的坐标,范围都在0-399
	int x=ran.nextInt(400);
	int y=ran.nextInt(400);
	for(int i=0;i<100;i++){

		//画一个能够覆盖画面中一块区域的白色矩形来清屏(把原来的笔迹都覆盖掉)
		g.setColor(Color.white);
		g.fillRect(300,300,300,300);
		g.setColor(Color.black);
		g.fillOval(200+x+i,200+y+i,30,30);
		try{

			Thread.sleep(30);
		}catch(Exception ef){

		}
	}
}
- 我们运行后发现,小球确实在中间的白色矩形区域内实现了不留轨迹的运动,但是小球闪烁的非常厉害。这其中的原因有两个,一个是多个线程对象同时运行会产生冲突,另一个是IO设备使用频率过高。后者我们在稍后的部分讲到用双缓冲绘图去解决,前者则通过下面的方法解决。
- 我们只在主类中创建一次ThreadClass对象。然后再创建一个列表,每次按按钮时将一组坐标存到这个列表中,最后通过run()方法中依次读出这个列表中的每一项并画出。
在主类中创建ThreadClass对象并运行(主类的showFrame方法中插入以下代码)
先创建坐标类
public class Location {

	public int x;
	public int y;
	public Location(int x,int y){

		this.x=x;
		this.y=y;
	}
}
然后在主类和ThreadClass类中创建列表
public ArrayList<Location> locs=new ArrayList<Location>();
然后在按钮监听器的方法下写入这段代码
public void actionPerformed(ActionEvent e){

	Random ran=new Random();
	int x=ran.nextInt(400);
	int y=ran.nextInt(400);
	Location loc=new Location(x,y);
	locs.add(loc);
	System.out.println(locs.size());
}
然后将画布g和列表locs传入创建的线程对象中,在主类的showFrame方法插入以下代码。
ThreadClass thc=new ThreadClass(g,locs);
thc.start();
重载Thread Class的run()方法
public void run(){

	while(true){

		g.setColor(Color.white);
		g.fillRect(300,300,300,300);
		for(int i=0;i<locs.size();i++){

			g.setColor(Color.black);
			//每次给小球坐标偏移一下
			int x=locs.get(i).x++;
			int y=locs.get(i).y++;
			g.fillOval(200+x,200+y,30,30);
		}
		try{

			Thread.sleep(30);
		}catch(Exception ef){

		}
	}
}
二、如何让小球在画面中真实地动起来?
- 众所周知,要想描述物体的运动状态,需要知道物体的三个物理量——位置、速度和加速度。我们只需要找到方法描述这三个物理量,便可以很好的模拟真实小球的运动。
在这里我们可以创建一个Vector类来描述位置、速度和加速度这三个物理量
public class Vector {

	public int x;
	public int y;
	public Vector(int x,int y){

		this.x=x;
		this.y=y;
	}
	//向量的加和运算
	public void add(Vector vec){

		this.x+=vec.x;
		this.y+=vec.y;
	}
}
然后我们再创建一个Ball类来代表小球(move函数是本部分的关键)
public class Ball {

	public Vector location;//位置
	public Vector speed;//速度
	public Vector acce;//加速度

	//构造器传参,设定小球的基本参数
	public Ball(Vector location,Vector speed,Vector acce){

		this.location=location;
		this.speed=speed;
		this.acce=acce;
	}

	//小球移动,这是整个部分的关键!!!每画完一次小球就调用一次move函数,让小球依据速度和加速度来改变一次位置
	public void move(){

		this.speed.x+=acce.x;//每调用一次move函数小球的速度就和加速度做一次加法
		this.speed.y+=acce.y;
		this.location.x+=speed.x;//每调用一次move函数小球的位置坐标就和速度做一次加法
		this.location.y+=speed.y;
	}
}
有了这两个类,我们就可以表示任意二维的向量运动了
- 比如说从原点出发,向右速度为5,向下加速度为10的平抛运动可以表示为
Vector location=new Vector(0,0);
Vector speed=new Vector(5,0);
Vector acce=new Vector(10,0);
- 从原点出发,向右速度为5,向上速度为10,向下加速度为10的上抛运动可以表示为
Vector location=new Vector(0,0);
Vector speed=new Vector(5,10);
Vector acce=new Vector(10,0);
- 利用这个原理,我们已经可以做出一点好玩的东西了!
试想一下,我们可以先给窗体添加一个鼠标监听器,然后获取鼠标按下和松开的点的坐标,然后沿着按下和松开的点连成的直线方向丢出一个小球,这样是不是就可以做一个投篮游戏了呢。 - 具体操作:给窗体加上鼠标监听器在mousePress函数下获取鼠标按下的点的坐标x1,y1在mouseRelease函数下获取鼠标松开的点的坐标x2,y2生成一个小球对象,以(x2,y2)作为小球坐标,(x2-x1)作为x方向上的速度,(y2-y1)作为y方向上的速度,y方向上加速度为1。然后把这个小球放入到传入ThreadClass的列表中,让线程将这个小球画出。
需要改变的是主类中Mouse类的代码和ThreadClass类中run方法的代码
- Mouse类
//创建内部类监听器(也可以重新创建一个文件编写该类)
	class Mouse implements ActionListener,MouseListener{

		int prx=0;
		int pry=0;//记录按下鼠标的点的坐标

		//重写按钮监听方法
		public void actionPerformed(ActionEvent e){
     }

		public void mouseClicked(MouseEvent e) {
     }

		public void mousePressed(MouseEvent e) {

			prx=e.getX();
			pry=e.getY();//获取按下鼠标的点的坐标
		}

		public void mouseReleased(MouseEvent e) {

			int speedx=(int)((e.getX()-prx)/10);
			int speedy=(int)((e.getY()-pry)/10);

			Vector location=new Vector(e.getX(),e.getY());
			Vector speed=new Vector(speedx,speedy);
			Vector acce=new Vector(0,1);
			Ball ball=new Ball(location,speed,acce);
			balls.add(ball);
		}
		public void mouseEntered(MouseEvent e) {
     }
		public void mouseExited(MouseEvent e) {
     }
	}
- ThreadClass下的run方法
public void run(){

		while(true){

			g.setColor(Color.white);
			g.fillRect(300,0,600,900);
			for(int i=0;i<balls.size();i++){

				g.setColor(Color.black);
				g.fillOval(balls.get(i).location.x,balls.get(i).location.y,30,30);
				balls.get(i).move();
			}
			try{

				Thread.sleep(30);
			}catch(Exception ef){

			}
		}
	}
执行效果如图所示(为了显示小球向量运动的效果,这里省去了清屏操作)

完整代码放到这里:
https://pan.baidu.com/s/10HcOSvuov14moes1jPe9JQ
提取码:z8ii
三、多线程游戏仿真实例分享
(三个游戏的源代码、图片素材链接在下文中获取)
游戏一:飞机大战
游戏演示:
Java游戏制作
飞机大战简介:
- 飞机大战整个程序一共用了五个类GameUIFrame(游戏界面窗体显示及主程序)、ThreadClass(线程类,进行图片绘制、生成怪物、判断碰撞、刷新分数等一系列功能,是程序的主体部分)、FlyObject(创建所有飞行物对象的类,可以定义飞行物的位置、速度、加速度、显示图片等)、Vector(上文中介绍过的向量类)以及Listener(鼠标监听器,负责获取鼠标在屏幕上的点绘制我方飞船和生成飞船发出的子弹)。
要实现飞机大战主要完成这几件事:
- 绘制我方飞机、不断发射子弹
- 不断随机生成怪物、宝箱
- 判断子弹与怪物、怪物与我方飞机之间是否碰撞
- 爆炸动效、刷新分数
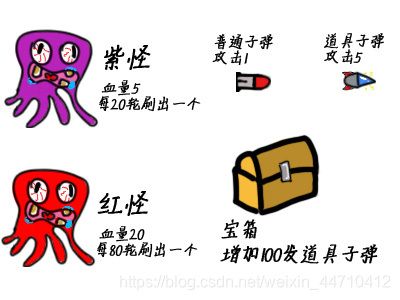
由于时间关系,目前博主所制作的游戏暂时只具有以上这些功能,有兴趣的伙伴还可以试着增加关卡、Boss、新的怪物(比如会发射子弹的怪物)、剧情等等。
我们在游戏进行的过程中,难免会生成大量的图片对象。前面我们讲到,当我们需要在屏幕上绘制的图像过多时会出现卡顿闪屏现象,第二个解决方法就是双缓冲绘图,下面我来简单的介绍一下。
双缓冲绘图解决闪屏
- 我们正常画图的时候,是从窗体对象中直接获取Graphics类对象来绘画,然后每一次把需要画的图形传输到我们的屏幕上时,都需要占用一定的输入输出(IO)设备通道。所以当我们需要绘制的图像过多时将导致IO设备使用频率过高,屏幕就会出现闪屏现象。
- 双缓冲绘图就是一次性把所有要画的对象先画到内存中,最后再把内存中的图片用窗体对象中直接获取Graphics类对象画出来。
- 打个比方,比如说我要把地上的落叶全部扫进垃圾桶里,我把地上的树叶一片一片直接捡到垃圾桶里,这就是不用双缓冲绘图的情况;如果说我有一个垃圾铲,先把树叶捡到垃圾铲里,然后再一次性倒进垃圾桶,效率是不是高多了?这就有点类似双缓冲绘图的原理。
要实现双缓冲绘图,首先我们要创建BufferedImage对象,然后从这个缓存对象中获取画布:
//创建缓存
BufferedImage bufImg=new BufferedImage(1200,1200,BufferedImage.TYPE_INT_ARGB);
//最后的TYPE_INT_ARGB代表创建的是具有合成整数像素的 8 位 RGBA 颜色分量的图像,也可以选择其他类型,详见Java的API文件
//获取缓存上的画布
Graphics bufg=bufImg.getGraphics();
获取了Graphics bufg后,我们所有的绘图操作先在bufg上完成,等一轮图像画完之后,再把bufg上的图像画到原本的Graphics对象中
g.drawImage(bufImg,0,0,null);
飞机大战制作Step1:飞行物
- 游戏中真正的飞行物一共只有三种,我方飞机、怪物和子弹(均需要在创建FlyObject对象时设定位置、速度、加速度、图片、血量)。但是因为宝箱、爆炸特效需要定义的参数比真正的飞行物要少(只需要位置和图片),所以宝箱和爆炸特效也可以使用FlyObject类创建。
- 我们可以为上面五类飞行物各创建一个列表,用于存放其对象;每次需要生成一架飞机或者一个怪物时,就往对应的列表中放入一个对象。然后在线程的run方法中依次将每个列表中的所有对象全部画出。
- 在FlyObject类中,最重要的是FlyObject的构造方法、move方法(负责计算飞行物的下一个坐标)和drawFO方法(传入画布,将飞行物图片画到飞行物的坐标上)。
//有图片、有血量的飞行物
public FlyObject(Vector location,Vector speed,Vector acce,String imgName,int HP){

	this.location=location;//位置
	this.speed=speed;//速度
	this.acce=acce;//加速度
	this.HP=HP;//血量

	this.imgName=fileAddress+imgName;//图片地址
	ImageIcon imgicon=new ImageIcon(this.imgName);//如果我们想要在画布上画一张图片,可以先用图片地址创建一个ImageIcon对象,然后再从这个对象中获取Image对象
	img=imgicon.getImage();
}
//前面介绍过的move方法
public void move(){

		speed.add(acce);
		location.add(speed);
}
//将飞行物的图片画到画布上
public void drawFO(Graphics g){

//如果被绘制的对象有图片就画图片,没图片就画一个圆
	if(imgName!=null){

//			System.out.println(imgName);
		g.drawImage(img,location.x, location.y,null);
	}else{

		g.fillOval(location.x, location.y,10,10);
	}
}
- 游戏过程中,我方飞船是始终跟随着鼠标共同移动的。要实现这一点,我们需要在Listener类中实现MouseMotionListener,然后重写鼠标移动mouseMoved方法(记得最后要给窗体添加MouseMotionListener监听器)。当鼠标在窗体中进行移动时,该方法会不断地获取鼠标在窗体中的坐标,参考下面这段代码重写mouseMoved方法:
 public void mouseMoved(MouseEvent e){

    	Vector location=new Vector(e.getX(),e.getY());
    	FlyObject mp=new FlyObject(location,null,null,"我机.png");
    	mps.add(mp);//mps是存放我方飞机对象的列表ArrayList mps
    }
- 这样一来,在移动鼠标的过程该方法会被不停的调用,并且不停的往mps列表中存放我放飞机对象。在线程类的run方法中,我们每一次只需要获取该列表的最后一项(我方飞机的最新坐标)将其画出即可。
- 因为子弹是我方飞机发射出来的,所以子弹生成坐标只需要取我方飞机的坐标即可。
//不断发射子弹
	public void generateBullet(){

	//隔一段时间就生成一些子弹(int len是一个计数器,它记录的是run方法中的运行次数,所有代码跑完一次就加一)
			if(len%5==0){

		    	for(int i=0;i<4;i++){

		    	//设定子弹坐标
		    		Vector location_fo=new Vector(mps.get(mps.size()-1).location.x,mps.get(mps.size()-1).location.y+20*i);
		        	Vector speed_fo=new Vector(100,0);//设定子弹速度
		        	Vector acce_fo=new Vector(0,0);//设定子弹加速度(这里把加速度设为0意思就是让子弹做匀速运动)
		        	FlyObject fo=new FlyObject(location_fo,speed_fo,acce_fo,"子弹.png",1);
		        	fos.add(fo);
		    	}
			}
	}
- 怪物的生成就更简单了,在游戏设定中,怪物会从界面的最右边被生成,一直往窗体的最左边走,纵坐标和速度是随机的。
public void generateEnemy(){

	if(len%20==0){

		Random ran=new Random();
		//怪物的横坐标是固定的(窗体的最右边),纵坐标是随机的
		int loc_y=ran.nextInt(900)+100;
		//怪物只在x方向有速度
		int spd_x=-ran.nextInt(10)-10;
		Vector location=new Vector(1200,loc_y);
		Vector speed=new Vector(spd_x,0);
		Vector acce=new Vector(0,0);
		FlyObject enemy=new FlyObject(location,speed,acce,"怪物.png",5);
		enemys.add(enemy);
	}
}
飞机大战制作Step2:判断碰撞
- 判断两个物体是否碰撞,我这里用到的原理是判断两个飞行物坐标的距离是否小于一定的值(比如说图片宽度)。而且我们每一轮都要判断每一个子弹和每一个怪物的距离,都要判断我方飞机和怪物的距离等等。我们的所有飞行物都被放入了列表中,所以我们需要建立循环拆解列表,将其中的元素逐个取出,逐个比较。
//判断子弹是否击中怪物、怪物是否触碰我机、是否拾得宝箱
public void judgeAttack(Graphics bufg_judgeAttack){

	//判断子弹是否击中怪物
	for(int i=0;i<enemys.size();i++){

		//取出怪物对象
		FlyObject en=enemys.get(i);
		for(int j=0;j<fos.size();j++){

			//取出子弹对象
			FlyObject fo=fos.get(j);
			//获取子弹和怪物的坐标位置
			int fo_x=fo.location.x;
			int fo_y=fo.location.y;
			int en_x2=en.location.x;
			int en_y2=en.location.y;

			//计算怪物和子弹之间的距离(也可以采用if(横坐标的差值<某数&纵坐标的差值<某数)
			int distance_fo_en=(int)Math.sqrt(Math.pow((fo_x-en_x2),2)+Math.pow((fo_y-en_y2),2));
			if(distance_fo_en<=50){

				//这里en(怪物)的HP是血量,fo(子弹)的HP是伤害值。
				en.HP-=fo.HP;
				//在该子弹位置添加一个子弹爆炸效果,后面会介绍
				explosion(fos.get(j));
				//将该子弹从列表中移除
				fos.remove(j);
				if(en.HP<=0){

					//怪物爆炸效果
					explosion(enemys.get(i));
					//这里如果直接用enemys.remove(i)会导致循坏for(int j=0;j
					enemys.get(i).img=null;
					//把怪物图片去除(每次画图就不画该怪物了),然后把它移出屏幕
					enemys.get(i).location=new Vector(-1000,0);
					if(en.imgName.equals(fileAddress+"怪物.png")){

						score+=10;
					}else if(en.imgName.equals(fileAddress+"怪物2.png")){

						score+=50;
					}
				}

			}

		}
	}
}
飞机大战制作Step3:爆炸动效
-
前面说到过爆炸动效也可以放进FlyObject类列表中,完成爆炸动效需要写两个方法,一个方法生成爆炸动效对象,一个方法绘制爆炸动效。因为爆炸动效一般都是在子弹或者怪物消失的时候才会生成,所以只生成一次;但是绘制爆炸动效需要多次绘制,所以生成爆炸动效对象和绘制爆炸动效需要分成两个方法来写。
-
生成爆炸动效的方法传入的是飞行物的对象,因为绘制爆炸动效至少需要两个元素:爆炸发生在哪里,生成什么爆炸效果(怪物的爆炸效果和子弹的爆炸效果不同)。所以首先我们对该飞行物的图片名称进行一个判断(判断是什么东西爆炸),然后取出它的坐标。最后生成一个对应的爆炸效果对象放入列表中。

-
爆炸效果是一种动态效果,所以还涉及到切换图片的操作。我们可以将预先准备好的几张图片同意文件名格式并编好序号,方便每画完一次图片就切换一张。
	//爆炸动效
	public void explosion(FlyObject flo){

	//判断是什么对象爆炸
		if(flo.imgName.equals(fileAddress+"怪物.png")|flo.imgName.equals(fileAddress+"怪物2.png")){

		//获取爆炸对象的坐标
			int x_explo=flo.location.x;
			int y_explo=flo.location.y;
			Vector location=new Vector(x_explo,y_explo);
			//生成爆炸动效对象
			FlyObject explo=new FlyObject(location,null,null,"爆炸_1.png",10);
			//将爆炸动效对象添加到列表中
			explotions.add(explo);
		}
	}

	//绘制爆炸动效
	public void drawExplo(Graphics bufg_explotion){

	//依次将列表中的每个爆炸图像画出
		for(int i=0;i<explotions.size();i++){

			explotions.get(i).drawFO(bufg_explotion);
			//这里的HP表示的是这个爆炸效果持续的时间,每画一次效果HP减一,当HP等于0时停止绘制该爆炸效果
			explotions.get(i).HP--;

			if(explotions.get(i).imgName.equals(fileAddress+"爆炸_1.png")){

				//下面这条代码的作用是每画完一次图像就更换一次图片,以此达到动态变化的效果
				ImageIcon imgicon=new ImageIcon(fileAddress+"爆炸_"+((explotions.get(i).HP%3)+1)+".png");//因为我绘制的爆炸效果图片一共有三张,所以这里取除以三的余数来设定图片的文件名
				explotions.get(i).img=imgicon.getImage();
			}
			//当爆炸动效对象的HP等于0时移除该对象
			if(explotions.get(i).HP==0){

				explotions.remove(i);
			}
		}
	}
飞机大战制作Step4:游戏暂停/继续,判定游戏结束
-
我们想要的效果:在游戏画面的左下角有一个暂停键,我们点击暂停键时游戏会进入暂停状态,再点击开始游戏会恢复到暂停之前的状态。

-
我们需要做的操作:我们可以创建一个布尔值对象gameRest(布尔值只有true和false两种状态),初始值设定为false,每一轮线程运行时都需要先判断一下gameRest值是否为false,如果为true,则跳过绘制飞行物、判断碰撞等操作;如果为false,则继续正常运行。
-
接着我们写一个方法来改变gameRest的值,这样我们每调用一次方法就切换一次gameRest的值
//游戏暂停/开始
public void on_off(){

	gameRest=!gameRest;
}
- 在鼠标监听器中添加一个监听事件,在mouseReleased方法下我们可以判断一下鼠标松开的坐标是否落在画面左下角这块区域,如果是就调用on_off方法来改变gameRest的值。
- 当我们的飞船与怪物相碰时,飞船坠落,游戏结束,这里同样用到了一个布尔值gameOver
//判断游戏是否结束
	public void judgeGameOver(Graphics g_judgeGameOver){

		for(int i=0;i<enemys.size();i++){

			FlyObject en=enemys.get(i);

			FlyObject mp=mps.get(mps.size()-1);

			int mp_x=mp.location.x;
			int mp_y=mp.location.y;
			int en_x=en.location.x;
			int en_y=en.location.y;

			int distance_mp_en=(int)Math.sqrt(Math.pow((mp_x-en_x),2)+Math.pow((mp_y-en_y),2));
			if(distance_mp_en<=60){

				//绘制gameOver图片
				ImageIcon imgicon_gamover=new ImageIcon(fileAddress+"gameover.png");
				Image img_gamover=imgicon_gamover.getImage();
				g_judgeGameOver.drawImage(img_gamover,0,0,null);
				gameOver=true;
			}
		}
	}
- 最后在run方法中插一段判断gameOver的代码
if(gameOver==true){
     break;}
飞机大战制作Step5:刷新分数
- 将游戏分数的万位、千位、百位和十位和个位分别取出,然后每个数字对应显示一张图片,将刷新分数的方法写入run方法中,每一轮刷新一次分数。(Java中的符号“/”代表整除)
//获取万位
int number_5=score/10000;
//获取千位
int number_4=(score-number_5*10000)/1000;
//获取百位
int number_3=(score-number_5*10000-number_4*1000)/100;
//获取十位
int number_2=(score-number_5*10000-number_4*1000-number_3*100)/10;
//获取个位
int number_1=score-number_5*10000-number_4*1000-number_3*100-number_2*10;
- 同样的,将每个数字的图片素材同一文件名格式并编号
- 这里的fileAddress是我存放图片素材的目录,这样当我更换图片目录时只需要更改这一个值就可以了。
//生成图片对象
ImageIcon imgicon_score=new ImageIcon(fileAddress+"Score.png");
Image img_score=imgicon_score.getImage();
ImageIcon imgicon5=new ImageIcon(fileAddress+number_5+".png");
Image img5=imgicon5.getImage();
ImageIcon imgicon4=new ImageIcon(fileAddress+number_4+".png");
Image img4=imgicon4.getImage();
ImageIcon imgicon3=new ImageIcon(fileAddress+number_3+".png");
Image img3=imgicon3.getImage();
ImageIcon imgicon2=new ImageIcon(fileAddress+number_2+".png");
Image img2=imgicon2.getImage();
ImageIcon imgicon1=new ImageIcon(fileAddress+number_1+".png");
Image img1=imgicon1.getImage();

//bufg_score是该方法导入的Graphics类画布
bufg_score.drawImage(img_score, 340,50,null);
bufg_score.drawImage(img5, 590,50,null);
bufg_score.drawImage(img4, 650,50,null);
bufg_score.drawImage(img3, 710,50,null);
bufg_score.drawImage(img2, 770,50,null);
bufg_score.drawImage(img1, 830,50,null);
- 第一个游戏案例的分享差不多就到这里,如果有什么描述不够清楚的地方欢迎大家在评论区留言。也可以点击下方链接,下载我这三个游戏的全部源代码和游戏素材进行参考
游戏源代码及游戏素材链接——提取码:hjzd
- 这个游戏目前来说做得还非常粗糙,还有一些小漏洞和可以优化的地方,如果有小伙伴下载了我的代码,发现有什么好的建议欢迎私信或在评论区中指出。欢迎交流,您的评论将给我的学习之路带来巨大帮助。
可以优化的地方:
- 有的子弹会穿过怪物,或者有时候碰到怪物没有死,说明判断碰撞和物体移动的方法还有缺陷。
- 怪物血量减少到一定程度时出现破损效果,这样看起来对怪物剩余血量更直观
- 游戏玩法比较单一,可以给飞机适当增加新的技能,增加关卡和Boss,丰富玩法
- 缺少游戏开始界面、背景音乐、音效等
- 游戏玩到后期比较卡顿,因为飞出窗体的子弹、怪物等仍然存在列表中,每次绘制图片时都要将这些看不见的对象重新再画一遍,十分消耗性能。
游戏二:接豆人
游戏演示:
Java原创游戏分享
-
接豆人游戏和飞机大战玩法虽然差异比较大,但是用到的代码原理其实是类似的。
-
黄色的吃豆人的移动,同样是依靠鼠标监听器的mouseMoved方法不断获取鼠标的坐标然后绘制接豆人的图像。只不过这次我们只获取鼠标的横坐标,纵坐标设定为一个定值,这样就可以实现我们的接豆人只做水平方向的运动了。

-
接豆人吃到宝石和道具的判断,和飞机大战中的判断碰撞是类似的;接豆人中随机掉落的宝石、炸弹和道具,与飞机大战中刷新怪物是类似的。
-
两个游戏比较不同的地方是,在接豆人游戏中如果吃到了蜘蛛或者金币礼包是会触发新事件的。而且在接豆人中也增加了玩家的生命值。
-
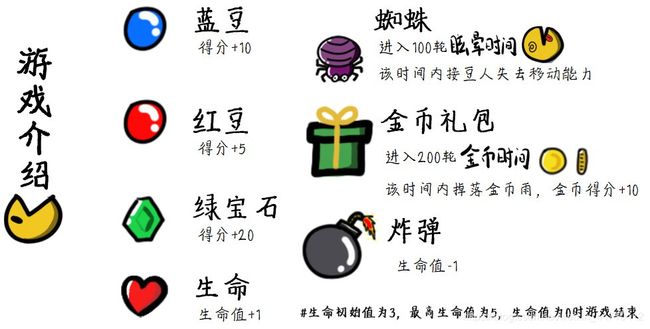
大致总结一下,实现接豆人需要完成这几件事:让接豆人在水平方向跟随鼠标移动随机生成宝石、炸弹蜘蛛和道具,并且赋予下落物体一个垂直方向的加速度,增加真实感判断接豆人是否接到了掉落物给金币礼包和蜘蛛添加触发效果(下金币雨和接豆人进入眩晕)游戏暂停、游戏结束后重新开始间隔一段时间清理一下飞行物列表,提高游戏流畅度
-
和飞机大战类似的地方就不再赘述,这里介绍一些不同的地方
接豆人制作Step1:金币礼包和蜘蛛的触发效果
- 首先我们需要定义四个变量
	public int rewardTime;//奖励时间
	public Boolean pause=false;//是否进入眩晕状态
	public int pauseTime;//眩晕时间
	public FlyObject mp_pause;//用于绘制眩晕时接豆人的图片
- 在判断碰撞的方法下面,如果接豆人碰到的是礼物,则给rewardTime加上200,如果是蜘蛛,则给pauseTime加上200,且将pause的值改为true。
- 在生成下落物的方法中,我们先对rewardTime进行一个判断,如果rewardTime大于0,就下金币,如果小于等于0,就生成其他掉落物。
//生成下落物
public void generateDrop(){

	if(rewardTime>0){

		if(len%1==0){

			rewardTime--;//每次rewardTime递减
			Random ran=new Random();
			Vector location=new Vector(ran.nextInt(750)+50,50);
			Vector speed=new Vector(0,ran.nextInt(1)+10);
			Vector acce=new Vector(0,2);

			FlyObject fo=new FlyObject(location,speed,acce,"金币1.png");
			fos.add(fo);
		}
	}else{
     //生成其他掉落物
	}
- 当接豆人进入眩晕状态时,身边的掉落物还是正常掉落的,但是接豆人在眩晕状态下不能移动、不能接取掉落物。所以我们需要在绘制接豆人和判断碰撞的方法下分别先对pause的值进行一个判断,如果pause为false则正常运行。
//绘制我机
public void draw_mp(){

	if(pause==false){

		if(mps.size()-5>=0){

			FlyObject mp=mps.get(mps.size()-5);
			mp.drawFO(bufg);
		}
	}else{

		//当pause为true时执行
		pauseTime--;//pauseTime递减
		mp_pause.drawFO(bufg);//绘制接豆人眩晕时的图片
		if(pauseTime==0){

			pause=false;//当pauseTime减少到0时将pause改回为false
		}
	}
}
接豆人制作Step2:游戏重新开始
- 这个功能的实现和飞机大战中说过的暂停功能非常类似,我们需要创建一个布尔值gameOver,然后当生命值减少到0时将gameOver改为true。然后屏幕上显示gameOver的图像

- 当我们点击该区域时,将gameOver的值改回为false,并且将所有的飞行物列表、分数、生命值等全部恢复到游戏刚开始的状态。
if(thc.gameOver){

	if(e.getX()>340&e.getX()<540&e.getY()>630&e.getY()<710){

		thc.life=3;
		thc.fos.removeAll(fos);
		thc.mps.removeAll(mps);
		thc.score=0;
		thc.gameOver=false;
	}
}
接豆人制作Step3:清理列表数据,提升流畅度
- 我们每间隔一段时间就把超出窗体可见范围的飞行物都从列表中删去,防止游戏后期需要画的飞行物太多导致卡顿。
//清理缓存(在run方法中调用该方法)
public void clear(){

	//每500轮清理一次
	if(len%500==0){

		System.out.println("清理前:");
		System.out.println("fos size is"+fos.size());
		System.out.println("mps size is"+mps.size());
		System.out.println("exps size is"+explotions.size());
		clearList(fos,0);
		clearList(mps,1);
		clearList(explotions,0);
		System.out.println("清理后:");
		System.out.println("fos size is"+fos.size());
		System.out.println("mps size is"+mps.size());
		System.out.println("exps size is"+explotions.size());
	}
}

//清理列表(传入需要清理的列表,并传入清理类型)
public void clearList(ArrayList<FlyObject> fos,int flag){

	int fos_size=fos.size();
	//其他飞行物类型的清理
	if(flag==0){

		for(int i=fos.size()-10;i>-1;i--){

			//判断一下从哪个飞行物开始超出窗体可见范围(在它之前的飞行物一定是超过了)
			if(fos.get(i).location.y>1000){

				for(int j=0;j<i;j++){

					fos.remove(0);//不断删除列表的第一个元素,直到删到开始超出窗体范围的那一个
				}
				break;
			}
		}
	//接豆人的列表的清理
	}else if(flag==1){

		//只保留列表中最后一百个元素,前面的全部删除
		for(int i=0;i<fos_size-100;i++){

			fos.remove(0);
		}
	}
}
游戏源代码及游戏素材链接——提取码:hjzd
游戏三:双线挑战(双人游戏)
- 这个游戏和上面两个游戏不太一样,它是一个使用键盘操控的双人小游戏。操作方法有点类似贪吃蛇,两个人分别操控一条线,当触碰到游戏边界或者自身及对手的线时,游戏结束。所以在游戏过程中,双方可以尽可能地把对方包围在一个比较小的空间里,使自己成为最后的赢家。
- 虽然这个游戏的画面设计比较粗糙,但是这次增加了游戏开始界面、游戏背景音乐的播放功能,仍然非常有意思。
- 这个游戏一共做了三个版本

双线挑战制作Step1:键盘监听器的使用
- 键盘监听器的接口是KeyListener,我们主要用到keyPress和keyReleased两个方法,他们分别在键盘按下和键盘松开时被调用。
class Listener implements KeyListener{

	public void keyTyped(KeyEvent e) {

	}
	public void keyPressed(KeyEvent e) {

	//获取按下键的keycode
		int keyc=e.getKeyCode();
		System.out.println(keyc+" is pressed!");
		//也可以使用String press=e.getKeyChar()+"";这样获取到的就是键盘的字符
	}
	public void keyReleased(KeyEvent e) {

	//获取松开键的keycode
		int keyc=e.getKeyCode();
		System.out.println(keyc+" is released!");
	}
}
- 然后一定要记得给窗体加上监听器对象!而且键盘的监听相较于鼠标监听器还有一个特殊的地方,键盘的监听器需要焦点,键盘监听器需要获取焦点发生的动作事件。比如说我们的qq登陆界面上有两个输入框,如果我们直接敲击键盘,此时电脑是不知道我们需要输入的是账号还是密码。只有我们点击账号文本框后,才能让账号文本框得到焦点,从而顺利输入我们的账号。
- 同时,窗体获取焦点的代码也必须放在窗体可见之后,否则无法正常监听键盘事件
//设置窗体可见,jf是创建的JFrame对象
jf.setVisible(true);
jf.addKeyListener(mou);//为窗体添加键盘监听器
jf.requestFocusInWindow();//窗体获得焦点,记得要放在窗体可见之后
- 现在让我们一起来做几个小实验,对键盘监听器的原理进一步了解(记得在实验前将键盘调为英文输入模式,否则无法正常监听英文键的输入):连续敲击F键;长按F键;慢速交替敲击F和D键;同时按下F和D键;快速交替敲击F和D键。
- 下面是博主测出的结果(F键的keycode为70,D键的keycode为68):

- 看出来这几种按键方式的特点了吗?我们使用键盘与程序交互时,这些按键方式反馈的差异会给我们带来很大帮助。比如说有的游戏中同时按下W和D键是向右上跳,只按W键是向上跳,只按D键是向右走。我们就可以在键盘监听器中先判断用户是同时按了W,D键还是先按了D键再按W键,从而决定让角色向右上跳,还是先向右走再向垂直上跳。
双线挑战制作Step2:用键盘控制线条的走向
- 因为在双线挑战游戏中,我们是需要线条留下轨迹的,所以我们的游戏背景图片只需要画一次(否则就会把轨迹覆盖了)。那怎么让图片只画一次呢?
//我们可以先定义一个整数flag1
public int flag1=0;
- 在画图之前先判断一下这个值是不是0,是0的话说明没有被画过;在画图的代码中,记得将flag1改为除0以外的数,表示这个图已经被画过一次了。
	//只画一次图片
public void draw_just_once(int type){

//如果说flag1为0,则开始画图
	if(flag1==0){

		ImageIcon imgic=new ImageIcon(fileAddress+"游戏背景_2.png");
		Image img=imgic.getImage();
		g.drawImage(img, 0,0,null);
		flag1++;//更改flag1的值,表示图已画过
	}
}
- 当我们的背景只画一次,而小方块又在不停的移动时,小方块自然就留下了轨迹;对于实现小方块移动的方法,和飞机大战中的FlyObject类、Vector类差不多。
- 我们先创建一个从窗体的左上角出发的小方块,速度向右为1(这里的LineBall类和FlyObject原理及代码基本相同(move方法、Vector类的使用等),不太清楚的小伙伴可以回到飞机大战Step1看一看)
lb_blue=new LineBall(new Vector(0,0),new Vector(1,0));
- LineBall的drawLB方法和FlyObject的drawFO方法稍有不同。因为我这里用的小方块的图片是5个像素,所以说小方块的location每加1,我就让小方块的坐标向右移5个像素。
public void drawLB(Graphics g){

	if(imgName==null){

		g.fillRect(location.x*10+50, location.y*10+50, 10,10);
	}else{

		ImageIcon imgic=new ImageIcon(fileAddress+imgName);
		Image img=imgic.getImage();
		g.drawImage(img,location.x*10+50, location.y*10+70, null);
	}
}
- 然后在线程中运行这一段代码
	lb_blue.imgName="蓝_4.png";
	lb_blue.drawLB(g);//画完以后让小方块move移动一次
	lb_blue.move();
 try{

	 Thread.sleep(50);
 }catch(Exception ef){
     }
- 运行效果大概是这样的

- 现在如果我们想让小方块改变它的移动方向,只需要改变对象lb_blue的speed值即可(比如说想让小方块往下走,那speed就改成(0,1);想往左走,那就改成(-1,0)。
- 因为我们要使用键盘操控,所以我们必须获取WASD和上下左右键的keycode(可以使用双线挑战制作Step1中的方法自己试验一下,把这8个按键都按一遍就知道它们的keycode了,需要知道其他按键的keycode也可用此方法)。
- 在键盘监听器的keyReleased方法下去判断按键及做出响应
public void keyReleased(KeyEvent e) {

	int keyc=e.getKeyCode();
	System.out.println(keyc+" is released!");
	int speed=1;
	if(lb_blue.len!=0){

		if(lb_blue.speed.y==0){

			if(keyc==87){
     //w
				lb_blue.len=0;
				lb_blue.speed=new Vector(0,-speed);
			}
			if(keyc==83){
     //s
				lb_blue.len=0;
				lb_blue.speed=new Vector(0,speed);
			}
		}
		if(lb_blue.speed.x==0){

			if(keyc==65){
     //a
				lb_blue.len=0;
				lb_blue.speed=new Vector(-speed,0);
			}
			if(keyc==68){
     //d
				lb_blue.len=0;
				lb_blue.speed=new Vector(speed,0);
			}
		}
	}
}
- 博主这里还用到了几个判断,在这里我给大家解释一下。
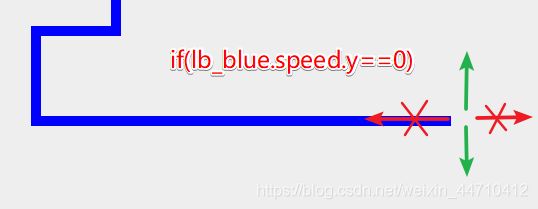
if(lb_blue.speed.y==0)/if(lb_blue.speed.x==0):这里的判断是,假如小方块目前正在往左走或者往右走(即y方向速度为0)时,才可以向上或者向下拐(不然就会出现本来在往上走,按了向下键后突然原地掉头,在这个游戏设定中是不符合规则的)后面的判断x方向速度同理。
if(lb_blue.len!=0):这里的len代表的是小方块在当前方向行走的距离,每更改一次方向len就清零一次。它的意思是小方块更改方向后,必须往更改后的方向至少前进一格才能再次更改方向,否则仍然有可能出现“原地掉头”的操作。
双线挑战制作Step3:利用二维数组设定“棋盘”
- 回顾一下双线挑战最重要的游戏规则:玩家线条不能够触碰到边界、不能触碰对方和自身的线条。
- 大家觉得这种判定方法是不是像在下棋?两个玩家就像顺着小方块的移动方向不停的摆棋子(小方块),当下一个要摆的棋子超出了边界,或者摆在了原来有棋子的格子上时,游戏结束。
- 二维数组的特点就十分符合我们的需求,比如说我们创建了一个大小为70*70的棋盘chessBoard。(横纵坐标范围均为0-69)
public static int[][] chessBoard=new int [70][70];
- 我们可以用chessBoard[x][y]=?来表示棋盘上坐标为(x,y)的格子里面装的是什么,这里我们用0代表空,1代表这里有棋子。那么chessBoard[8][9]=0就代表坐标(8,9)的格子里没有棋子;chessBoard[7][6]=1就代表(7,6)的格子里已经放有棋子了。(二维数组在创建的时候默认每个位置的值都是0,也就是没有棋子)
//判断游戏是否结束
public Boolean judge_gameover(){

	//判断棋子是否超出边界
	if(location.x>69|location.y>69|location.x<0|location.y<0){

		gameOver=true;
		return true;
	//判断棋子要放下的位置上原本有没有棋子
	}else if(chessBoard[location.x][location.y]==1){

		gameOver=true;
		return true;
	//如果上面两种情况都不是,则返回false
	}else{

		gameOver=false;
		return false;
	}
}
- 同时,我们需要修改一下drawLB的方法
public void drawLB(Graphics g){

	if(imgName==null){

	//当棋子走到某一格时,将棋盘的这一格状态改为“有棋子”
		chessBoard[location.x][location.y]=1;
		g.fillRect(location.x*10+50, location.y*10+50, 10,10);
	}else{

	//当棋子走到某一格时,将棋盘的这一格状态改为“有棋子”
		chessBoard[location.x][location.y]=1;
		ImageIcon imgic=new ImageIcon(fileAddress+imgName);
		Image img=imgic.getImage();
		g.drawImage(img,location.x*10+50, location.y*10+70, null);
	}
}
双线挑战制作Step4:给游戏添加背景音乐
- 首先我们需要创建一个PlayMusic类来载入音乐文件,准备播放
import java.applet.AudioClip;
import java.net.MalformedURLException;
import java.net.URL;
import javax.swing.JApplet;

public class PlayMusic {

	public AudioClip music = loadSound("此处输入需要播放的音乐文件路径(文件格式必须为WAV格式)");

	public static AudioClip loadSound(String filename) {

		URL url = null;
		try {

			url = new URL("file:" + filename);
		}
		catch (MalformedURLException e) {
     ;}
		return JApplet.newAudioClip(url);
	}
	//音乐播放
	public void play() {

		//音乐播放
		music.play();
		//循环播放
		music.loop();
	}
}
- 然后在需要播放音乐和音效的地方,插入这一段代码
PlayMusic p=new PlayMusic();
p.play();
- 就这么简单!
游戏源代码及游戏素材链接——提取码:hjzd
一点点总结心得:
实现一个程序的步骤——
- 我想要实现什么效果?
- 为了实现这样的效果我要怎么做?
(开干!) - 做好的效果和我的预期符合吗?如果不符合我要怎么修改?
- 搜集资料,撰写博客,和同学交流,对程序进一步优化
写在最后:
java给了我一种前所未有的体验,或者说一种前所未有的快感。只需要敲击键盘,就可以像在广阔的平原,凭空升起一座城堡。
复杂纷繁的代码,从我的手中获得了意义,获得了生气。在这个世界里,犹如掌握了“生杀大权”,游戏的一切都由我来定义。
飞机长什么样子,怪物又长什么样子;飞机一次打多少发子弹,怪物吃多少子弹会被杀死;怪物以什么姿态出生,又以什么姿态死去……
每一个程序的活泼生动,都是用一条条朴实无华的代码堆砌的。手握代码,我们就是这个世界的造物主!


