LNMP架构介绍及部署
目录
-
- **介绍**
- **安装**
- **配置**
介绍
LNMP与LAMP
LNMP架构:linux + Nginx + Mysql + PHP 的结构体系
LAMP架构:linux + Apache + Mysql + PHP 的结构体系
很明显他们的区别在于Nginx和Apache
我们先了解一下nginx和apache的区别
| Nginx | Apache |
|---|---|
| 本身是代理服务器,负载均衡能力强,可实现分布式架构及高可用集群 | 动态页面处理能力强 |
| 占用内存资源少,可处理高并发请求 | rewrite 功能强大 |
| 模块设计编写相对简单 | 模块超多,基本想到的都可以找到 |
| 社区活跃,高性能模块出品快 | 稳定性强,bug少 |
之后我们再看看LNMP与LAMP的差异
-
LNMP
在LNMP架构中 php是一个独立程序,可以单独部署php集群 -
LAMP
在LAMP架构中 php是apache的一个插件,php和apache只能在一个节点上。
LNMP架构部署
安装
- 节点规划
| 主机 | IP | 角色 |
|---|---|---|
| php-server | 192.168.139.134 | php脚本程序解析 |
| nginx-server | 192.168.139.131 | web服务 |
| mysql-server | 192.168.139.135 | 数据库节点 |
nginx安装部署请看
nginx安装
软件版本
nginx version: nginx/1.14.0
mysql Ver 8.0.18
php 7.2.0
- 处理防火墙
 systemctl stop firewalld
 systemctl disable firewalld
 setenforce 0  //临时处理selinux防火墙
- 修改主机名
hostnamectl set-hostname nginx-server
su - l
hostnamectl set-hostname php-server
su - l
hostnamectl set-hostname mysql-server
su - l
- 时间同步
yum install -y ntp ntpdate
ntpdate cn.pool.ntp.org
hwclock --systohc
三个节点做时间同步
-
mysql安装
– 下载rmp包安装
mysql-8.0.18-1.el7.x86_64.rpm-bundle.tar
– 配置yum源
安装过程中可能会存在依赖,修改安装网络源来解除依赖。
安装阿里镜像源
阿里源– 卸载Mariadb
rpm -e mariadb-libs postfix– 安装mysql
groupadd mysql
useradd -g mysql mysql
mkdir mysql
tar xf mysql-8.0.18-1.el7.x86_64.rpm-bundle\ \(1\).tar -C mysql
cd mysql
yum localinstall mysql-community-client-8.0.18-1.el7.x86_64.rpm mysql-community-server-8.0.18-1.el7.x86_64.rpm mysql-community-libs-8.0.18-1.el7.x86_64.rpm mysql-community-common-8.0.18-1.el7.x86_64.rpm
启动
systemctl start mysqld
找到root默认密码
grep “temporary password” /var/log/mysqld.log
-
php 安装
安装目录 /usr/local/php
– 下载安装包
php-7.2.0.tar.gz
– 安装依赖包
[root@php-server ~]# yum install -y gcc gcc-c++ make zlib zlib-devel pcre pcre-devel libjpeg libjpeg-devel libpng libpng-devel freetype freetype-devel libxml2 libxml2-devel glibc glibc-devel glib2 glib2-devel bzip2 bzip2-devel ncurses ncurses-devel curl curl-devel e2fsprogs e2fsprogs-devel krb5 krb5-devel openssl openssl-devel openldap openldap-devel nss_ldap openldap-clients openldap-servers
解压
tar zxvf php-7.2.0.tar.gz -C /usr/local/src/
cd /usr/local/src/php-7.2.0
编译
./configure --prefix=/usr/local/php --with-config-file-path=/usr/local/php --enable-mbstring --with-openssl --enable-ftp --with-gd --with-jpeg-dir=/usr --with-png-dir=/usr --with-mysql=mysqlnd --with-mysqli=mysqlnd --with-pdo-mysql=mysqlnd --with-pear --enable-sockets --with-freetype-dir=/usr --with-zlib --with-libxml-dir=/usr --with-xmlrpc --enable-zip --enable-fpm --enable-xml --enable-sockets --with-gd --with-zlib --with-iconv --enable-zip --with-freetype-dir=/usr/lib/ --enable-soap --enable-pcntl --enable-cli --with-curl
安装
make && make install
配置
PHP配置
- 配置启动项
[root@php-server php-7.2.0]# cp php.ini-production /usr/local/php/etc/php.ini
[root@php-server php-7.2.0]# cp php.ini-production /etc/php.ini
[root@php-server php-7.2.0]# cd /usr/local/src/php-7.2.0/sapi/fpm/
[root@php-server fpm]# cp -p init.d.php-fpm /etc/init.d/php-fpm
[root@php-server fpm]# cd /etc/init.d/
[root@php-server init.d]# chmod +x php-fpm
[root@php-server init.d]# chkconfig php-fpm on
[root@php-server init.d]# vim /etc/profile
export PATH=/usr/local/php/bin:/usr/local/php/sbin:$PATH
[root@php-server init.d]# source /etc/profile
[root@php-server init.d]# php -v
PHP 7.2.0 (cli) (built: Jun 17 2020 16:01:00) ( NTS )
Copyright (c) 1997-2017 The PHP Group
Zend Engine v3.2.0, Copyright (c) 1998-2017 Zend Technologies
- 配置php-fpm模块
[root@php-server init.d]# cd /usr/local/php/
[root@php-server php]# cd etc/
[root@php-server etc]# cp php-fpm.conf.default php-fpm.conf
[root@php-server etc]# cd php-fpm.d/
[root@php-server php-fpm.d]# cp www.conf.default www.conf
[root@php-server php-fpm.d]# vim /usr/local/php/etc/php-fpm.conf
pm.max_children = 50    //最多同时提供50个进程提供50个并发服务
pm.start_servers = 5    //启动时启动5个进程
pm.min_spare_servers = 2     //最小空闲进程数
pm.max_spare_servers = 8     //最大空闲进程数

[root@php-server php-fpm.d]# cat /usr/local/php/etc/php-fpm.d/www.conf |grep -iv "^\;"
[www]


user = nginx
group = nginx

listen = 0.0.0.0:9000


listen.owner = nginx
listen.group = nginx


pm = dynamic

pm.max_children = 5

pm.start_servers = 2

pm.min_spare_servers = 1

pm.max_spare_servers = 3
- nginx配置
[root@nginx-server ~]# vim /etc/nginx/nginx.conf
user nginx nginx;
pid /var/run/nginx.pid;
error_log logs/error.log;
events {

  worker_connections  1024;
}
http {

  include mime.types;
  default_type application/octet-stream;
  log_format main '$remote_addr - $remote_user [$time_local] "$request"';
server {

   listen   80;
   server_name 192.168.139.131;
   charset koi8-r;
   access_log logs/host.access.log main;
   location / {

      root  /www;
      index index.html index.htm;
   }
   location ~ \.php$ {

      root  /www;
      fastcgi_pass 192.168.139.134:9000;
      fastcgi_index index.php ;
      fastcgi_param SCRIPT_FILENAME $document_root$fastcgi_script_name;
      include       fastcgi_params;
   }
 }
}
[root@nginx-server nginx]# nginx -t
nginx: the configuration file /opt/data/nginx/conf/nginx.conf syntax is ok
nginx: configuration file /opt/data/nginx/conf/nginx.conf test is successful
[root@nginx-server nginx]# systemctl restart nginx

[root@nginx-server nginx]# ps -ef |grep nginx
root      12527      1  0 18:14 ?        00:00:00 nginx: master process /opt/data/nginx/sbin/nginx -c /opt/data/nginx/conf/nginx.conf
nginx     12529  12527  0 18:14 ?        00:00:00 nginx: worker process
root      12616   1148  0 18:14 pts/0    00:00:00 grep --color=auto nginx
测试网页
PHP节点上创建测试目录
[root@php-server /]# mkdir www
[root@php-server /]# groupadd nginx            //创建nginx属组
[root@php-server /]# useradd -g nginx nginx
[root@php-server /]# chown -R nginx:nginx www
[root@php-server /]# vim www/index.php      //编辑测试网页
<?php
phpinfo();
?>

[root@php-server /]# cd /usr/local/php/sbin/
[root@php-server sbin]# ./php-fpm            //启动php
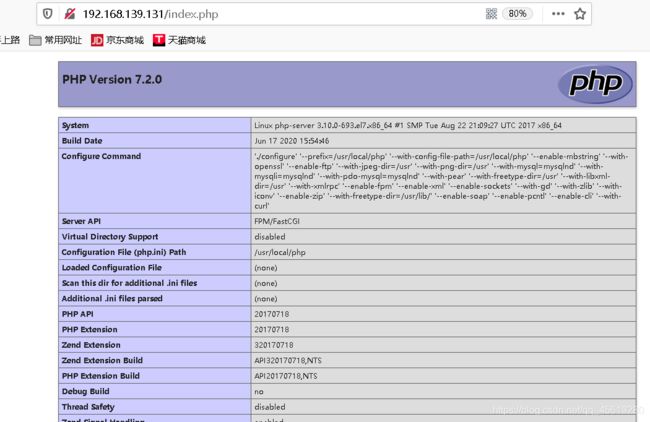
浏览器上进行测试
- mysql配置
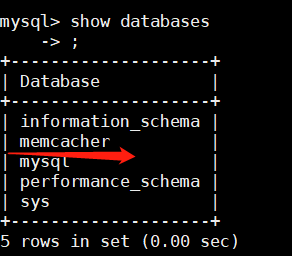
创建测试用户和数据库


php节点上安装php-mysql链接模块
[root@php-server ~]# cd /usr/local/src/php-7.2.0/ext/
[root@php-server ext]# cd mysqli/
[root@php-server mysqli]# /usr/local/php/bin/phpize
Configuring for:
PHP Api Version:         20170718
Zend Module Api No:      20170718
Zend Extension Api No:   320170718
Cannot find autoconf. Please check your autoconf installation and the
$PHP_AUTOCONF environment variable. Then, rerun this script.
[root@php-server mysqli]# echo $?
1
[root@php-server mysqli]# yum install -y autoconf
[root@php-server mysqli]# /usr/local/php/bin/phpize
Configuring for:
PHP Api Version:         20170718
Zend Module Api No:      20170718
Zend Extension Api No:   320170718
[root@php-server mysqli]# ./configure \
> --with-php-config=/usr/local/php/bin/php-config \
> --enable-embedded-mysqli=shared \
> --enable-shared
[root@php-server mysqli]# make
[root@php-server mysqli]# make install
[root@php-server mysqli]# cd /usr/local/php/lib/php/extensions/no-debug-non-zts-20170718/
[root@php-server no-debug-non-zts-20170718]# ls
mysqli.so  opcache.a  opcache.so  pdo_mysql.so
[root@php-server no-debug-non-zts-20170718]# cd /usr/local/src/php-7.2.0/ext/pdo
[root@php-server pdo]# cd /usr/local/src/php-7.2.0/ext/pdo_mysql/
[root@php-server pdo_mysql]# /usr/local/php/bin/phpize
Configuring for:
PHP Api Version:         20170718
Zend Module Api No:      20170718
Zend Extension Api No:   320170718
[root@php-server pdo_mysql]# ./configure \
> --with-php-config=/usr/local/php/bin/php-config \
> --with-pdo-mysql=mysqlnd
[root@php-server pdo_mysql]# make
[root@php-server pdo_mysql]# echo $?
0
[root@php-server pdo_mysql]# make install

# 添加模块
[root@php-server php-7.2.0]# cp php.ini-production /usr/local/php/etc/php.ini
cp:是否覆盖"/usr/local/php/etc/php.ini"? y
[root@php-server php-7.2.0]# cd /usr/local/php/etc/
[root@php-server etc]# vim php.ini
extension_dir = "/usr/local/php/lib/php/extensions/no-debug-non-zts-20170718"
extension = mysqli.so
extension = pdo_mysql.so
[root@php-server etc]# service php-fpm restart
Gracefully shutting down php-fpm warning, no pid file found - php-fpm is not running ?
Starting php-fpm [17-Jun-2020 21:15:51] ERROR: unable to bind listening socket for address '0.0.0.0:9000': Address already in use (98)
[17-Jun-2020 21:15:51] ERROR: FPM initialization failed
 failed
[root@php-server ~]# ps -ef |grep php
root       1050      1  0 21:19 ?        00:00:00 php-fpm: master process (/usr/local/php/etc/php-fpm.conf)
nginx      1051   1050  0 21:19 ?        00:00:00 php-fpm: pool www
nginx      1052   1050  0 21:19 ?        00:00:00 php-fpm: pool www
nginx      1053   1050  0 21:19 ?        00:00:00 php-fpm: pool www
nginx      1054   1050  0 21:19 ?        00:00:00 php-fpm: pool www
nginx      1055   1050  0 21:19 ?        00:00:00 php-fpm: pool www
root       1223   1137  0 21:20 pts/0    00:00:00 grep --color=auto php
[root@php-server ~]# kill 1050
[root@php-server ~]# ps -ef |grep php
root       1357   1137  0 21:21 pts/0    00:00:00 grep --color=auto php
[root@php-server ~]# service php-fpm restart
Gracefully shutting down php-fpm . done
Starting php-fpm  done
编辑测试
[root@php-server ~]# vim /www/index1.php
<?php
$con = new mysqli('192.168.139.135','test01','ABC123@com','memcacher');
if(!$con)
   echo "faling...";
else
   echo "success connect mysql\n";
?>
- 数据库创建的用户可以远程访问
- 需要给创建用户数据库的权限
- 创建用户时修改认证插件 mysql_native_password,并开放端口
在my.cnf 中 放开
default-authentication-plugin=mysql_native_password

