数独项目Last弹:网络识别PIAN
数独项目Last弹:网络识别PIAN
- 前言
- 数据准备
- 网络定义
- 推理预测
- 总结
- Reference
前言
小刀又来啦,继上次我们讲解完如何 利用经典图像处理手段分割出九宫格的81个宫格来获取题目中的数字 ,我们这次来讲解如何利用 ANN(人工神经网络)来自动识别数字,然后利用我们最开始讲的DFS数独算法来得到答案并显示出来,今天就是收官之作啦。
来看看我们上次的结果,即给出一副数独题目图片,我们分割到了以下的81张子图片。(关门放图
本身像手写数字识别MNIST就已经是入门机器学习图像分类的敲门砖,我们今天的数字还近似于打印体数字,就更加简单了,所以小刀也完全杀鸡用不着名刀。常见的线性FC层加RELU加MSL(mean square loss)三合一套餐足以,基本的机器学习知识大家完全可以自行知乎百度,有非常多的帖子博客,我也不多说啦~
然后就是个人理解常见的机器学习图像分类算法核心就是高维数据映射加多重非线性激活,实现对于某种特殊图案或者结构的局部响应。
话不多说,开始我们今天的收官之作~
数据准备
训练网络少不了数据集,而数据集的准备,清洗,处理等操作一般占到整个model设计的80%,可谓重中之重,数据的好坏直接影响到了你后期的效果。当然我们目前的分类难度基本没有多大,所以不必太在意这点~我这里也只是以很小的一部分分割图像为训练数据
今天我们用到的出装有:(torch 的安装可能有点麻烦,推荐去CSDN查找相关解说博客~)
import os
import time
import cv2 as cv
import torch
import torchvision
import numpy as np
from PIL import Image
from tqdm.notebook import tqdm
import torch.nn.functional as F
from torchvision import transforms
from torch.utils.data import DataLoader, Dataset
import matplotlib.pyplot as plt
我们先把分割好的图片数据归个类,类似这样
每个分组的文件夹名称即是该组数据的标签,而文件夹中图片的命名就随个人口味了
接下来定义数据文件夹变量和读取数据集图片名称到对应的txt文件里
# 数据集目录
train_img_data_dir = "./data/"
# 图像数据文件名合集
train_img_txt = "./train_img_txt.txt"
# 读取
f1 = open(train_img_txt, 'a')  # 打开文件流
pic_type = '.bmp'  # 文件类型
# train_img_txt 不存在时创建
if not os.path.exists(train_img_txt):
    os.mknod(train_img_txt)
# 保存图片的名称到 train_img_txt
for sub_dir_name in os.listdir(train_img_data_dir):
    for filename in os.listdir(train_img_data_dir+sub_dir_name+'/'):
        f1.write(sub_dir_name+'/'+filename.rstrip(pic_type))  # 只保存名字,去除后缀.jpg
        f1.write("\n")  # 换行
f1.close()
Torch(神经网络训练框架)是支持自定义数据集类的,可以配合DataLoader组成数据集生成器,在网络训练时按照训练进程的生产该训练批次所需要的数据batch,避免了把所有的图像一次性都加载到缓存里,极大节省了空间
来看看自定义训练数据集类(测试数据集也可以按照这种方法生成,这里我们只演示训练过程中所需要的数据集生成方法):
# 数据集定义
class My_DataSet(Dataset):
    def __init__(self, root, list_path, img_type='bmp', transforms=None, target_transforms=None):
        """
        Training Dataset Definition
        Args:
            root ([str]): [root_path]
            list_path ([str]): [txt file containing file names]
            img_type (str, optional): [img type]. Defaults to 'png'.
            transforms ([torchvision.transforms], optional): [transforms applied to raw imgs]. Defaults to None.
            target_transforms ([torchvision.transforms], optional): [transforms applied to raw imgs label if it's img too]. Defaults to None.
        """
        super(My_DataSet, self).__init__()
        self.root = root
        self.list_path = list_path
        self.transforms = transforms
        self.target_transforms = target_transforms
        self.img_ids = [img_id.strip() for img_id in open(list_path)]
        self.train_tot = len(self.img_ids)
        self.files = []
        for name in self.img_ids:
            img_file_path = os.path.join(
                self.root, "{}.".format(name)+img_type)
            self.files.append({

                "img": img_file_path,
                "label": name.strip('/')[0],
                "name": name
            })

    # return length of datasets
    def __len__(self):
        return len(self.files)

    # generation function
    def __getitem__(self, index):
        datafile = self.files[index]
        image = Image.open(datafile["img"]).convert('L')
        # image transforms
        if self.transforms is not None:
            image = self.transforms(image)
        label = int(datafile["label"])
        # gt_transforms
        if self.target_transforms is not None:
            label = self.target_transforms(label)
        return image, label
然后我们来实体化这个数据集生成器:
# 网络的一些常量定义:训练批次大小,验证批次大小,输入图像大小(默认长宽相等)
model_config={

    'TRAIN_BATCH_SIZE':4,
    'TEST_BATCH_SIZE':4,
    'input_size':40,
}

# numpy/Image type -> torch.tensor
# resize到网络输入大小,然后转为tensor
train_transform = transforms.Compose([transforms.Resize((model_config['input_size'],model_config['input_size'])), transforms.ToTensor()])
train_dataset = My_DataSet(train_img_data_dir, train_img_txt, 'bmp', train_transform, None)
# Loader, 按训练批次数量加载,shuffle打乱顺序
train_dataloader = DataLoader(dataset=train_dataset, batch_size=model_config['TRAIN_BATCH_SIZE'],
                              shuffle=True)
print(len(train_dataloader))

"""
[output]
38
"""
我们来看看其中一张图片及其标签正不正确:
for k, v in enumerate(train_dataloader):
    # 打印一个批次数据的shape
    print(v[0].shape)
    # 改到可以显示的格式
    img = v[0].squeeze().squeeze()
    plt.imshow(img[0], cmap='gray')
    # 标签值
    plt.title(v[1][0].item())
    plt.show()
    break

 """
[output]
torch.Size([4, 1, 40, 40])
"""
网络定义
这里网络的主体结构是:Flatten(延展到一维)→ FC(全连接)→ Relu → FC(全连接)→ Relu → FC(全连接)→ MSELoss
我们使用torch来自定义一个简单的model:
class Number_Net(torch.nn.Module):
    def __init__(self, config):
        """
        Net Definition
        Args:
            config ([dict]): [model configuration dict]
        """
        super(Number_Net, self).__init__()
        self.Flatten = torch.nn.Flatten()
        self.Linear_1 = torch.nn.Linear(config['input_size']**2, 400)
        self.Linear_2 = torch.nn.Linear(400, 100)
        self.Linear_3 = torch.nn.Linear(100, 10)
        self.LeakyReLU = torch.nn.LeakyReLU()
        self.Softmax = torch.nn.Softmax(dim=-1)

    def forward(self, x):
        x = self.Flatten(x)
        x = self.Linear_1(x)
        x = self.LeakyReLU(x)
        x = self.Linear_2(x)
        x = self.LeakyReLU(x)
        x = self.Linear_3(x)
        return x
在Torch框架里定义常见网络也是特别方便的,没有什么技术性,然后我们实例化model:
model = Number_Net(config = model_config)
print(model) # 打印网络结构

"""
[output]
Number_Net(
  (Flatten): Flatten(start_dim=1, end_dim=-1)
  (Linear_1): Linear(in_features=1600, out_features=400, bias=True)
  (Linear_2): Linear(in_features=400, out_features=100, bias=True)
  (Linear_3): Linear(in_features=100, out_features=10, bias=True)
  (LeakyReLU): LeakyReLU(negative_slope=0.01)
  (Softmax): Softmax(dim=-1)
)
"""
接下类设置网络的评价函数及更新方法:
criterion = torch.nn.MSELoss(reduction = 'sum')
ADAM_optimizer = torch.optim.Adam(model.parameters(), lr = 1e-3)
接下来是网络的训练过程:
# 原图像的宽高
raw_img_row = 40
raw_img_col = 40
# 独热编码数量
ONE_HOT_NUM = 10
# 图像补0长度
padding_length_1 = (model_config['input_size']-raw_img_row)//2
padding_length_2 = (model_config['input_size']-raw_img_col)//2
# 保存权重flag
SAVE = False
# 测试flag
VAL = False
# 训练中测试flag
TRAIN_WITH_VAL = False
# 优化器
optimizer = ADAM_optimizer  # RMS_optimizer
# 是否加载已有model权重
LOAD_MODEL = False
model_ckpt_path = ''
if LOAD_MODEL and model_ckpt_path != '':
    checkpoint = torch.load(model_ckpt_path, map_location=torch.device('cpu'))
    model.load_state_dict(checkpoint, strict=True)
    print("Load weights OK")

# 记录训练时的损失和正确率
TRAIN_LOSS_RECORD = []
TRAIN_ACC_RECORD = []

# 中间结果
train_len = 0.0
train_running_counter = 0.0
train_running_loss = 0.0

# 训练迭代数
epochs = 10
for epoch in range(epochs):
    tk0 = tqdm(train_dataloader, ncols=100, total=int(len(train_dataloader)))
    for train_iter, train_data_batch in enumerate(tk0):
        model.train()
        train_images = train_data_batch[0].float()  # (B, 28,28)
        train_labels = train_data_batch[1]
        train_labels = F.one_hot(train_labels, ONE_HOT_NUM).float()
        train_images = F.pad(train_images, pad=(padding_length_2, padding_length_2,padding_length_1, padding_length_1, ))
        # print(train_images.shape)
        # feed into the model
        train_outputs = model(train_images)
        # calculate loss
        train_loss_ = criterion(train_outputs, train_labels)
        # count
        train_counter_ = torch.eq(torch.argmax(train_labels, dim=1),
                                  torch.argmax(train_outputs, dim=1)).float().sum()
        # fresh weights
        optimizer.zero_grad()
        train_loss_.backward()
        optimizer.step()
        # record
        train_len += len(train_labels)
        train_running_loss += train_loss_.item()
        train_running_counter += train_counter_
        train_loss = train_running_loss / train_len
        train_accuracy = train_running_counter / train_len
        TRAIN_LOSS_RECORD.append(train_loss)
        TRAIN_ACC_RECORD.append(train_accuracy)
        # print information
        tk0.set_description_str('Epoch {}/{} : Training'.format(epoch+1, epochs))
        tk0.set_postfix({
     'Train_Loss': '{:.5f}'.format(
            train_loss), 'Train_Accuracy': '{:.5f}'.format(train_accuracy)})
    # 测试过程
    if TRAIN_WITH_VAL:
        with torch.no_grad():
            model.eval()
            val_len = 0.0
            val_running_counter = 0.0
            val_running_loss = 0.0
            val_loss = val_accuracy = 0.0

            tk1 = tqdm(val_dataloader, ncols=100,
                       total=int(len(val_dataloader)))
            for val_iter, val_data_batch in enumerate(tk1):
                # (64, 1, 200, 200) float32 1. 0.
                val_images = val_data_batch[0].float()
                val_labels = val_data_batch[1]  # (1024, 10) int64 9 0

                val_labels = F.one_hot(
                    val_labels, num_classes=ONE_HOT_NUM).float()
                val_images = F.pad(val_images, pad=(
                    padding_length, padding_length, padding_length, padding_length))

                val_outputs = model(val_images)
                val_loss_ = criterion(val_outputs, val_labels)
                val_counter_ = torch.eq(torch.argmax(val_labels, dim=1), torch.argmax(
                    val_outputs, dim=1)).float().sum()

                val_len += len(val_labels)
                val_running_loss += val_loss_.item()
                val_running_counter += val_counter_

                val_loss = val_running_loss / val_len
                val_accuracy = val_running_counter / val_len
                tk1.set_postfix({
     'Val_Loss': '{:.5f}'.format(
                    val_loss), 'Val_Accuarcy': '{:.5f}'.format(val_accuracy)})

if SAVE:
    torch.save(model.state_dict(), './soduku_simple_model_net_weighs.pth')
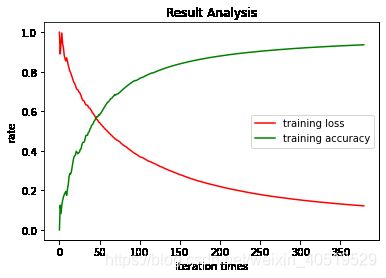
来看下训练过程中的loss和acc变化:
15次迭代后acc为95.6%,还是比较正常的,这里继续训练的话还可以增加,但是那也没必要了,因为很有可能是过拟合,本身我们的分类数据就很简单,点到为止。
推理预测
有了模型,我们可以来对之前生成的81张子图像逐一预测其对应的数字标签,然后生成一个数组,喂入DFS数独算法里,就可以得到最后的解啦。
我们来编写利用model预测单张图片对应数字标签的函数:
def predict_number(np_img, model, togray=False, binary=False, reshape=False, target_shape=(40, 40)):
    """
    use model to predict single img
    Args:
        np_img ([numpy]): [raw_img]
        model ([torch model]): [trained model]
        togray (bool, optional): [convert img to gray type]. Defaults to False.
        binary (bool, optional): [convert img to binary img]. Defaults to False.
        reshape (bool, optional): [reshape img to target size]. Defaults to False.
        target_shape (tuple, optional): [target size of model]. Defaults to (40,40).

    Returns:
        [int]: [number label of input_img]
    """
    test_img = np.copy(np_img)
    test_img = test_img.astype(np.float32)
    if togray:
        test_img = cv.cvtColor(test_img, cv.COLOR_BGR2GRAY)
    if binary:
        ret, test_img = cv.threshold(test_img, 127, 255, cv.THRESH_BINARY)
    if reshape:
        test_img = cv.resize(test_img, target_shape)
    # 扩展到网络匹配的输入格式
    test_img = torch.from_numpy(test_img).unsqueeze(0).unsqueeze(0)
    test_output = model(test_img)
    return torch.argmax(test_output).item()
然后是利用之前的DFS解数独来实现结果预测并显示答案的函数:
def sudoku_translate(raw_data_path, model, thresh=1000, standar_num_path='./standard_nums/', pic_type='.bmp'):
    """
    give answer to the input 81 sub_imgs from one Sudoku Question
    Args:
        raw_data_path ([str]): [sub_imgs file path]
        model ([torch model]): [trained model]
        thresh (int, optional): [threshold to check if a sub_img is blank]. Defaults to 1000.
        standar_num_path (str, optional): [standard number sub_imgs file path]. Defaults to './standard_nums/'.
        pic_type (str, optional): [img type]. Defaults to '.bmp'.

    Returns:
        [None]: [None]
    """

    # 根据数独数据生成数独图像的函数
    def get_soduku_img(img_numbers):
        """
        generate sudoku img using input number arrays with standard sub_imgs
        Args:
            img_numbers ([numpy]): [9*9 arrays]

        Returns:
            [numpy]: [result image]
        """
        raw_img = None
        for i in range(9):
            for j in range(9):
                sub_img = np.array(Image.open(
                    standar_num_path+str(img_numbers[i][j])+pic_type).convert('L'), dtype=np.float32)
                if j == 0:
                    temp = sub_img
                else:
                    temp = np.concatenate([temp, sub_img], axis=-1)
                if j < 8:
                    temp = np.concatenate(
                        [temp, np.ones((temp.shape[0], 2))*255.], axis=-1)
            if i == 0:
                raw_img = temp
            else:
                raw_img = np.concatenate([raw_img, temp], axis=0)
            if i < 8:
                raw_img = np.concatenate(
                    [raw_img, np.ones((2, raw_img.shape[1]))*255.], axis=0)
        return raw_img

    # 存储子图像list
    pics = []
    # 存储子图象文件名list
    pics_path = []
    for pic in os.listdir(raw_data_path):
        pics_path.append(pic)
    # 排序 1-81
    pics_path = sorted(pics_path, key=lambda x: int(x.split('.')[0]))
    # print(pics_path)
    # 加载图像数据
    for pic_name in pics_path:
        pics.append(np.array(Image.open(raw_data_path +
                                        pic_name).convert('L'), dtype=np.float32))

    # 识别原子图象数字标签
    sudoku = []
    for pic in pics:
        # print(np.sum(pic))
        # blank img check
        if np.sum(pic) < thresh:
            sudoku.append(0)
        else:
            sudoku.append(predict_number(pic, model))
    #  reshape
    sudoku = np.array(sudoku).reshape((9, 9))
    # get ans, Sudoku是DFS数独求解函数,参照本系列第一篇推文
    ans = Sudoku(sudoku)

    # generate images to show
    raw_soduku_img = get_soduku_img(sudoku)
    ans_soduku_img = get_soduku_img(ans)
    # print(ans)
    plt.figure()
    plt.subplot(121)
    plt.imshow(raw_soduku_img, cmap='gray')
    plt.title('Raw img')
    plt.subplot(122)
    plt.imshow(ans_soduku_img, cmap='gray')
    plt.title('Ans img')
    plt.show()
    return
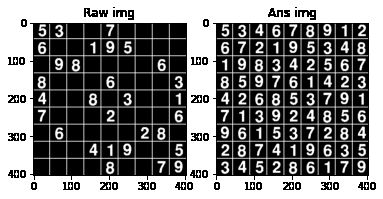
来看看结果:
Loop Depth:  51
Time Used for solving: 0.00504s
总结
其实整个小项目下来最核心的还是DFS数独算法,图像处理分割数字和网络搭建都是为了得到原图分割子图象的正确数字标签而已,自然也有很多其他方法,比如模板匹配,KNN最邻近判断等。小刀本人也比较喜欢直接用结果讲话,会有较多的代码显示逻辑过程,会给一些小伙伴带来阅读门槛,或许在以后某个时间你们会想起来可以参照学习一波吧~
![]()
![]()
Reference
[1] 数独项目Last弹:网络识别PIAN


