Python中图像标题生成的注意机制实战教程
【翻译自 : A Hands-on Tutorial to Learn Attention Mechanism For Image Caption Generation in Python】
【说明:analyticsvidhya这里的文章个人很喜欢,所以闲暇时间里会做一点翻译和学习实践的工作,这里是相应工作的实践记录,希望能帮到有需要的人!】
总览
了解图像字幕生成的注意力机制
实现注意力机制以在python中生成字幕
介绍
注意机制是人类所具有的复杂的认知能力。 当人们收到信息时,他们可以有意识地忽略一些主要信息,而忽略其他次要信息。
这种自我选择的能力称为注意力。 注意机制使神经网络能够专注于其输入子集以选择特定特征。
近年来,神经网络推动了图像字幕的巨大发展。 研究人员正在为计算机视觉和序列到序列建模系统寻找更具挑战性的应用程序。 他们试图用人类的术语描述世界。 在上一篇文章中,我们看到了通过Merge架构进行图像标题处理的过程,今天,我们将探讨一种更为复杂而精致的设计来解决此问题。
注意机制已成为深度学习社区中从业者的首选方法。 它最初是在使用Seq2Seq模型的神经机器翻译的背景下设计的,但今天我们将看看它在图像字幕中的实现。
注意机制不是将整个图像压缩为静态表示,而是使显着特征在需要时动态地走在最前列。 当图像中有很多杂波时,这一点尤其重要。
让我们举个例子来更好地理解:
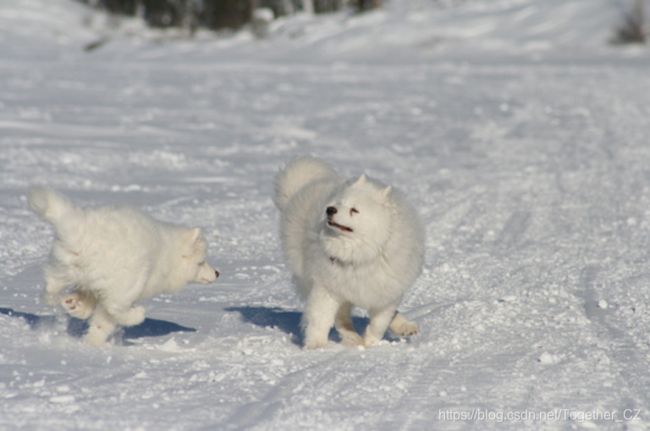
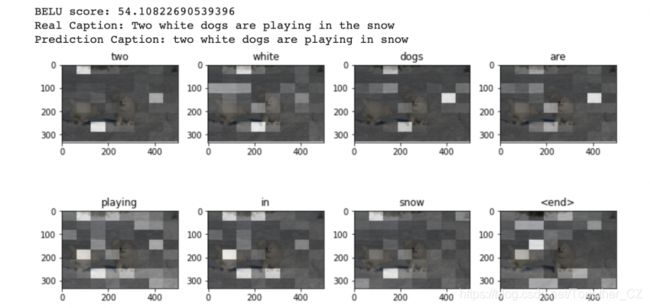
我们的目标是生成一个标题,例如“两只白狗在雪地上奔跑”。 为此,我们将看到如何实现一种称为Bahdanau的注意力或本地注意力的特定类型的注意力机制。
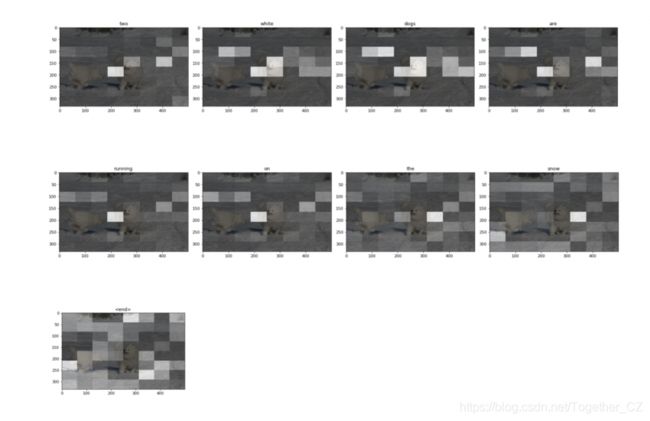
通过这种方式,我们可以看到模型在生成标题时将焦点放在图像的哪些部分。 此实现将需要深度学习的强大背景。
目录
1、问题陈述的处理
2、了解数据集
3、实现
1、导入所需的库
2、数据加载和预处理
3、模型定义
4、模型训练
5、贪婪搜索和BLEU评估
4、下一步是什么?
5、尾注
问题陈述的处理
编码器-解码器图像字幕系统将使用将产生隐藏状态的预训练卷积神经网络对图像进行编码。然后,它将使用LSTM解码此隐藏状态并生成标题。
对于每个序列元素,将先前元素的输出与新序列数据结合起来用作输入。这为RNN网络提供了一种记忆,可能使字幕更具信息性和上下文感知能力。
但是RNN的训练和评估在计算上往往很昂贵,因此在实践中,内存只限于少数几个元素。注意模型可以通过从输入图像中选择最相关的元素来帮助解决此问题。使用Attention机制,首先将图像分为n个部分,然后我们计算每个图像的图像表示形式。当RNN生成新单词时,注意机制将注意力集中在图像的相关部分上,因此解码器仅使用特定的图片的一部分。
在Bahdanau或本地关注中,关注仅放在少数几个来源位置。 由于全球关注集中于所有目标词的所有来源方词,因此在计算上非常昂贵。 为了克服这种缺陷,本地注意力选择只关注每个目标词的编码器隐藏状态的一小部分。
局部注意力首先找到对齐位置,然后在其位置所在的左右窗口中计算注意力权重,最后对上下文向量进行加权。 局部注意的主要优点是减少了注意机制计算的成本。
在计算中,本地注意力不是考虑源语言端的所有单词,而是根据预测函数预测在当前解码时要对齐的源语言端的位置,然后在上下文窗口中导航, 仅考虑窗口中的单词。
Bahdanau注意的设计
编码器和解码器的所有隐藏状态用于生成上下文向量。注意机制将输入和输出序列与前馈网络参数化的比对得分进行比对。它有助于注意源序列中最相关的信息。该模型基于与源位置和先前生成的目标词关联的上下文向量来预测目标词。
为了参考原始字幕评估字幕,我们使用一种称为BLEU的评估方法。它是使用最广泛的评估指标。它用于分析要评估的翻译语句与参考翻译语句之间n-gram的相关性。
在本文中,多个图像等效于翻译中的多个源语言句子。 BLEU的优点是考虑更长的匹配信息,它认为的粒度是n元语法字而不是单词。 BLEU的缺点是无论匹配哪种n-gram,都将被视为相同。
我希望这使您对我们如何处理此问题陈述有所了解。让我们深入研究实施!
了解数据集
我使用了Flickr8k数据集,其中每个图像都与五个不同的标题相关联,这些标题描述了所收集的图像中描述的实体和事件。
Flickr8k体积小巧,可以使用CPU在低端笔记本电脑/台式机上轻松进行培训,因此是一个很好的入门数据集。
我们的数据集结构如下:
让我们实现字幕生成的注意机制!
步骤1:-导入所需的库
在这里,我们将利用Tensorflow创建模型并对其进行训练。 大部分代码归功于TensorFlow教程。 如果您想要GPU进行训练,则可以使用Google Colab或Kaggle笔记本。
import string
import numpy as np
import pandas as pd
from numpy import array
from pickle import load

from PIL import Image
import pickle
from collections import Counter
import matplotlib.pyplot as plt

import sys, time, os, warnings
warnings.filterwarnings("ignore")
import re

import keras
import tensorflow as tf
from tqdm import tqdm
from nltk.translate.bleu_score import sentence_bleu

from keras.preprocessing.sequence import pad_sequences
from keras.utils import to_categorical
from keras.utils import plot_model
from keras.models import Model
from keras.layers import Input
from keras.layers import Dense, BatchNormalization
from keras.layers import LSTM
from keras.layers import Embedding
from keras.layers import Dropout
from keras.layers.merge import add
from keras.callbacks import ModelCheckpoint
from keras.preprocessing.image import load_img, img_to_array
from keras.preprocessing.text import Tokenizer
from keras.applications.vgg16 import VGG16, preprocess_input

from sklearn.utils import shuffle
from sklearn.model_selection import train_test_split
from sklearn.utils import shuffle
步骤2:-数据加载和预处理
定义图像和字幕路径,并检查数据集中总共有多少图像。
image_path = "/content/gdrive/My Drive/FLICKR8K/Flicker8k_Dataset"
dir_Flickr_text = "/content/gdrive/My Drive/FLICKR8K/Flickr8k_text/Flickr8k.token.txt"
jpgs = os.listdir(image_path)

print("Total Images in Dataset = {}".format(len(jpgs)))
输出如下:
我们创建一个数据框来存储图像ID和标题,以便于使用。
file = open(dir_Flickr_text,'r')
text = file.read()
file.close()

datatxt = []
for line in text.split('\n'):
   col = line.split('\t')
   if len(col) == 1:
       continue
   w = col[0].split("#")
   datatxt.append(w + [col[1].lower()])

data = pd.DataFrame(datatxt,columns=["filename","index","caption"])
data = data.reindex(columns =['index','filename','caption'])
data = data[data.filename != '2258277193_586949ec62.jpg.1']
uni_filenames = np.unique(data.filename.values)

data.head()
输出如下:
接下来,让我们可视化一些图片及其5个标题:
npic = 5
npix = 224
target_size = (npix,npix,3)
count = 1

fig = plt.figure(figsize=(10,20))
for jpgfnm in uni_filenames[10:14]:
   filename = image_path + '/' + jpgfnm
   captions = list(data["caption"].loc[data["filename"]==jpgfnm].values)
   image_load = load_img(filename, target_size=target_size)
   ax = fig.add_subplot(npic,2,count,xticks=[],yticks=[])
   ax.imshow(image_load)
   count += 1

   ax = fig.add_subplot(npic,2,count)
   plt.axis('off')
   ax.plot()
   ax.set_xlim(0,1)
   ax.set_ylim(0,len(captions))
   for i, caption in enumerate(captions):
       ax.text(0,i,caption,fontsize=20)
   count += 1
plt.show()
输出如下:
接下来,让我们看看我们当前的词汇量是多少:
vocabulary = []
for txt in data.caption.values:
   vocabulary.extend(txt.split())
print('Vocabulary Size: %d' % len(set(vocabulary)))
输出如下:
接下来执行一些文本清理,例如删除标点符号,单个字符和数字值:
def remove_punctuation(text_original):
   text_no_punctuation = text_original.translate(string.punctuation)
   return(text_no_punctuation)

def remove_single_character(text):
   text_len_more_than1 = ""
   for word in text.split():
       if len(word) > 1:
           text_len_more_than1 += " " + word
   return(text_len_more_than1)

def remove_numeric(text):
   text_no_numeric = ""
   for word in text.split():
       isalpha = word.isalpha()
       if isalpha:
           text_no_numeric += " " + word
   return(text_no_numeric)

def text_clean(text_original):
   text = remove_punctuation(text_original)
   text = remove_single_character(text)
   text = remove_numeric(text)
   return(text)

for i, caption in enumerate(data.caption.values):
   newcaption = text_clean(caption)
   data["caption"].iloc[i] = newcaption
现在让我们看一下清理后词汇量的大小
clean_vocabulary = []
for txt in data.caption.values:
   clean_vocabulary.extend(txt.split())
print('Clean Vocabulary Size: %d' % len(set(clean_vocabulary)))
输出如下:
接下来,我们将所有标题和图像路径保存在两个列表中,以便我们可以使用路径集立即加载图像。 我们还向每个字幕添加了“ <开始>”和“ <结束>”标签,以便模型可以理解每个字幕的开始和结束。
PATH = "/content/gdrive/My Drive/FLICKR8K/Flicker8k_Dataset/"
all_captions = []
for caption  in data["caption"].astype(str):
   caption = ' ' + caption+ ' '
   all_captions.append(caption)

all_captions[:10]
输出如下:
all_img_name_vector = []
for annot in data["filename"]:
   full_image_path = PATH + annot
   all_img_name_vector.append(full_image_path)

all_img_name_vector[:10]
输出如下:
现在您可以看到我们有40455个图像路径和标题。
print(f"len(all_img_name_vector) : {len(all_img_name_vector)}")
print(f"len(all_captions) : {len(all_captions)}")
输出如下:
我们将仅取每个批次的40000个,以便可以正确选择批次大小,即如果批次大小= 64,则可以选择625个批次。为此,我们定义了一个函数来将数据集限制为40000个图像和标题。
def data_limiter(num,total_captions,all_img_name_vector):
 train_captions, img_name_vector = shuffle(total_captions,all_img_name_vector,random_state=1)
 train_captions = train_captions[:num]
 img_name_vector = img_name_vector[:num]
 return train_captions,img_name_vector

train_captions,img_name_vector = data_limiter(40000,total_captions,all_img_name_vector)
步骤3:-模型定义
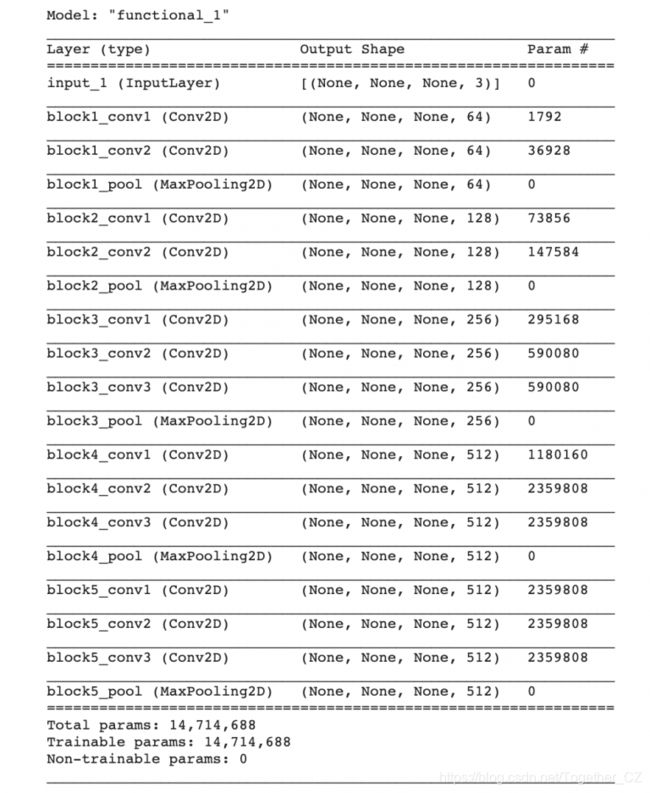
让我们使用VGG16定义图像特征提取模型。 我们必须记住,这里不需要分类图像,只需要为图像提取图像矢量即可。 因此,我们从模型中删除了softmax层。 我们必须先将所有图像预处理为相同大小,即224×224,然后再将其输入模型。
def load_image(image_path):
   img = tf.io.read_file(image_path)
   img = tf.image.decode_jpeg(img, channels=3)
   img = tf.image.resize(img, (224, 224))
   img = preprocess_input(img)
   return img, image_path

image_model = tf.keras.applications.VGG16(include_top=False, weights='imagenet')
new_input = image_model.input
hidden_layer = image_model.layers[-1].output
image_features_extract_model = tf.keras.Model(new_input, hidden_layer)

image_features_extract_model.summary()
输出如下:
接下来,让我们将每个图片名称映射到要加载图片的函数:
encode_train = sorted(set(img_name_vector))
image_dataset = tf.data.Dataset.from_tensor_slices(encode_train)
image_dataset = image_dataset.map(load_image, num_parallel_calls=tf.data.experimental.AUTOTUNE).batch(64)
我们提取特征并将其存储在各自的.npy文件中,然后将这些特征通过编码器传递.NPY文件存储在任何计算机上重建数组所需的所有信息,包括dtype和shape信息。
%%time
for img, path in tqdm(image_dataset):
 batch_features = image_features_extract_model(img)
 batch_features = tf.reshape(batch_features,
                             (batch_features.shape[0], -1, batch_features.shape[3]))

 for bf, p in zip(batch_features, path):
   path_of_feature = p.numpy().decode("utf-8")
   np.save(path_of_feature, bf.numpy())
接下来,我们标记标题,并为数据中所有唯一的单词建立词汇表。 我们还将词汇量限制在前5000个单词以节省内存。我们将更换的话不词汇与令牌
top_k = 5000
tokenizer = tf.keras.preprocessing.text.Tokenizer(num_words=top_k,
                                                 oov_token="",
                                                 filters='!"#$%&()*+.,-/:;=?@[\]^_`{|}~ ')

tokenizer.fit_on_texts(train_captions)
train_seqs = tokenizer.texts_to_sequences(train_captions)
tokenizer.word_index[''] = 0
tokenizer.index_word[0] = ''

train_seqs = tokenizer.texts_to_sequences(train_captions)
cap_vector = tf.keras.preprocessing.sequence.pad_sequences(train_seqs, padding='post')
让我们可视化填充的训练和标题以及标记化的向量:
train_captions[:3]输出如下:
train_seqs[:3]输出如下:
接下来,我们可以计算所有字幕的最大和最小长度:
def calc_max_length(tensor):
   return max(len(t) for t in tensor)
max_length = calc_max_length(train_seqs)

def calc_min_length(tensor):
   return min(len(t) for t in tensor)
min_length = calc_min_length(train_seqs)

print('Max Length of any caption : Min Length of any caption = '+ str(max_length) +" : "+str(min_length))
输出如下:
接下来,使用80-20拆分创建训练和验证集:
img_name_train, img_name_val, cap_train, cap_val = train_test_split(img_name_vector,cap_vector, test_size=0.2, random_state=0)定义训练参数:
BATCH_SIZE = 64
BUFFER_SIZE = 1000
embedding_dim = 256
units = 512
vocab_size = len(tokenizer.word_index) + 1
num_steps = len(img_name_train) // BATCH_SIZE
features_shape = 512
attention_features_shape = 49


def map_func(img_name, cap):
 img_tensor = np.load(img_name.decode('utf-8')+'.npy')
 return img_tensor, cap
dataset = tf.data.Dataset.from_tensor_slices((img_name_train, cap_train))

# Use map to load the numpy files in parallel
dataset = dataset.map(lambda item1, item2: tf.numpy_function(
        map_func, [item1, item2], [tf.float32, tf.int32]),
         num_parallel_calls=tf.data.experimental.AUTOTUNE)

dataset = dataset.shuffle(BUFFER_SIZE).batch(BATCH_SIZE)
dataset = dataset.prefetch(buffer_size=tf.data.experimental.AUTOTUNE)
接下来,让我们重点定义编码器-解码器的体系结构。 本文定义的架构类似于论文“ Show and Tell:一种神经图像字幕生成器”中描述的架构:-
VGG-16编码器定义如下:
class VGG16_Encoder(tf.keras.Model):
   # This encoder passes the features through a Fully connected layer
   def __init__(self, embedding_dim):
       super(VGG16_Encoder, self).__init__()
       # shape after fc == (batch_size, 49, embedding_dim)
       self.fc = tf.keras.layers.Dense(embedding_dim)
       self.dropout = tf.keras.layers.Dropout(0.5, noise_shape=None, seed=None)

   def call(self, x):
       #x= self.dropout(x)
       x = self.fc(x)
       x = tf.nn.relu(x)
       return x
我们基于GPU / CPU功能定义RNN
def rnn_type(units):
   if tf.test.is_gpu_available():
       return tf.compat.v1.keras.layers.CuDNNLSTM(units,
                                       return_sequences=True,
                                       return_state=True,
                                       recurrent_initializer='glorot_uniform')
   else:
       return tf.keras.layers.GRU(units,
                                  return_sequences=True,
                                  return_state=True,
                                  recurrent_activation='sigmoid',
                                  recurrent_initializer='glorot_uniform')
接下来,使用Bahdanau注意定义RNN解码器:
'''The encoder output(i.e. 'features'), hidden state(initialized to 0)(i.e. 'hidden') and
the decoder input (which is the start token)(i.e. 'x') is passed to the decoder.'''

class Rnn_Local_Decoder(tf.keras.Model):
 def __init__(self, embedding_dim, units, vocab_size):
   super(Rnn_Local_Decoder, self).__init__()
   self.units = units
   self.embedding = tf.keras.layers.Embedding(vocab_size, embedding_dim)
   self.gru = tf.keras.layers.GRU(self.units,
                                  return_sequences=True,
                                  return_state=True,
                                  recurrent_initializer='glorot_uniform')

   self.fc1 = tf.keras.layers.Dense(self.units)

   self.dropout = tf.keras.layers.Dropout(0.5, noise_shape=None, seed=None)
   self.batchnormalization = tf.keras.layers.BatchNormalization(axis=-1, momentum=0.99, epsilon=0.001, center=True, scale=True, beta_initializer='zeros', gamma_initializer='ones', moving_mean_initializer='zeros', moving_variance_initializer='ones', beta_regularizer=None, gamma_regularizer=None, beta_constraint=None, gamma_constraint=None)

   self.fc2 = tf.keras.layers.Dense(vocab_size)

   # Implementing Attention Mechanism
   self.Uattn = tf.keras.layers.Dense(units)
   self.Wattn = tf.keras.layers.Dense(units)
   self.Vattn = tf.keras.layers.Dense(1)

 def call(self, x, features, hidden):
   # features shape ==> (64,49,256) ==> Output from ENCODER
   # hidden shape == (batch_size, hidden_size) ==>(64,512)
   # hidden_with_time_axis shape == (batch_size, 1, hidden_size) ==> (64,1,512)

   hidden_with_time_axis = tf.expand_dims(hidden, 1)

   # score shape == (64, 49, 1)
   # Attention Function
   '''e(ij) = f(s(t-1),h(j))'''
   ''' e(ij) = Vattn(T)*tanh(Uattn * h(j) + Wattn * s(t))'''

   score = self.Vattn(tf.nn.tanh(self.Uattn(features) + self.Wattn(hidden_with_time_axis)))

   # self.Uattn(features) : (64,49,512)
   # self.Wattn(hidden_with_time_axis) : (64,1,512)
   # tf.nn.tanh(self.Uattn(features) + self.Wattn(hidden_with_time_axis)) : (64,49,512)
   # self.Vattn(tf.nn.tanh(self.Uattn(features) + self.Wattn(hidden_with_time_axis))) : (64,49,1) ==> score

   # you get 1 at the last axis because you are applying score to self.Vattn
   # Then find Probability using Softmax
   '''attention_weights(alpha(ij)) = softmax(e(ij))'''

   attention_weights = tf.nn.softmax(score, axis=1)

   # attention_weights shape == (64, 49, 1)
   # Give weights to the different pixels in the image
   ''' C(t) = Summation(j=1 to T) (attention_weights * VGG-16 features) '''

   context_vector = attention_weights * features
   context_vector = tf.reduce_sum(context_vector, axis=1)

   # Context Vector(64,256) = AttentionWeights(64,49,1) * features(64,49,256)
   # context_vector shape after sum == (64, 256)
   # x shape after passing through embedding == (64, 1, 256)

   x = self.embedding(x)
   # x shape after concatenation == (64, 1,  512)

   x = tf.concat([tf.expand_dims(context_vector, 1), x], axis=-1)
   # passing the concatenated vector to the GRU

   output, state = self.gru(x)
   # shape == (batch_size, max_length, hidden_size)

   x = self.fc1(output)
   # x shape == (batch_size * max_length, hidden_size)

   x = tf.reshape(x, (-1, x.shape[2]))

   # Adding Dropout and BatchNorm Layers
   x= self.dropout(x)
   x= self.batchnormalization(x)

   # output shape == (64 * 512)
   x = self.fc2(x)

   # shape : (64 * 8329(vocab))
   return x, state, attention_weights

 def reset_state(self, batch_size):
   return tf.zeros((batch_size, self.units))


encoder = VGG16_Encoder(embedding_dim)
decoder = Rnn_Local_Decoder(embedding_dim, units, vocab_size)
接下来,我们定义损失函数和优化器:
optimizer = tf.keras.optimizers.Adam()
loss_object = tf.keras.losses.SparseCategoricalCrossentropy(
   from_logits=True, reduction='none')

def loss_function(real, pred):
 mask = tf.math.logical_not(tf.math.equal(real, 0))
 loss_ = loss_object(real, pred)
 mask = tf.cast(mask, dtype=loss_.dtype)
 loss_ *= mask

 return tf.reduce_mean(loss_)
步骤4:-模型训练
接下来,让我们定义培训步骤。 我们使用一种称为教师强制的技术,该技术将目标单词作为下一个输入传递给解码器。 此技术有助于快速了解正确的序列或序列的正确统计属性。
loss_plot = []

@tf.function
def train_step(img_tensor, target):
 loss = 0
 # initializing the hidden state for each batch
 # because the captions are not related from image to image

 hidden = decoder.reset_state(batch_size=target.shape[0])
 dec_input = tf.expand_dims([tokenizer.word_index['']] * BATCH_SIZE, 1)

 with tf.GradientTape() as tape:
     features = encoder(img_tensor)
     for i in range(1, target.shape[1]):
         # passing the features through the decoder
         predictions, hidden, _ = decoder(dec_input, features, hidden)
         loss += loss_function(target[:, i], predictions)

         # using teacher forcing
         dec_input = tf.expand_dims(target[:, i], 1)

 total_loss = (loss / int(target.shape[1]))
 trainable_variables = encoder.trainable_variables + decoder.trainable_variables
 gradients = tape.gradient(loss, trainable_variables)
 optimizer.apply_gradients(zip(gradients, trainable_variables))

 return loss, total_loss
接下来,我们训练模型:
EPOCHS = 20
for epoch in range(start_epoch, EPOCHS):
   start = time.time()
   total_loss = 0

   for (batch, (img_tensor, target)) in enumerate(dataset):
       batch_loss, t_loss = train_step(img_tensor, target)
       total_loss += t_loss

       if batch % 100 == 0:
           print ('Epoch {} Batch {} Loss {:.4f}'.format(
             epoch + 1, batch, batch_loss.numpy() / int(target.shape[1])))
   # storing the epoch end loss value to plot later
   loss_plot.append(total_loss / num_steps)

   print ('Epoch {} Loss {:.6f}'.format(epoch + 1,
                                        total_loss/num_steps))

   print ('Time taken for 1 epoch {} sec\n'.format(time.time() - start))
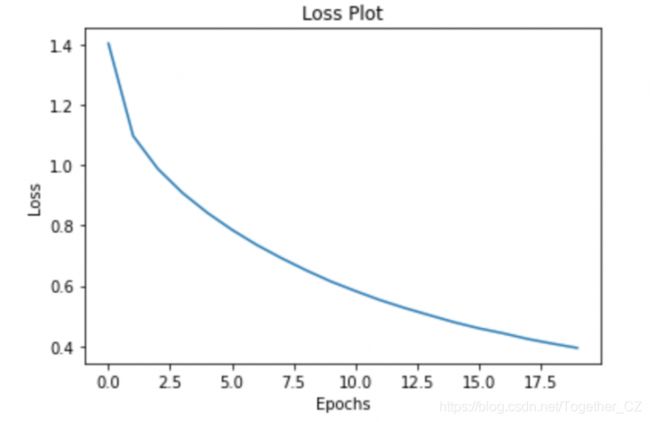
让我们绘制误差图:
plt.plot(loss_plot)
plt.xlabel('Epochs')
plt.ylabel('Loss')
plt.title('Loss Plot')
plt.show()
输出如下:
步骤5:-贪婪搜寻和BLEU评估
让我们定义定义字幕的贪婪方法:
def evaluate(image):
   attention_plot = np.zeros((max_length, attention_features_shape))

   hidden = decoder.reset_state(batch_size=1)
   temp_input = tf.expand_dims(load_image(image)[0], 0)
   img_tensor_val = image_features_extract_model(temp_input)
   img_tensor_val = tf.reshape(img_tensor_val, (img_tensor_val.shape[0], -1, img_tensor_val.shape[3])

   features = encoder(img_tensor_val)
   dec_input = tf.expand_dims([tokenizer.word_index['']], 0)
   result = []

   for i in range(max_length):
       predictions, hidden, attention_weights = decoder(dec_input, features, hidden)
       attention_plot[i] = tf.reshape(attention_weights, (-1, )).numpy()
       predicted_id = tf.argmax(predictions[0]).numpy()
       result.append(tokenizer.index_word[predicted_id])

       if tokenizer.index_word[predicted_id] == '':
           return result, attention_plot

       dec_input = tf.expand_dims([predicted_id], 0)
   attention_plot = attention_plot[:len(result), :]

   return result, attention_plot
另外,我们定义了一个函数来绘制生成的每个单词的注意力图,就像在简介中看到的那样
def plot_attention(image, result, attention_plot):
   temp_image = np.array(Image.open(image))
   fig = plt.figure(figsize=(10, 10))
   len_result = len(result)
   for l in range(len_result):
       temp_att = np.resize(attention_plot[l], (8, 8))
       ax = fig.add_subplot(len_result//2, len_result//2, l+1)
       ax.set_title(result[l])
       img = ax.imshow(temp_image)
       ax.imshow(temp_att, cmap='gray', alpha=0.6, extent=img.get_extent())

   plt.tight_layout()
   plt.show()
最后,让我们在文章开头为图片生成标题,看看注意力机制关注什么并生成
# captions on the validation set
rid = np.random.randint(0, len(img_name_val))
image = '/content/gdrive/My Drive/FLICKR8K/Flicker8k_Dataset/2319175397_3e586cfaf8.jpg'

# real_caption = ' '.join([tokenizer.index_word[i] for i in cap_val[rid] if i not in [0]])
result, attention_plot = evaluate(image)

# remove  and  from the real_caption
first = real_caption.split(' ', 1)[1]
real_caption = 'Two white dogs are playing in the snow'

#remove "" in result
for i in result:
   if i=="":
       result.remove(i)

for i in real_caption:
   if i=="":
       real_caption.remove(i)

#remove  from result
result_join = ' '.join(result)
result_final = result_join.rsplit(' ', 1)[0]

real_appn = []
real_appn.append(real_caption.split())
reference = real_appn
candidate = result

score = sentence_bleu(reference, candidate)
print(f"BELU score: {score*100}")

print ('Real Caption:', real_caption)
print ('Prediction Caption:', result_final)
plot_attention(image, result, attention_plot)
输出如下:
您可以看到我们能够生成与真实字幕相同的字幕。 让我们尝试一下测试集中的其他图像。
rid = np.random.randint(0, len(img_name_val))
image = img_name_val[rid]
start = time.time()
real_caption = ' '.join([tokenizer.index_word[i] for i in cap_val[rid] if i not in [0]])
result, attention_plot = evaluate(image)

first = real_caption.split(' ', 1)[1]
real_caption = first.rsplit(' ', 1)[0]

#remove "" in result
for i in result:
   if i=="":
       result.remove(i)

#remove  from result
result_join = ' '.join(result)
result_final = result_join.rsplit(' ', 1)[0]

real_appn = []
real_appn.append(real_caption.split())
reference = real_appn
candidate = result_final

print ('Real Caption:', real_caption)
print ('Prediction Caption:', result_final)

plot_attention(image, result, attention_plot)
print(f"time took to Predict: {round(time.time()-start)} sec")

Image.open(img_name_val[rid])
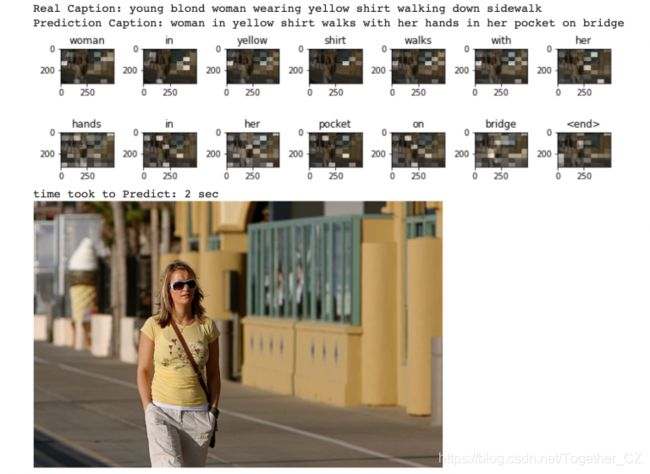
输出如下:
您可以看到,即使我们的字幕与真实字幕有很大不同,它仍然非常准确。 它能够识别出女人的黄色衬衫和她的手在口袋里。
让我们看看另一个:
rid = np.random.randint(0, len(img_name_val))
image = img_name_val[rid]

real_caption = ' '.join([tokenizer.index_word[i] for i in cap_val[rid] if i not in [0]])
result, attention_plot = evaluate(image)

# remove  and  from the real_caption
first = real_caption.split(' ', 1)[1]
real_caption = first.rsplit(' ', 1)[0]

#remove "" in result
for i in result:
   if i=="":
       result.remove(i)

for i in real_caption:
   if i=="":
       real_caption.remove(i)

#remove  from result
result_join = ' '.join(result)
result_final = result_join.rsplit(' ', 1)[0]

real_appn = []
real_appn.append(real_caption.split())
reference = real_appn
candidate = result

score = sentence_bleu(reference, candidate)
print(f"BELU score: {score*100}")

print ('Real Caption:', real_caption)
print ('Prediction Caption:', result_final)

plot_attention(image, result, attention_plot)
在这里,我们可以看到我们的字幕比真实的字幕之一更好地定义了图像。
在那里! 我们已经成功实现了用于生成图像标题的注意力机制。
下一步是什么?
近年来,注意力机制得到了高度利用,这仅仅是更多先进系统的开始。您可以实施以改善模型的事情:-利用较大的数据集,尤其是MS COCO数据集或比MS COCO大26倍的Stock3M数据集。实现不同的注意力机制,例如带有Visual Sentinel和的自适应注意力。语义注意实现基于Transformer的模型,该模型的性能应比LSTM好得多。为图像特征提取实现更好的体系结构,例如Inception,Xception和Efficient network。
尾注
这对注意力机制及其如何应用于深度学习应用程序非常有趣。在注意力机制和取得最新成果方面进行了大量研究。请务必尝试我的一些建议,以改善发电机的性能并与我分享您的结果!您觉得这篇文章对您有帮助吗?请在下面的评论部分中分享您的宝贵反馈。随时分享您完整的代码笔记本,这将对我们的社区成员有所帮助。
