MyBatisPlus 学习笔记
目录
- MyBatisPlus
-
- 零、声明
- 一、简介
-
- 1、特性
- 二、入门
-
- 1、创建并初始化数据库
-
- 1.1、创建数据库`mybatis_plus`
- 1.2、创建 `User` 表
- 1.3、插入数据
- 2、初始化工程
- 3、添加依赖
-
- 3.1、引入依赖
- 3.2、idea中安装lombok插件
- 4、配置
- 5、编写代码
- 6、测试
- 7、 配置日志
- 三、CRUD
-
- 1、insert
-
- 1.1、插入操作
- 1.2、主键策略
-
- 1.2.1、数据库自增长序列或字段
- 1.2.2、UUID
- 1.2.3、Redis生成ID
- 1.2.4、ID_WORKER
- 1.2.5、实现主键自增
- 2、update
-
- 2.1、根据Id更新操作
- 2.2、自动填充
- 2.3、乐观锁
- 3、select
-
- 3.1、根据id查询记录
- 3.2、通过多个id批量查询
- 3.3、简单的条件查询
- 3.4、分页
- 4、delete
-
- 4.1、根据id删除记录
- 4.2、批量删除
- 4.3、简单的条件查询删除
- 4.4、逻辑删除
- 四、MyBatisPlus条件构造器
-
- 1、wapper介绍
- 2、QueryWrapper
-
- 2.1、ge、gt、le、lt、isNull、isNotNull
- 2.2、eq、ne
- 2.3、between、notBetween
- 2.4、allEq
- 2.5、like、notLike、likeLeft、likeRight
- 2.6、in、notIn、inSql、notinSql、exists、notExists
- 2.7、orderBy、orderByDesc、orderByAsc
- 2.8、last
- 2.9、指定要查询的列
- 3、UpdateWrapper
-
-
- 3.1、or、and
- 3.2、嵌套or、嵌套and
- 3.3、set、setSql
-
MyBatisPlus
零、声明
此笔记参考尚硅谷视频教程码出来的,所有步骤均经过本人测试,有详细代码,图解,可供大家参考。
官方视频教程地址
一、简介
MyBatisPlus官网 官方文档
MyBatis-Plus(简称 MP)是一个 MyBatis 的增强工具,在 MyBatis 的基础上只做增强不做改变,为简化开发、提高效率而生。
1、特性
- 无侵入:只做增强不做改变,引入它不会对现有工程产生影响,如丝般顺滑
- 损耗小:启动即会自动注入基本 CURD,性能基本无损耗,直接面向对象操作
- 强大的 CRUD 操作:内置通用 Mapper、通用 Service,仅仅通过少量配置即可实现单表大部分 CRUD 操作,更有强大的条件构造器,满足各类使用需求
- 支持 Lambda 形式调用:通过 Lambda 表达式,方便的编写各类查询条件,无需再担心字段写错
- 支持主键自动生成:支持多达 4 种主键策略(内含分布式唯一 ID 生成器 - Sequence),可自由配置,完美解决主键问题
- 支持 ActiveRecord 模式:支持 ActiveRecord 形式调用,实体类只需继承 Model 类即可进行强大的 CRUD 操作
- 支持自定义全局通用操作:支持全局通用方法注入( Write once, use anywhere )
- 内置代码生成器:采用代码或者 Maven 插件可快速生成 Mapper 、 Model 、 Service 、 Controller 层代码,支持模板引擎,更有超多自定义配置等您来使用
- 内置分页插件:基于 MyBatis 物理分页,开发者无需关心具体操作,配置好插件之后,写分页等同于普通 List 查询
- 分页插件支持多种数据库:支持 MySQL、MariaDB、Oracle、DB2、H2、HSQL、SQLite、Postgre、SQLServer 等多种数据库
- 内置性能分析插件:可输出 Sql 语句以及其执行时间,建议开发测试时启用该功能,能快速揪出慢查询
- 内置全局拦截插件:提供全表 delete 、 update 操作智能分析阻断,也可自定义拦截规则,预防误操作
二、入门
1、创建并初始化数据库
1.1、创建数据库mybatis_plus
CREATE DATABASE mybatis_plus;
USE mybatis_plus;
1.2、创建 User 表
其表结构如下:
| id | name | age | |
|---|---|---|---|
| 1 | Jone | 18 | [email protected] |
| 2 | Jack | 20 | [email protected] |
| 3 | Tom | 28 | [email protected] |
| 4 | Sandy | 21 | [email protected] |
| 5 | Billie | 24 | [email protected] |
DROP TABLE IF EXISTS user;

CREATE TABLE user
(
	id BIGINT(20) NOT NULL COMMENT '主键ID',
	name VARCHAR(30) NULL DEFAULT NULL COMMENT '姓名',
	age INT(11) NULL DEFAULT NULL COMMENT '年龄',
	email VARCHAR(50) NULL DEFAULT NULL COMMENT '邮箱',
	PRIMARY KEY (id)
);
1.3、插入数据
DELETE FROM user;

INSERT INTO user (id, name, age, email) VALUES
(1, 'Jone', 18, '[email protected]'),
(2, 'Jack', 20, '[email protected]'),
(3, 'Tom', 28, '[email protected]'),
(4, 'Sandy', 21, '[email protected]'),
(5, 'Billie', 24, '[email protected]');
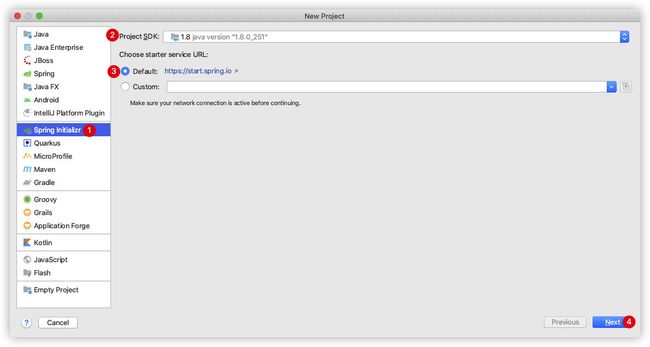
2、初始化工程
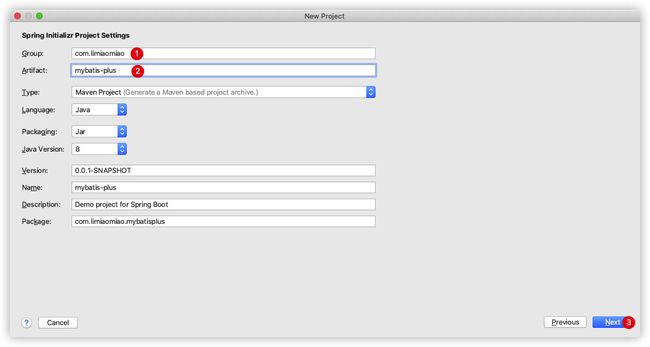
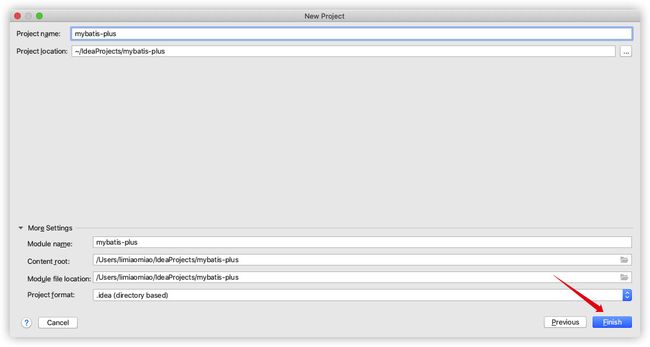
使用 Spring Initializr 快速初始化一个 Spring Boot 工程
Group:com.limiaomiao
Artifact:mybatis-plus
3、添加依赖
3.1、引入依赖
<dependency>
  <groupId>com.baomidougroupId>
  <artifactId>mybatis-plus-boot-starterartifactId>
  <version>3.3.1.tmpversion>
dependency>

<dependency>
  <groupId>mysqlgroupId>
  <artifactId>mysql-connector-javaartifactId>
dependency>

<dependency>
  <groupId>org.projectlombokgroupId>
  <artifactId>lombokartifactId>
dependency>
**注意:**引入 MyBatis-Plus 之后请不要再次引入 MyBatis 以及 MyBatis-Spring,以避免因版本差异导致的问题。
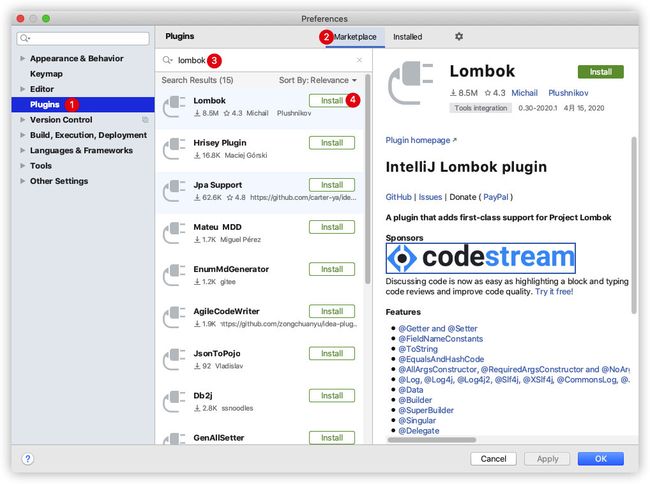
3.2、idea中安装lombok插件
4、配置
在 application.properties 配置文件中添加 MySQL 数据库的相关配置
spring.datasource.driver-class-name=com.mysql.cj.jdbc.Driver
spring.datasource.url=jdbc:mysql://localhost:3306/mybatis_plus?useSSL=false&useUnicode=true&characterEncoding=UTF-8&serverTimezone=Asia/Shanghai&allowPublicKeyRetrieval=true
spring.datasource.username=root
spring.datasource.password=88888888
5、编写代码
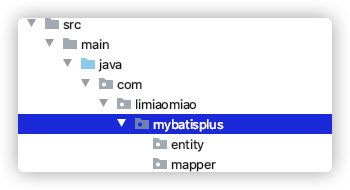
- 创建包entity和mapper
- 创建实体类User
@Data
public class User {

    private Long id;
    private String name;
    private Integer age;
    private String email;
}
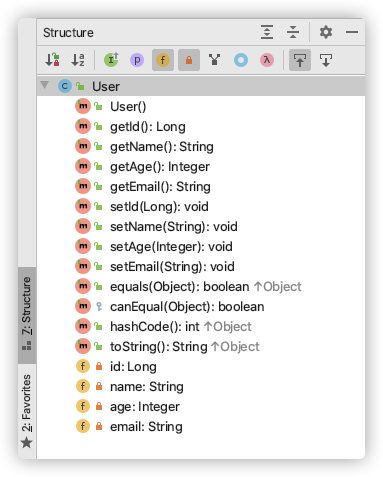
- @Data的效果
- 创建UserMapper接口
@Repository
public interface UserMapper extends BaseMapper<User> {

}
- 主类
在 Spring Boot 启动类中添加 @MapperScan 注解,扫描 Mapper 文件夹
**注意:**扫描的包名根据实际情况修改
@SpringBootApplication
@MapperScan("com.limiaomiao.mybatisplus.mapper")
public class MybatisPlusApplication {


    public static void main(String[] args) {

        SpringApplication.run(MybatisPlusApplication.class, args);
    }

}
6、测试
@SpringBootTest
class MybatisPlusApplicationTests {


    @Autowired
    private UserMapper userMapper;

    // 查询user表所有数据
    @Test
    void findAll() {

        List<User> users = userMapper.selectList(null);
        System.out.println(users);
    }

}
7、 配置日志
在application.properties文件中添加
#mybatis日志
mybatis-plus.configuration.log-impl=org.apache.ibatis.logging.stdout.StdOutImpl
三、CRUD
1、insert
1.1、插入操作
@SpringBootTest
class MybatisPlusApplicationTests {


    @Autowired
    private UserMapper userMapper;


    // 添加操作
    @Test
    public void addUser() {

        User user = new User();
        user.setName("limiaomiao");
        user.setAge(19);
        user.setEmail("[email protected]");
        int insert = userMapper.insert(user);
        System.out.println("insert" + insert);
    }

}
- 数据库中不需要设置主键,mybatis-plus生成的id值长度为19位
1.2、主键策略
1.2.1、数据库自增长序列或字段
最常见的方式。利用数据库,全数据库唯一。
优点:
1)简单,代码方便,性能可以接受。
2)数字ID天然排序,对分页或者需要排序的结果很有帮助。
1.2.2、UUID
优点:
1)简单,代码方便。
2)生成ID性能非常好,基本不会有性能问题。
3)全球唯一,在遇见数据迁移,系统数据合并,或者数据库变更等情况下,可以从容应对
缺点:
1)没有排序,无法保证趋势递增。
2)UUID往往是使用字符串存储,查询的效率比较低
3)存储空间比较大,如果是海量数据库,就需要考虑存储量的问题
4)传输数据量大
5)不可读
1.2.3、Redis生成ID
当使用数据库来生成ID性能不够要求的时候,我们可以尝试使用Redis来生成ID。这主要依赖于Redis是单线程的,所以也可以用生成全局唯一的ID。可以用Redis的原子操作 INCR和INCRBY来实现。
可以使用Redis集群来获取更高的吞吐量。假如一个集群中有5台Redis。可以初始化每台Redis的值分别是1,2,3,4,5,然后步长都是5。各个Redis生成的ID为:
A:1,6,11,16,21
B:2,7,12,17,22
C:3,8,13,18,23
D:4,9,14,19,24
E:5,10,15,20,25
原文地址—分布式系统唯一ID生成方案汇总
1.2.4、ID_WORKER
MyBatis-Plus默认的主键策略是:ID_WORKER 全局唯一ID
1.2.5、实现主键自增
要想主键自增需要配置如下主键策略
- 需要在创建数据表的时候设置主键自增
- 实体字段中配置 @TableId(type = IdType.AUTO)
@TableId(type = IdType.AUTO)
private Long id;
若mysql中未设置自增,mybatis中设置 @TableId(value = “id”, type = IdType.AUTO)
报错:java.sql.SQLException: Field ‘id’ doesn’t have a default value
- IdType源码
public enum IdType {

    AUTO(0),							// 自动增长
    NONE(1),							// 没有策略,需要自己设置值
    INPUT(2),							// 自己设置值
    ASSIGN_ID(3),
    ASSIGN_UUID(4),
    /** @deprecated */
    @Deprecated
    ID_WORKER(3),					// mybatis-plus提供,生成一个19位的值,数字类型使用
    /** @deprecated */
    @Deprecated
    ID_WORKER_STR(3),			// mybatis-plus提供,生成一个19位的值,字符串类型使用
    /** @deprecated */
    @Deprecated
    UUID(4);							// 随机唯一值
}
- 要想影响所有实体的配置,可以设置全局主键配置
#全局设置主键生成策略
mybatis-plus.global-config.db-config.id-type=auto
2、update
2.1、根据Id更新操作
// 修改操作
@Test
public void updateUser(){

    User user = new User();
    user.setId(2L);
    user.setAge(100);
    int row = userMapper.updateById(user);
    System.out.println(row);
}
**注意:**update时生成的sql自动是动态sql,而且语句中只有要修改的值
2.2、自动填充
项目中经常会遇到一些数据,每次都使用相同的方式填充,例如记录的创建时间,更新时间等。
我们可以使用MyBatis Plus的自动填充功能,完成这些字段的赋值工作:
(1)数据库表中添加自动填充字段
在User表中添加datetime类型的新的字段 create_time、update_time
ALTER TABLE user ADD COLUMN create_time datetime;
ALTER TABLE user ADD COLUMN update_time datetime;
(2)实体添加属性和注解
@TableField(fill = FieldFill.INSERT)
private Date createTime;

//@TableField(fill = FieldFill.UPDATE)
@TableField(fill = FieldFill.INSERT_UPDATE)
private Date updateTime;
(3)实现元对象处理器接口
注意:不要忘记添加 @Component 注解
@Component
public class MyMetaObjectHandler implements MetaObjectHandler {

    // 使用mybatis-plus实现添加操作,这个方法会执行
    @Override
    public void insertFill(MetaObject metaObject) {

        this.setFieldValByName("createTime",new Date(),metaObject);
        this.setFieldValByName("updateTime",new Date(),metaObject);
    }

    // 使用mybatis-plus实现修改操作,这个方法会执行
    @Override
    public void updateFill(MetaObject metaObject) {

        this.setFieldValByName("updateTime",new Date(),metaObject);
    }
}
(4) 测试
// 添加操作
@Test
public void addUser() {

    User user = new User();
    user.setName("zhangsan");
    user.setAge(20);
    user.setEmail("[email protected]");
    int insert = userMapper.insert(user);
    System.out.println("insert" + insert);
}
// 修改操作
@Test
public void updateUser(){

    User user = new User();
    user.setId(1263721644648628226L);
    user.setAge(100);
    int row = userMapper.updateById(user);
    System.out.println(row);
}
2.3、乐观锁
**主要适用场景:**当要更新一条记录的时候,希望这条记录没有被别人更新,也就是说实现线程安全的数据更新。
多个人同时修改同一条记录,最后提交的数据会将之前提交的数据覆盖。
乐观锁实现方式:
- 取出记录时,获取当前version
- 更新时,带上这个version
- 执行更新时, set version = newVersion where version = oldVersion
- 如果version不对,就更新失败
(1)数据库中添加version字段
ALTER TABLE `user` ADD COLUMN `version` INT(11);
(2)实体类添加version字段并添加 @Version 注解
@Version
@TableField(fill = FieldFill.INSERT)
private Integer version;	// 版本号
(3)元对象处理器接口添加version的insert默认值
@Override
public void insertFill(MetaObject metaObject) {

    ......
    this.setFieldValByName("version", 1, metaObject);
}
(4)在 MybatisPlusConfig 中注册 Bean
- 创建配置类MybatisPlusConfig
@Configuration
@MapperScan("com.limiaomiao.mybatisplus.mapper")  // 把springboot启动类的配置也拿过来
public class MybatisPlusConfig {


    /**
     * 乐观锁插件
     */
    @Bean
    public OptimisticLockerInterceptor optimisticLockerInterceptor() {

        return new OptimisticLockerInterceptor();
    }
}
(5) 测试
// 添加操作
@Test
public void addUser() {

    User user = new User();
    user.setName("lisi");
    user.setAge(20);
    user.setEmail("[email protected]");
    int insert = userMapper.insert(user);
    System.out.println("insert:" + insert);
}
// 测试乐观锁插件 成功的情况
@Test
public void testOptimisticLocker() {

		// 需要先查再改
    // 查询
    User user = userMapper.selectById(1L);
    // 修改数据
    user.setName("Helen Yao");
    user.setEmail("[email protected]");
    // 执行更新
    userMapper.updateById(user);
}
// 测试乐观锁插件 成功的情况
@Test
public void testOptimisticLockerFail() {


    // 查询
    User user = userMapper.selectById(1263733915844169729L);
    // 修改数据
    user.setName("李四");
    // 模拟取出数据后,数据库中version实际数据比取出的值大,即已被其它线程修改并更新了version
    user.setVersion(user.getVersion() - 1);
    // 执行更新
    userMapper.updateById(user);
}
3、select
3.1、根据id查询记录
@Test
public void testSelectById(){

    User user = userMapper.selectById(1L);
    System.out.println(user);
}
3.2、通过多个id批量查询
// 多个id批量查询
@Test
public void testSelectBatchIds(){

    List<User> users = userMapper.selectBatchIds(Arrays.asList(1L, 2L, 3L));
}
3.3、简单的条件查询
通过map封装查询条件
注意:map中的key对应的是数据库中的列名。例如数据库user_id,实体类是userId,这时map的key需要填写user_id
@Test
public void testSelectByMap(){


    HashMap<String, Object> map = new HashMap<>();
    map.put("name", "limiaomiao");
    map.put("age", 19);
    List<User> users = userMapper.selectByMap(map);

    users.forEach(System.out::println);
}
3.4、分页
MyBatis Plus自带分页插件,只要简单的配置即可实现分页功能
(1)配置插件
/**
 * 分页插件
 */
@Bean
public PaginationInterceptor paginationInterceptor() {

    return new PaginationInterceptor();
}
(2) 测试selectPage分页
@Test
public void testSelectPage() {

    // 创建page对象,传入两个参数(当前页和每页显示记录数)
    Page<User> page = new Page<>(1, 3);
    // 调用mybatis-plus分页查询方法
    // 调用分页查询过程中,mybatis-plus底层会把分页所有数据封装到page对象里面
    userMapper.selectPage(page,null);
    // 通过page对象获取分页数据
    System.out.println(page.getCurrent());  // 当前页
    System.out.println(page.getRecords());  // 每页数据list集合
    System.out.println(page.getSize());     // 每页显示记录数
    System.out.println(page.getTotal());    // 总记录数
    System.out.println(page.getPages());    // 总页数
    System.out.println(page.hasNext());     // 是否有下一页
    System.out.println(page.hasPrevious()); // 是否有下上一页
}
4、delete
4.1、根据id删除记录
// 根据id删除
@Test
public void testDeleteById(){

    int result = userMapper.deleteById(1L);
    System.out.println(result);
}
4.2、批量删除
// 根据id批量删除
@Test
public void testDeleteBatchIds() {


    int result = userMapper.deleteBatchIds(Arrays.asList(2L,3L));
    System.out.println(result);
}
4.3、简单的条件查询删除
// 简单的条件查询删除
@Test
public void testDeleteByMap() {

    HashMap<String, Object> map = new HashMap<>();
    map.put("name", "李四");
    map.put("age", 20);
    int result = userMapper.deleteByMap(map);
    System.out.println(result);
}
4.4、逻辑删除
- 物理删除:真实删除,将对应数据从数据库中删除,之后查询不到此条被删除数据
- 逻辑删除:假删除,将对应数据中代表是否被删除字段状态修改为“被删除状态”,之后在数据库中仍旧能看到此条数据记录
(1)数据库中添加 deleted字段
ALTER TABLE `user` ADD COLUMN `deleted` boolean;
(2)实体类添加deleted 字段并加上 @TableLogic 注解 和 @TableField(fill = FieldFill.INSERT) 注解
@TableLogic
@TableField(fill = FieldFill.INSERT)
private Boolean deleted;
(3)元对象处理器接口添加deleted的insert默认值
@Override
public void insertFill(MetaObject metaObject) {

    ......
    this.setFieldValByName("deleted", 0, metaObject);
}
注意:也可以在数据库中设置默认值,但是两种方式不能同时使用
(4)application.properties 加入配置
mybatis-plus.global-config.db-config.logic-delete-value=1
mybatis-plus.global-config.db-config.logic-not-delete-value=0
此为默认值,如果你的默认值和mp默认的一样,该配置可无
(5)测试逻辑删除
// 添加操作
@Test
public void addUser() {

    User user = new User();
    user.setName("王五");
    user.setAge(20);
    user.setEmail("[email protected]");
    int insert = userMapper.insert(user);
    System.out.println("insert:" + insert);
}
// 根据id删除
@Test
public void testDeleteById(){

    int result = userMapper.deleteById(1263758436491907074L);
    System.out.println(result);
}
- 测试后发现,数据并没有被删除,deleted字段的值由0变成了1
- 测试后分析打印的sql语句,是一条update
- **注意:**被删除数据的deleted 字段的值必须是 0,才能被选取出来执行逻辑删除的操作
(7)测试逻辑删除后的查询
MyBatis Plus中查询操作也会自动添加逻辑删除字段的判断
// 查询user表所有数据,如果有逻辑删除,只会查出未被删除的数据
@Test
void findAll() {

    List<User> users = userMapper.selectList(null);
    System.out.println(users);
}
测试发现打印的sql语句,包含 WHERE deleted=0
四、MyBatisPlus条件构造器
1、wapper介绍
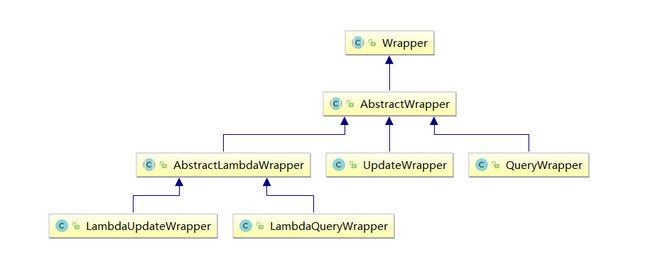
Wrapper : 条件构造抽象类,最顶端父类
-
AbstractWrapper : 用于查询条件封装,生成 sql 的 where 条件
-
QueryWrapper : Entity 对象封装操作类,不是用lambda语法
-
UpdateWrapper : Update 条件封装,用于Entity对象更新操作
-
AbstractLambdaWrapper : Lambda 语法使用 Wrapper统一处理解析 lambda 获取 column。
-
LambdaQueryWrapper :看名称也能明白就是用于Lambda语法使用的查询Wrapper
-
LambdaUpdateWrapper : Lambda 更新封装Wrapper
2、QueryWrapper
**注意:**以下条件构造器的方法入参中的 column均表示数据库字段
2.1、ge、gt、le、lt、isNull、isNotNull
@Test
public void testSelectQuery(){

    // 创建QueryWrapper对象
    QueryWrapper queryWrapper = new QueryWrapper();
    // 通过QueryWrapper设置条件
    // ge 大于等于、gt 大于、le 小于等于、lt 小于、isNull 为空、isNotNull 不为空
    queryWrapper.ge("age", 12);
    List list = userMapper.selectList(queryWrapper);
    list.forEach(System.out::println);
}
2.2、eq、ne
**注意:**seletOne返回的是一条实体记录,当出现多条时会报错
@Test
public void testSelectQuery(){

    // 创建QueryWrapper对象
    QueryWrapper queryWrapper = new QueryWrapper();
    // 通过QueryWrapper设置条件
    queryWrapper.eq("name", "limiaomiao");
    User user = userMapper.selectOne(queryWrapper);
    System.out.println(user);
}
@Test
public void testSelectQuery() {

    // 创建QueryWrapper对象
    QueryWrapper queryWrapper = new QueryWrapper();
    // 通过QueryWrapper设置条件
    // eq 等于、ne 不等于
    queryWrapper.ne("name", "limiaomiao");
    List list = userMapper.selectList(queryWrapper);
    list.forEach(System.out::println);
}
2.3、between、notBetween
注意:包含大小边界
@Test
public void testSelectQuery() {

    // 创建QueryWrapper对象
    QueryWrapper queryWrapper = new QueryWrapper();
    // 通过QueryWrapper设置条件
    queryWrapper.between("age", 20, 30);
    Integer count = userMapper.selectCount(queryWrapper);
    System.out.println(count);
}
2.4、allEq
@Test
public void testSelectQuery() {

    // 创建QueryWrapper对象
    QueryWrapper queryWrapper = new QueryWrapper();
    // 通过QueryWrapper设置条件
    Map<String, Object> map = new HashMap<>();
    map.put("id", 1263677952940388354L);
    map.put("name", "limiaomiao");
    map.put("age", 19);
    queryWrapper.allEq(map);
    List<User> users = userMapper.selectList(queryWrapper);
    users.forEach(System.out::println);
}
2.5、like、notLike、likeLeft、likeRight
selectMaps返回Map集合列表
@Test
public void testSelectQuery() {

    // 创建QueryWrapper对象
    QueryWrapper queryWrapper = new QueryWrapper();
    // 通过QueryWrapper设置条件
    queryWrapper.notLike("name", "e");
    List<Map<String, Object>> maps = userMapper.selectMaps(queryWrapper);//返回值是Map列表
    maps.forEach(System.out::println);
}
2.6、in、notIn、inSql、notinSql、exists、notExists
in、notIn:
- notIn(“age”,{1,2,3})—>age not in (1,2,3)
- notIn(“age”, 1, 2, 3)—>age not in (1,2,3)
inSql、notinSql:可以实现子查询
- 例:
inSql("age", "1,2,3,4,5,6")—>age in (1,2,3,4,5,6) - 例:
inSql("id", "select id from table where id < 3")—>id in (select id from table where id < 3)
@Test
public void testSelectQuery() {

    // 创建QueryWrapper对象
    QueryWrapper queryWrapper = new QueryWrapper();
    // 通过QueryWrapper设置条件
    queryWrapper.inSql("id", "select id from user where id < 5");
    List<Object> objects = userMapper.selectObjs(queryWrapper);//返回值是Object列表
    objects.forEach(System.out::println);
}
2.7、orderBy、orderByDesc、orderByAsc
@Test
public void testSelectQuery() {

    // 创建QueryWrapper对象
    QueryWrapper queryWrapper = new QueryWrapper();
    // 通过QueryWrapper设置条件
    queryWrapper.orderByDesc("id");
    List<User> users = userMapper.selectList(queryWrapper);
    users.forEach(System.out::println);
}
2.8、last
直接拼接到 sql 的最后
**注意:**只能调用一次,多次调用以最后一次为准,有sql注入的风险,请谨慎使用
@Test
public void testSelectQuery() {

    // 创建QueryWrapper对象
    QueryWrapper queryWrapper = new QueryWrapper();
    // 通过QueryWrapper设置条件
    queryWrapper.last("limit 1");
    List<User> users = userMapper.selectList(queryWrapper);
    users.forEach(System.out::println);
}
2.9、指定要查询的列
@Test
public void testSelectQuery() {

    // 创建QueryWrapper对象
    QueryWrapper queryWrapper = new QueryWrapper();
    // 通过QueryWrapper设置条件
    queryWrapper.select("id", "name", "age");
    List<User> users = userMapper.selectList(queryWrapper);
    users.forEach(System.out::println);
}
3、UpdateWrapper
3.1、or、and
不调用or则默认为使用 and连
@Test
public void testUpdateWrapper() {

    // 创建QueryWrapper对象
    UpdateWrapper<User> userUpdateWrapper = new UpdateWrapper<>();
    // 修改值
    User user = new User();
    user.setAge(99);
    user.setName("Andy");
    // 修改条件
    userUpdateWrapper
            .like("name", "e")
            .or()
            .between("age", 20, 30);
    int result = userMapper.update(user, userUpdateWrapper);
    System.out.println(result);
}
3.2、嵌套or、嵌套and
这里使用了lambda表达式,or中的表达式最后翻译成sql时会被加上圆括号
@Test
public void testUpdateWrapper() {

    // 创建QueryWrapper对象
    UpdateWrapper<User> userUpdateWrapper = new UpdateWrapper<>();
    // 修改值
    User user = new User();
    user.setAge(99);
    user.setName("Andy");
    // 修改条件
    userUpdateWrapper
            .like("name", "h")
            .or(i -> i.eq("name", "李白").ne("age", 20));
    int result = userMapper.update(user, userUpdateWrapper);
    System.out.println(result);
}
3.3、set、setSql
最终的sql会合并 user.setAge(),以及 userUpdateWrapper.set() 和 setSql() 中 的字段
@Test
public void testUpdateWrapper() {

    // 创建QueryWrapper对象
    UpdateWrapper<User> userUpdateWrapper = new UpdateWrapper<>();
    // 修改值
    User user = new User();
    user.setAge(99);
    user.setName("Andy");
    // 修改条件
    userUpdateWrapper
            .like("name", "h")
            .set("name", "老李头")							// 除了可以查询还可以使用set设置修改的字段
            .setSql(" email = '[email protected]'");	// 可以有子查询
    int result = userMapper.update(user, userUpdateWrapper);
    System.out.println(result);
}
