Spring Security Oauth2 SSO单点登录配置及原理深度剖析
单点登录(SingleSignOn,SSO),就是通过用户的一次性鉴别登录。当用户在身份认证服务器上登录一次以后,即可获得访问单点登录系统中其他关联系统和应用软件的权限,同时这种实现是不需要管理员对用户的登录状态或其他信息进行修改的,这意味着在多个应用系统中,用户只需一次登录就可以访问所有相互信任的应用系统。
随着企业各系统越来越多,如办公自动化(OA)系统,财务管理系统,档案管理系统,信息查询系统等,登录问题就变得愈发重要。要记录那么多的用户名和密码,实在不是一件容易的事儿。而为了便于记忆,很多人都在不同的站点使用相同的用户名和密码,虽然这样可以减少负担,但是同时也降低了安全性,而且使用不同的站点同样要进行多次登录。基于以上原因,为用户提供一个畅通的登录通道变得十分重要。
单点登录(SingleSign-On,SSO)是一种帮助用户快捷访问网络中多个站点的安全通信技术。单点登录系统基于一种安全的通信协议,该协议通过多个系统之间的用户身份信息的交换来实现单点登录。使用单点登录系统时,用户只需要登录一次,就可以访问多个系统,不需要记忆多个口令密码。单点登录使用户可以快速访问网络,从而提高工作效率,同时也能帮助提高系统的安全性。
OAUTH协议为用户资源的授权提供了一个安全的、开放而又简易的标准。与以往的授权方式不同之处是OAUTH的授权不会使第三方触及到用户的帐号信息(如用户名与密码),即第三方无需使用用户的用户名与密码就可以申请获得该用户资源的授权,因此OAUTH是安全的。OAuth是Open Authorization的简写。
虽然OAuth2一开始是用来允许用户授权第三方应用访问其资源的一种协议,并不是用来做单点登录的,但是我们可以用其特性,来变相的实现单点登录,其中就要用到其授权码模式(authorization code),并且,token生成使用JWT。
下面我们建立一套工程,包含授权平台、OA-综合办公平台、CRM-移动营销平台,来模拟单点登录过程,阐述其配置进行,并针对其原理,进行深度剖析。
授权平台
pom
最终的pom依赖如下:
4.0.0
spring-security-oauth2-sso-sample
org.xbdframework.sample
1.0.0-SNAPSHOT
org.xbdframework.sample
sso-auth-server
0.0.1-SNAPSHOT
sso-auth-server
Demo project for Spring Boot
org.springframework.boot
spring-boot-starter-thymeleaf
org.springframework.boot
spring-boot-starter-web
org.springframework.boot
spring-boot-starter-security
org.springframework.security.oauth.boot
spring-security-oauth2-autoconfigure
org.springframework.boot
spring-boot-starter-test
test
org.springframework.boot
spring-boot-maven-plugin
请注意,spring-security-oauth2-autoconfigure依赖必不可少,这是SpringBoot工程,而不是SpringCloud工程。SpringCloud的话,引入oauth2 starter即可。
EnableAuthorizationServer
授权服务器配置如下:
package org.xbdframework.sample.sso.authserver.confg;
import org.springframework.beans.factory.annotation.Autowired;
import org.springframework.context.annotation.Bean;
import org.springframework.context.annotation.Configuration;
import org.springframework.security.crypto.password.PasswordEncoder;
import org.springframework.security.oauth2.config.annotation.builders.InMemoryClientDetailsServiceBuilder;
import org.springframework.security.oauth2.config.annotation.configurers.ClientDetailsServiceConfigurer;
import org.springframework.security.oauth2.config.annotation.web.configuration.AuthorizationServerConfigurerAdapter;
import org.springframework.security.oauth2.config.annotation.web.configuration.EnableAuthorizationServer;
import org.springframework.security.oauth2.config.annotation.web.configurers.AuthorizationServerEndpointsConfigurer;
import org.springframework.security.oauth2.config.annotation.web.configurers.AuthorizationServerSecurityConfigurer;
import org.springframework.security.oauth2.provider.ClientDetailsService;
import org.springframework.security.oauth2.provider.token.store.JwtAccessTokenConverter;
import org.springframework.security.oauth2.provider.token.store.JwtTokenStore;
@EnableAuthorizationServer
@Configuration
public class AuthorizationServerConfiguration extends AuthorizationServerConfigurerAdapter {
@Autowired
private PasswordEncoder passwordEncoder;
@Override
public void configure(AuthorizationServerSecurityConfigurer security) throws Exception {
security.allowFormAuthenticationForClients()
.tokenKeyAccess("isAuthenticated()");
}
@Override
public void configure(ClientDetailsServiceConfigurer clients) throws Exception {
clients.withClientDetails(a1());
}
@Bean
public ClientDetailsService a1() throws Exception {
return new InMemoryClientDetailsServiceBuilder()
// client oa application
.withClient("oa")
.secret(passwordEncoder.encode("oa_secret"))
.scopes("all")
.authorizedGrantTypes("authorization_code", "refresh_token")
.redirectUris("http://localhost:8080/oa/login", "http://www.baidu.com")
.accessTokenValiditySeconds(7200)
.autoApprove(true)
.and()
// client crm application
.withClient("crm")
.secret(passwordEncoder.encode("crm_secret"))
.scopes("all")
.authorizedGrantTypes("authorization_code", "refresh_token")
.redirectUris("http://localhost:8090/crm/login")
.accessTokenValiditySeconds(7200)
.autoApprove(true)
.and()
.build();
}
@Override
public void configure(AuthorizationServerEndpointsConfigurer endpoints) throws Exception {
endpoints.accessTokenConverter(jwtAccessTokenConverter())
.tokenStore(jwtTokenStore());
}
@Bean
public JwtTokenStore jwtTokenStore() {
return new JwtTokenStore(jwtAccessTokenConverter());
}
@Bean
public JwtAccessTokenConverter jwtAccessTokenConverter() {
JwtAccessTokenConverter jwtAccessTokenConverter = new JwtAccessTokenConverter();
jwtAccessTokenConverter.setSigningKey("123456");
return jwtAccessTokenConverter;
}
}
WebSecurityConfiguration
Spring Security 配置如下:
package org.xbdframework.sample.sso.authserver.confg;
import org.springframework.context.annotation.Bean;
import org.springframework.context.annotation.Configuration;
import org.springframework.security.authentication.AuthenticationManager;
import org.springframework.security.config.annotation.authentication.builders.AuthenticationManagerBuilder;
import org.springframework.security.config.annotation.web.builders.HttpSecurity;
import org.springframework.security.config.annotation.web.builders.WebSecurity;
import org.springframework.security.config.annotation.web.configuration.WebSecurityConfigurerAdapter;
import org.springframework.security.core.userdetails.User;
import org.springframework.security.core.userdetails.UserDetails;
import org.springframework.security.core.userdetails.UserDetailsService;
import org.springframework.security.crypto.bcrypt.BCryptPasswordEncoder;
import org.springframework.security.crypto.password.PasswordEncoder;
import org.springframework.security.provisioning.InMemoryUserDetailsManager;
import java.util.ArrayList;
import java.util.Collection;
import java.util.List;
@Configuration
public class WebSecurityConfiguration extends WebSecurityConfigurerAdapter {
@Override
protected void configure(AuthenticationManagerBuilder auth) throws Exception {
auth.userDetailsService(userDetailsServiceBean()).passwordEncoder(passwordEncoder());
}
@Override
public void configure(WebSecurity web) throws Exception {
web.ignoring().antMatchers("/assets/**", "/css/**", "/images/**");
}
@Override
protected void configure(HttpSecurity http) throws Exception {
http.formLogin()
.loginPage("/login")
.and()
.authorizeRequests()
.antMatchers("/login").permitAll()
.anyRequest()
.authenticated()
.and().csrf().disable().cors();
}
@Bean
@Override
public UserDetailsService userDetailsServiceBean() {
Collection users = buildUsers();
return new InMemoryUserDetailsManager(users);
}
private Collection buildUsers() {
String password = passwordEncoder().encode("123456");
List users = new ArrayList<>();
UserDetails user_admin = User.withUsername("admin").password(password).authorities("ADMIN", "USER").build();
UserDetails user_user1 = User.withUsername("user 1").password(password).authorities("USER").build();
users.add(user_admin);
users.add(user_user1);
return users;
}
@Bean
public PasswordEncoder passwordEncoder() {
return new BCryptPasswordEncoder();
}
@Bean
@Override
public AuthenticationManager authenticationManagerBean() throws Exception {
return super.authenticationManagerBean();
}
} 至于后续的创建登录页面、首页等,比较简单,不再赘述,想查看具体代码请参考文末的工程链接,下载后自行查看。
OA-综合办公平台
pom
最终的pom依赖如下:
4.0.0
spring-security-oauth2-sso-sample
org.xbdframework.sample
1.0.0-SNAPSHOT
org.xbdframework.sample
sso-oa
0.0.1-SNAPSHOT
sso-oa
Demo project for Spring Boot
org.springframework.boot
spring-boot-starter-oauth2-client
org.springframework.boot
spring-boot-starter-security
org.springframework.security.oauth.boot
spring-security-oauth2-autoconfigure
org.springframework.boot
spring-boot-starter-thymeleaf
org.thymeleaf.extras
thymeleaf-extras-springsecurity5
org.springframework.boot
spring-boot-starter-web
org.springframework.boot
spring-boot-starter-test
test
org.springframework.boot
spring-boot-maven-plugin
请注意,spring-security-oauth2-autoconfigure依赖必不可少,这是SpringBoot工程,而不是SpringCloud工程。SpringCloud的话,引入oauth2 starter即可。
WebSecurityConfiguration
Spring Security配置如下:
package org.xbdframework.sample.sso.oa.config;
import org.springframework.boot.autoconfigure.security.oauth2.client.EnableOAuth2Sso;
import org.springframework.context.annotation.Configuration;
import org.springframework.security.config.annotation.web.builders.HttpSecurity;
import org.springframework.security.config.annotation.web.builders.WebSecurity;
import org.springframework.security.config.annotation.web.configuration.WebSecurityConfigurerAdapter;
@EnableOAuth2Sso
@Configuration
public class WebSecurityConfiguration extends WebSecurityConfigurerAdapter {
@Override
public void configure(WebSecurity web) throws Exception {
super.configure(web);
}
@Override
protected void configure(HttpSecurity http) throws Exception {
http.logout()
.and()
.authorizeRequests()
.anyRequest().authenticated()
.and()
.csrf().disable();
}
}
特别注意,一定不要忘记@EnableOAuth2Sso注解,这是单点登录相关自动化配置的入口。
CRM-移动营销平台
相关配置同OA平台,不再赘述。
单点登录过程
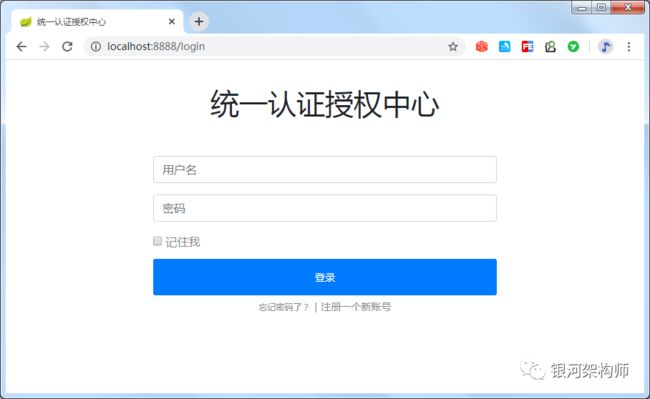
系统都建立好以后,我们依次启动授权系统(8888)、OA平台(8080)、CRM平台(8090)。访问OA平台http://localhost:8080/oa/system/profile。此时,浏览器会重定向到授权系统登录页面,需要登录。
此时,我们查看Network标签,查看其访问路径,即可看到确实是先跳转到了商品系统的登录页面(http://localhost:8080/oa/login),然后又重定向到授权系统的授权链接,由于未登录,所以最后又重定向到授权系统的登录界面,如图:
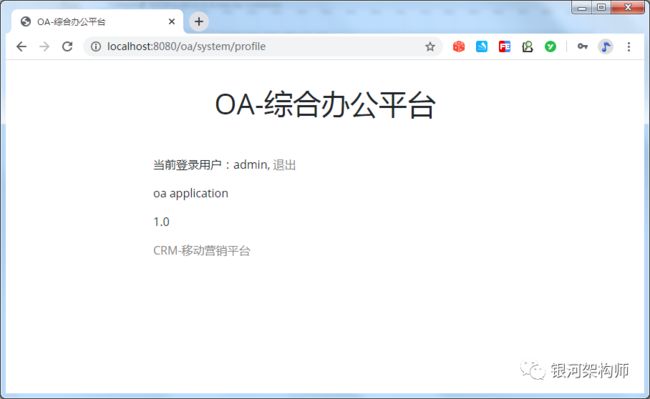
使用admin/123456进行登录,成功的跳转到了OA平台的profile页面。
可以看到,admin用户已成功登录。此时,再次查看Network标签。
在成功登录之后,授权系统重定向到OA平台配置的回调地址(http://localhost:8080/oa/login),与此同时,携带了两个参数code和state。最最重要的一个,便是code(state参数是防止CSRF攻击而设置的,此处不谈)。客户端可根据此code,访问授权系统token接口(/oauth/token),申请token。申请成功后,重定向到OA平台配置的回调地址(http://localhost:8080/oa/login)。
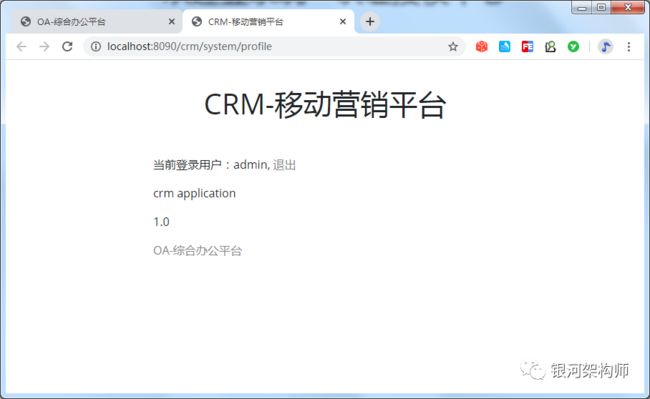
然后,我们点击“CRM-移动营销平台”(亦可直接在浏览器输入地址访问,效果是一样的。CRM平台的访问地址为:http://localhost:8090/crm/sysmtem/profile),此时,我们并不需要登录,即可直接访问该页面。
再次查看Network标签。
可以看到,与第一次访问OA平台相同,浏览器先重定向到CRM平台的登录页面,然后又重定向到授权系统的授权链接,最后直接就重新重定向到CRM平台的登录页面,而不同的是,此次访问并不需要再次重定向到授权系统进行登录,而是成功访问授权系统的授权接口,并携带着code重定向到CRM平台的回调路径。然后框架依据此code,再次访问授权的token接口(/oauth/token),顺利拿到了token,可正常访问受保护的资源。
为什么访问第二次无需登录,就直接拿到了第一次登录的用户信息了呢,它是怎么拿到的,而且不至于发生错乱呢?
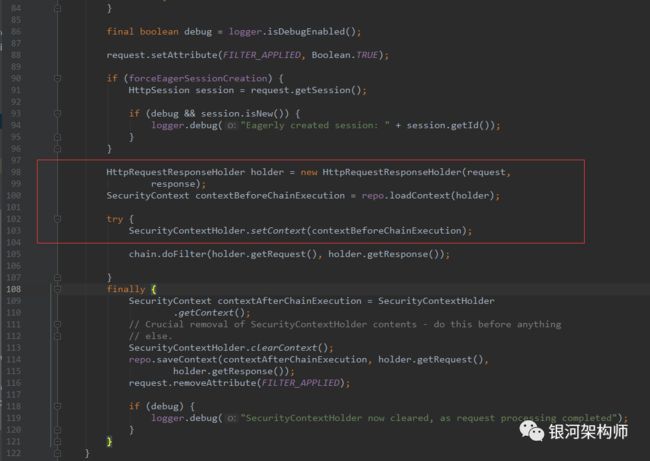
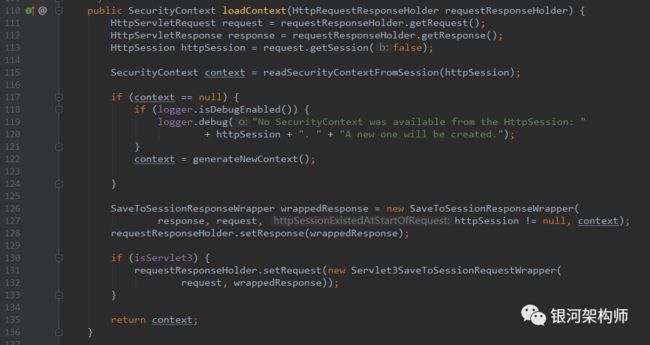
这还是归功于Spring Security。Spring Security第一个Filter,便是SecurityContextPersistenceFilter。作何用处呢?从字面意思理解,便是安全上下文持久化Filter,即存储已认证成功的用户信息。如遇该用户请求后续访问,则可直接取出并使用。
其重点就在于HttpSessionSecurityContextRepository类的loadContext。
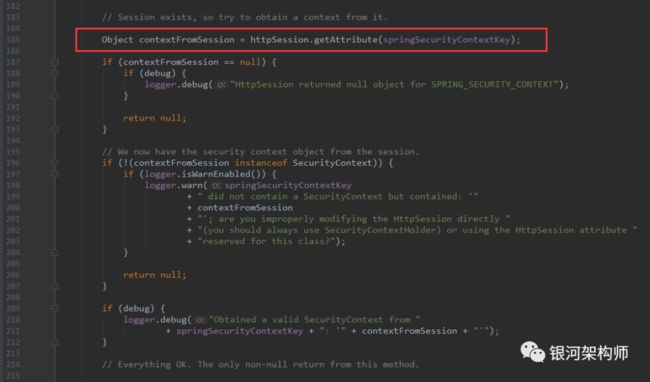
再来看一下readSecurityContextFromSession方法是如何获取SecurityContext的。
Spring Security在认证成功后,会向Session中写入一些属性,而key值即为SPRING_SECURITY_CONTEXT。后续可根据Request请求中的Session,获取此信息,其中有登录用户、权限等信息。
基于同一浏览器访问同一网站,其JSESSIONID固定。所以当访问OA平台时,浏览器会重定向到授权平台,此时会生成一个JSESSIONID,以标识当前登录用户,然后再重定向回OA平台回调地址;当再访问CRM平台时,一样会重定向到授权平台,此时授权平台根据此前生成的唯一JSESSIONID,可直接获取上一次登录用户的信息。这一节作者也是查找了好久,才找到这里,真是不容易!
如图所示,OA平台、CRM平台,在访问授权平台时,为同一个JSESSIONID。
当用户访问服务器的时候会为每一个用户开启一个session,浏览器正是基于JSESSIONID,来判断这个SESSION到底属于哪个用户。即JSESSIONID就是用来判断当前用户对应于哪个SESSION。换句话说,服务器识别SESSION的方法是通过JSESSIONID来告诉服务器该客户端的SESSION在内存的什么地方。
客户端
我们来分析一下客户端是如何触发一系列请求的。
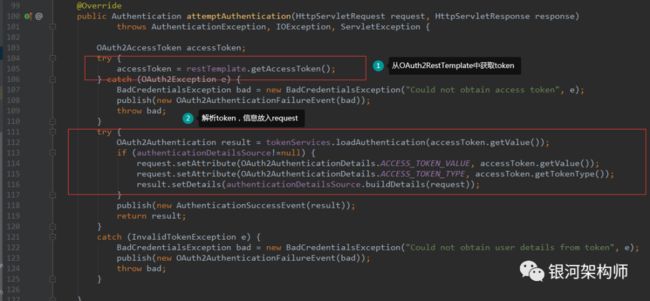
在前文中说过一个注解非常重要,就是@EnableOAuth2Sso。依托此注解,框架自动注册了OAuth2ClientAuthenticationProcessingFilter实例。从名字即能看出作何用处。其中,重要逻辑如下:
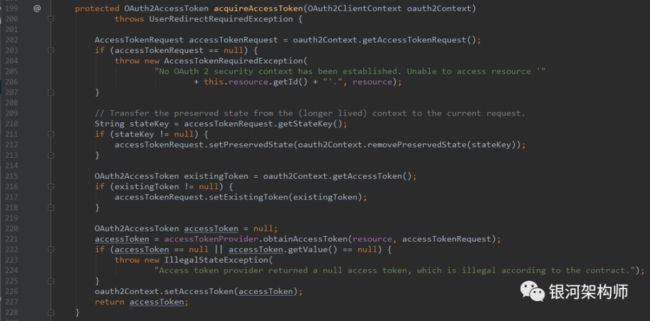
第二部分没什么说的,重点在于第一部分,从OAuth2RestTemplate中获取token。
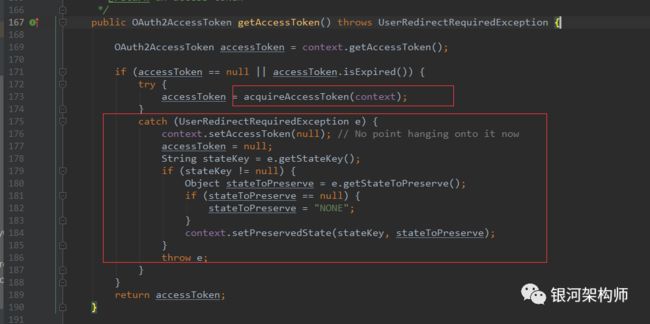
可以看到,框架先从OAuth2ClientContext中获取缓存的token,如没有,再调用acquireAccessToken方法进行获取。如果发生UserRedirectRequiredException异常,则抛出。记着这里抛出的这个异常,就是由于此,才会触发后续一系列的授权、登录等重定向。
先来说一下acquireAccessToken方法。
其它的都不重要,重点一就在于accessTokenProvider.obtainAccessToken这一句话,而accessTokenProvider不是别的,正是AuthorizationCodeAccessTokenProvider。重点二,一旦获取了token,即缓存到OAuth2ClientContext中。因此,后续请求可直接从OAuth2ClientContext中获取token,就是这个原因。
在第一次访问OA平台时时,由于没有登录,也没有申请授权,所以没有code、没有state。因此,框架会生成一个UserRedirectRequiredException并返回,进而被OAuth2RestTemplate的getAccessToken方法捕获并抛出。
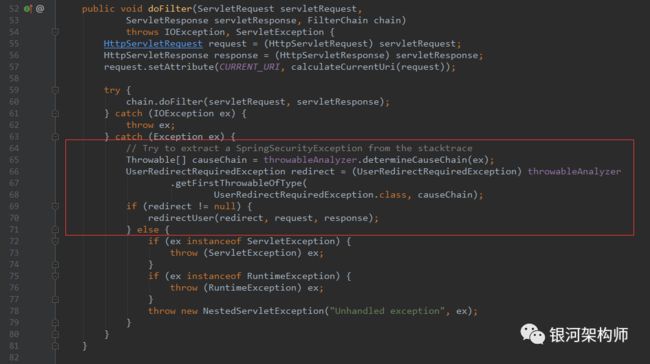
那么,抛出的异常框架怎么处理的,触发了重定向呢?
答案就是OAuth2ClientContextFilter,在后续filter过程中,会触发重定向,逻辑如下:
而重定向返回回调url之后,跟访问profile页面跳转到客户端应用自己的登录页面一样,都是/login,而刚好被OAuth2ClientAuthenticationProcessingFilter所拦截,其拦截路径,就是/login。不同的是,前者是后者一系列操作后的后续操作,即访问profile页面跳转到客户端应用自己的登录页面,被OAuth2ClientAuthenticationProcessingFilter拦截,进而发生UserRedirectRequiredException异常,重定向到授权服务申请授权,申请成功后又重定向到登录页面,进而成功根据code获取到token。
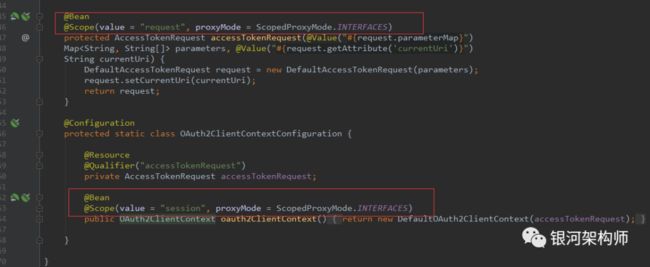
下面再说明一下AccessTokenRequest对象和OAuth2ClientContext对象,这两个bean的声明如下:
可以看到,AccessTokenRequest对象scope为request,针对每个HTTP的request请求有效,也就是说,在一次HTTP请求中,每个Bean定义对应一个实例。而OAuth2ClientContext对象的scope为session,针对每个HTTP的Session有效,即在一个HTTP Session中,每个Bean定义对应一个实例。这样,便把不同请求、不同用户给区分开了。
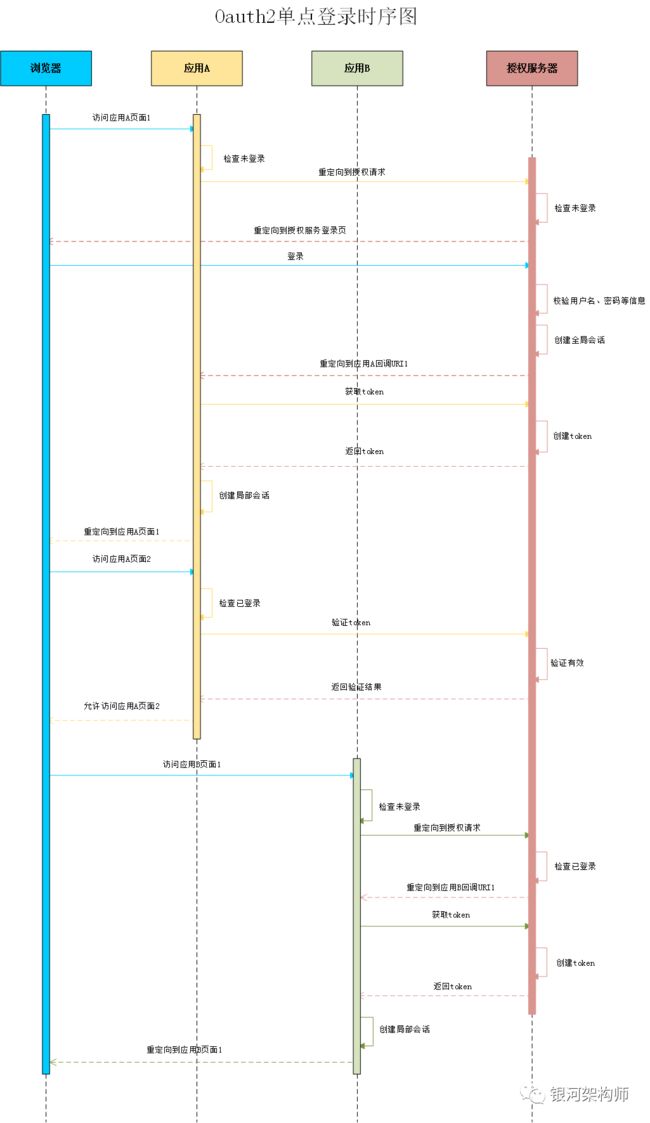
UML时序图
整个授权过程的时序图如下:
源码
附上源码,以供参考,欢迎star、fork!
github
https://github.com/liuminglei/spring-security-oauth2-sso-sample.git
gitee
https://gitee.com/xbd521/spring-security-oauth2-sso-sample.git
![]()
回复以下关键字,获取更多资源
SpringCloud进阶之路 | Java 基础 | 微服务 | JAVA WEB | JAVA 进阶 | JAVA 面试 | MK 精讲
![]()
笔者开通了个人微信公众号【银河架构师】,分享工作、生活过程中的心得体会,填坑指南,技术感悟等内容,会比博客提前更新,欢迎订阅。
![]()
