吴恩达机器学习课程-作业3-多分类和神经网络(python实现)
Machine Learning(Andrew) ex3-Multi-class Classification and Neural Networks
椰汁笔记
Multi-class Classification
- 1.1 Dataset
这里的数据存储变成了.mat的格式,这样的数据选择借助scipy.io.loadmat()实现
import scipy.io as sio
data = sio.loadmat("ex3data1.mat")
print(data.keys())#查看其中包含的key-value键值对
X = data['X']#通过字典的访问方式得到数据
y = data['y']
其中X和y都是numpy数组,X(5000,400),y(5000,1),其中X存储的是5000张20x20pixel的图片,y是图片对应的数字
- 1.2 Visualizing the data
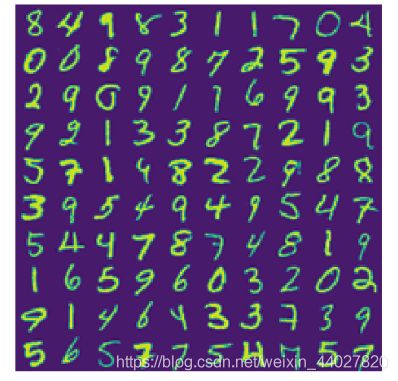
可视化其中一部分图片,图片是按照代表的数字大小顺序存储的,为了更好的呈现数据集,重其中随机选择若干张图片,并拼接成一个大的图片显示(这里是我想多了,可以直接通过matplotlib.pyplot的subplot实现,既然做了就这样吧)
def randomly_select(images, numbers):
    """
    从images中选择numbers张图片

    parameters:
    ----------
    images : ndarray
            多干张图片
    numbers : int
            随机选择的图片数量
    """
    m = images.shape[0]
    n = images.shape[1]
    flags = np.zeros((m,), bool)
    res = False
    for i in range(numbers):
        index = random.randint(0, m - 1)
        while flags[index]:
            index = random.randint(0, m)
        if type(res) == bool:
            res = images[index].reshape(1, n)
        else:
            res = np.concatenate((res, images[index].reshape(1, n)), axis=0)
    return res

def mapping(images, images_dimension):
    """
    将若干张图片,组成一张图片

    parameters:
    ----------
    images : ndarray
            多干张图片
    images_dimension : int
            新的正方形大图片中一边上有多少张图片
    """
    image_dimension = int(np.sqrt(images.shape[-1]))
    image = False
    im = False
    for i in images:
        if type(image) == bool:
            image = i.reshape(image_dimension, image_dimension)
        else:
            if image.shape[-1] == image_dimension * images_dimension:
                if type(im) == bool:
                    im = image
                else:
                    im = np.concatenate((im, image), axis=0)
                image = i.reshape(image_dimension, image_dimension)
            else:
                image = np.concatenate((image, i.reshape(image_dimension, image_dimension)), axis=1)
    return np.concatenate((im, image), axis=0)
让做好的图片显示出来,使用matplotlib.pyplot.imshow(),这里需要注意直接显示图片会发现图片是反的,我们通过转置将图片放正。这里的颜色是默认的设置,可以自己改为黑白等。
    im = mapping(randomly_select(X, 100), 10)
    plt.imshow(im.T)  # 图片是镜像的需要转置让它看起来更更正常
    plt.axis('off')
    plt.show()
- 1.3 Vectorizing Logistic Regression
这一部分在上一次作业实现,这里直接放代码
def cost(theta, X, y, l):
    m = X.shape[0]
    part1 = np.mean((-y) * np.log(sigmoid(X.dot(theta))) - (1 - y) * np.log(1 - sigmoid(X.dot(theta))))
    part2 = (l / (2 * m)) * np.sum(theta * theta)
    return part1 + part2
def gradient(theta, X, y, l):
    m = X.shape[0]
    part1 = X.T.dot(sigmoid(X.dot(theta)) - y)
    part2 = (l / m) * theta
    part2[0] = 0
    return part1 + part2
- 1.4 One-vs-all Classification
实现多分类的方法就是用多个二分类器组合,每个分类器置识别一个数字即可。也就是我们要对0-9这10个数字训练10组分类器。
训练对应与某一个数字的分类器,需要重新构造y,当前的y的存储的是0-9,我们需要把它存储成向量[0,0,…,1,0],对应下标处的内容为1则表示是该数字。
def convert(y):
    """
    将y的每个值变化为向量,来表示数字

    parameters:
    ----------
    y : ndarray
            表示图片对应额数字
    """
    n = len(np.unique(y))
    res = False
    for i in y:
        temp = np.zeros((1, n))
        temp[0][i[0] % 10] = 1
        if type(res) == bool:
            res = temp
        else:
            res = np.concatenate((res, temp), axis=0)
    return res
这样对应的y,每一列就代表了是否是某个数字。
对利用循环对每个数字进行分类器训练,y[…, i]即为是否为第i个数字
    y = convert(y)
    X = np.insert(X, 0, 1, axis=1)
    m = X.shape[0]
    n = X.shape[1] - 1
    theta = np.zeros((n + 1,))
    trained_theta = False
    for i in range(y.shape[-1]):
        res = opt.minimize(fun=cost, x0=theta, args=(X, y[..., i], 1), method="TNC", jac=gradient)
        if type(trained_theta) == bool:
            trained_theta = res.x.reshape(1, n + 1)
        else:
            trained_theta = np.concatenate((trained_theta, res.x.reshape(1, n + 1)), axis=0)
这里用循环没有向量化的计算快,我有个想法就是直接将theta初始化为(n+1,10),直接用到优化中实现向量化。这里处理时需要注意,在使用高级优化方法中,theta只能传入1维的数组,因此需要在内部还原。但是我使用后,出现了报错linear seach failed。没有搞懂为什么。
这里的预测函数与之前的不同,需要计算10组,取最大值的就是对应的数字。
def predict(theta, X):
    p = sigmoid(X.dot(theta.T))
    res = False
    for i in p:
        index = np.argmax(i)
        temp = np.zeros((1, 10))
        temp[0][index] = 1
        if type(res) == bool:
            res = temp
        else:
            res = np.concatenate((res, temp), axis=0)
    return res
用这个预测方法到我们的评价中
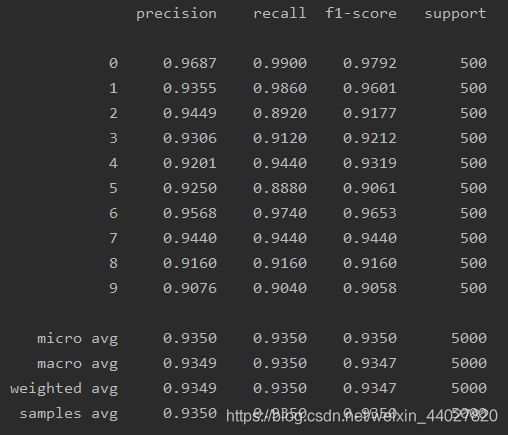
print(classification_report(y, predict(trained_theta, X), target_names=[str(i) for i in range(10)], digits=4))
Neural Networks
- 2.1 Model representation

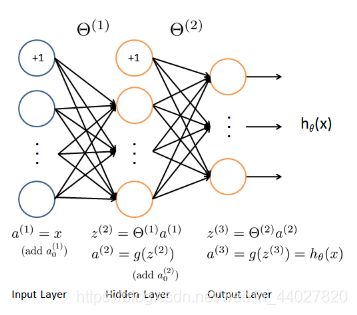
这个网络模型除输入层和输出层外,只有一层隐藏层,输入层为400个单元,隐藏层为25个单元,输出层为10个单元。我对隐藏层的作用的理解就是自动组合生成更好的特征。
读入训练好的参数,特别维度
    data = sio.loadmat("ex3data1.mat")
    theta = sio.loadmat("ex3weights.mat")
    theta1 = theta["Theta1"]  # (25,401)
    theta2 = theta["Theta2"]  # (10,26)
- 2.2 Feedforward Propagation and Prediction
前向传播就是按照网络顺序计算出最后的结果,计算的具体方式,核心思想是上一层的每个节点相对于下一层的某个节点都有对应的权重,所有权重组合起来就是参数theta
a i ( j ) = g ( θ i 0 ( j − 1 ) a 0 ( j − 1 ) + θ i 1 ( j − 1 ) a 1 ( j − 1 ) + ⋯ + θ i n ( j − 1 ) a n ( j − 1 ) ) a_i^{(j)} = g(\theta_{i0}^{(j-1)}a_0^{(j-1)}+\theta_{i1}^{(j-1)}a_1^{(j-1)}+\dots+\theta_{in}^{(j-1)}a_n^{(j-1)}) ai(j)=g(θi0(j−1)a0(j−1)+θi1(j−1)a1(j−1)+⋯+θin(j−1)an(j−1))
a i ( j ) 上标表示所在j层,下标表示当前层第i个 a_i^{(j)} \textrm{上标表示所在j层,下标表示当前层第i个} ai(j)上标表示所在j层,下标表示当前层第i个
向量化的表示方法在最上面的模型图上。
需要注意每层需要添加偏置单元,一般是在该层其他单元结果计算完后再加。
实现之前我们要理解theta是怎么存储的,第i行就是对应计算第i个单元的全部参数(参数个数等于前一层的单元数),因此在实现时需要将theta转置。
实现前向传播加最后的预测,其中theta接受元组或列表型参数,其中存储每层对应的参数theta,最后求输出层值最大的单元号作为分类结果。
def predict(theta, X):
    labels = theta[-1].shape[0]
    for t in theta:
        X = np.insert(X, 0, 1, axis=1)
        X = sigmoid(X.dot(t.T))
    p = X
    res = np.zeros((1, labels))
    print(p)
    for i in p:
        index = np.argmax(i)
        temp = np.zeros((1, labels))
        temp[0][index] = 1
        res = np.concatenate((res, temp), axis=0)
    return res[1:]
使用之前读入的已经训练好的参数,直接预测
这里需要注意,作业中训练好的参数中使用的训练集对y的处理是
| 数字 | 1 | 2 | 3 | 4 | 5 | 6 | 7 | 8 | 9 | 0 |
|---|---|---|---|---|---|---|---|---|---|---|
| 对应的向量下标 | 0 | 1 | 2 | 3 | 4 | 5 | 6 | 7 | 8 | 9 |
这与我自写的convert方法不同我的处理方式是
| 数字 | 0 | 1 | 2 | 3 | 4 | 5 | 6 | 7 | 8 | 9 |
|---|---|---|---|---|---|---|---|---|---|---|
| 对应的向量下标 | 0 | 1 | 2 | 3 | 4 | 5 | 6 | 7 | 8 | 9 |
因此要转换一下
    y = convert(data['y'])
    # 这里用于训练的训练集对y的处理是
    # 1 2 3 ... 0
    # [0,0,0,...,0]
    # 而convert处理中时
    # 0 1 2 ... 9
    # [0,0,0,...,0]
    # 因此需要转换
    y0 = y[..., 0].reshape(y.shape[0], 1)
    y = np.concatenate((y[..., 1:], y0), axis=1)
    X = data['X']  # (5000,400)
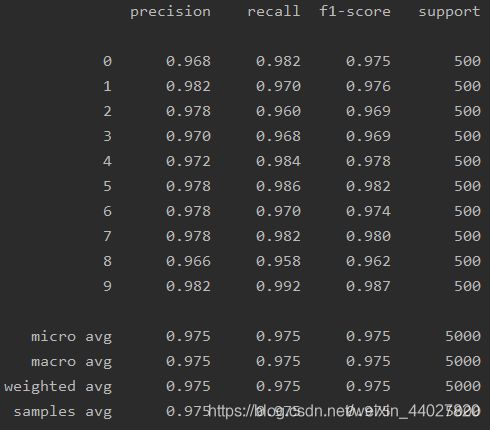
    print(classification_report(y, predict((theta1, theta2), X), digits=3))
可以看到拟合得比逻辑回归更好,我认为就是自动训练出来得特征起得效果,这是隐藏层做的事,可以通过增加隐藏层来提高准确度。但是神经网络计算量也是非常的大。

完整的代码会同步在我的github
欢迎指正错误

