简单的SSM整合项目。
文章目录
- 前言
- 1.SSM的定义
- 2. SSM整合开发的流程
- 3.SSM整合需要用到的容器
- 4. SSM整合的实现步骤
-
- 1.准备好本次项目所需要使用的数据库表
- 2.新建maven web项目
- 3.加入依赖:
- 4.编写xml文件
- 5.创建各种包的结构,比如service,dao,entity,controller等包
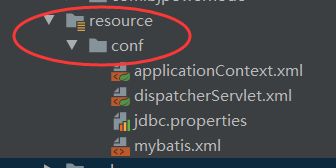
- 6.编写SpringMvc,Spring,Mybatis的配置文件 我这里都是放在resource的conf目录之下
- 7.开始编写代码。比如dao接口,dao的mapper文件,以及service,controller等等
- 8.编写jsp页面来发送请求。以及三个在WEB-INF下的结果页面
- 9.将项目搭建到Tomcat服务器上。
- 10.启动Tomcat服务器
- 11.验证我们所做的项目,看各个功能是否可以正常使用
前言
本文讲解了一个简单的SSM整合流程。实现了对数据库表的增删查操作
1.SSM的定义
SSM 编程,即 SpringMVC + Spring + MyBatis 整合,是当前最为流行的 JavaEE 开发技术架构。其实 SSM 整合的实质,仅仅就是将 MyBatis整合入 Spring。因为 SpringMVC原本就是 Spring
的一部分,不用专门整合。
SSM 整合的实现方式可分为两种:基于 XML 配置方式,基于注解方式。
2. SSM整合开发的流程
用户发起请求---->SpringMvc接受请求---->交给Spring中的service对象---->最后有service调用dao来处理数据。
3.SSM整合需要用到的容器
1.SpringMvc的容器:负责管理Controller对象以及web相关的对象。
2.Spring的容器:负责管理service,dao,工具类等对象。
4. SSM整合的实现步骤
1.准备好本次项目所需要使用的数据库表
这是我本次项目所使用的学生表

2.新建maven web项目
3.加入依赖:
需要加入到的依赖有:


  org.springframework
  spring-webmvc
  5.2.5.RELEASE


  org.mybatis
  mybatis
  3.5.1


  org.springframework
  spring-context
  5.2.5.RELEASE


  org.springframework
  spring-tx
  5.2.5.RELEASE


  org.springframework
  spring-jdbc
  5.2.5.RELEASE


  org.mybatis
  mybatis-spring
  1.3.1


  mysql
  mysql-connector-java
  8.0.19


  com.fasterxml.jackson.core
  jackson-core
  2.9.0


  com.fasterxml.jackson.core
  jackson-databind
  2.9.0


  com.alibaba
  druid
  1.1.12


  javax.servlet
  javax.servlet-api
  3.1.0
  provided


  javax.servlet.jsp
  jsp-api
  2.2.1-b03
  provided


  org.springframework
  spring-web
  5.2.5.RELEASE
4.编写xml文件
1.注册DispatcherServlet(中央调度器)。
目的有两点:
1)创建SpringMvc容器,创建了SpringMvc容器了就会有Controller对象。
2)DispatcherServlet是一个Servlet,有了Servlet才能够处理请求
- 注册Spring的监听器【ContextLoaderListener】。
目的是创建spring容器,这样才有dao,service等对象。
- 注册字符集过滤器。
目的是解决post请求方式出现的乱码情况。
下面是我配置的xml文件
<?xml version="1.0" encoding="UTF-8"?>
<web-app xmlns="http://xmlns.jcp.org/xml/ns/javaee"
         xmlns:xsi="http://www.w3.org/2001/XMLSchema-instance"
         xsi:schemaLocation="http://xmlns.jcp.org/xml/ns/javaee http://xmlns.jcp.org/xml/ns/javaee/web-app_4_0.xsd"
         version="4.0">

<!--中央调度器-->
  <servlet>
    <servlet-name>fearless</servlet-name>
    <servlet-class>org.springframework.web.servlet.DispatcherServlet</servlet-class>
    <init-param>
      <param-name>contextConfigLocation</param-name>
      <param-value>classpath:conf/dispatcherServlet.xml</param-value>
    </init-param>
    <load-on-startup>1</load-on-startup>
  </servlet>

  <servlet-mapping>
    <servlet-name>fearless</servlet-name>
    <url-pattern>/</url-pattern>
  </servlet-mapping>


<!--注册监听器。用于创建spring容器-->
    <context-param>
      <param-name>contextConfigLocation</param-name>
      <param-value>classpath:conf/applicationContext.xml</param-value>
    </context-param>
    <listener>
     <listener-class>org.springframework.web.context.ContextLoaderListener</listener-class>
   </listener>

    <!--关闭mysql资源的监听器-->
    <listener>
    <listener-class>com.fearless.listener.ContextFinalizer</listener-class>
    </listener>


  <!--声明字符集过滤器。用于解决post方式请求乱码的现象-->
    <filter>
        <filter-name>characterEncodingFilter</filter-name>
        <filter-class>org.springframework.web.filter.CharacterEncodingFilter</filter-class>
       <init-param>
          <param-name>encoding</param-name>
          <param-value>utf-8</param-value>
        </init-param>
       <init-param>
          <param-name>forceRequestEncoding</param-name>
          <param-value>true</param-value>
      </init-param>
      <init-param>
         <param-name>forceResponseEncoding</param-name>
         <param-value>true</param-value>
      </init-param>
    </filter>
   <filter-mapping>
       <filter-name>characterEncodingFilter</filter-name>
       <url-pattern>/*
5.创建各种包的结构,比如service,dao,entity,controller等包

6.编写SpringMvc,Spring,Mybatis的配置文件 我这里都是放在resource的conf目录之下
下面是SpringMvc的配置文件,文件名叫dispatcherServlet.xml
<?xml version="1.0" encoding="UTF-8"?>
<beans xmlns="http://www.springframework.org/schema/beans"
       xmlns:xsi="http://www.w3.org/2001/XMLSchema-instance"
       xmlns:context="http://www.springframework.org/schema/context"
       xmlns:mvc="http://www.springframework.org/schema/mvc"
       xsi:schemaLocation="http://www.springframework.org/schema/beans http://www.springframework.org/schema/beans/spring-beans.xsd http://www.springframework.org/schema/context https://www.springframework.org/schema/context/spring-context.xsd http://www.springframework.org/schema/mvc https://www.springframework.org/schema/mvc/spring-mvc.xsd">

    <!--springMvc配置文件。用于管理Controller对象以及Web相关的对象-->


    <!--使用组件扫描器来创建Controller对象-->
    <context:component-scan base-package="com.fearless.controller"/>

    <!--声明视图解析器-->
    <bean class="org.springframework.web.servlet.view.InternalResourceViewResolver">
        <property name="prefix" value="/WEB-INF/view/"/>
        <property name="suffix" value=".jsp"/>
    </bean>


    <!--声明注解驱动-->
    <mvc:annotation-driven/>
    <mvc:default-servlet-handler/>
</beans>
下面是Spring 的配置文件,文件名叫application.xml
<?xml version="1.0" encoding="UTF-8"?>
<beans xmlns="http://www.springframework.org/schema/beans"
       xmlns:xsi="http://www.w3.org/2001/XMLSchema-instance"
       xmlns:context="http://www.springframework.org/schema/context"
       xsi:schemaLocation="http://www.springframework.org/schema/beans http://www.springframework.org/schema/beans/spring-beans.xsd http://www.springframework.org/schema/context https://www.springframework.org/schema/context/spring-context.xsd">

<!--spring配置文件。用于管理service,dao,工具类等对象。-->

<!--指定属性配置文件-->
    <context:property-placeholder location="classpath:conf/jdbc.properties"></context:property-placeholder>


<!--数据源对象-->
    <bean id="dataSource" class="com.alibaba.druid.pool.DruidDataSource"
    init-method="init" destroy-method="close">
        <property name="url" value="${jdbc.url}"/>
        <property name="username" value="${jdbc.username}"/>
        <property name="password" value="${jdbc.password}"/>
    </bean>

<!--factory对象-->
    <bean id="sqlSessionFactory" class="org.mybatis.spring.SqlSessionFactoryBean">
        <property name="dataSource" ref="dataSource"/>
        <property name="configLocation" value="classpath:conf/mybatis.xml"/>
    </bean>


<!--声明mybatis的扫描器来创建dao对象-->
    <bean class="org.mybatis.spring.mapper.MapperScannerConfigurer">
        <property name="sqlSessionFactoryBeanName" value="sqlSessionFactory"/>
        <property name="basePackage" value="com.fearless.dao"/>
    </bean>

<!--使用component来创建service对象-->
    <context:component-scan base-package="com.fearless.service"/>


<!--事务的配置:1)注解的配置  2)aspectj的配置-->
</beans>
下面是Mybatis的配置文件
<?xml version="1.0" encoding="UTF-8" ?>
<!DOCTYPE configuration
        PUBLIC "-//mybatis.org//DTD Config 3.0//EN"
        "http://mybatis.org/dtd/mybatis-3-config.dtd">
<configuration>

<!--别名设置-->
    <typeAliases>
        <package name="com.fearless.entity"/>
    </typeAliases>

    <!--
        sql mapper(sql映射文件) 的位置
    -->
    <mappers>
        <package name="com.fearless.dao"/>
    </mappers>
</configuration>
以及数据的属性配置文件
jdbc.url=jdbc:mysql://localhost:3306/ssm?useSSL=false&serverTimezone=CTT
jdbc.username=root
jdbc.password=123456
7.开始编写代码。比如dao接口,dao的mapper文件,以及service,controller等等
首先是实体类Student放在entity包下`
package com.fearless.entity;

public class Student {

    private Integer id;
    private  String name;
    private String email;
    private Integer age;


    public String toString() {

        return "Student{" +
                "id=" + id +
                ", name='" + name + '\'' +
                ", email='" + email + '\'' +
                ", age=" + age +
                '}';
    }

    public Integer getId() {

        return id;
    }

    public void setId(Integer id) {

        this.id = id;
    }

    public String getName() {

        return name;
    }

    public void setName(String name) {

        this.name = name;
    }

    public String getEmail() {

        return email;
    }

    public void setEmail(String email) {

        this.email = email;
    }

    public Integer getAge() {

        return age;
    }

    public void setAge(Integer age) {

        this.age = age;
    }
}
下面是dao包中的dao接口和mapper文件
dao接口
package com.fearless.dao;

import com.fearless.entity.Student;

import java.util.List;

public interface StudentDao {


    int addStudent(Student student);

    List<Student> queryAllStudent();

    int deleteStudent(Integer id);

}
mapper文件
<?xml version="1.0" encoding="UTF-8" ?>
<!DOCTYPE mapper
        PUBLIC "-//mybatis.org//DTD Mapper 3.0//EN"
        "http://mybatis.org/dtd/mybatis-3-mapper.dtd">
<mapper namespace="com.fearless.dao.StudentDao">
    <select id="queryAllStudent" resultType="Student">
        select id,name,age from student order by id
    </select>
    <insert id="addStudent">
        insert into student(id,name,email,age) values (#{
     id},#{
     name},#{
     email},#{
     age})
    </insert>
    <delete id="deleteStudent">
        delete from student where id=#{
     id}
    </delete>
</mapper>
下面是service接口及其实现类,放在service包下
service接口
package com.fearless.service;
import com.fearless.entity.Student;
import java.util.List;

public interface StudentService {

    List<Student> queryStudent();

    int addStudents(Student student);

    int deleteStudentById(Integer id);
}
service接口实现类
package com.fearless.service.impl;
import com.fearless.dao.StudentDao;
import com.fearless.entity.Student;
import com.fearless.service.StudentService;
import org.springframework.stereotype.Service;
import javax.annotation.Resource;
import java.util.List;


@Service
public class StudentServiceImpl implements StudentService {

    /*引用类型的自动注入@Autowired,@Resource
    *   @Resource:先按byName,byName找不到了再用byType
    *   @Autowired使用byType。
    * */
    @Resource
    private StudentDao studentDao;

    //查询所有学生
    public List<Student> queryStudent() {

        List<Student> list=studentDao.queryAllStudent();
        return list;
    }

    //注册学生
    public int addStudents(Student student) {

        int num=studentDao.addStudent(student);
        return num;
    }

    //删除学生
    public int deleteStudentById(Integer id) {

        int num=studentDao.deleteStudent(id);
        return num;
    }
}
下面是controller类。放在controller包下
package com.fearless.controller;
import com.fearless.entity.Student;
import com.fearless.service.StudentService;
import org.springframework.stereotype.Controller;
import org.springframework.web.bind.annotation.RequestMapping;
import org.springframework.web.bind.annotation.ResponseBody;
import org.springframework.web.servlet.ModelAndView;
import javax.annotation.Resource;
import java.util.List;
@Controller
@RequestMapping("/student")
public class ControllerOne {
//引用数据类型赋值(自动注入)
@Resource
private StudentService service;
//注册学生的处理器方法
@RequestMapping(value = "/register")
public ModelAndView addStudentController(Student student){
//调用service对象来处理请求
int num=service.addStudents(student);
String tips="";
if(num>0){
//注册成功
tips=student.getName()+"注册成功";
}
ModelAndView mv=new ModelAndView();
mv.addObject("注册结果",tips);
mv.setViewName("result");
return mv;
}
//删除学生的处理器方法
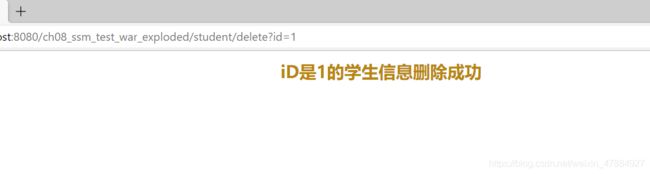
@RequestMapping(value = "/delete")
public ModelAndView doDelete(Integer id){
String tips="编号是"+id+"删除失败";
//调用service对象来处理请求业务
int num=service.deleteStudentById(id);
if(num>0){
tips="iD是"+id+"的学生信息删除成功";
}
ModelAndView mv=new ModelAndView();
mv.addObject("tip",tips);
mv.setViewName("result2");
return mv;
}
//浏览所有学生的处理器方法
@RequestMapping(value = "/all")
@ResponseBody
public List<Student> doView(){
return service.queryStudent();
}
}
8.编写jsp页面来发送请求。以及三个在WEB-INF下的结果页面
这是各类视图的结构

index.jsp页面代码
<%@ page contentType="text/html;charset=UTF-8" language="java" %>
<html>
<head>
    <title>梦开始的地方。</title>
</head>
<body>
    <center>
        <h5 style="color: blue">开始吧</h5>
        <h3><a href="add.jsp">注册学生</a></h3>
        <h3><a href="delete.jsp">删除学生</a></h3>
        <h3><a href="viewAllStudents.jsp">浏览所有学生</a></h3>
    </center>
</body>
</html>
add.jsp页面代码
<%@ page contentType="text/html;charset=UTF-8" language="java" %>
<html>
<head>
    <title>注册页面</title>
</head>
<body>
<body>
<center>
    <h5 style="color: blue">开始吧</h5>
    <form action="student/register" method="post">
        <table border="2">
            <tr>
                <td>ID</td>
                <td><input type="text" name="id"><br></td>
            </tr>
            <tr>
                <td>名字</td>
                <td><input type="text" name="name"><br></td>
            </tr>
            <tr>
                <td>邮箱</td>
                <td><input type="text" name="email"><br></td>
            </tr>
            <tr>
                <td>年龄</td>
                <td><input type="text" name="age"><br></td>
            </tr>
            <tr>
                <td><input type="submit" value="注册"></td>
            </tr>
        </table>
    </form>
</center>
</body>
</body>
</html>
delete.jsp页面代码
<%@ page contentType="text/html;charset=UTF-8" language="java" %>
<html>
<head>
    <title>注册页面</title>
</head>
<body>
<body>
<center>
    <h5 style="color: blue">开始吧</h5>
    <form action="student/register" method="post">
        <table border="2">
            <tr>
                <td>ID</td>
                <td><input type="text" name="id"><br></td>
            </tr>
            <tr>
                <td>名字</td>
                <td><input type="text" name="name"><br></td>
            </tr>
            <tr>
                <td>邮箱</td>
                <td><input type="text" name="email"><br></td>
            </tr>
            <tr>
                <td>年龄</td>
                <td><input type="text" name="age"><br></td>
            </tr>
            <tr>
                <td><input type="submit" value="注册"></td>
            </tr>
        </table>
    </form>
</center>
</body>
</body>
</html>
viewAllStudents.jsp页面代码。这里我们使用了jQuery的ajax请求。所以需要导入jQuery的库文件。
<%@ page contentType="text/html;charset=UTF-8" language="java" %>
<html>
<head>
<title>所有学生</title>
<script type="text/javascript" src="js/myjQuery.js"></script>
<script type="text/javascript">
$(function(){
//页面加载完毕直接执行loadStudents方法
loadStudents()
$("#btn01").click(function () {
loadStudents()
})
})
function loadStudents() {
$.ajax({
url:"student/all",
type:"get",
dataType:"json",
success(resp){
//先将旧的数据清除
$("#info").html("")
$.each(resp,function(i,n){
//添加新的数据
$("#info").append("")
.append(""+n.id+" ")
.append(""+n.name+" ")
.append(""+n.email+" ")
.append(""+n.age+" ")
.append(" ")
})
}
})
}
</script>
</head>
<body>
<center>
<div>
<table border="3">
<thead>
<tr>
<td>id</td>
<td>姓名</td>
<td>邮箱</td>
<td>年龄</td>
</tr>
</thead>
<tbody id="info">
</tbody>
</table>
</div>
<a href="student/all">浏览</a><br>
<input type="button" id="btn01" value="按钮">
</center>
</body>
</html>
result1.jsp代码
<%@ page contentType="text/html;charset=UTF-8" language="java" %>
<html>
<head>
    <title>结果页面</title>
</head>
<body>
    <center>
        <h4>结果页面</h4>
        <h4>${
     注册结果}</h4>
    </center>
</body>
</html>
result2.jsp代码
<%@ page contentType="text/html;charset=UTF-8" language="java" %>
<html>
<head>
    <title>结果页面</title>
</head>
<body>
    <center>
        <h4 style="color: darkgoldenrod">${
     tip}</h4>
    </center>
</body>
</html>
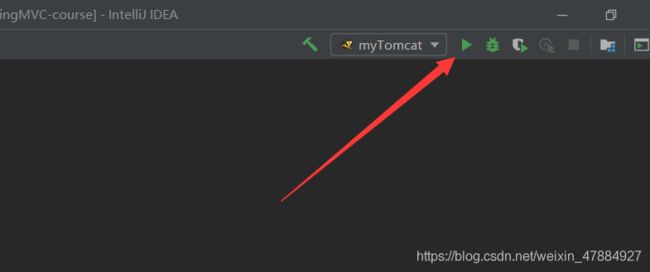
9.将项目搭建到Tomcat服务器上。

10.启动Tomcat服务器
11.验证我们所做的项目,看各个功能是否可以正常使用
index.jsp界面

注册功能

注册成功

查看数据库表,数据增加上去了

delete.jsp页面,这里我们把刚刚注册的学生"张三"删除

给出提示,删除成功,
再到数据库表中确认一下,发现id是1的学生张三不见了。说明删除成功

viewAllStudents.jsp页面,这里我们刚才在viewAllStudents.jsp中设定了当页面加载完毕后自动显示查询结果,

这样我们就完成了一个简单的SMM整合项目