分享一下自己通过hexo+gitee/github搭建个人博客的流程
选择该方式搭建的理由和要做的准备
每个项目在开始之前,都需要先清楚项目的目的、主要的需求和核心点在哪。我在选择搭建的方式之前,根据个人状况确认了博客的搭建需要满足以下需求:
- 无需自备服务器,静态网站也没关系
- 不错的分类归档
- 方便文章追溯
- 简洁的排版
- 不用了解或使用太多前端知识(排版是我的痛)
根据自行百度了解,在github/gitee上搭建的Pages博客最起码是满足第1点要求的,选用哪种方式在github上搭建便打算先简单使用下搭建的技术了解后再做确认。下图为gitee支持搭建静态网站的技术:
![]()
第一个选用的是hexo(庆幸不用选第二个了),理由是文章多,有足够的参考,官方网站也提供中文文档。在开始之前需要做以下的准备:
- nodejs安装(百度官网下载安装即可)
- github/gitee账号
- git安装
虽然gitee/github都可以部署,但还是要提下两者之间的细微区别:
- gitee是国内站点,网络稳定高速,github访问有时不稳定
- 站点项目更新部署到github/gitee后,github会自动重新部署更新,失败后还会给你发邮件,gitee则需要到respository里手动更新(除非你升级会员)
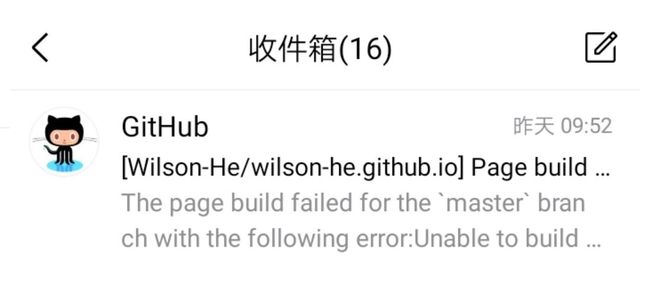
在部署到gitee/github之前可以先在本地调试样式添加文章,调好了后再部署到github上。
搭建hexo本地环境
- 确认nodejs已安装:node -v
- 安装hexo:npm install -g hexo
- 环境初始化:hexo init 目录名(目录不存在则自动创建),出现Start blogging with Hexo!则完成
- 进入初始化的项目目录后运行:hexo server [-p 端口号],默认端口为4000,访问localhost:port出现下图则本地基础环境搭建完成

个人了解到的hexo与next主题配置
项目目录下的核心目录/文件如下:
- scaffolds:模板、脚架目录
- source:源文件夹(内容核心),所有的文章和分类、标签等都是通过该文件夹下的内容进行发布的
- source/_post:所有发布的文章都在该文件夹中
- source/xxx:菜单xxx页面,如分类source/categories用于存放分类页,但分类页md文件是无需内容的,hexo会自动索引
- themes:当前hexo项目的各类主题存放文件夹,把所需的主题目录添加到该文件夹中并更改项目_config.yml相应配置即可更换主题
- themes/{themeName}/_config.yml:主题配置文件,主题的各种样式、配置都可在该文件中更改
- _config.yml:项目配置文件,设置项目的通用配置(主题外的配置,如标题、分页、搜索、作者、发布地址等)
由于landscape的排版与样式不太符合自己的style,所以选择了next,足够简洁,一目了然(作为最多人选择的主题不是没有原因的)。使用next主题只需将该主题目录下载存放到项目的themes下并更改/_config.yml的theme配置值为相应主题名。
下载next主题(如果慢的话可以同步到gitee再从gitee下载):git clone https://github.com/theme-next/hexo-theme-next.git
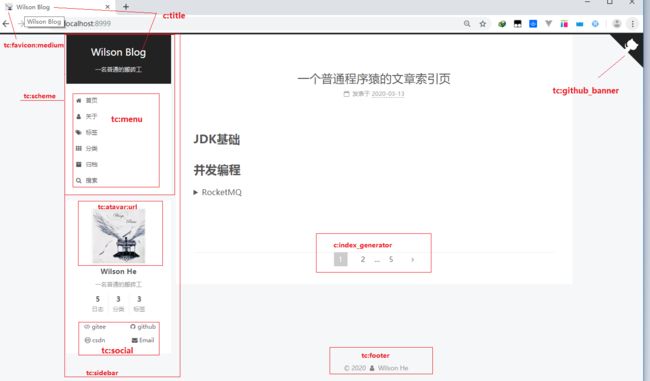
以next为例,hexo的页面都是通过_config.yml与/themes/next/_config.yml配置的,明显的配置如下图(c:为_config.yml中的配置,tc:themes/next/_config.yml中的配置):
菜单栏menu配置
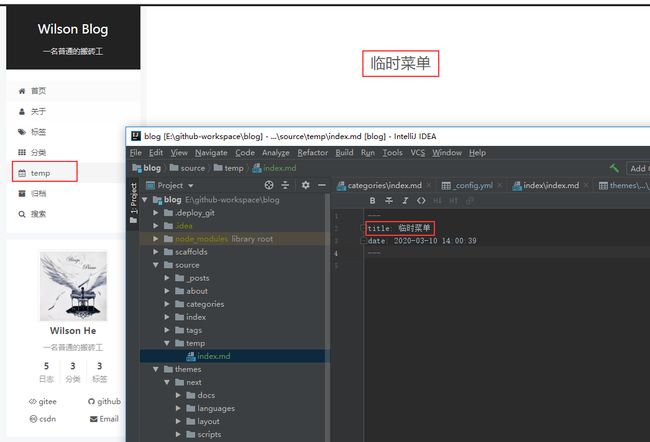
hexo菜单栏可以在项目目录下通过hexo new page {menuName}指令创建,也可直接创建/source/{menuName}/index.md文件,并在themes\next_config.yml添加menu:{menuName}配置,如一个自定义菜单的局部配置(next/_config.yml):
menu:
  # || 后面是图标名,可在https://fontawesome.com/icons中查询所需图片
  home: /index || home
  about: /about/ || user
  tags: /tags/ || tags
  categories: /categories/ || th
  temp: /temp/ || calendar
  archives: /archives/ || archive
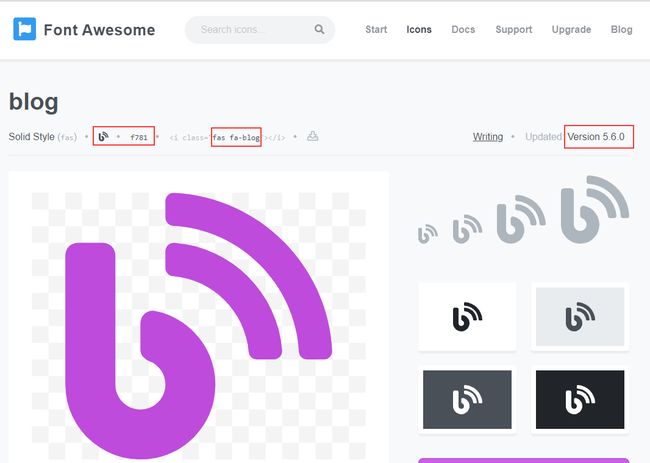
需要注意的是在fontawesome中搜到的图标不一定都有,还需要根据图标名查询themes/next/source/lib/font-awesome/css/font-awesome.css下有没有该图标样式,如stack-overflow则在css文件下先搜索下有没有该样式,有的话才会显示fontawesome中对应的图标,没有的话会显示一个矩形。有些图标fontawesome有但css中没有的原因是版本不同,目前我在网上搜的最新fontawesome最新的css是4.7.0的,但fontawesome上的一些图标版本是新的版本才有(如blog)的,所以个人猜测是版本原因导致网站上搜到的一些图标不可用。仔细点观察其实可以发现css中的样式content是与fontawesome上的图标Unicode是一样的:
文章创建、添加标签、分类
文章创建可通过在/source/_posts下创建"文章.md"文件就可,也可通过命令行hexo new {article}来创建。
hexo里的文章都可通过添加文章头进行文章归档,以下为一篇个人文章头:
---
title: 聊聊MQ与如何基于Spring Boot RocketMQ搭建一个消息中心
date: 2020-03-09 16:54:18
tags: [RocketMQ, Spring Boot]
categories: [RocketMQ, Spring Boot]
---
在文章头中添加了tags和categories后即可完成标签与分类,无需额外的操作,前提是source目录下已存在categories与tags。
个人_config.yml主要更改的配置
比较细的细节觉得前面都讲了,请容我偷下懒吧,以下为个人的配置文件主要更改:
# Site 站点配置
title: Wilson Blog
subtitle: '一名普通的搬砖工'
description: '一名普通的搬砖工'
keywords:
author: Wilson He
language: zh-CN
timezone: 'Asia/Shanghai'

index_generator:
  path: ''
  # 每页只显示一篇文章
  per_page: 1
  # 根据创建时间排序,如果文章有设置top值,则先按top由高到低排,目前个人是在索引文章上加了top值设为首页文章的
  order_by: -date
theme: next
# 添加搜索功能,需先安装搜索插件:npm install hexo-generator-searchdb并将themes的_config.yml中local_search:enable设为true
search:
  path: search.xml
  field: post
  format: html
  limit: 10000
# 部署的项目地址,为私有仓库
deploy:
  type: git
  repo: https://github.com/Wilson-He/wilson-he.github.io
#  repo: https://gitee.com/Wilson-He/Wilson-He
启用搜索服务需要安装搜索插件:npm install hexo-generator-searchdb
个人themes/next/_config.yml主要更改的配置
favicon:
  small: /images/favicon-16x16-next.png
  # 这里的/images路径是themes/next/source下的images
  medium: /images/piano-icon.png
  apple_touch_icon: /images/apple-touch-icon-next.png
  safari_pinned_tab: /images/logo.svg
footer:
  # 不显示next原有的powered和version footer
  powered:
    enable: false
    version: false
# 首页信息与菜单显示样式,Pisces为网站信息显示在左侧,Mist在顶部,更多的自行尝试
scheme: Pisces
menu:
  home: /index || home
  about: /about/ || user
  tags: /tags/ || tags
  categories: /categories/ || th
  temp: /temp/ || calendar
  archives: /archives/ || archive
sidebar:
  # 边栏位置设置
  position: left
# 头像设置
avatar:
  url: https://xxx.aliyuncs.com/atavar/xxx.jpg
# 头像下显示的社交图标与链接,||后为fontawesome上的图标名
social:
  gitee: https://gitee.com/Wilson-He || gg
  github: https://github.com/Wilson-He || github
  csdn: https://blog.csdn.net/z28126308 || creative-commons
  Email: mailto:[email protected] || envelope
# 奖赏设置,true则每篇文章末尾会新增捐赠按钮,点击会显示收款图片(如果是直接显示我肯定会直接enable false的[doge])
reward_settings:
  # If true, reward will be displayed in every article by default.
  enable: true
  animation: false
  #comment: Donate comment here.
reward:
  wechatpay: /images/wechatpay.jpg
  alipay: /images/alipay.jpg
// 头部显示github banner
github_banner:
  enable: true
  permalink: https://github.com/Wilson-He
// 启用本地搜索
local_search:
  enable: true
部署到github/gitee
部署流程十分简单,安装hexo git插件后在github/gitee建立仓库,再在项目目录命令行部署即可。
安装hexo git插件:npm install hexo-deployer-git --save
github:
- 创建命名为username.github.io的页面仓库(小知识:个人开源的项目命名规则都是io.github.projectName,这里纯粹是顺序调转了)
- 在项目目录命令行执行
hexo deploydeploy指令即可部署到页面仓库(如果没配置好git则需要输入github账号密码)
每次有部署时github都会为我们重新部署运行静态博客,失败会发送邮件,这一点很方便。博客页面仓库配置成功时查看仓库Settings下的Github Pages会显示以下图片内容,访问该地址即可显示你的博客页面(没事不用来闲逛,目前没啥内容可给大家看):
gitee:
- 创建博客发布仓库(命名无要求)
- 执行
hexo deploy - 点击仓库“服务”->“Gitee Pages”,配置成功后会显示网站地址,
非会员版gitee部署后要重新更新,有时还会有样式显示问题,唯一的优点就是比github快
搭建过程使用到的文档
- hexo官方文档:https://hexo.io/zh-cn/docs/
- next主题官方文档(很详细):https://theme-next.org/docs/getting-started/ ,next主题的所有设置、第三方服务(评论、搜索、统计等)、插件都有详细的文档
- fontawesome图标网站:https://fontawesome.com/?from=io
