CentOS中iSCSI的配置及使用
iSCSI基本概念
- iSCSI (Internet Small Computer System Interface互联网小型计算机系统接口),是一个基于TCP/IP的协议,主要用于通过IP网络仿真SCSI,从而为远程块存储设备提供数据传输和管理。
- iSCSI技术在工作形式上分为服务端(target)与客户端(initiator),iSCSI服务端即用于存放硬盘存储资源的服务器,而iSCSI客户端则是用户使用的软件,用于获取远程服务端的存储资源。
- 在Centos7上,默认的服务端软件是targetcli,客户端的软件是iscsiadm。
iSCSI相关名词
-
TPG:目标门户组(Target Portal Group)目标上的IP连接组,某个特定iSCSI目标要侦听的接口IP地址和TCP端口的集合。可以将目标配置添加到TPG以协调多个LUN的设置。
-
ACL:访问权限控制列表,一种使用节点IQN(通常是启动器名称)来验证启动器的访问权限的访问限制。
-
IQN:iSCSI限定名称,全球唯一名称,用于以强制命名格式来识别启动器和目标(全部小写)
IQN的格式为:iqn.年份-月份.com|cn|net|org.域名:自定义标识,如:iqn.2020-02.com.test:desktop; 其中的字母均应为小写,即使输入时包含大写,命令执行后,系统会自动转换成小写。
-
LUN:逻辑单元号,带有编号的块设备,连接到目标且通过目标来使用。可以有一个或多个LUN连接到单个目标,但通常一个目标提供一个LUN。
-
TARGET:iSCSI 服务器上的存储资源.
-
portals:网络接口及端口,目标或启动器上用于建立的IP地址和端口,默认3260端口。
iSCSI配置及使用
1. 服务器使用Linux,客户端使用Windows
- 环境:
1>服务器: CentOS Linux release 7.5.1804 (Core)
2>客户端:Windows10
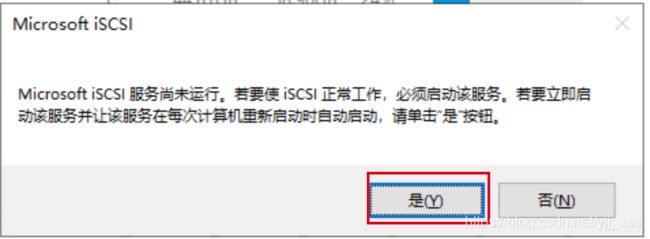
iscsi initiatorname : iqn.1991-05.com.microsoft:win10-client0(该信息需要查看iscsi 配置信息,在搜索框内输入iscsi,若为首次使用,选择iscsi发起程序,则会弹出下图的提示框,点击是。在配置中查看发起程序名称,也可以更改发起名称,这个随个人。)

- 具体配置
1) 服务器磁盘分区:
使用lsblk查看磁盘信息,这里使用/dev/sdb1 和/dev/sdb2来作为共享存储资源,也可以使用一整个或多个磁盘作为共享资源。
[root@localhost ~]# lsblk
NAME            MAJ:MIN RM  SIZE RO TYPE MOUNTPOINT
sda               8:0    0   40G  0 disk
├─sda1            8:1    0  300M  0 part /boot
└─sda2            8:2    0 19.7G  0 part
  ├─centos-root 253:0    0 17.7G  0 lvm  /
  └─centos-swap 253:1    0    2G  0 lvm  [SWAP]
sdb               8:16   0   10G  0 disk
├─sdb1            8:17   0    5G  0 part
└─sdb2            8:18   0    5G  0 part
若是需要使用新的磁盘的其中一部分分区,可以对其进行分区:
[root@localhost ~]# fdisk /dev/sdb
Welcome to fdisk (util-linux 2.23.2).

Changes will remain in memory only, until you decide to write them.
Be careful before using the write command.

Device does not contain a recognized partition table
Building a new DOS disklabel with disk identifier 0xc0063f0d.

Command (m for help): n
Partition type:
   p   primary (0 primary, 0 extended, 4 free)
   e   extended
Select (default p):
Using default response p
Partition number (1-4, default 1):
First sector (2048-20971519, default 2048):
Using default value 2048
Last sector, +sectors or +size{
     K,M,G} (2048-20971519, default 20971519): 10500000
Partition 1 of type Linux and of size 5 GiB is set

Command (m for help): n
Partition type:
   p   primary (1 primary, 0 extended, 3 free)
   e   extended
Select (default p):
Using default response p
Partition number (2-4, default 2):
First sector (10500001-20971519, default 10500096):
Using default value 10500096
Last sector, +sectors or +size{
     K,M,G} (10500096-20971519, default 20971519):
Using default value 20971519
Partition 2 of type Linux and of size 5 GiB is set

Command (m for help): p

Disk /dev/sdb: 10.7 GB, 10737418240 bytes, 20971520 sectors
Units = sectors of 1 * 512 = 512 bytes
Sector size (logical/physical): 512 bytes / 512 bytes
I/O size (minimum/optimal): 512 bytes / 512 bytes
Disk label type: dos
Disk identifier: 0xc0063f0d

   Device Boot      Start         End      Blocks   Id  System
/dev/sdb1            2048    10500000     5248976+  83  Linux
/dev/sdb2        10500096    20971519     5235712   83  Linux

Command (m for help): w
The partition table has been altered!

Calling ioctl() to re-read partition table.
Syncing disks.
2)执行systemctl start target #启动服务
执行systemctl stop firewalld #关闭防火墙
systemctl enable target #设置开机自启动
3)执行targetcli开始配置
a. 查看目录
[root@localhost ~]# targetcli
/> ls
o- / ......................................................................................... [...]
  o- backstores .............................................................................. [...]
  | o- block .................................................................. [Storage Objects: 0]
  | o- fileio ................................................................. [Storage Objects: 0]
  | o- pscsi .................................................................. [Storage Objects: 0]
  | o- ramdisk ................................................................ [Storage Objects: 0]
  o- iscsi ............................................................................ [Targets: 0]
  o- loopback ......................................................................... [Targets: 0]
b. 添加两个磁盘分区到Backstore项下,block1,block2为磁盘共享存储自定义标识符
/> backstores/block create block1 /dev/sdb1
Created block storage object block1 using /dev/sdb1.
/> backstores/block create block2 /dev/sdb2
Created block storage object block2 using /dev/sdb2.
c. 创建服务器Target
创建TARGET ,自动生成TPG1. 默认绑定的portal为0.0.0.0:3260
若是因为0.0.0.0:3260不安全,可以创建监听地址:
先删除原来的监听地址:
iscsi/iqn.2020-02.com.test:server/tpg1/portals/ delete 0.0.0.0 3260
再添加新的地址(默认端口3260):
iscsi/iqn.2020-02.com.test:server/tpg1/portals/ create 192.168.132.103
此处就使用默认绑定的0.0.0.0:3260
/> iscsi/ create iqn.2020-02.com.test:server
Created target iqn.2020-02.com.test:server.
Created TPG 1.
Global pref auto_add_default_portal=true
Created default portal listening on all IPs (0.0.0.0), port 3260.
d. 在TPG项下,新建ACL,设置为客户端使用(其中iqn.1991-05.com.microsoft:win10-client0为win10 的iscsi initiatorname)
/> iscsi/iqn.2020-02.com.test:server/tpg1/acls create iqn.1991-05.com.microsoft:win10-client0
Created Node ACL for iqn.1991-05.com.microsoft:win10-client0
e. 创建LUN
将backstores下的两个共享磁盘创建为LUN,并自动映射到客户端的访问资源区。
/> iscsi/iqn.2020-02.com.test:server/tpg1/luns create /backstores/block/block1
Created LUN 0.
Created LUN 0->0 mapping in node ACL iqn.1991-05.com.microsoft:win10-client0
/> iscsi/iqn.2020-02.com.test:server/tpg1/luns create /backstores/block/block2
Created LUN 1.
Created LUN 1->1 mapping in node ACL iqn.1991-05.com.microsoft:win10-client0
配置后的信息:
/> ls
o- / ......................................................................................... [...]
  o- backstores .............................................................................. [...]
  | o- block .................................................................. [Storage Objects: 2]
  | | o- block1 ......................................... [/dev/sdb1 (0 bytes) write-thru activated]
  | | | o- alua ................................................................... [ALUA Groups: 1]
  | | |   o- default_tg_pt_gp ....................................... [ALUA state: Active/optimized]
  | | o- block2 ......................................... [/dev/sdb2 (0 bytes) write-thru activated]
  | |   o- alua ................................................................... [ALUA Groups: 1]
  | |     o- default_tg_pt_gp ....................................... [ALUA state: Active/optimized]
  | o- fileio ................................................................. [Storage Objects: 0]
  | o- pscsi .................................................................. [Storage Objects: 0]
  | o- ramdisk ................................................................ [Storage Objects: 0]
  o- iscsi ............................................................................ [Targets: 1]
  | o- iqn.2020-02.com.test:server ....................................................... [TPGs: 1]
  |   o- tpg1 ............................................................... [no-gen-acls, no-auth]
  |     o- acls .......................................................................... [ACLs: 1]
  |     | o- iqn.1991-05.com.microsoft:win10-client0 .............................. [Mapped LUNs: 2]
  |     |   o- mapped_lun0 ................................................ [lun0 block/block1 (rw)]
  |     |   o- mapped_lun1 ................................................ [lun1 block/block2 (rw)]
  |     o- luns .......................................................................... [LUNs: 2]
  |     | o- lun0 .................................... [block/block1 (/dev/sdb1) (default_tg_pt_gp)]
  |     | o- lun1 .................................... [block/block2 (/dev/sdb2) (default_tg_pt_gp)]
  |     o- portals .................................................................... [Portals: 1]
  |       o- 0.0.0.0:3260 ..................................................................... [OK]
  o- loopback ......................................................................... [Targets: 0]
注:若要开启CHAP认证,可以参考这篇文章:基于CHAP认证的iSCSI连接
- 从client端连接
a. 打开iscsi发起程序(参考前文“环境”部分怎么打开)
b. 发现->发现门户->写入IP(server的IP)->确定
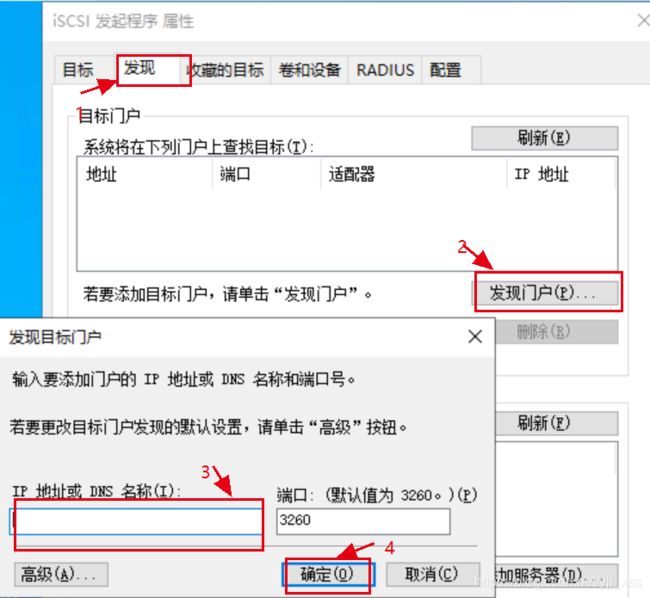
添加成功会在列表中显示刚添加的目标。
c. 依照下图步骤进行连接
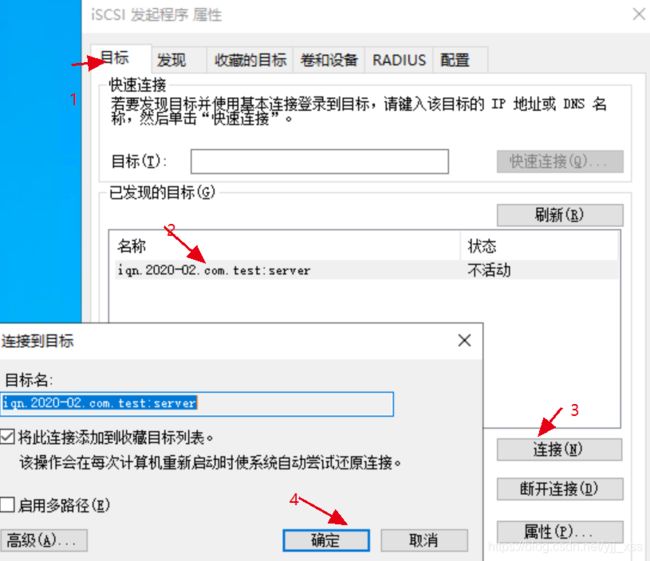
d. 最终上图中的状态会变为已连接

查看磁盘信息:右击计算机->管理->磁盘管理,就会看见iscsi共享的盘(如果前面步骤都没有问题,这里没有新加的盘,可以刷新或者重新扫描磁盘试试)。
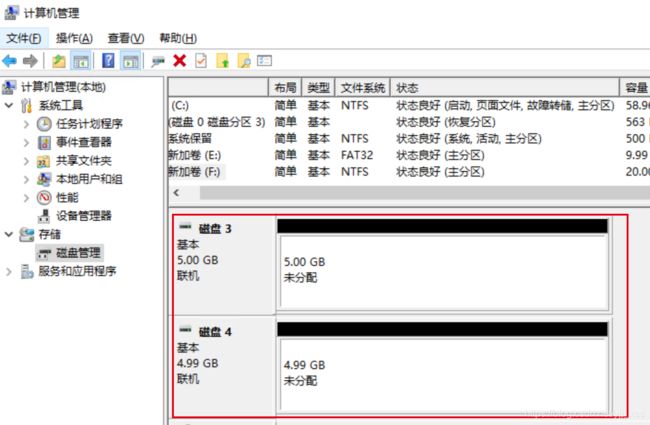
右键新添加的磁盘,新建卷,即可使用。
2. 服务器使用Linux,客户端使用Linux
- 环境:
a. 服务器: CentOS Linux release 7.5.1804 (Core)
b. 客户端:CentOS Linux release 7.5.1804 (Core)
yum install iscsi-initiator-utils -y #安装
systemctl start iscsi #启动
iscsi initiatorname : InitiatorName=iqn.1994-05.com.redhat:client1
该信息可以使用cat /etc/iscsi/initiatorname.iscsi查看,当然也可以修改,这里就先略过了。
[root@localhost driver]# cat /etc/iscsi/initiatorname.iscsi
InitiatorName=iqn.1994-05.com.redhat:client1
c. 查看磁盘信息:
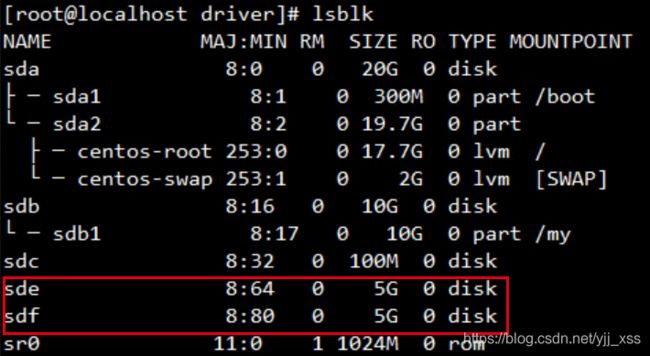
[root@localhost driver]# lsblk
NAME            MAJ:MIN RM  SIZE RO TYPE MOUNTPOINT
sda               8:0    0   20G  0 disk
├─sda1            8:1    0  300M  0 part /boot
└─sda2            8:2    0 19.7G  0 part
  ├─centos-root 253:0    0 17.7G  0 lvm  /
  └─centos-swap 253:1    0    2G  0 lvm  [SWAP]
sdb               8:16   0   10G  0 disk
└─sdb1            8:17   0   10G  0 part /my
sdc               8:32   0  100M  0 disk
sr0              11:0    1 1024M  0 rom
- 在server中添加信息参考前文
- 客户端iscsi发现存储设备
a.查看目标存储(这里需要已知目标存储的IP及端口信息)
iscsiadm -m discovery -t sendtargets -p IP 3260
[root@localhost driver]# iscsiadm -m discovery -t sendtargets -p 192.168.132.103 3260
192.168.132.103:3260,1 iqn.2020-02.com.test:server
b. 查看核对信息
iscsiadm -m node -o show
c.登录发现的全部目标存储
iscsiadm --m node –login
[root@localhost driver]# iscsiadm --m node –login
192.168.132.103:3260,1 iqn.2020-02.com.test:server
d.更新 IQN
systemctl restart iscsid
e.登录指定存储
iscsiadm --mode node --portal 192.168.132.103 3260 --login
iscsiadm --mode node --portal 192.168.132.103 3260 --login
Logging in to [iface: default, target: iqn.2020-02.com.test:server, portal: 192.168.132.103,3260] (multiple)
Login to [iface: default, target: iqn.2020-02.com.test:server, portal: 192.168.132.103,3260] successful.
[root@localhost ~]# mkfs.ext3 /dev/sde
...
[root@localhost ~]# mkfs.ext3  /dev/sdf
...
[root@localhost ~]# mkdir /data0
[root@localhost ~]# mkdir /data1
[root@localhost ~]# mount /dev/sde /data0
[root@localhost ~]# mount /dev/sdf /data1
[root@localhost ~]# vim /etc/fstab
...
/dev/sde		/data0			ext3	defaults	0 0
/dev/sdf		/data1			ext3	defaults	0 0
[root@localhost ~]# mount -a
3. 卸载
- client端:修改持久化,卸载磁盘
vim /etc/fstab 删除上步骤中添加的两行
卸载磁盘, 并查验。
[root@localhost ~]# umount /data0
[root@localhost ~]# umount /data1
[root@localhost ~]# df -h | grep data0
[root@localhost ~]# df -h | grep data1
断开连接
[root@localhost ~]#  iscsiadm -m session -P 3|grep Attached
		Attached SCSI devices:
			Attached scsi disk sde		State: running
			Attached scsi disk sdf		State: running
[root@localhost ~]#  iscsiadm -m node -T iqn.2020-02.com.test:server -u
Logging out of session [sid: 2, target:iqn.2020-02.com.test:server, portal: 192.168.132.103,3260]
Logout of [sid: 2, target: iqn.2020-02.com.test:server, portal: 192.168.132.103,3260] successful.
[root@localhost ~]#  iscsiadm -m session -P 3|grep Attached
iscsiadm: No active sessions.
[root@localhost ~]#
- server端:进入targetcli查看当前服务器信息
在这里插入代码片
删除luns添加的Backstore磁盘,删除acls中客户端IQN的认证信息,删除 iSCSI Target,删除 Backstroes 中已加入的磁盘。
/> /iscsi/iqn.2020-02.com.test:server/tpg1/luns/ delete lun0
Deleted LUN 0.
/> /iscsi/iqn.2020-02.com.test:server/tpg1/luns/ delete lun1
Deleted LUN 1.
/> /iscsi/iqn.2020-02.com.test:server/tpg1/acls/ delete iqn.1991-05.com.microsoft:win10-client0
Deleted Node ACL iqn.1991-05.com.microsoft:win10-client0.
/> /iscsi/ delete iqn.2020-02.com.test:server
Deleted Target iqn.iqn.2020-02.com.test:server.
/> /backstores/block/ delete block1
Deleted storage object block1.
/> /backstores/block/ delete block2
Deleted storage object block2.
/>
查看删除后的信息
/> ls
o- / ................................................................................................................................................................. [...]
  o- backstores .......................................................................................................................................... [...]
  | o- block ................................................................................................................. [Storage Objects: 0]
  | o- fileio .................................................................................................................. [Storage Objects: 0]
  | o- pscsi .................................................................................................................. [Storage Objects: 0]
  | o- ramdisk ............................................................................................................ [Storage Objects: 0]
  o- iscsi ...................................................................................................... [1-way disc auth, Targets: 0]
  o- loopback ............................................................................................................................. [Targets: 0]
/>
保存配置退出
/> saveconfig
Last 10 configs saved in /etc/target/backup.
Configuration saved to /etc/target/saveconfig.json
/> exit
Global pref auto_save_on_exit=true
Last 10 configs saved in /etc/target/backup.
Configuration saved to /etc/target/saveconfig.json
server为centos 6,进行如下操作:
1.安装服务
[root@localhost ~]# yum -y install scsi-target-utils

2.启动服务
[root@localhost ~]# /etc/init.d/tgtd start
正在启动 SCSI target daemon:                              [确定]
[root@localhost ~]# chkconfig tgtd on
[root@localhost ~]# netstat -tuanlp | grep tgtd
tcp        0      0 0.0.0.0:3260                0.0.0.0:*                   LISTEN      4611/tgtd
tcp        0      0 :::3260                     :::*                        LISTEN      4611/tgtd

3.配置/etc/tgt/targets.conf,设置共享存储设备的路径相关属性
[root@localhost ~]# vi /etc/tgt/targets.conf
<target iqn.2020-04.com.server:test1>
    backing-store /dev/sdb1
    backing-store /dev/sdc1
    initiator-address 192.168.132.103
    initiator-address 192.168.132.0/24
    incominguser viscsiuser viscsipasswd
    write-cache off
</target>

# backing-store:虚拟的设备
# initiator-address:允许使用的客户端(可以不设置,则默认是all)
# incominguser:配置通过用户和密码访问(可以不设置)
# write-cache:不使用缓存,直接访问存储设备

4.重启服务
[root@localhost ~]#  /etc/init.d/tgtd restart
停止 SCSI target daemon:                                  [确定]
正在启动 SCSI target daemon:                              [确定]

5.查看iscsi target共享存储的相关信息,使用tgt-admin --show命令
[root@localhost ~]# tgt-admin --show
Target 1: iqn.2020-04.com.server:test1
    System information:
        Driver: iscsi
        State: ready
    I_T nexus information:
    LUN information:
        LUN: 0
            Type: controller
            SCSI ID: IET     00010000
            SCSI SN: beaf10
            Size: 0 MB, Block size: 1
            Online: Yes
            Removable media: No
            Prevent removal: No
            Readonly: No
            Backing store type: null
            Backing store path: None
            Backing store flags:
        LUN: 1
            Type: disk
            SCSI ID: IET     00010001
            SCSI SN: beaf11
            Size: 10737 MB, Block size: 512
            Online: Yes
            Removable media: No
            Prevent removal: No
            Readonly: No
            Backing store type: rdwr
            Backing store path: /dev/sdb1
            Backing store flags:
        LUN: 2
            Type: disk
            SCSI ID: IET     00010002
            SCSI SN: beaf12
            Size: 5364 MB, Block size: 512
            Online: Yes
            Removable media: No
            Prevent removal: No
            Readonly: No
            Backing store type: rdwr
            Backing store path: /dev/sdc1
            Backing store flags:
    Account information:
        viscsiuser
    ACL information:
        192.168.132.103
        192.168.132.0/24
[root@localhost ~]#

6.关闭防火墙
[root@localhost ~]# service iptables stop
client端和el7的操作几乎一致。
- 可以参考的其他文章:
https://documentation.suse.com/sles/12-SP4/html/SLES-all/cha-iscsi.html
https://linux.cn/article-4973-1.html
