Lenet 5与 ResNet18
使用pytorch构建神经网络系列
第五章 经典卷积神经网络
目录
- 使用pytorch构建神经网络系列
-
- 第五章 经典卷积神经网络
-
- 1.Lenet5
- 2.ResNet
1.Lenet5

输入为32 * 32像素图片
经过6个kernel 5 *5的卷积层 ,设置stride = 1,padding =0
经过subsampling,这里我们自己设置为Maxpooling ,大小为2 ✖️2,stride = 2
输出 6 ✖️14 ✖️14 进入下一层卷积
经过16个kernel 5 *5的卷积层 ,设置stride = 1,padding =0
经过subsampling,这里我们自己设置为Maxpooling ,大小为2 ✖️2,stride = 2
输出16 ✖️5 ✖️5 进入全链接层
经过一层120个neural 线性层 再经过Relu激活
经过一层84个neural 线性层 再经过Relu激活
最后输出 10个结果(Gaussian connection)
class Lenet5(nn.Module):
    """
    for cifar10 dataset.
    """
    def __init__(self):
        super(Lenet5, self).__init__()

        self.conv_unit= nn.Sequential(
            # x:[b, 3, 32, 32]
            nn.Conv2d(3, 6, kernel_size=5, stride=1, padding=0),
            nn.MaxPool2d(kernel_size=2, stride=2, padding=0),
            nn.Conv2d(6, 16, kernel_size=5, stride=1, padding=0),
            nn.MaxPool2d(kernel_size=2, stride=2, padding=0)

        )
        self.fc_unit = nn.Sequential(
            nn.Linear(16*5*5, 120),
            nn.ReLU(),
            nn.Linear(120, 84),
            nn.ReLU(),
            nn.Linear(84, 10)
        )

        self.criterion = nn.CrossEntropyLoss()
forward
    def forward(self, x):
        """

        :param x: [b, 3, 32, 32]
        :return:
        """
        batchsz = x.size(0)
        # [b, 3, 32, 32] ==> [b, 16, 5, 5]
        x = self.conv_unit(x)
        # [b, 16, 5, 5] ==> [b, 16*5*5]
        x = x.view(batchsz, 16*5*5)
        #  [b, 16*5*5] ==> [b, 10]
        logits = self.fc_unit(x)

        return logits
从dataset包中下载CIFAR10数据集,设置batch size为256,每个batch有256张图片丢到神经网络中训练,使用transforms.Compose对数据进行统一处理,这里只进行Normalization。
import torch
from torchvision import datasets
from torchvision import transforms
from torch.utils.data import DataLoader
from torch import nn, optim
from Lenet5 import Lenet5


def main():
    batchsz = 256
    cifar_train = datasets.CIFAR10('cifar', True, transform=transforms.Compose([
        transforms.Resize(32, 32),
        transforms.ToTensor(),
        transforms.Normalize(mean=[0.485, 0.456, 0.406],
                             std=[0.229, 0.224, 0.225])

    ]), download=True)

    cifar_train = DataLoader(cifar_train, batch_size=batchsz, shuffle=True)

    cifar_test = datasets.CIFAR10('cifar', False, transform=transforms.Compose([
        transforms.Resize(32, 32),
        transforms.ToTensor(),
        transforms.Normalize(mean=[0.485, 0.456, 0.406],
                             std=[0.229, 0.224, 0.225])
    ]), download=True)

    cifar_train = DataLoader(cifar_test, batch_size=batchsz, shuffle=True)
使用gpu加速,损失函数使用交叉熵,梯度更新使用Adamgrad
 	device = torch.device('cuda')
    model = Lenet5()
    criterion = nn.CrossEntropyLoss()
    optimizer = optim.Adam(model.parameters(), lr = 1e-3) #传入网络参数
    print(model)
对Lenet5模型,设置epoch = 150,150次更新
    for epoch in range(150):

        model.train()

        for batchidx, (x, label) in enumerate(cifar_train):
            # x, label = x.to(divice), label.to(divice)
            # [b, 10]
            # loss:

            logits = model(x)

            loss = criterion(logits, label)
            # loss(tensor scalar)
            # backpropagation

            optimizer.zero_grad() #梯度清零
            loss.backward() #BP
            optimizer.step() #更新
        print('epoch:', epoch, 'loss:', loss.item()) #loss标量转化为array打印

        model.eval()
        with torch.no_grad():
        # test ,包在不进行梯度更新内完成
            total_correct = 0
            total_num = 0
            for  x, label in cifar_train:
                logits = model(x) # [b, 10]
                pred = logits.argmax(dim = 1)
                total_correct += torch.eq(pred, label).float().sum().item()
                # eq返回一个 byte tensor 转换成float后累加,
                # 是一个scalar tensor,使用.item()转换成numpy
                total_num += x.size(0)

            acc = total_correct / total_num
            print("accuracy:", acc)
epoch: 58 loss: 0.007965920493006706
accuracy: 1.0
epoch: 59 loss: 0.009623807854950428
accuracy: 1.0
epoch: 60 loss: 0.00962372962385416
accuracy: 1.0
epoch: 61 loss: 0.009976484812796116
accuracy: 1.0
epoch: 62 loss: 0.004600073676556349
accuracy: 1.0
从结果来看,在训练了60次左右测试集上面的准确率达到了100%,loss也很小了。
2.ResNet
堆叠更多的网络层次并不能得到神经网络性能的提升,会存在梯度离散的问题,grad长时间为0。
因此在多层卷积中间添加短接,shortcut,直接跳过至少2层神经网络。跳过表现不好的网络层使得整体表现不会因层数增加而衰减变差。
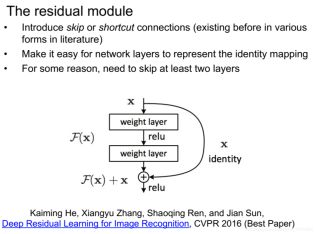
实验发现在2~3层卷积层中添加一个shortcut效果最好。
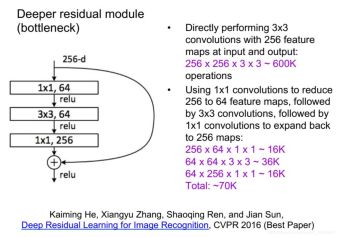
对于一个256的batch,要经过一层256个feature mapping的卷积层,卷积核大小为3✖️3,我们需要256✖️256✖️3✖️3 的参数数量,大小约为600k,如果不断加深网络层数,那么参数的数量会非常的多,因此我们将这一层神经网络展开层3层并添加shortcut优化网络:
第一层使用64个feature mapping ,大小为1✖️1 ,参数量 256✖️64✖️1✖️1
第二层使用64个feature mapping ,大小为3✖️3 ,参数量 64✖️64✖️1✖️1
第二层使用256个feature mapping ,大小为1✖️1 ,参数量 64✖️256✖️1✖️1
输出依然是256 dimension的feature mapping。但是参数量从原来600k降到70k。
每2层短接一个shortcut,使得一个34层的ResNet可以退化到一个19层的VGG:

代码实现:
ResBlk实现每一个短接的block,其中包含两层卷积层
import torch
from torch import nn
from torch.nn import functional as F

class ResBlk(nn.Module):
    """
    resnet block
    """
    def __init__(self, chan_in, chan_out, stride=1):
        """
        :param chan_in:
        :param chan_out:
        """
        super(ResBlk, self).__init__()

        self.conv1 = nn.Conv2d(chan_in, chan_out, kernel_size=3, stride=stride, padding=1)
        self.bn1 = nn.BatchNorm2d(chan_out)
        self.conv2 = nn.Conv2d(chan_out, chan_out, kernel_size=3, stride=1, padding=1)
        self.bn2 = nn.BatchNorm2d(chan_out)

        self.extra = nn.Sequential()
        if chan_in != chan_out:
            self.extra = nn.Sequential(
                nn.Conv2d(chan_in, chan_out, kernel_size=1, stride=stride),
                nn.BatchNorm2d(chan_out)
            )

    def forward(self, x):
        """
        :param x: [b, chan, h, w]
        :return:
        """
        out = F.relu(self.bn1(self.conv1(x)))
        out = self.bn2(self.conv2(out))
        # shortcut
        # [b, chan_in, h, w] ==> [b, chan_out, h, w]
        # element-wise add:

        out = self.extra(x) + out

        return out
class ResNet18(nn.Module):
    def __init__(self):
        super(ResNet18, self).__init__()

        self.conv1 = nn.Sequential(
            nn.Conv2d(3, 64, kernel_size=3, stride=3, padding=0),
            nn.BatchNorm2d(64)
        )
        # followed 4 blocks
        # [b, 64, h, w] ==> [b, 128, h, w]
        self.blk1 = ResBlk(64, 128, stride=2)
        # [b, 128, h, w] ==> [b, 256, h, w]
        self.blk2 = ResBlk(128, 256, stride=2)
        # [b, 256, h, w] ==> [b, 512, h, w]
        self.blk3 = ResBlk(256, 512, stride=2)
        # [b, 512, h, w] ==> [b, 512, h, w]
        self.blk4 = ResBlk(512, 512, stride=2)

        self.outlayer = nn.Linear(512*1*1, 10)

    def forward(self, x):
        """

        :param x:
        :return:
        """
        x = F.relu(self.conv1(x))

        # [b, 64, h, w] ==> [b, 512, h, w]
        x = self.blk1(x)
        x = self.blk2(x)
        x = self.blk3(x)
        x = self.blk4(x)
        print('after conv:', x.shape)
        x = F.adaptive_max_pool2d(x, [1, 1])
        print('after pooling:', x.shape)
        x = x.view(x.size(0), -1)

        x = self.outlayer(x)

        return x

#测试x输出的shape
def main():
    blk = ResBlk(64, 128, stride=2)
    tmp = torch.randn(2, 64, 32, 32)
    out = blk(tmp)
    print('block :', out.shape)

    x = torch.randn(2, 3, 32, 32)
    model = ResNet18()
    out = model(x)
    print('resnet:', out.shape)

if __name__ == '__main__':
    main()
block : torch.Size([2, 128, 16, 16])
after conv: torch.Size([2, 512, 2, 2])
after pooling: torch.Size([2, 512, 1, 1])
resnet: torch.Size([2, 10])