机器学习之掌纹识别(掌纹分类)
机器学习之掌纹识别
- 一、掌纹特征提取
-
- 1.1 Gabor滤波器
- 二、掌纹信息分类
-
- 2.1 基于PCA+SVM的掌纹信息分类
- 2.2 基于PCA+KNN的掌纹信息分类
- 分类结果总结
- 三、掌纹信息匹配
-
- 3.1掌纹信息相似度匹配
一、掌纹特征提取
1.1 Gabor滤波器
Gabor滤波器是一个或一组Gabor函数离散形式,在计算机视觉中常用到Gabor滤波器来提取纹理特征。说白了,就是一个加了高斯窗的傅里叶变换。
Gabor滤波器(专注于纹理特征的一种滤波器)
链接: Gabor特征的详细介绍(博主推荐)
下面时我们项目的代码部分:
Gabor特征采集部分如下(示例):
1.建立Gabor滤波器
def build_filters():
    gabor_filters = []
    gabor_size = [6,9,12,15,18,21] #定义gabor尺度,6个
    lamda = np.pi/1.0 #波长
    for theta in np.arange(0,np.pi,np.pi / 4): #定义gabor的4个方向
        for i in range(6):
            kern = cv2.getGaborKernel((gabor_size[i],gabor_size[i]),1.0,theta,lamda,0.5,0,ktype=cv2.CV_32F)
            kern /= 1.2*kern.sum()
            filters.append(kern)
    print("np.arange(0,np.pi,np.pi / 4)",np.arange(0,np.pi,np.pi / 4))
    print("np.pi",np.pi)
    print("len",len(gabor_filters))
    return gabor_filters
2.Gabor特征提取
def getGabor(img,filters):
    print('len(filters)',len(filters))
    res = [] #滤波结果
    for i in range(len(filters)):
        res1 = scan_win(img,filters[i])
        res.append(np.asarray(res1))
    # pb.figure(2)
    for temp in range(len(res)):
        pb.subplot(4,6,temp+1)
        pb.imshow(res[temp],cmap='gray')
    # pb.show()
    return res
3.整合特征导入txt文件
def make_feature(filters):
    pic_list = []
    #将所有图片的特征向量进行堆叠,最后得到(500,16384)大小的特征矩阵
    stack_metrix = np.array([[0]])
    count=0
    for i in range(0, 100):
        # 用于存放当前类别标签(用外层循环i的值来表示)
        pic_list.append(i)
        class_matrix = np.array(pic_list, ndmin=2)
        for j in range(1, 6):
            path = 'ROI/p_{}_{}.bmp'.format(i, j)
            x = cv2.imread(path)
            data=getGabor(x,filters)
            data = np.asarray(data)
            data=normalization(data)
            data = np.reshape(data, (1, -1))
            one_data = np.column_stack((data, class_matrix))
            print(one_data)
            count=count+1
            print('第{}次'.format(count))
            # y压缩标签列表添加到每张图片特征矩阵的最后一维即为扁平化处理
            # 第一次不堆叠
            if i == 0 and j == 1:
                stack_metrix = one_data
                continue
            stack_metrix = np.row_stack((stack_metrix, one_data))
        pic_list.pop()
    np.savetxt('(new)feature.txt', stack_metrix)
二、掌纹信息分类
2.1 基于PCA+SVM的掌纹信息分类
链接: SVM(支持向量机)最佳理解.
代码如下(示例):
def train_model_pca_svm():
    """
    1.PCA+SVM进行分类
    2.PCA降维至20维
    :return:
    """
    data, target = load_data()
    x_train, x_test, y_train, y_test = train_test_split(data, target, test_size=0.3, random_state=13)

    # 利用PCA将特征降至20维,测试集上的预测精度为: 0.9487179487179487
    # 利用PCA将特征降至50维,测试集上的预测精度为: 0.9572649572649573
    # 利用PCA将特征降至100维,测试集上的预测精度为: 0.9658119658119658
    pca = PCA(n_components=100)
    x_train = pca.fit_transform(x_train)
    svm_clf = SVC(C=100)
    svm_clf.fit(x_train, y_train)

    # 利用在训练集上进行降维的PCA对测试数据进行降维
    # 保证转换矩阵相同
    x_test_process = pca.transform(x_test)
    y_predict = svm_clf.predict(x_test_process)
    score = svm_clf.score(x_test_process, y_test)
    print('测试集上的预测精度为:{}'.format(score))
    print('\n')
    print('测试集前10个样本的类别为:', y_test[:10].tolist())
    print('预测的类别为:', y_predict[:10])
    print('\n')
    print(classification_report(y_test, y_predict))
2.2 基于PCA+KNN的掌纹信息分类
链接: KNN(K邻近)最佳理解.
代码如下(示例):
def train_model_pca_knn(i):
    """
    1.PCA+KNN进行分类
    2.PCA降维至20维
    :return:
    """
    data, target = load_data()
    x_train, x_test, y_train, y_test = train_test_split(data, target, test_size=0.3, random_state=13)
    # 利用PCA将特征降至100维,测试集上的预测精度为: 0.9658119658119658
    pca = PCA(n_components=20)
    x_train = pca.fit_transform(x_train)
    my_model=KNeighborsClassifier(algorithm='kd_tree',p=10,n_neighbors=i)
    my_model.fit(x_train, y_train)
    #k为1,测试集上的预测精度为:0.9316239316239316
    # 利用在训练集上进行降维的PCA对测试数据进行降维
    # 保证转换矩阵相同
    x_test_process = pca.transform(x_test)
    y_predict = my_model.predict(x_test_process)
    score = my_model.score(x_test_process, y_test)
    print('测试集上的预测精度为:{}'.format(score))
    print('\n')
    print('测试集前10个样本的类别为:', y_test[:10].tolist())
    print('预测的类别为:', y_predict[:10])
    print('\n')
    print(classification_report(y_test, y_predict))
分类结果总结
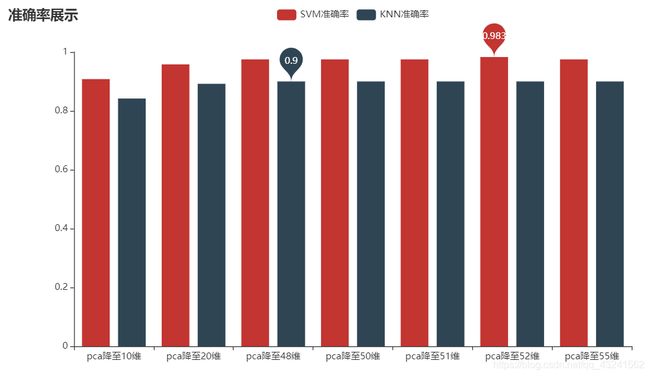
对于该类掌纹分类效果上看,分类效果可见SVM优于KNN,由此可得出结论,SVM在该类图片数据集上的分类效果较好。三、掌纹信息匹配
3.1掌纹信息相似度匹配
原理:获取特征文件进行扁平化处理之后对特征集的数据逐一匹配。
def compare_pic(feature1,feature2):
    unsim = 0
    x1 = np.array(feature1).flatten() #将特征做扁平化处理
    x2 = np.array(feature2).flatten()
    for pic1,pic1 in zip(x1,x2):
        if pic1 != pic1:
            unsim += 1
    print(unsim)
    sim = 1 - unsim/len(x1)
    print('相似度',sim)
    return sim
之后对图片特征逐个遍历检索即可。
    for i in range(0, 100):
            path = 'ROI/p_{}_{}.bmp'.format(i,1)
            x = cv2.imread(path)
            data=Gg.getGabor(x,filters)
            simial_score.append(int(compare_pic(data,feature)*1000))
            count=count+1
            print('第{}次检索'.format(count))
   	class_score=simial_score.index(max(simial_score))
又是熬夜写文章的一晚。
希望可以帮助到有需要的朋友,我们一起学习,一起进步!!!
如果愿意和我交流技术的朋友,您将获得一下交流方式
QQ:1093279164
(纯粹交流技术!谢谢!也可以一起打比赛!!!)
