React使用笔记
1、网页基础使用
1.1 jsx
1.全称: JavaScript XML
2.react定义的一种类似于XML的JS扩展语法: JS + XML本质是React.createElement(component, props, …children)方法的语法糖
3.作用: 用来简化创建虚拟DOM
1)写法:var ele =
Hello JSX!
2)注意1:它不是字符串, 也不是HTML/XML标签
3)注意2:它最终产生的就是一个JS对象
4.标签名任意: HTML标签或其它标签
5.标签属性任意: HTML标签属性或其它
6.基本语法规则
jsx语法规则:
1.定义虚拟DOM时,不要写引号。
2.标签中混入JS表达式时要用{}。
3.样式的类名指定不要用class,要用className。
4.内联样式,要用style={ {key:value}}的形式去写。
5.只有一个根标签
6.标签必须闭合
7.标签首字母
(1).若小写字母开头,则将该标签转为html中同名元素,若html中无该标签对应的同名元素,则报错。
(2).若大写字母开头,react就去渲染对应的组件,若组件没有定义,则报错。
基础知识补充:
一定注意区分:【js语句(代码)】与【js表达式】
1.表达式:一个表达式会产生一个值,可以放在任何一个需要值的地方
下面这些都是表达式:
(1). a
(2). a+b
(3). demo(1)
(4). arr.map()
(5). function test () {}
2.语句(代码):
下面这些都是语句(代码):
(1).if(){}
(2).for(){}
(3).switch(){case:xxxx}
2 组件
两种方式:
- 函数式组件:定义方法不能直接用方法需要用标签
<script type="text/babel">
function Demo(){
console.log("demo")
return <h1>我是组件</h1>
}
//组件需要返回值,并且函数大写,
/*
执行了ReactDOM.render(
- 类式组件
<script type="text/babel">
//1.创建类式组件
class MyComponent extends React.Component {
render(){
//render是放在哪里的?—— MyComponent的原型对象上,供实例使用。
//render中的this是谁?—— MyComponent的实例对象 <=> MyComponent组件实例对象。
console.log('render中的this:',this);
return <h2>我是用类定义的组件(适用于【复杂组件】的定义)</h2>
}
}
//2.渲染组件到页面
ReactDOM.render(<MyComponent/>,document.getElementById('test'))
/*
执行了ReactDOM.render(
2.1 复习类的基本知识
	<script type="text/javascript" >
		/*
			总结:
				1.类中的构造器不是必须要写的,要对实例进行一些初始化的操作,如添加指定属性时才写。
				2.如果A类继承了B类,且A类中写了构造器,那么A类构造器中的super是必须要调用的。
				3.类中所定义的方法,都放在了类的原型对象上,供实例去使用。
		*/
		//创建一个Person类
		class Person {

			//构造器方法
			constructor(name,age){

				//构造器中的this是谁?—— 类的实例对象
				this.name = name
				this.age = age
			}
			//一般方法
			speak(){

				//speak方法放在了哪里?——类的原型对象上,供实例使用
				//通过Person实例调用speak时,speak中的this就是Person实例
				console.log(`我叫${
       this.name},我年龄是${
       this.age}`);
			}
		}

		//创建一个Student类,继承于Person类
		class Student extends Person {

			constructor(name,age,grade){

				super(name,age)
				this.grade = grade
				this.school = '尚硅谷'
			}
			//重写从父类继承过来的方法
			speak(){

				console.log(`我叫${
       this.name},我年龄是${
       this.age},我读的是${
       this.grade}年级`);
				this.study()
			}
			study(){

				//study方法放在了哪里?——类的原型对象上,供实例使用
				//通过Student实例调用study时,study中的this就是Student实例
				console.log('我很努力的学习');
			}
		}

		class Car {

			constructor(name,price){

				this.name = name
				this.price = price
				// this.wheel = 4
			}
			//类中可以直接写赋值语句,如下代码的含义是:给Car的实例对象添加一个属性,名为a,值为1
			a = 1
			wheel = 4
			static demo = 100
		}
		const c1 = new Car('奔驰c63',199)
		console.log(c1);
		console.log(Car.demo);
	</script>
2.2 state 三大组件核心
	<script type="text/babel">
		//1.创建组件
		class Weather extends React.Component{


			//构造器调用几次? ———— 1次
			constructor(props){

				console.log('constructor');
				super(props)
				//初始化状态
				this.state = {
     isHot:false,wind:'微风'}
				//解决changeWeather中this指向问题
				this.changeWeather = this.changeWeather.bind(this)
			}

			//render调用几次? ———— 1+n次 1是初始化的那次 n是状态更新的次数
			render(){

				console.log('render');
				//读取状态
				const {
     isHot,wind} = this.state
				return <h1 onClick={
     this.changeWeather}>今天天气很{
     isHot ? '炎热' : '凉爽'},{
     wind}</h1>
			}

			//changeWeather调用几次? ———— 点几次调几次
			changeWeather(){

				//changeWeather放在哪里? ———— Weather的原型对象上,供实例使用
				//由于changeWeather是作为onClick的回调,所以不是通过实例调用的,是直接调用
				//类中的方法默认开启了局部的严格模式,所以changeWeather中的this为undefined

				console.log('changeWeather');
				//获取原来的isHot值
				const isHot = this.state.isHot
				//严重注意:状态必须通过setState进行更新,且更新是一种合并,不是替换。
				this.setState({
     isHot:!isHot})
				console.log(this);

				//严重注意:状态(state)不可直接更改,下面这行就是直接更改!!!
				//this.state.isHot = !isHot //这是错误的写法
			}
		}
		//2.渲染组件到页面
		ReactDOM.render(<Weather/>,document.getElementById('test'))

	</script>
简写demo
	<script type="text/babel">
		//1.创建组件
		class Weather extends React.Component{

			//初始化状态
			state = {
     isHot:false,wind:'微风'}

			render(){

				const {
     isHot,wind} = this.state
				return <h1 onClick={
     this.changeWeather}>今天天气很{
     isHot ? '炎热' : '凉爽'},{
     wind}</h1>
			}

			//自定义方法————要用赋值语句的形式+箭头函数  匿名方法:this获取父实现的this
			changeWeather = ()=>{

				const isHot = this.state.isHot
				this.setState({
     isHot:!isHot})
			}
		}
		//2.渲染组件到页面
		ReactDOM.render(<Weather/>,document.getElementById('test'))

	</script>
2.3 组件三大核心属性 props
	<script type="text/babel">
		//创建组件
		class Person extends React.Component{

			render(){

				// console.log(this);
				const {
     name,age,sex} = this.props
				return (
					<ul>
						<li>姓名:{
     name}</li>
						<li>性别:{
     sex}</li>
						<li>年龄:{
     age+1}</li>
					</ul>
				)
			}
		}
		//渲染组件到页面
		ReactDOM.render(<Person name="jerry" age={
     19}  sex="男"/>,document.getElementById('test1'))
		ReactDOM.render(<Person name="tom" age={
     18} sex="女"/>,document.getElementById('test2'))

		const p = {
     name:'老刘',age:18,sex:'女'}
		// console.log('@',...p);
		// ReactDOM.render(,document.getElementById('test3'))
		ReactDOM.render(<Person {
     ...p}/>,document.getElementById('test3'))
	</script>
限制条件
	<script type="text/babel">
		//创建组件
		class Person extends React.Component{

			render(){

				// console.log(this);
				const {
     name,age,sex} = this.props
				//props是只读的
				//this.props.name = 'jack' //此行代码会报错,因为props是只读的
				return (
					<ul>
						<li>姓名:{
     name}</li>
						<li>性别:{
     sex}</li>
						<li>年龄:{
     age+1}</li>
					</ul>
				)
			}
		}
		//对标签属性进行类型、必要性的限制
		Person.propTypes = {

			name:PropTypes.string.isRequired, //限制name必传,且为字符串
			sex:PropTypes.string,//限制sex为字符串
			age:PropTypes.number,//限制age为数值
			speak:PropTypes.func,//限制speak为函数
		}
		//指定默认标签属性值
		Person.defaultProps = {

			sex:'男',//sex默认值为男
			age:18 //age默认值为18
		}
		//渲染组件到页面
		ReactDOM.render(<Person name={
     100} speak={
     speak}/>,document.getElementById('test1'))
		ReactDOM.render(<Person name="tom" age={
     18} sex="女"/>,document.getElementById('test2'))

		const p = {
     name:'老刘',age:18,sex:'女'}
		// console.log('@',...p);
		// ReactDOM.render(,document.getElementById('test3'))
		ReactDOM.render(<Person {
     ...p}/>,document.getElementById('test3'))

		function speak(){

			console.log('我说话了');
		}
	</script>
2.6 组件生命周期
旧版本生命周期

- 组件从创建到死亡它会经历一些特定的阶段。
- React组件中包含一系列勾子函数(生命周期回调函数), 会在特定的时刻调用。
- 我们在定义组件时,会在特定的生命周期回调函数中,做特定的工作。
			1. 初始化阶段: 由ReactDOM.render()触发---初次渲染
								1.	constructor()
								2.	componentWillMount()
								3.	render()
								4.	componentDidMount() =====> 常用
												一般在这个钩子中做一些初始化的事,例如:开启定时器、发送网络请求、订阅消息
			2. 更新阶段: 由组件内部this.setSate()或父组件render触发
								1.	shouldComponentUpdate()
								2.	componentWillUpdate()
								3.	render() =====> 必须使用的一个
								4.	componentDidUpdate()
			3. 卸载组件: 由ReactDOM.unmountComponentAtNode()触发
								1.	componentWillUnmount()  =====> 常用
												一般在这个钩子中做一些收尾的事,例如:关闭定时器、取消订阅消息
流程demo
	<script type="text/babel">
		/*
				1. 初始化阶段: 由ReactDOM.render()触发---初次渲染
									1.	constructor()
									2.	componentWillMount()
									3.	render()
									4.	componentDidMount() =====> 常用
													一般在这个钩子中做一些初始化的事,例如:开启定时器、发送网络请求、订阅消息
				2. 更新阶段: 由组件内部this.setSate()或父组件render触发
									1.	shouldComponentUpdate()
									2.	componentWillUpdate()
									3.	render() =====> 必须使用的一个
									4.	componentDidUpdate()
				3. 卸载组件: 由ReactDOM.unmountComponentAtNode()触发
									1.	componentWillUnmount()  =====> 常用
													一般在这个钩子中做一些收尾的事,例如:关闭定时器、取消订阅消息
		*/
		//创建组件
		class Count extends React.Component{


			//构造器
			constructor(props){

				console.log('Count---constructor');
				super(props)
				//初始化状态
				this.state = {
     count:0}
			}

			//加1按钮的回调
			add = ()=>{

				//获取原状态
				const {
     count} = this.state
				//更新状态
				this.setState({
     count:count+1})
			}

			//卸载组件按钮的回调
			death = ()=>{

				ReactDOM.unmountComponentAtNode(document.getElementById('test'))
			}

			//强制更新按钮的回调
			force = ()=>{

				this.forceUpdate()
			}

			//组件将要挂载的钩子
			componentWillMount(){

				console.log('Count---componentWillMount');
			}

			//组件挂载完毕的钩子
			componentDidMount(){

				console.log('Count---componentDidMount');
			}

			//组件将要卸载的钩子
			componentWillUnmount(){

				console.log('Count---componentWillUnmount');
			}

			//控制组件更新的“阀门”
			shouldComponentUpdate(){

				console.log('Count---shouldComponentUpdate');
				return true
			}

			//组件将要更新的钩子
			componentWillUpdate(){

				console.log('Count---componentWillUpdate');
			}

			//组件更新完毕的钩子
			componentDidUpdate(){

				console.log('Count---componentDidUpdate');
			}

			render(){

				console.log('Count---render');
				const {
     count} = this.state
				return(
					<div>
						<h2>当前求和为:{
     count}</h2>
						<button onClick={
     this.add}>点我+1</button>
						<button onClick={
     this.death}>卸载组件</button>
						<button onClick={
     this.force}>不更改任何状态中的数据,强制更新一下</button>
					</div>
				)
			}
		}

		//父组件A
		class A extends React.Component{

			//初始化状态
			state = {
     carName:'奔驰'}

			changeCar = ()=>{

				this.setState({
     carName:'奥拓'})
			}

			render(){

				return(
					<div>
						<div>我是A组件</div>
						<button onClick={
     this.changeCar}>换车</button>
						<B carName={
     this.state.carName}/>
					</div>
				)
			}
		}

		//子组件B
		class B extends React.Component{

			//组件将要接收新的props的钩子
			componentWillReceiveProps(props){

				console.log('B---componentWillReceiveProps',props);
			}

			//控制组件更新的“阀门”
			shouldComponentUpdate(){

				console.log('B---shouldComponentUpdate');
				return true
			}
			//组件将要更新的钩子
			componentWillUpdate(){

				console.log('B---componentWillUpdate');
			}

			//组件更新完毕的钩子
			componentDidUpdate(){

				console.log('B---componentDidUpdate');
			}

			render(){

				console.log('B---render');
				return(
					<div>我是B组件,接收到的车是:{
     this.props.carName}</div>
				)
			}
		}

		//渲染组件
		ReactDOM.render(<Count/>,document.getElementById('test'))
	</script>
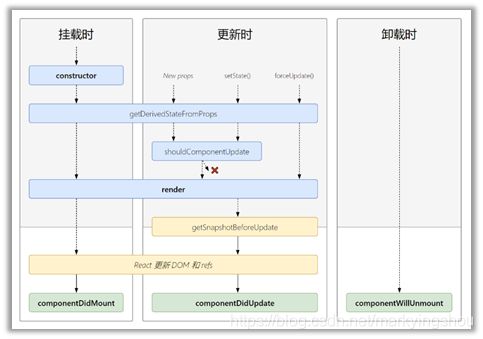
新版本react 17.0.1生命周期
- 初始化阶段: 由ReactDOM.render()触发—初次渲染
1. constructor()
2. getDerivedStateFromProps
3. render()
4. componentDidMount() =====> 常用
一般在这个钩子中做一些初始化的事,例如:开启定时器、发送网络请求、订阅消息 - 更新阶段: 由组件内部this.setSate()或父组件重新render触发
1. getDerivedStateFromProps
2. shouldComponentUpdate()
3. render()
4. getSnapshotBeforeUpdate
5. componentDidUpdate() - 卸载组件: 由ReactDOM.unmountComponentAtNode()触发
1. componentWillUnmount() =====> 常用一般在这个钩子中做一些收尾的事,例如:关闭定时器、取消订阅消息
getSnapshotBeforeUpdate
getSnapshotBeforeUpdate(prevProps, prevState) {
// 我们是否在 list 中添加新的 items ?
// 捕获滚动位置以便我们稍后调整滚动位置。
if (prevProps.list.length < this.props.list.length) {
const list = this.listRef.current;
return list.scrollHeight - list.scrollTop;
}
return null;
}
componentDidUpdate(prevProps, prevState, snapshot) {
// 如果我们 snapshot 有值,说明我们刚刚添加了新的 items,
// 调整滚动位置使得这些新 items 不会将旧的 items 推出视图。
//(这里的 snapshot 是 getSnapshotBeforeUpdate 的返回值)
if (snapshot !== null) {
const list = this.listRef.current;
list.scrollTop = list.scrollHeight - snapshot;
}
}
2.7 虚拟dom和DOM diffing算法
	/** 1. 虚拟DOM中key的作用:
		1). 简单的说: key是虚拟DOM对象的标识, 在更新显示时key起着极其重要的作用。

		2). 详细的说: 当状态中的数据发生变化时,react会根据【新数据】生成【新的虚拟DOM】,
									随后React进行【新虚拟DOM】与【旧虚拟DOM】的diff比较,比较规则如下:

						a. 旧虚拟DOM中找到了与新虚拟DOM相同的key:
									(1).若虚拟DOM中内容没变, 直接使用之前的真实DOM
									(2).若虚拟DOM中内容变了, 则生成新的真实DOM,随后替换掉页面中之前的真实DOM

						b. 旧虚拟DOM中未找到与新虚拟DOM相同的key
									根据数据创建新的真实DOM,随后渲染到到页面

2. 用index作为key可能会引发的问题:
					1. 若对数据进行:逆序添加、逆序删除等破坏顺序操作:
									会产生没有必要的真实DOM更新 ==> 界面效果没问题, 但效率低。

					2. 如果结构中还包含输入类的DOM:
									会产生错误DOM更新 ==> 界面有问题。

					3. 注意!如果不存在对数据的逆序添加、逆序删除等破坏顺序操作,
						仅用于渲染列表用于展示,使用index作为key是没有问题的。

3. 开发中如何选择key?:
					1.最好使用每条数据的唯一标识作为key, 比如id、手机号、身份证号、学号等唯一值。
					2.如果确定只是简单的展示数据,用index也是可以的。
	*/
第三章 React 脚手架
3.1.1 react脚手架
1.	xxx脚手架: 用来帮助程序员快速创建一个基于xxx库的模板项目
1.	包含了所有需要的配置(语法检查、jsx编译、devServer…)
2.	下载好了所有相关的依赖
3.	可以直接运行一个简单效果
2.	react提供了一个用于创建react项目的脚手架库: create-react-app
3.	项目的整体技术架构为:  react + webpack + es6 + eslint
4.	使用脚手架开发的项目的特点: 模块化, 组件化, 工程化
3.1.2 创建项目
第一步,全局安装:npm i -g create-react-app
第二步,切换到想创项目的目录,使用命令:create-react-app hello-react
第三步,进入项目文件夹:cd hello-react
第四步,启动项目:npm start
yarn vscode 无法加载文件 C:\Users\mark\AppData\Roaming\npm\yarn.ps1,因为在此系统上禁止运行脚本。解决方法:
运行powershell(管理员身份)-》输入 set-ExecutionPolicy RemoteSigned -》A

脚手架项目结构
	public ---- 静态资源文件夹
		favicon.icon ------ 网站页签图标
		index.html -------- 主页面
		logo192.png ------- logo图
		logo512.png ------- logo图
		manifest.json ----- 应用加壳的配置文件
		robots.txt -------- 爬虫协议文件
src ---- 源码文件夹
		App.css -------- App组件的样式
		App.js --------- App组件
		App.test.js ---- 用于给App做测试
		index.css ------ 样式
		index.js ------- 入口文件
		logo.svg ------- logo图
		reportWebVitals.js
			--- 页面性能分析文件(需要web-vitals库的支持)
		setupTests.js
			---- 组件单元测试的文件(需要jest-dom库的支持)
index.html解析
	<meta charset="utf-8" />

		<link rel="icon" href="%PUBLIC_URL%/favicon.ico" />

		<meta name="viewport" content="width=device-width, initial-scale=1" />

    <meta name="theme-color" content="red" />
    <meta
      name="description"
      content="Web site created using create-react-app"
		/>

		<link rel="apple-touch-icon" href="%PUBLIC_URL%/logo192.png" />

		<link rel="manifest" href="%PUBLIC_URL%/manifest.json" />
    <title>React Apptitle>
    <body>

    <noscript>You need to enable JavaScript to run this app.noscript>
    body>
第四章、react ajax请求
设置跨域 src目录下创建setupProxy.js
   const proxy = require('http-proxy-middleware')

   module.exports = function(app) {

     app.use(
       proxy('/api1', {
       //api1是需要转发的请求(所有带有/api1前缀的请求都会转发给5000)
         target: 'http://localhost:5000', //配置转发目标地址(能返回数据的服务器地址)
         changeOrigin: true, //控制服务器接收到的请求头中host字段的值
         /*
         	changeOrigin设置为true时,服务器收到的请求头中的host为:localhost:5000
         	changeOrigin设置为false时,服务器收到的请求头中的host为:localhost:3000
         	changeOrigin默认值为false,但我们一般将changeOrigin值设为true
         */
         pathRewrite: {
     '^/api1': ''} //去除请求前缀,保证交给后台服务器的是正常请求地址(必须配置)
       }),
       proxy('/api2', {

         target: 'http://localhost:5001',
         changeOrigin: true,
         pathRewrite: {
     '^/api2': ''}
       })
     )
   }
第五章
1.	单页Web应用(single page web application,SPA)。
2.	整个应用只有一个完整的页面。
3.	点击页面中的链接不会刷新页面,只会做页面的局部更新。
4.	数据都需要通过ajax请求获取, 并在前端异步展现。
5.1.1 内置组件
- 传递参数 有history 等参数
- 可以自带样式
- 匹配一个即返回,多个才路由选择才包起来
组件路由和组件区别
路由组件与一般组件
NavLink可以实现路由链接的高亮,通过activeClassName指定样式名
1.写法不同:
	一般组件:<Demo/>
	路由组件:<Route path="/demo" component={Demo}/>
2.存放位置不同:
	一般组件:components
	路由组件:pages
3.接收到的props不同:
	一般组件:写组件标签时传递了什么,就能收到什么
	路由组件:接收到三个固定的属性
		history:
					go: ƒ go(n)
					goBack: ƒ goBack()
					goForward: ƒ goForward()
					push: ƒ push(path, state)
					replace: ƒ replace(path, state)
		location:
					pathname: "/about"
					search: ""
					state: undefined
		match:
					params: {}
					path: "/about"
					url: "/about"
路由严格匹配和模糊匹配
1.默认使用的是模糊匹配(简单记:【输入的路径】必须包含要【匹配的路径】,且顺序要一致)
2.开启严格匹配:
3.严格匹配不要随便开启,需要再开,有些时候开启会导致无法继续匹配二级路由
redirect使用
1.一般写在所有路由注册的最下方,当所有路由都无法匹配时,跳转到Redirect指定的路由
2.具体编码:
BrowserRouter与HashRouter的区别
1.底层原理不一样:
BrowserRouter使用的是H5的history API,不兼容IE9及以下版本。
HashRouter使用的是URL的哈希值。
2.path表现形式不一样
BrowserRouter的路径中没有#,例如:localhost:3000/demo/test
HashRouter的路径包含#,例如:localhost:3000/#/demo/test
3.刷新后对路由state参数的影响
(1).BrowserRouter没有任何影响,因为state保存在history对象中。
(2).HashRouter刷新后会导致路由state参数的丢失!!!
4.备注:HashRouter可以用于解决一些路径错误相关的问题。
5.1.2 向路由组件传输参数
	1.params参数
				路由链接(携带参数):详情Link>
				注册路由(声明接收):<Route path="/demo/test/:name/:age" component={Test}/>
				接收参数:this.props.match.params
	2.search参数
				路由链接(携带参数):详情Link>
				注册路由(无需声明,正常注册即可):<Route path="/demo/test" component={Test}/>
				接收参数:this.props.location.search
				备注:获取到的search是urlencoded编码字符串,需要借助querystring解析
	3.state参数
				路由链接(携带参数):详情Link>
				注册路由(无需声明,正常注册即可):<Route path="/demo/test" component={Test}/>
				接收参数:this.props.location.state
				备注:刷新也可以保留住参数
编程式路由导航
export default class Message extends Component {
state = {
messageArr:[
{
id:'01',title:'消息1'},
{
id:'02',title:'消息2'},
{
id:'03',title:'消息3'},
]
}
replaceShow = (id,title)=>{
//replace跳转+携带params参数
//this.props.history.replace(`/home/message/detail/${id}/${title}`)
//replace跳转+携带search参数
// this.props.history.replace(`/home/message/detail?id=${id}&title=${title}`)
//replace跳转+携带state参数
this.props.history.replace(`/home/message/detail`,{
id,title})
}
pushShow = (id,title)=>{
//push跳转+携带params参数
// this.props.history.push(`/home/message/detail/${id}/${title}`)
//push跳转+携带search参数
// this.props.history.push(`/home/message/detail?id=${id}&title=${title}`)
//push跳转+携带state参数
this.props.history.push(`/home/message/detail`,{
id,title})
}
back = ()=>{
this.props.history.goBack()
}
forward = ()=>{
this.props.history.goForward()
}
go = ()=>{
this.props.history.go(-2)
}
render() {
const {
messageArr} = this.state
return (
<div>
<ul>
{
messageArr.map((msgObj)=>{
return (
<li key={
msgObj.id}>
{
/* 向路由组件传递params参数 */}
{
/* {msgObj.title} */}
{
/* 向路由组件传递search参数 */}
{
/* {msgObj.title} */}
{
/* 向路由组件传递state参数 */}
<Link to={
{
pathname:'/home/message/detail',state:{
id:msgObj.id,title:msgObj.title}}}>{
msgObj.title}</Link>
<button onClick={
()=> this.pushShow(msgObj.id,msgObj.title)}>push查看</button>
<button onClick={
()=> this.replaceShow(msgObj.id,msgObj.title)}>replace查看</button>
</li>
)
})
}
</ul>
<hr/>
{
/* 声明接收params参数 */}
{
/* */ }
{
/* search参数无需声明接收,正常注册路由即可 */}
{
/* */ }
{
/* state参数无需声明接收,正常注册路由即可 */}
<Route path="/home/message/detail" component={
Detail}/>
<button onClick={
this.back}>回退</button>
<button onClick={
this.forward}>前进</button>
<button onClick={
this.go}>go</button>
</div>
)
}
}
编程式路由导航接口
借助this.prosp.history对象上的API对操作路由跳转、前进、后退
-this.prosp.history.push()
-this.prosp.history.replace()
-this.prosp.history.goBack()
-this.prosp.history.goForward()
-this.prosp.history.go()
5.1.3 withRouter可以让一般组件也拥有路由功能
import React, {
Component } from 'react'
import {
withRouter} from 'react-router-dom' //必须引入export时候,可以让组件带上history prop withRouter(组件)
class Header extends Component {
back = ()=>{
this.props.history.goBack()
}
forward = ()=>{
this.props.history.goForward()
}
go = ()=>{
this.props.history.go(-2)
}
render() {
console.log('Header组件收到的props是',this.props);
return (
<div className="page-header">
<h2>React Router Demo</h2>
<button onClick={
this.back}>回退</button>
<button onClick={
this.forward}>前进</button>
<button onClick={
this.go}>go</button>
</div>
)
}
}
export default withRouter(Header)
//withRouter可以加工一般组件,让一般组件具备路由组件所特有的API
//withRouter的返回值是一个新组件
5.1.4 BrowserRouter与HashRouter的区别
1.底层原理不一样:
			BrowserRouter使用的是H5的history API,不兼容IE9及以下版本。
			HashRouter使用的是URL的哈希值。
2.path表现形式不一样
			BrowserRouter的路径中没有#,例如:localhost:3000/demo/test
			HashRouter的路径包含#,例如:localhost:3000/#/demo/test
3.刷新后对路由state参数的影响
			(1).BrowserRouter没有任何影响,因为state保存在history对象中。
			(2).HashRouter刷新后会导致路由state参数的丢失!!!
4.备注:HashRouter可以用于解决一些路径错误相关的问题。
6、引入antd前端UI框架shiyong
使用方法:
高级配置 antd文档
此时我们需要对 create-react-app 的默认配置进行自定义,这里我们使用 react-app-rewired (一个对 create-react-app 进行自定义配置的社区解决方案)。

引入 react-app-rewired 并修改 package.json 里的启动配置。由于新的 [email protected] 版本的关系,你还需要安装 customize-cra。

$ yarn add react-app-rewired customize-cra
/* package.json */
"scripts": {
-   "start": "react-scripts start",
+   "start": "react-app-rewired start",
-   "build": "react-scripts build",
+   "build": "react-app-rewired build",
-   "test": "react-scripts test",
+   "test": "react-app-rewired test",
}
然后在项目根目录创建一个 config-overrides.js 用于修改默认配置。

module.exports = function override(config, env) {
  // do stuff with the webpack config...
  return config;
};

使用 babel-plugin-import#
antd更改自定义主题:官方文档
1、yarn add less less-loader 同时修改根目录 config-overrides.js
设置代码: -代表删除 +代表添加
- const {
      override, fixBabelImports } = require('customize-cra');
+ const {
      override, fixBabelImports, addLessLoader } = require('customize-cra');

module.exports = override(
  fixBabelImports('import', {

    libraryName: 'antd',
    libraryDirectory: 'es',
-   style: 'css',
+   style: true,
  }),
+ addLessLoader({

+   javascriptEnabled: true,
+   modifyVars: {
      '@primary-color': '#1DA57A' },
+ }),
);
# alidationError: Invalid options object. Less Loader has been initialized 解决方法:
antD按需引入完整文档:
## 十四、antd的按需引入+自定主题
			1.安装依赖:yarn add react-app-rewired customize-cra babel-plugin-import less less-loader
			2.修改package.json
					....
						"scripts": {
							"start": "react-app-rewired start",
							"build": "react-app-rewired build",
							"test": "react-app-rewired test",
							"eject": "react-scripts eject"
						},
					....
			3.根目录下创建config-overrides.js
					//配置具体的修改规则
					const { override, fixBabelImports,addLessLoader} = require('customize-cra');
					module.exports = override(
						fixBabelImports('import', {
							libraryName: 'antd',
							libraryDirectory: 'es',
							style: true,
						}),
						addLessLoader({
							lessOptions:{
								javascriptEnabled: true,
								modifyVars: { '@primary-color': 'green' },
							}
						}),
					);
				4.备注:不用在组件里亲自引入样式了,即:import 'antd/dist/antd.css'应该删掉 高版本less可能报错antd nrecognized input. Possibly missing '(' in mixin call 解决方法:使用低版本less和lessloader 修改package.json
    "less": "^3.12.2",
    "less-loader": "^7.1.0",
7 redux使用
7.1 1. redux是什么
- redux是一个专门用于做状态管理的JS库(不是react插件库)。
- 它可以用在react, angular, vue等项目中, 但基本与react配合使用。
- 作用: 集中式管理react应用中多个组件共享的状态。
7.1.3 使用redux情况:
- 某个组件的状态,需要让其他组件可以随时拿到(共享)。
- 一个组件需要改变另一个组件的状态(通信)。
- 总体原则:能不用就不用, 如果不用比较吃力才考虑使用。
7.1.4 redux工作流程

7.2 redux三个核心概念
7.2.1 action
- 动作的对象
- 包含2个属性
- type:标识属性, 值为字符串, 唯一, 必要属性
- data:数据属性, 值类型任意, 可选属性
- 例子:{ type: ‘ADD_STUDENT’,data:{name: ‘tom’,age:18} }
7.2.2 reducer
- 用于初始化状态、加工状态。
- 加工时,根据旧的state和action, 产生新的state的纯函数。
7.2.3 store
- 将state、action、reducer联系在一起的对象
- 如何得到此对象?
- import {createStore} from ‘redux’
- import reducer from ‘./reducers’
- const store = createStore(reducer)
- 此对象的功能?
- getState(): 得到state
- dispatch(action): 分发action, 触发reducer调用, 产生新的state
- subscribe(listener): 注册监听, 当产生了新的state时, 自动调用
精简版redux
(1).去除Count组件自身的状态
(2).src下建立:
				-redux
					-store.js
					-count_reducer.js

(3).store.js:
			1).引入redux中的createStore函数,创建一个store
			2).createStore调用时要传入一个为其服务的reducer
			3).记得暴露store对象

(4).count_reducer.js:
			1).reducer的本质是一个函数,接收:preState,action,返回加工后的状态
			2).reducer有两个作用:初始化状态,加工状态
			3).reducer被第一次调用时,是store自动触发的,
							传递的preState是undefined,
							传递的action是:{type:'@@REDUX/INIT_a.2.b.4}

(5).在index.js中监测store中状态的改变,一旦发生改变重新渲染<App/>
		备注:redux只负责管理状态,至于状态的改变驱动着页面的展示,要靠我们自己写。
2.求和案例_redux完整版
		新增文件:
			1.count_action.js 专门用于创建action对象
			2.constant.js 放置容易写错的type值
3.求和案例_redux异步action版
		 (1).明确:延迟的动作不想交给组件自身,想交给action
		 (2).何时需要异步action:想要对状态进行操作,但是具体的数据靠异步任务返回。
		 (3).具体编码:
		 			1).yarn add redux-thunk,并配置在store中
		 			2).创建action的函数不再返回一般对象,而是一个函数,该函数中写异步任务。
		 			3).异步任务有结果后,分发一个同步的action去真正操作数据。
		 (4).备注:异步action不是必须要写的,完全可以自己等待异步任务的结果了再去分发同步action。
1. setState
setState更新状态的2种写法
	(1). setState(stateChange, [callback])------对象式的setState
            1.stateChange为状态改变对象(该对象可以体现出状态的更改)
            2.callback是可选的回调函数, 它在状态更新完毕、界面也更新后(render调用后)才被调用

	(2). setState(updater, [callback])------函数式的setState
            1.updater为返回stateChange对象的函数。
            2.updater可以接收到state和props。
            4.callback是可选的回调函数, 它在状态更新、界面也更新后(render调用后)才被调用。
总结:
		1.对象式的setState是函数式的setState的简写方式(语法糖)
		2.使用原则:
				(1).如果新状态不依赖于原状态 ===> 使用对象方式
				(2).如果新状态依赖于原状态 ===> 使用函数方式
				(3).如果需要在setState()执行后获取最新的状态数据,
					要在第二个callback函数中读取
2. lazyLoad
路由组件的lazyLoad
	//1.通过React的lazy函数配合import()函数动态加载路由组件 ===> 路由组件代码会被分开打包
	const Login = lazy(()=>import('@/pages/Login'))

	//2.通过指定在加载得到路由打包文件前显示一个自定义loading界面
	<Suspense fallback={
     <h1>loading.....</h1>}>
        <Switch>
            <Route path="/xxx" component={
     Xxxx}/>
            <Redirect to="/login"/>
        </Switch>
    </Suspense>
3. Hooks
1. React Hook/Hooks是什么?
(1). Hook是React 16.8.0版本增加的新特性/新语法
(2). 可以让你在函数组件中使用 state 以及其他的 React 特性
2. 三个常用的Hook
(1). State Hook: React.useState()
(2). Effect Hook: React.useEffect()
(3). Ref Hook: React.useRef()
3. State Hook
(1). State Hook让函数组件也可以有state状态, 并进行状态数据的读写操作
(2). 语法: const [xxx, setXxx] = React.useState(initValue)
(3). useState()说明:
        参数: 第一次初始化指定的值在内部作缓存
        返回值: 包含2个元素的数组, 第1个为内部当前状态值, 第2个为更新状态值的函数
(4). setXxx()2种写法:
        setXxx(newValue): 参数为非函数值, 直接指定新的状态值, 内部用其覆盖原来的状态值
        setXxx(value => newValue): 参数为函数, 接收原本的状态值, 返回新的状态值, 内部用其覆盖原来的状态值
4. Effect Hook
(1). Effect Hook 可以让你在函数组件中执行副作用操作(用于模拟类组件中的生命周期钩子)
(2). React中的副作用操作:
        发ajax请求数据获取
        设置订阅 / 启动定时器
        手动更改真实DOM
(3). 语法和说明:
        useEffect(() => {
          // 在此可以执行任何带副作用操作
          return () => { // 在组件卸载前执行
            // 在此做一些收尾工作, 比如清除定时器/取消订阅等
          }
        }, [stateValue]) // 如果指定的是[], 回调函数只会在第一次render()后执行

(4). 可以把 useEffect Hook 看做如下三个函数的组合
        componentDidMount()
        componentDidUpdate()
    	componentWillUnmount()
5. Ref Hook
(1). Ref Hook可以在函数组件中存储/查找组件内的标签或任意其它数据
(2). 语法: const refContainer = useRef()
(3). 作用:保存标签对象,功能与React.createRef()一样
4. Fragment
使用
<>
作用
可以不用必须有一个真实的DOM根标签了
5. Context
理解
一种组件间通信方式, 常用于【祖组件】与【后代组件】间通信
使用
1) 创建Context容器对象:
	const XxxContext = React.createContext()

2) 渲染子组时,外面包裹xxxContext.Provider, 通过value属性给后代组件传递数据:
	<xxxContext.Provider value={
     数据}>
		子组件
    </xxxContext.Provider>

3) 后代组件读取数据:

	//第一种方式:仅适用于类组件
	  static contextType = xxxContext  // 声明接收context
	  this.context // 读取context中的value数据

	//第二种方式: 函数组件与类组件都可以
	  <xxxContext.Consumer>
	    {

	      value => ( // value就是context中的value数据
	        要显示的内容
	      )
	    }
	  </xxxContext.Consumer>
注意
在应用开发中一般不用context, 一般都用它的封装react插件
6. 组件优化
Component的2个问题
只要执行setState(),即使不改变状态数据, 组件也会重新render() ==> 效率低
只当前组件重新render(), 就会自动重新render子组件,纵使子组件没有用到父组件的任何数据 ==> 效率低
效率高的做法
只有当组件的state或props数据发生改变时才重新render()
原因
Component中的shouldComponentUpdate()总是返回true
解决
办法1:
	重写shouldComponentUpdate()方法
	比较新旧state或props数据, 如果有变化才返回true, 如果没有返回false
办法2:
	使用PureComponent
	PureComponent重写了shouldComponentUpdate(), 只有state或props数据有变化才返回true
	注意:
		只是进行state和props数据的浅比较, 如果只是数据对象内部数据变了, 返回false
		不要直接修改state数据, 而是要产生新数据
项目中一般使用PureComponent来优化
7. render props
如何向组件内部动态传入带内容的结构(标签)?
Vue中:
	使用slot技术, 也就是通过组件标签体传入结构
React中:
	使用children props: 通过组件标签体传入结构
	使用render props: 通过组件标签属性传入结构,而且可以携带数据,一般用render函数属性
children props
  xxxx

{this.props.children}
问题: 如果B组件需要A组件内的数据, ==> 做不到
render props
8. 错误边界
理解:
错误边界(Error boundary):用来捕获后代组件错误,渲染出备用页面
特点:
只能捕获后代组件生命周期产生的错误,不能捕获自己组件产生的错误和其他组件在合成事件、定时器中产生的错误
使用方式:
getDerivedStateFromError配合componentDidCatch
// 生命周期函数,一旦后台组件报错,就会触发
static getDerivedStateFromError(error) {

    console.log(error);
    // 在render之前触发
    // 返回新的state
    return {

        hasError: true,
    };
}

componentDidCatch(error, info) {

    // 统计页面的错误。发送请求发送到后台去
    console.log(error, info);
}
9. 组件通信方式总结
组件间的关系:
- 父子组件
- 兄弟组件(非嵌套组件)
- 祖孙组件(跨级组件)
几种通信方式:
	1.props:
		(1).children props
		(2).render props
	2.消息订阅-发布:
		pubs-sub、event等等
	3.集中式管理:
		redux、dva等等
	4.conText:
		生产者-消费者模式
比较好的搭配方式:
	父子组件:props
	兄弟组件:消息订阅-发布、集中式管理
	祖孙组件(跨级组件):消息订阅-发布、集中式管理、conText(开发用的少,封装插件用的多)