python 基础知识之(numpy、pandas、matplotlib、tensorflow)
1、Numpy库:
参考网页
1.1创建Numpy变量
创建一个 ndarray 只需调用 NumPy 的 array 函数即可:numpy.array(object, dtype = None, copy = True, order = None, subok = False, ndmin = 0)
名称 描述
object 数组或嵌套的数列
dtype 数组元素的数据类型,可选
copy 对象是否需要复制,可选
order 创建数组的样式,C为行方向,F为列方向,A为任意方向(默认)
subok 默认返回一个与基类类型一致的数组
ndmin 指定生成数组的最小维度
1.1.1 NumPy 数据类型:
名称 描述
bool 布尔型数据类型(True 或者 False)
int 默认的整数类型(类似于 C 语言中的 long,int32 或 int64)
intc 与 C 的 int 类型一样,一般是 int32 或 int 64
intp 用于索引的整数类型(类似于 C 的 ssize_t,一般情况下仍然是 int32 或 int64)
int8 字节(-128 to 127)
int16 整数(-32768 to 32767)
int32 整数(-2147483648 to 2147483647)
int64 整数(-9223372036854775808 to 9223372036854775807)
uint8 无符号整数(0 to 255)
uint16 无符号整数(0 to 65535)
uint32 无符号整数(0 to 4294967295)
uint64 无符号整数(0 to 18446744073709551615)
float_ float64 类型的简写
float16 半精度浮点数,包括:1 个符号位,5 个指数位,10 个尾数位
float32 单精度浮点数,包括:1 个符号位,8 个指数位,23 个尾数位
float64 双精度浮点数**,包括:1 个符号位,11 个指数位,52 个尾数位
complex_ complex128 类型的简写,即 128 位复数
complex64 复数,表示双 32 位浮点数(实数部分和虚数部分)
complex128 复数,表示双 64 位浮点数(实数部分和虚数部分)
numpy 的数值类型实际上是 dtype 对象的实例,并对应唯一的字符,包括 np.bool_,np.int32,np.float32,等等
**构造随机数据:**
x=np.zeros((2,3),dtype=int)
numpy.ones(shape, dtype = None, order = 'C')
1.2 numpy之数据分布总结
'''
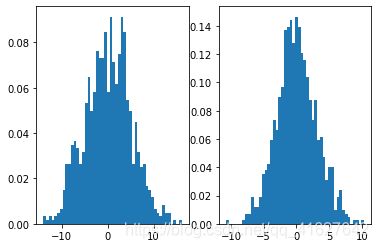
np.random.normal()的意思是一个正态分布,normal这里是正态的意思。我在看孪生网络的时候看到这样的一个例子:
numpy.random.normal(loc=0,scale=1e-2,size=shape) ,意义如下:
参数loc(float):正态分布的均值,对应着这个分布的中心。loc=0说明这一个以Y轴为对称轴的正态分布,
参数scale(float):正态分布的标准差,对应分布的宽度,scale越大,正态分布的曲线越矮胖,scale越小,曲线越高瘦。
参数size(int 或者整数元组):输出的值赋在shape里,默认为None。
'''
import numpy as np
import matplotlib.pyplot as plt
data1=np.random.normal(0,5,1000)
data2=np.random.normal(0,3,1000)
plt.subplot(1,2,1)
plt.hist(data1,bins=50,normed=True)
plt.subplot(1,2,2)
plt.hist(data2,bins=50,normed=True)
plt.show()
1.3 numpy的数据类型转换
1.4Python array.tostring方法代
from array.array import tostring [as 别名]
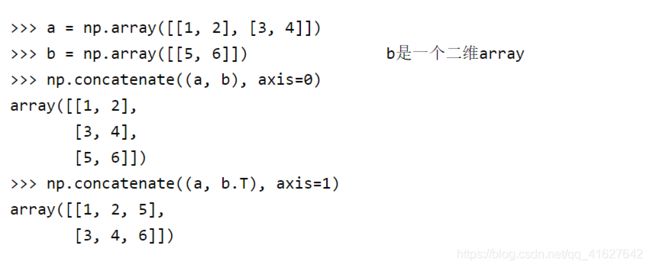
1.5np.concatenate函数
1.6 np.linalg.norm()向量的范数求解
添加链接描述
1.7 numpy.argsort()
博客
我们发现argsort()函数是将x中的元素从小到大排列,提取其对应的index(索引),然后输出
1.8 numpy中的matrix矩阵处理
numpy中的matrix矩阵处理

矩阵对象的属性:
matrix.T transpose:返回矩阵的转置矩阵
matrix.H hermitian (conjugate) transpose:返回复数矩阵的共轭元素矩阵
matrix.I inverse:返回矩阵的逆矩阵
matrix.A base array:返回矩阵基于的数组
矩阵对象的方法:
all([axis, out]) :沿给定的轴判断矩阵所有元素是否为真(非0即为真)
any([axis, out]) :沿给定轴的方向判断矩阵元素是否为真,只要一个元素为真则为真。
argmax([axis, out]) :沿给定轴的方向返回最大元素的索引(最大元素的位置).
argmin([axis, out]): 沿给定轴的方向返回最小元素的索引(最小元素的位置)
argsort([axis, kind, order]) :返回排序后的索引矩阵
astype(dtype[, order, casting, subok, copy]):将该矩阵数据复制,且数据类型为指定的数据类型
byteswap(inplace) Swap the bytes of the array elements
choose(choices[, out, mode]) :根据给定的索引得到一个新的数据矩阵(索引从choices给定)
clip(a_min, a_max[, out]) :返回新的矩阵,比给定元素大的元素为a_max,小的为a_min
compress(condition[, axis, out]) :返回满足条件的矩阵
conj() :返回复数的共轭复数
conjugate() :返回所有复数的共轭复数元素
copy([order]) :复制一个矩阵并赋给另外一个对象,b=a.copy()
cumprod([axis, dtype, out]) :返回沿指定轴的元素累积矩阵
cumsum([axis, dtype, out]) :返回沿指定轴的元素累积和矩阵
diagonal([offset, axis1, axis2]) :返回矩阵中对角线的数据
dot(b[, out]) :两个矩阵的点乘
dump(file) :将矩阵存储为指定文件,可以通过pickle.loads()或者numpy.loads()如:a.dump(‘d:\a.txt’)
dumps() :将矩阵的数据转存为字符串.
fill(value) :将矩阵中的所有元素填充为指定的value
flatten([order]) :将矩阵转化为一个一维的形式,但是还是matrix对象
getA() :返回自己,但是作为ndarray返回
getA1():返回一个扁平(一维)的数组(ndarray)
getH() :返回自身的共轭复数转置矩阵
getI() :返回本身的逆矩阵
getT() :返回本身的转置矩阵
max([axis, out]) :返回指定轴的最大值
mean([axis, dtype, out]) :沿给定轴方向,返回其均值
min([axis, out]) :返回指定轴的最小值
nonzero() :返回非零元素的索引矩阵
prod([axis, dtype, out]) :返回指定轴方型上,矩阵元素的乘积.
ptp([axis, out]) :返回指定轴方向的最大值减去最小值.
put(indices, values[, mode]) :用给定的value替换矩阵本身给定索引(indices)位置的值
ravel([order]) :返回一个数组,该数组是一维数组或平数组
repeat(repeats[, axis]) :重复矩阵中的元素,可以沿指定轴方向重复矩阵元素,repeats为重复次数
reshape(shape[, order]) :改变矩阵的大小,如:reshape([2,3])
resize(new_shape[, refcheck]) :改变该数据的尺寸大小
round([decimals, out]) :返回指定精度后的矩阵,指定的位数采用四舍五入,若为1,则保留一位小数
searchsorted(v[, side, sorter]) :搜索V在矩阵中的索引位置
sort([axis, kind, order]) :对矩阵进行排序或者按轴的方向进行排序
squeeze([axis]) :移除长度为1的轴
std([axis, dtype, out, ddof]) :沿指定轴的方向,返回元素的标准差.
sum([axis, dtype, out]) :沿指定轴的方向,返回其元素的总和
swapaxes(axis1, axis2):交换两个轴方向上的数据.
take(indices[, axis, out, mode]) :提取指定索引位置的数据,并以一维数组或者矩阵返回(主要取决axis)
tofile(fid[, sep, format]) :将矩阵中的数据以二进制写入到文件
tolist() :将矩阵转化为列表形式
tostring([order]):将矩阵转化为python的字符串.
trace([offset, axis1, axis2, dtype, out]):返回对角线元素之和
transpose(*axes) :返回矩阵的转置矩阵,不改变原有矩阵
var([axis, dtype, out, ddof]) :沿指定轴方向,返回矩阵元素的方差
view([dtype, type]) :生成一个相同数据,但是类型为指定新类型的矩阵。
1.9 np.array_split(ary, indices_or_sections, axis=0)
数据格式的互换
dataframe转化成array

1
df=df.values
array转化成dataframe

1
2
3
import pandas as pd

df = pd.DataFrame(df)
2、 Pandas库
2.1对DateFrame进行行列操作
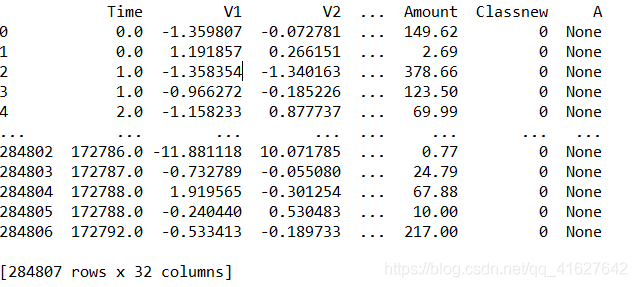
2.1再DateFrame后面插入新的一列
import pandas  as pd
path="D:\Python 基础\Test\逻辑回归-信用卡欺诈检测"+os.sep +"creditcard.csv"
data= pd.read_csv(path)
data['A']=None  #再DataFrame后面插入新的一列A
print(data)
2.2 pd.concat 在DataFrame后面添加两列,这种方法的缺点是不能指定位置
import pandas  as pd
path="D:\Python 基础\Test\逻辑回归-信用卡欺诈检测"+os.sep +"creditcard.csv"
data= pd.read_csv(path)
print(pd.concat([data, pd.DataFrame(columns=list('AB'))]))
2.3运用 list.insert的方法list.insert(index, obj),在指定位置
import pandas  as pd
path="D:\Python 基础\Test\逻辑回归-信用卡欺诈检测"+os.sep +"creditcard.csv"
data= pd.read_csv(path)
col_name = data.columns.tolist()#把DateFrame转换为列表
col_name.insert(1,'A')#插入新的一列A再第一列
df=pd.DataFrame(data,columns=col_name)
2.4在A列前面B列
import pandas  as pd
path="D:\Python 基础\Test\逻辑回归-信用卡欺诈检测"+os.sep +"creditcard.csv"
data= pd.read_csv(path)
col_name = data.columns.tolist()
col_name.insert(1,'A')
df=pd.DataFrame(data,columns=col_name)
col_name = df.columns.tolist()
col_name.insert(col_name.index('A'),'B')# 在 A列前面插入B
print(df.reindex(columns=col_name))
2.5在指定位置插入一列常数
import pandas  as pd
path="D:\Python 基础\Test\逻辑回归-信用卡欺诈检测"+os.sep +"creditcard.csv"
data= pd.read_csv(path)
data.insert(0,"Ones",1)
print(data)
1.6删除列
import pandas  as pd
path="D:\Python 基础\Test\逻辑回归-信用卡欺诈检测"+os.sep +"creditcard.csv"
data= pd.read_csv(path)
print(data.drop(columns = ['V1','V2']))
1.7统计某列每类值出现的频率**
#两种方式
class_number=data.loc[:,'Classnew'].value_counts()#统计某一列各个数值得出现次数
count_classes = pd.value_counts(data['Classnew'], sort = True).sort_index()
1.8 set_index
DataFrame可以通过set_index方法,可以设置单索引和复合索引。
DataFrame.set_index(keys, drop=True, append=False, inplace=False, verify_integrity=False)
append添加新索引,drop为False,inplace为True时,索引将会还原为列
  a    b  c    d
0  bar  one  z  1.0
1  bar  two  y  2.0
2  foo  one  x  3.0
3  foo  two  w  4.0
indexed1 = data.set_index('c')
    a    b    d
c
z  bar  one  1.0
y  bar  two  2.0
x  foo  one  3.0
w  foo  two  4.0
reset_index可以还原索引,从新变为默认的整型索引
DataFrame.reset_index(level=None, drop=False, inplace=False, col_level=0, col_fill=”)
level控制了具体要还原的那个等级的索引
drop为False则索引列会被还原为普通列,否则会丢失
data.reset_index()
   a    b  c    d
0  bar  one  z  1.0
1  bar  two  y  2.0
2  foo  one  x  3.0
3  foo  two  w  4.0
1.9pandas库的pd.merge函数
【python】详解pandas库的pd.merge函数
3、Matplot库直线/曲线图
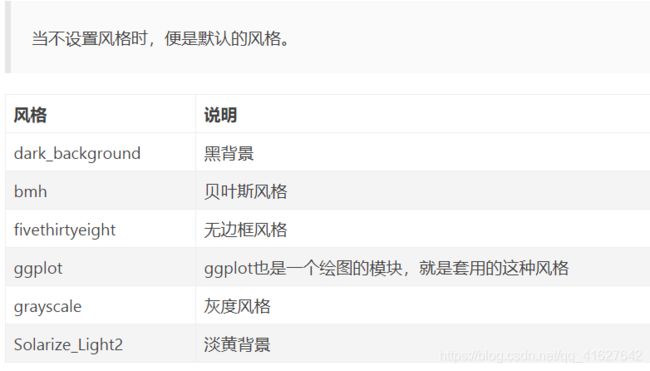
3.0设置背景风格
# 导入模块
import matplotlib.pyplot as plt
import numpy as np

# 数据
x = np.linspace(-5, 5, 50)
y = x**2

# 设置风格
plt.style.use('dark_background')

# 绘图
plt.plot(x, y)

# 展示
plt.show()
3.1#直线/曲线图
#直线/曲线图
x=np.linspace(-1,1,20)#再(-1,1)之间等间隔选取20个点
y1=2*x+1
y2=x**2+1
fig=plt.figure(figsize=(5,5))#绘制一个
plt.plot(x,y1,c="red",label="y1=2*x+1",linewidth=1.0, linestyle='-.')#线宽和线的样式
plt.plot(x,y2,c="blue",label="y2=x**2+1",linewidth=1.0, linestyle='--')
font = {
     'family': 'Times New Roman', 'weight': 'normal', 'size': 15}#设置的图列标注的字体
plt.xlabel("x",font)
plt.ylabel("y",font)
plt.title("The value of y",font)
plt.xlim((-0.5, 0.5)) # x刻度范围
plt.ylim((-1, 3)) # y刻度范围
plt.xticks(np.linspace(-0.5, 0.5, 5)) # 重定义x轴显示刻度值
plt.yticks([0,0.5,0.75,1.5,2.0,2.5])# 重定义y轴显示刻度值
axy = plt.gca() # 获取当前坐标轴信息
axy.spines['right'].set_color('none') # 设置右边框为空
axy.spines['top'].set_color('none') # 设置顶边框为空
axy.xaxis.set_ticks_position('bottom') # 设置x轴坐标刻度数字的位置为bottom(还有top\both\default\none)
axy.spines['bottom'].set_position(('data', 0)) # 把bottom边框移到y=0的位置 (位置属性:outward\axes\data)
axy.yaxis.set_ticks_position('left') # 设置y轴坐标刻度数字为left
axy.spines['left'].set_position(('data', 0)) # 把left边框移动到x=0的位置
# 画点和垂直线,并对点进行标注
x0 = 0.4
y0 = 2*x0 + 1

plt.plot([x0, x0,], [0, y0,], 'k--', linewidth=2.5) # 画出一条垂直于x轴的虚线.
plt.scatter([x0, ], [y0, ], s=50, color='b') # 画点,s代表点的大小
plt.annotate(r'$x*2+1=%s$' % y0,     # 标注的文字
             xy=(x0, y0),           # 标注的数据点
             xycoords='data',       # 基于数据的值来选位置
             xytext=(+20, -30),     # 标注的位置(相对坐标位置)
             textcoords='offset points',   # xy偏差值
             fontsize=12,           # 字体大小
             arrowprops=dict(arrowstyle='->', connectionstyle="arc3, rad=.3")) # 连线类型设置为箭头,有弧度, rad为弧度值

# 添加注释
plt.text(0.4, -1.8, r'$Text:\ \mu\ \sigma_i\ \alpha_t.\ written\ by\ likejiao.$')
plt.legend(loc='best',prop=font)
plt.show()
3.2 柱状图
#柱状图
import matplotlib.pyplot as plt
import numpy as np

n = 12 # 生成n个数据
X = np.arange(n) # X为0到n-1的整数
print(np.random.uniform(0.5, 1.0, n))#{0.5,1.0}区间产生12个产生具有均匀分布的数组
Y1 = (1 - X / float(n)) * np.random.uniform(0.5, 1.0, n) # Y1和Y2都是随机分布的数据
Y2 = (1 - X / float(n)) * np.random.uniform(0.5, 1.0, n)
plt.bar(X, +Y1) # 画在坐标轴上方
plt.bar(X, -Y2) # 画在坐标轴下方
# 设置横纵坐标的边界,去掉横坐标的线
plt.xlim(-.5, n)
plt.xticks(np.linspace(-.5, n,12))
plt.ylim(-1.25, 1.25)
plt.yticks(())
# 加颜色优化图像,facecolor设置主体颜色,edgecolor设置边框颜色
plt.bar(X, +Y1, facecolor='#9999ff', edgecolor='white')
plt.bar(X, -Y2, facecolor='#ff9999', edgecolor='white')
# 加数值优化图像
for x, y in zip(X, Y1):
    # ha: horizontal alignment 横向对齐
    # va: vertical alignment 纵向对齐
    plt.text(x + 0.4, y + 0.05, '%.2f' % y, ha='center', va='bottom')

for x, y in zip(X, Y2):
    # ha: horizontal alignment
    # va: vertical alignment
    plt.text(x + 0.4, -y - 0.05, '%.2f' % y, ha='center', va='top')
plt.show()
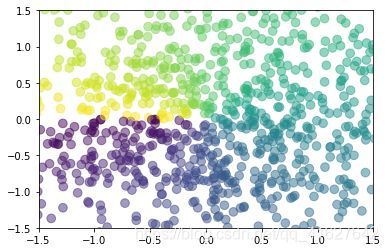
3.3 散点图
#绘制散点图
import matplotlib.pyplot as plt
import numpy as np

n = 1024 # 数据集的大小,下面两行生产1024个呈正态分布的二维数据组(平均数是0,方差是1)
X = np.random.normal(0, 1, n) # 每一个点的X值
Y = np.random.normal(0, 1, n) # 每一个点的Y值
T = np.arctan2(Y, X) # 计算每一个点的颜色

plt.scatter(X, Y, s=75, c=T, alpha=.5) # s:size, c:color, alpha透明度为50%

plt.xlim(-1.5, 1.5)
#plt.xticks(()) # 隐藏x坐标轴
plt.ylim(-1.5, 1.5)
#plt.yticks(()) # 隐藏y坐标轴

# 最后展示图片
plt.show()
3.4 3D图
#绘制3D图像
import matplotlib.pyplot as plt
from mpl_toolkits.mplot3d import Axes3D
import numpy as np

# 先定义一个图像窗口,在窗口上添加3D坐标轴
fig = plt.figure()
ax = Axes3D(fig)

# 给X, Y赋值
X = np.arange(-4, 4, 0.25)
Y = np.arange(-4, 4, 0.25)
X, Y = np.meshgrid(X, Y)    # x-y 平面的网格
R = np.sqrt(X ** 2 + Y ** 2)
# 计算高度值
Z = np.sin(R)
# Z = (1 - X / 2 + X**5 + Y**3) * np.exp(-X**2 -Y**2) # drawcontours.py里的等高线函数

# 三维曲面,并将一个 colormap rainbow 填充颜色,之后将三维图像投影到 XY 平面上做一个等高线图。
ax.plot_surface(X, Y, Z, rstride=1, cstride=1, cmap=plt.get_cmap('rainbow')) # rstride:row的跨度, cstride:column的跨度

# 添加XY平面的等高线
ax.contourf(X, Y, Z, zdir='z', offset=-2, cmap=plt.get_cmap('rainbow')) # zdir:沿着z轴方向投影, offset相对于z=0的偏移距离

# 设置z轴的坐标范围,显得好看一点
ax.set_zlim(-2,2)

# 最后展示图片
plt.show()
4、tensorflow库
4.1tensorflow的编程思想
TensorFlow使用图来表示计算任务 ****。图中的节点被称之为 op (各种加减乘除等操作). 一个 op获得 0 个或多个 Tensor , 执行计算, 产生 0 个或多个 Tensor . 每个 Tensor 是一个类型化的多维数组.tensor也是tensorflow中的核心数据类型。
一个 TensorFlow 图(graph)描述了计算的过程. 为了进行计算, 图必须在会话(session)里被启动. 会话将图的op分发到诸如 CPU 或 GPU 之类的 设备 上, 同时提供执行 op 的方法. 这些方法执行后, 将产生的 tensor 返回.
1、tf.Graph()
为什么要写 tf.Graph().as_default()
tf.Graph() 表示实例化了一个类,一个用于 tensorflow 计算和表示用的数据流图,而图就是呈现这些画的纸,你可以利用很多线程生成很多张图,但是默认图就只有一张。
tf.Graph().as_default() 表示将这个类实例,也就是新生成的图作为整个 tensorflow 运行环境的默认图,如果只有一个主线程不写也没有关系,tensorflow 里面已经存好了一张默认图。可以使用tf.get_default_graph() 来调用(显示这张默认纸),当你有多个线程就可以创造多个tf.Graph(),就是你可以有一个画图本,有很多张图纸,这时候就会有一个默认图的概念了。
import tensorflow as tf
c=tf.constant(4.0)#创造常量,相当于图的节点op
assert c.graph is tf.get_default_graph() #看看主程序中新建的一个变量是不是在默认图里
g=tf.Graph()
with g.as_default():
    c=tf.constant(30.0)
    assert c.graph is g
2、 tf.Session()会话
from __future__ import print_function,division
import numpy as np
import tensorflow as tf

#create a Variable 创建变量w、X
w=tf.Variable(initial_value=[[1,2],[3,4]],dtype=tf.float32)
x=tf.Variable(initial_value=[[1,1],[1,1]],dtype=tf.float32)
y=tf.matmul(w,x)
z=tf.sigmoid(y)
print(z)
init_op=tf.global_variables_initializer()#初始化全局变量
#必须要使用global_variables_initializer的场合:含有tf.Variable的环境下,因为tf中建立的变量是没有初始化的,也就是在debug时还不是一个tensor量,而是一个Variable变量类型
with tf.Session() as session: #创建会话
    session.run(init_op)
    z=session.run(z)#会话运行操作op (z)
    print(z)
在图Graph中调用会话
import numpy as np
import tensorflow as tf

x=np.array([[[0,0,0],[0,0,0],[0,0,0],[0,0,0],[0,0,0],[0,0,0],[0,0,0]],
            [[0,0,0],[0,1,2],[1,1,0],[1,1,2],[2,2,0],[2,0,2],[0,0,0]],
            [[0,0,0],[0,0,0],[1,2,0],[1,1,1],[0,1,2],[0,2,1],[0,0,0]],
            [[0,0,0],[1,1,1],[1,2,0],[0,0,2],[1,0,2],[0,2,1],[0,0,0]],
            [[0,0,0],[1,0,2],[0,2,0],[1,1,2],[1,2,0],[1,1,0],[0,0,0]],
            [[0,0,0],[0,2,0],[2,0,0],[0,1,1],[1,2,1],[0,0,2],[0,0,0]],
            [[0,0,0],[0,0,0],[0,0,0],[0,0,0],[0,0,0],[0,0,0],[0,0,0]]])


W=np.array([[[[1,-1,0],[1,0,1],[-1,-1,0]],
             [[-1,0,1],[0,0,0],[1,-1,1]],
             [[-1,1,0],[-1,-1,-1],[0,0,1]]],

            [[[-1,1,-1],[-1,-1,0],[0,0,1]],
             [[-1,-1,1],[1,0,0],[0,-1,1]],
             [[-1,-1,0],[1,0,-1],[0,0,0]]]])

#this
x=np.reshape(a=x,newshape=(1,7,7,3))
W=np.transpose(W,axes=(1,2,3,0))        #weights,[height,width,in_channels,out_channels]
b=np.array([1,0])                       #bias

graph=tf.Graph()
with graph.as_default():
    input = tf.constant(value=x, dtype=tf.float32, name="input")
    filter = tf.constant(value=W, dtype=tf.float32, name="filter")
    bias = tf.constant(value=b, dtype=tf.float32, name="bias")
    out=tf.nn.conv2d(input=input,filter=filter,strides=[1,2,2,1],padding="VALID",name="conv2d")+bias
with graph.as_default():
    with tf.Session() as sess:
        init_op=tf.global_variables_initializer().run()
        print(sess.run(out)[0][:,:,0])
3、tensorflow中的变量
3.1创建变量
init(initial_value=None, trainable=True, collections=None, validate_shape=True, caching_device=None, name=None, variable_def=None, dtype=None, expected_shape=None, import_scope=None)
w=tf.Variable(initial_value=[[1,2],[3,4]],dtype=tf.float32)
作用:
创建一个新的变量,初始值为initial_value(这个构造函数会创建两个操作(Op),一个变量OP和一个assignOp来设置变量为其初始化值)
参数:
initial_value: 一个Tensor类型或者是能够转化为Tensor的python对象类型。它是这个变量的初始值。这个初始值必须指定形状信息,不然后面的参数validate_shape需要设置为false。当然也能够传入一个无参数可调用并且返回制定初始值的对象,在这种情况下,dtype必须指定。
trainable: 如果为True(默认也为Ture),这个变量就会被添加到图的集合GraphKeys.TRAINABLE_VARIABLES.中去 ,这个collection被作为优化器类的默认列表。
**collections:**图的collection 键列表,新的变量被添加到这些collection中去。默认是[GraphKeys.GLOBAL_VARIABLES].
validate_shape: 如果是False的话,就允许变量能够被一个形状未知的值初始化,默认是True,表示必须知道形状。
caching_device: 可选,描述设备的字符串,表示哪个设备用来为读取缓存。默认是变量的device,
name: 可选,变量的名称
variable_def: VariableDef protocol buffer. If not None, recreates the Variable object with its contents. variable_def and the other arguments are mutually exclusive.
dtype: 如果被设置,初始化的值就会按照这里的类型来定。
expected_shape: TensorShape类型.要是设置了,那么初始的值会是这种形状
import_scope: Optional string. Name scope to add to the Variable. Only used when initializing from protocol buffer.
tf.global_variables()
作用:返回全局变量(global variables)。(全局变量是在分布式环境的机器中共享的变量。)Variable()构造函数或者get_variable()自动地把新的变量添加到 graph collection GraphKeys.GLOBAL_VARIABLES 中。这个函数返回这个collection中的内容。
tf.local_variables()
作用:返回局部变量(local variables)。(局部变量是不做存储用的,仅仅是用来临时记录某些信息的变量。 比如用来记录某些epoch数量等等。) local_variable() 函数会自动的添加新的变量到构造函数或者get_variable()自动地把新的变量添加到 graph collection GraphKeys.LOCAL_VARIABLES 中。这个函数返回这个collection中的内容。
3.2基本函数讲解
3.2.1“常量”函数
tf.constant(value,dtype=None,shape=None,name=‘Const’,verify_shape=False)
# -*- coding: utf-8 -*-
from __future__ import print_function,division
import tensorflow as tf

#build graph
a=tf.constant(1.,name="a")
print("a:",a)
print("name of a:",a.name)
b=tf.constant(1.,shape=[2,2],name="b")
print("b:",b)
print("type of b:",type(b))

#construct session
sess=tf.Session()

#run in session
result_a=sess.run(a)
print("result_a:",result_a)
print("type of result_a:",type(result_a))
初始化为常量。tf中使用tf.constant_initializer(value)类生成一个初始值为常量value的tensor对象。constant_initializer类的构造函数定义:
当初始化一个维数很多的常量时,一个一个指定每个维数上的值很不方便,tf提供了 tf.zeros_initializer() 和 tf.ones_initializer() 类,分别用来初始化全0和全1的tensor对象。
#shape2行4列
import tensorflow as tf
init_zeros=tf.zeros_initializer()
init_ones = tf.ones_initializer
with tf.Session() as sess:
  x = tf.get_variable('x', shape=[2,4], initializer=init_zeros)
  y = tf.get_variable('y', shape=[8], initializer=init_ones)
  x.initializer.run()
  y.initializer.run()
  print(x.eval())
  print(y.eval())
 # [[0. 0. 0. 0.]
 #[0. 0. 0. 0.]]
#[1. 1. 1. 1. 1. 1. 1. 1.]
3.3 tf.get_variable的初始化调用为:
tf.get_variable(name, shape=None, initializer=None, dtype=tf.float32, trainable=True, collections=None)
其中initializer就是变量初始化的方法,初始化的方式有以下种类:
#shape是输出的维度
import tensorflow as tf
value = [0, 1, 2, 3, 4, 5, 6, 7]
init = tf.constant_initializer(value)
with tf.Session() as sess:
  x = tf.get_variable('x', shape=[8], initializer=init),
  x.initializer.run()
  print(x.eval())
#output:
#[ 0.  1.  2.  3.  4.  5.  6.  7.]
3.4初始化正太函数
初始化参数为正太分布在神经网络中应用的最多,可以初始化为标准正太分布和截断正太分布。
tf中使用 tf.random_normal_initializer() 类来生成一组符合标准正太分布的tensor。
tf中使用 tf.truncated_normal_initializer() 类来生成一组符合截断正太分布的tensor。tf.random_normal_initializer 类和 tf.truncated_normal_initializer 的构造函数定义:
import tensorflow as tf
init_random = tf.random_normal_initializer(mean=0.0, stddev=1.0, seed=None, dtype=tf.float32)
init_truncated = tf.truncated_normal_initializer(mean=0.0, stddev=1.0, seed=None, dtype=tf.float32)
with tf.Session() as sess:
  x = tf.get_variable('x', shape=[10], initializer=init_random)#调用初始化变量
  y = tf.get_variable('y', shape=[10], initializer=init_truncated)
  x.initializer.run()
  y.initializer.run()
  print(x.eval())
  print(y.eval())
#output:
# [-0.40236568 -0.35864913 -0.94253045 -0.40153521  0.1552504   1.16989613
#   0.43091929 -0.31410623  0.70080078 -0.9620409 ]
# [ 0.18356581 -0.06860946 -0.55245203  1.08850253 -1.13627422 -0.1006074
#   0.65564936  0.03948414  0.86558545 -0.4964745 ]
初始化为均匀分布。tf中使用 tf.random_uniform_initializer 类来生成一组符合均匀分布的tensor。 tf.random_uniform_initializer类构造函数定义:
import tensorflow as tf
init_uniform = tf.random_uniform_initializer(minval=0, maxval=10, seed=42, dtype=tf.float32)
with tf.Session() as sess:
  x = tf.get_variable('x', shape=[10], initializer=init_uniform)
  x.initializer.run()
  print(x.eval())
# output:
# [ 6.93343639  9.41196823  5.54009819  1.38017178  1.78720832  5.38881063
#   3.39674473  8.12443542  0.62157512  8.36026382]
从输出可以看到,均匀分布生成的随机数并不是从小到大或者从大到小均匀分布的,这里均匀分布的意义是每次从一组服从均匀分布的数里边随机抽取一个数。
3.5、tf.random_normal和tf.random_normal_initializer之间有什么区别?
最基本的答案:tf.random_normal是一个Tensor;但是tf.random_normal_initializer是一个RandomNormal,不是一个Tensor
参考博客
4、总结
再重申一遍,使用TensorFlow的时候,你需要理解的一些tensorflow问题:
怎么用图表示计算;
在Session里面计算图;
用tensor表示数据;
用变量保持状态;
用feeds(联系placeholder)和fetches来从任意的操作(Operation)中“放入”或者“拿出”数据。
再回忆一下tensorflow的思想:首先是构造过程来“组装”一个图,然后是执行过程用session来执行图中的操作(ops)。那么下面就用一个综合的例子联系之前对于各个类的分析来加强一些对于tensorflow基础的理解。
例子一:常量和图
# -*- coding: utf-8 -*-

from __future__ import print_function,division
import tensorflow as tf

#building the graph

'''
创建一个常量操作(op)产生 1x2 矩阵,这个操作(op)作为一个节点添加到默认的图中,但是这里这个矩阵并不是一个值,而是一个tensor。
创建另外一个常量操作产生一个1x2 矩阵(解释如上)
'''
mat1=tf.constant([3.,3.],name="mat1")
mat2=tf.constant([4.,4.],name="mat2")

#matrix sum.
s=tf.add(mat1,mat2)

'''
这个默认的图(grapg)现在已经有3个节点了:两个constan()操作和一个add()操作。为了真正的得到这个和的值,你需要把这个图投放到一个session里面执行。
'''

# Launch the default graph.
sess = tf.Session()

'''
为了得到和的值,我们要运行add 操作(op),因此我们在session里面调用“run()”函数,把代表add op的输出结果s传到函数里面去。表明我们想从add()操作得到输出。
'''
result=sess.run(s)
print("result:",result)

# Close the Session when we're done.
sess.close()
例子二:tensor和变量
# -*- coding: utf-8 -*-

from __future__ import print_function,division
import tensorflow as tf

#building the graph

#Create a Variable, that will be initialized to the scalar value 0.
state=tf.Variable(0,name="state")
print("the name of this variable:",state.name)

# Create an Op to add 1 to `state`.
one = tf.constant(1)
new_value = tf.add(state, one)
update = tf.assign(state, new_value)

# Variables must be initialized by running an `init` Op after having
# launched the graph.  We first have to add the `init` Op to the graph.
init_op = tf.initialize_all_variables()

# Launch the graph and run the ops.
with tf.Session() as sess:
  # Run the 'init' op
  sess.run(init_op)
  # Print the initial value of 'state'
  print(sess.run(state))
  # Run the op that updates 'state' and print 'state'.
  for _ in range(3):
    sess.run(update)
    print("value of state:",sess.run(state))
例三:fetches和feeds
这里很重要,因为很多新手在这里不理解
Fetches我不知道怎么翻译,所以还是就直接用fetches,表示一种取的动作,我们有时候需要在操作里面取一些输出,其实就是在执行图的过程中在run()函数里面传入一个tensor就行,然后就会输出tesnor的结果,比如上面的session.run(state)就可以当做一个fetch的动作啦。当然不仅仅限于fetch一个,你也可以fetch多个tensor。
feed我们知道是喂养的意思,这个又怎么理解呢?feed的动作一般和placeholder()函数一起用,前面说过,placeholder()起到占位的作用(参考前面的placeholder()函数),怎么理解呢?假如我有一个(堆)数据,但是我也许只知道他的类型,不知道他的值,我就可以先传进去一个类型,先把这个位置占着。等到以后再把数据“喂”给这个变量。
很抽象,那么举个例子
# -*- coding: utf-8 -*-

from __future__ import print_function,division
import tensorflow as tf

#fetch example
print("#fetch example")
a=tf.constant([1.,2.,3.],name="a")
b=tf.constant([4.,5.,6.],name="b")
c=tf.constant([0.,4.,2.],name="c")
add=a+b
mul=add*c

with tf.Session() as sess:
    result=sess.run([a,b,c,add,mul])
    print("after run:\n",result)

print("\n\n")

#feed example
print("feed example")
input1=tf.placeholder(tf.float32)
input2=tf.placeholder(tf.float32)
output=tf.mul(input1,input2)

with tf.Session() as session:
    result_feed=session.run(output,feed_dict={
     input1:[2.],input2:[3.]})
    print("result:",result_feed)
5、tf.placeholder()
tf.placeholder(dtype, shape=None, name=None)
作用:
placeholder的作用可以理解为占个位置,我并不知道这里将会是什么值,但是知道类型和形状等等一些信息,先把这些信息填进去占个位置**,然后以后用feed的方式来把这些数据“填”进去**。返回的就是一个用来用来处理feeding一个值的tensor。
那么feed的时候一般就会在你之后session的run()方法中用到feed_dict这个参数了。这个参数的内容就是你要“喂”给那个placeholder的内容(看下例)。
参数:
dtype: 将要被fed的元素类型
shape:(可选) 将要被fed的tensor的形状,要是不指定的话,你能够fed进任何形状的tensor。
name:(可选)这个操作的名字
x = tf.placeholder(tf.float32, shape=(1024, 1024))
y = tf.matmul(x, x)
with tf.Session() as sess:
print(sess.run(y)) # ERROR: will fail because x was not fed.
rand_array = np.random.rand(1024, 1024)
print(sess.run(y, feed_dict={
     x: rand_array})) # Will succeed.
3、tensorflow随笔-tf.nn.softplus
tf.nn.softplus(features, name = None),解释:这个函数的作用是计算激活函数softplus,即log( exp( features ) + 1)。
import tensorflow as tf

a = tf.constant([-1.0, 12.0])
with tf.Session() as sess:
    b = tf.nn.softplus(a)
    print (sess.run(b))
激活函数参考博客
1
2
dropout函数
dropout函数会以一个概率为keep_prob来决定神经元是否被抑制。如果被抑制,该神经元输出为0,如果不被抑制则该神经元的输出为输入的1/keep_probbe倍,每个神经元是否会被抑制是相互独立的。神经元是否被抑制还可以通过调节noise_shape来调节,当noise_shape[i] == shape(x)[i],x中的元素是相互独立的。如果shape(x)=k,l,m,n,当noise_shape=[k,1,1,n],表示数据的个数与通道是相互独立的,但是与数据的行和列是有关联的,即要么都为0,要么都为输入的1/keep_prob倍。
import tensorflow as tf
a = tf.constant([-1.0, 12.0])
with tf.Session() as sess:
    b = tf.nn.softplus(a)
    print (sess.run(b))

    x = tf.constant(np.array([np.arange(-5,5)]),dtype=tf.float32)
    sess = tf.Session()
    #元素之间互不干扰
    y = sess.run(tf.nn.dropout(x,keep_prob=0.5))
    print(y)
    #元素之间互不干扰
    y = sess.run(tf.nn.dropout(x,keep_prob=0.5,noise_shape=[1,10]))
    print(y)
    #元素之间存在关联
    y = sess.run(tf.nn.dropout(x,keep_prob=0.5,noise_shape=[1]))
    print(y)
[ 0.31326166 12.000006  ]
[[-0. -8. -0. -4. -2.  0.  0.  0.  6.  0.]]
[[-10.  -0.  -0.  -0.  -0.   0.   2.   4.   0.   0.]]
[[-0. -0. -0. -0. -0.  0.  0.  0.  0.  0.]]
4、Tensorflow中tf.train.exponential_decay函数(指数衰减法)
参考博客
tf.train.exponential_decay(learning_rate, global_, decay_steps, decay_rate, staircase=True/False)
其中,decayed_learning_rate为每一轮优化时使用的学习率;
learning_rate为事先设定的初始学习率;
       decay_rate为衰减系数;

       decay_steps为衰减速度
5、tf.variable_scope()用法详解
# 相当于实例化一个类g1
g1 = tf.Graph()

# 将计算图g1设置为默认图
with g1.as_default():
    # 在计算图g1中定义变量“v”,并设置初始值为0。
    # 进行初始化  "v"表示名称 initializer表示初始化,可以使用各种初始化的方法
    # tf.zeros_initializer(shape=[1])   初始化为0
    v = tf.get_variable(
         "v", shape=[10],initializer=tf.zeros_initializer())

g2 = tf.Graph()
with g2.as_default():
    # 在计算图g2中定义变量“v”,并设置初始值为1。
    v = tf.get_variable(
    "v", shape=[1],initializer=tf.ones_initializer())

# 在计算图g1中读取变量“v”的取值。
#将g1作为当前的作用域
with tf.Session(graph=g1) as sess:
    # 初始化所有的变量
    tf.initialize_all_variables().run()
    # tf.variable_scope返回相应的变量
    with tf.variable_scope("", reuse=True):
         # 在计算图g1中,变量“v”的取值应该为0,所以下面这行会输出[0.]。
         print(sess.run(tf.get_variable("v")))

# 在计算图g2中读取变量“v”的取值。
with tf.Session(graph=g2) as sess:
    tf.initialize_all_variables().run()
    with tf.variable_scope("", reuse=True):
        # 在计算图g2中,变量“v”的取值应该为1,所以下面这行会输出[1.]。
        print(sess.run(tf.get_variable("v")))
  #out[0. 0. 0. 0. 0. 0. 0. 0. 0. 0.]
#  [1.]
5、tf.get_collection的使用方法
该函数可以用来获取key集合中的所有元素,返回一个列表。列表的顺序依变量放入集合中的先后而定。scope为可选参数,表示的是名称空间(名称域),如果指定,就返回名称域中所有放入‘key’的变量的列表,不指定则返回所有变量。
参考博客
variables = tf.get_collection(tf.GraphKeys.VARIABLES)
  	for i in variables:
  	    print(i)
  #输出
 <tf.Variable 'conv1/weights:0' shape=(3, 3, 3, 96) dtype=float32_ref>
 <tf.Variable 'conv1/biases:0' shape=(96,) dtype=float32_ref>
 <tf.Variable 'conv2/weights:0' shape=(3, 3, 96, 64) dtype=float32_ref>
 <tf.Variable 'conv2/biases:0' shape=(64,) dtype=float32_ref>
 <tf.Variable 'local3/weights:0' shape=(16384, 384) dtype=float32_ref>
 <tf.Variable 'local3/biases:0' shape=(384,) dtype=float32_ref>
 <tf.Variable 'local4/weights:0' shape=(384, 192) dtype=float32_ref>
 <tf.Variable 'local4/biases:0' shape=(192,) dtype=float32_ref>
 <tf.Variable 'softmax_linear/softmax_linear:0' shape=(192, 10) dtype=float32_ref>
 <tf.Variable 'softmax_linear/biases:0' shape=(10,) dtype=float32_ref>
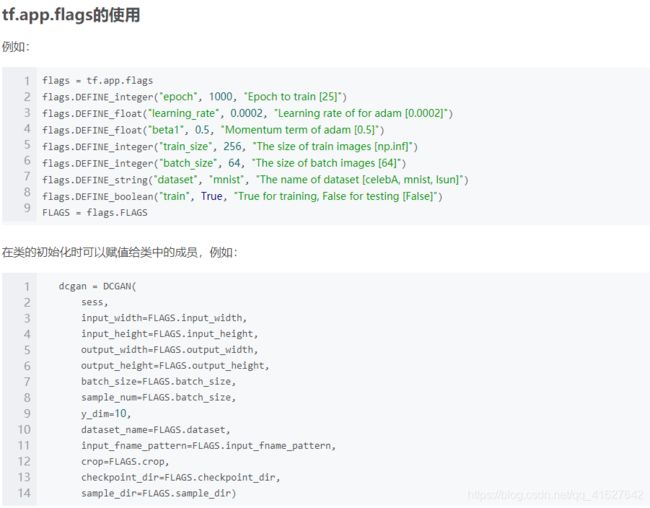
6、Tensorflow flags = tf.app.flags 的使用
在执行main函数之前首先进行flags的解析,也就是说TensorFlow通过设置flags来传递tf.app.run()所需要的参数,我们可以直接在程序运行前初始化flags,也可以在运行程序的时候设置命令行参数来达到传参的目的
7、tf.train.GradientDescentOptimizer(0.2).minimize(loss)
#coding:utf-8
#设损失函数 loss=(w+1)^2, 令w初值是常数5。反向传播就是求最优w,即求最小loss对应的w值
import tensorflow as tf
#定义待优化参数w初值赋5
w = tf.Variable(tf.constant(5, dtype=tf.float32))
#定义损失函数loss
loss = tf.square(w+1)#tf.square()是对a里的每一个元素求平方
#定义反向传播方法
train_step = tf.train.GradientDescentOptimizer(0.2).minimize(loss)
#生成会话,训练40轮
with tf.Session() as sess:
    init_op=tf.global_variables_initializer()#初始化
    sess.run(init_op)#初始化
    for i in range(40):#训练40轮
        sess.run(train_step)#训练
        w_val = sess.run(w)#权重
        loss_val = sess.run(loss)#损失函数
        print ("After %s steps: w is %f,   loss is %f." % (i, w_val,loss_val))#打印
8、tf.gfile()函数
这些函数和python中的os模块非常的相似,一般都可以用os模块代替吧
tf.gfile()函数
tensorflow gfile文件操作详解
9、Tensorflow】tf.import_graph_def
这个函数提供了一种方法来导入序列化的TensorFlow GraphDef协议缓冲区,并将GraphDef中的各个对象提取为tf。张量和tf。操作对象。一旦提取出来,这些对象就会被放到当前的默认图形中。
#将(frozen)TensorFlow模型载入内存
detection_graph = tf.Graph()
with detection_graph.as_default():
  od_graph_def = tf.GraphDef()#序列化的TensorFlow GraphDef协议缓冲区
  with tf.gfile.GFile(PATH_TO_CKPT, 'rb') as fid: #获取文本操作句柄,类似于python提供的文本操作open()函数,filename是要打开的文件名,mode是以何种方式去读写,将会返回一个文本操作句柄
    serialized_graph = fid.read()
    od_graph_def.ParseFromString(serialized_graph)#并将GraphDef中的各个对象提取为tf
    tf.import_graph_def(od_graph_def, name='')#这些对象就会被放到当前的默认图形中
将图从graph_def导入到当前默认图中. (即将舍弃的参数)
tf.import_graph_def
tf.import_graph_def(
    graph_def,
    input_map=None,
    return_elements=None,
    name=None,
    op_dict=None,
    producer_op_list=None
)
Tensorflow中tf.ConfigProto()详解
tf.ConfigProto()主要的作用是配置tf.Session的运算方式,比如gpu运算或者cpu运算
参考博客
import tensorflow as tf
session_config = tf.ConfigProto(
      log_device_placement=True,
      inter_op_parallelism_threads=0,
      intra_op_parallelism_threads=0,
      allow_soft_placement=True)
sess = tf.Session(config=session_config)
a = tf.constant([1.0, 2.0, 3.0, 4.0, 5.0, 6.0], shape=[2,3], name='b')
b = tf.constant([1.0, 2.0, 3.0, 4.0, 5.0, 6.0], shape=[3,2], name='b')
c = tf.matmul(a,b)
print(sess.run(c))
10 TensorFlow 中 tf.cast() 的用法
tf.cast()函数的作用是执行 tensorflow 中张量数据类型转换,比如读入的图片如果是int8类型的,一般在要在训练前把图像的数据格式转换为float32
cast(
x,
dtype,
name=None
)
将 x 的数据格式转化成 dtype. 例如,原来 x 的数据格式是 bool,那么将其转化成 float 以后,就能够将其转化成 0 和 1 的序列。反之也可以
a = tf.Variable([1,0,0,1,1])
b = tf.cast(a,dtype=tf.bool)
sess = tf.Session()
sess.run(tf.initialize_all_variables())
print(sess.run(b))
第一个参数 x: 待转换的数据(张量)
第二个参数 dtype: 目标数据类型
第三个参数 name: 可选参数,定义操作的名称
11、tf.slice()介绍
切片抽取内容
import tensorflow as tf
import numpy as np
x=[[1,2,3],[4,5,6]]
with tf.Session() as sess:
     begin = [0,1]  # 从x[0,1],即元素2开始抽取
     size = [2,1]   # 从x[0,1]开始,对x的第一个维度(行)抽取2个元素,在对x的第二个维度(列)抽取1个元素
     print sess.run(tf.slice(x,begin,size))  # 输出[[2 5]]
————————————————
Tensorflow 基础类型定义与操作
参考博客
TensorFlow卷积函数tf.nn.conv2d
tf.nn.conv2d(
    input,
    filter,
    strides,
    padding,
    use_cudnn_on_gpu=True,
    data_format='NHWC',
    dilations=[1, 1, 1, 1],
    name=None
)

Returns:
A Tensor.
input:
指需要做卷积的输入图像(tensor),具有[batch,in_height,in_width,in_channels]这样的4维shape,分别是图片数量、图片高度、图片宽度、图片通道数,数据类型为float32或float64。
filter:
相当于CNN中的卷积核,它是一个tensor,shape是[filter_height,filter_width,in_channels,out_channels]:滤波器高度、宽度、图像通道数、滤波器个数,数据类型和input相同。
strides:
卷积在每一维的步长,一般为一个一维向量,长度为4,一般为[1,stride,stride,1]。
padding:
定义元素边框和元素内容之间的空间,只能是‘SAME’(边缘填充)或者‘VALID’(边缘不填充)。
return:
返回值是Tensor

import tensorflow as tf
input = tf.Variable(tf.constant(1.0, shape=[1, 5, 5, 1]))
filter = tf.Variable(tf.constant([-1.0, 0, 0, -1], shape=[2, 2, 1, 1]))
op = tf.nn.conv2d(input, filter, strides=[1, 2, 2, 1], padding='SAME')

init = tf.global_variables_initializer()
with tf.Session() as sess:
  sess.run(init)
  print("op:\n",sess.run(op))
TensorFlow学习(四):梯度带(GradientTape),优化器(Optimizer)和损失函数(losses)
1、tf.GradientTape(梯度)
init_(persistent=False,watch_accessed_variables=True)
参数:
persistent: 布尔值,用来指定新创建的gradient tape是否是可持续性的。默认是False,意味着只能够调用一次gradient()函数。
watch_accessed_variables: 布尔值,表明这个gradien tap是不是会自动追踪任何能被训练(trainable)的变量。默认是True。要是为False的话,意味着你需要手动去指定你想追踪的那些变量。
比如在上面的例子里面,新创建的gradient tape设定persistent为True,便可以在这个上面反复调用gradient()函数。
For example, consider the function y = x * x. The gradient at x = 3.0 can be computed as:
x = tf.constant(3.0)
with tf.GradientTape() as g:
g.watch(x)
y = x * x
dy_dx = g.gradient(y, x) # Will compute to 6.0
import tensorflow as tf
def gradient():
    x=tf.constant(5,dtype=tf.float32)
    with tf.GradientTape() as g:
        g.watch(x)
        y=x*x*x
    dy_dx=g.gradient(y,x)
    return dy_dx

if __name__== "__main__":
    with tf.Session() as sess:
        op_init=tf.global_variables_initializer()
        sess.run(op_init)
        print(sess.run(gradient()))
2、优化器
tf.keras.optimizers.SGD(0.1)
3、损失函数
损失函数可以根据自己的需要自己写,也可以使用tensorflow中封装的一些损失函数,比如均方误差啊等等。损失函数也不用我啰嗦了,需要使用tensorflow中自带的那些损失函数,在tf.keras.losses里面找就行.
tf.keras.losses.mean_squared_error(train_Y,logit)
4、tf.math
TensorFlow函数:tf.math.polyval
def polyval(coeffs, x, name=None)
Computes the elementwise value of a polynomial.计算多项式元素的值
If x is a tensor and coeffs is a list n + 1 tensors, this function returns the value of the n-th order polynomial
p(x) = coeffs[n-1] + coeffs[n-2] * x + … + coeffs[0] * x**(n-1)
evaluated using Horner’s method, i.e.
p(x) = coeffs[n-1] + x * (coeffs[n-2] + … + x * (coeffs[1] +
x * coeffs[0]))
5、tf.squeeze
给定一个张量输入,该操作返回一个与已经可移除的所有尺寸为1的尺寸具有相同类型的张量。如果您不想删除所有尺寸为1的尺寸,则可以通过指定轴来删除特定的尺寸为1的维度。
# 't' is a tensor of shape [1, 2, 1, 3, 1, 1]
tf.shape(tf.squeeze(t))  # [2, 3]
# 't' is a tensor of shape [1, 2, 1, 3, 1, 1]
tf.shape(tf.squeeze(t, [2, 4]))  # [1, 2, 3, 1]
6、tf.expand_dims
TensorFlow中,想要维度增加一维,可以使用tf.expand_dims(input, dim, name=None)函数
7、tf.reduce_mean 降维求平均值
TensorFlow学习(六):基本神经网络(自己写一下)
激活操作提供了在神经网络中使用的不同类型的非线性模型。包括光滑非线性模型(sigmoid, tanh, elu, softplus, and softsign)。连续但是不是处处可微的函数(relu, relu6, crelu and relu_x)。当然还有随机正则化 (dropout)
TensorFlow学习(八):tensorborad可视化
tensorflow的可视化API主要是在tf.summary下面,帮助文档地址:tf.summary
1 Ⅰ.tf.summary.FileWriter类
简单来说,这个类就是把我们项目中的事件写到文件里面去,之后我们可以通过这个文件可视化。
构造函数
init(logdir,graph=None,max_queue=10,flush_secs=120,graph_def=None,filename_suffix=None,session=None)
参数:
logdir: A string.表示事件文件要被写到的目录
graph: Graph 对象,
max_queue: Integer. Size of the queue for pending events and summaries.
flush_secs: Number. How often, in seconds, to flush the pending events and summaries to disk.
graph_def: 已经弃用
filename_suffix: A string. 每个事件文件的后缀.
session: A tf.Session object. See details above.
writer=tf.train.SummaryWriter(logdir="./log",graph=self.graph)
2.Summary Operations
tensorborad可视化
你可以通过summary的操作取得一个session里面的输出,然后把它传递到SummaryWriter对象并且附加到事件文件中。你能够通过tensorboard来可视化事件文件中的内容。
这里只讲其中的标量函数和配套的函数,其他的用法流程都是大同小异的,可以参考文档来使用.
1、tf.summary.scalar
用来显示标量信息,其格式为:
tf.summary.scalar(tags, values, collections=None, name=None)
例如:tf.summary.scalar('mean', mean)

一般在画loss,accuary时会用到这个函数。
2.融合所有tf.summary.merge_al
tf.summary.merge_all(key=tf.GraphKeys.SUMMARIES)
作用:把在图中收集的所有summaries融合起来.
3、with tf.name_scope(“fc1”):合理的命名和使用命名空间来让整个代码和计算图谱看上去更加的清晰
4、
各种卷积网络
tf.nn.conv2d(input,filters,strides,padding,data_format=‘NHWC’,dilations=None,name=None)
作用:
对于给定的输入和滤波器tensor(注意,这里输入的滤波器参数都是4维的)计算二维卷积,其中输入的形状默认是[batch, in_height, in_width, in_channels],滤波器/卷积核的形状是[filter_height, filter_width, in_channels, out_channels],
参数:
input: Tensor. 输入,元素必须是下面的类型: half, float32, float64.形状为[batch, in_height, in_width, in_channels]详细来说: batch就是一个batch的size,比如你同时丢100个样本什么的,in_height是样本的高,in_width就是样本的宽度,in_channels就是样本的通道数
filter: 滤波器,和输入的类型需要是一样的。形状为[filter_height, filter_width, in_channels, out_channels] filter_height你可以形象的理解为一个滑动窗口的高度,filter_width就可以是一个滑动窗口的宽度,in_channels表示作用的输入的通道数(深度),所以你会发现他和input里面的最后一个参数in_channels应该是相同的,out_channels表示输出的feature map的深度,其实这里本质就是filter的个数。
strides: 一个int类型或者一个int类型并且长度为1,2,4的列表,表明在各个维度上面滑动的步长,要是仅仅输入一个值,那么表明只在H和 W的步长,同时默认N和C着两个维度的步长为1
padding: padding策略,分别是"SAME"或者"VALID"。
data_format: 一个可选的字符串来指定输入的数据的格式,分别是 “NHWC”(默认)和"NCHW". "NHWC"表示的是数据的形状为 [batch, height, width, channels].,"NCHW"表明形状为 [batch, channels, height, width].
dilations: 一个int类型或者一个int类型并且长度为1,2,4的列表, 默认是1,表示在各个维度上面的空洞因子。要是指定一个值,就是在H和W的维度的空掉率为这个值。同时默认N和C着两个维度的步长为1
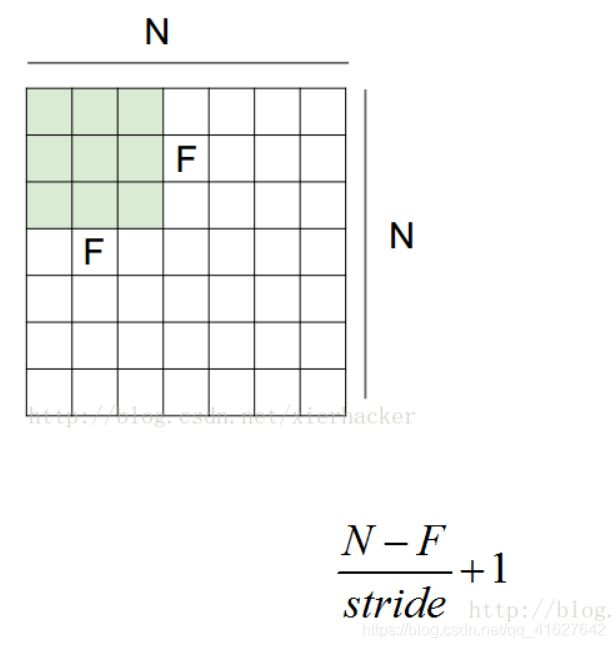
所以对于偏置的形状应当怎么设置呢?很简单,卷积核有n个,偏置的形状就是(n,).因为一个卷积核对应一个偏置,很容易就算出来了.比如这里的偏置b定为[1,0],因为有两个卷积核.
二.池化操作(Pooling)
列表:
tf.nn.avg_pool
tf.nn.max_pool
tf.nn.max_pool_with_argmax
tf.nn.avg_pool3d
tf.nn.max_pool3d
tf.nn.fractional_avg_pool
tf.nn.fractional_max_pool
tf.nn.pool
tf.nn.avg_pool(value, ksize, strides, padding, data_format=‘NHWC’, name=None)
作用:
在input上面执行average pooling
参数:
value: 一个4维tensor,形状为[batch, height, width, channels] 元素类型可以是 float32, float64, qint8, quint8, or qint32.
ksize: 整形列表,长度 >= 4. 表示窗口在输入的每个维度上面的尺寸.一般在二维的图像的情况下,都是[1,高,宽,1]
strides: 整形列表,长度 >= 4. 表示窗口滑动在输入tensor上面每个维度滑动的的步长.和卷积操作是一样的.
padding: 两种模式 ‘VALID’ 或者 ‘SAME’.
data_format: 两种模式 ‘NHWC’ 和 'NCHW’
name: 可选,操作名
tf.数据转化和形状变换
Ⅰ.数据类型转化
tf.image.convert_image_dtype
convert_image_dtype(image,dtype,saturate=False,name=None)
作用:把图片元素类型,转成想要的类型,返回转换后的图片,注意,要是转成了float类型之后,像素值会在 [0,1)这个范围内。
参数:
image: 图像
dtype: 待转换类型
saturate: If True, clip the input before casting (if necessary).
name: 可选操作名
Ⅱ.形状变换
resize_images(images,size,method=ResizeMethod.BILINEAR,align_corners=False)
作用:使用指定的方法来改变形状
参数:
images: 4维tensor,形状为 [batch, height, width, channels] 或者3维tensor,形状为 [height, width, channels].
size: 1维 int32类型的 Tensor,包含两个元素:new_height, new_width.
method: 改变形状的方法,默认是ResizeMethod.BILINEAR.
ResizeMethod.BILINEAR: 双线性插值(Bilinear interpolation.),0
ResizeMethod.NEAREST_NEIGHBOR: 最近邻插值(Nearest neighbor interpolation.),1
ResizeMethod.BICUBIC: 双三次插值(Bicubic interpolation.),2
ResizeMethod.AREA: 面积插值(Area interpolation.),3
还有其他类似的函数带有剪裁和形状改变的功能,如
resize_image_with_crop_or_pad(…): Crops and/or pads an image to a target width and height.
裁剪和/或将图像填充到目标宽度和高度。
central_crop(…): Crop the central region of the image.
crop_and_resize(…): Extracts crops from the input image tensor and bilinearly resizes them (possibly
crop_to_bounding_box(…): Crops an image to a specified bounding box.
Ⅲ.图像翻转
上面介绍了尺寸的问题,然后就是翻转的问题了.为什么要翻转呢?以这幅图为例:
flip_left_right(…): 左右翻转
flip_up_down(…): 上下翻转
transpose_image(…): 对角线翻转
random_flip_left_right(…): 随机左右翻转
random_flip_up_down(…): 随机上下翻转
三.颜色变换
和前面使用翻转可以来”增加数据集”以外,调节颜色属性也是同样很有用的方法,这里主要有调整亮度,对比度,饱和度,色调等方法.如下:
亮度:
adjust_brightness(…): 调整亮度
random_brightness(…): 随机调整亮度
对比度:
adjust_contrast(…): 调整对比度
random_contrast(…): 随机调整亮度
饱和度:
adjust_saturation(…): 调整饱和度
random_saturation(…): 随机调整饱和度
色调:
adjust_hue(…): 调整色调
random_hue(…): 随机调整色调
图像翻转
本节只详细介绍三个非常有用的的函数,两个是翻转图像的,分别是random_flip_left_right(…) 和 random_flip_up_down(…) 看名字就知道是左右翻转和上下翻转,还有一个是tf.image.sample_distorted_bounding_box 是随机截取图像。
import numpy as np
import tensorflow as tf
import cv2 as cv
import os
filepath="C:\\Users\\User\\Pictures\\Camera Roll\\2.jpg"
raw_image=cv.imread(filepath)
raw_image = cv.cvtColor(raw_image,cv.COLOR_BGR2RGB)
graph=tf.Graph()
with graph.as_default():
    image=tf.image.convert_image_dtype(raw_image,tf.float32)#1、转换数据类型
    image_resize=tf.image.resize_images(image, size=[180,200],method=1)
    image_resize1=tf.image.resize_image_with_crop_or_pad(image_resize, target_height=100, target_width=100)
    image_resize2=tf.image.crop_to_bounding_box(image_resize1,offset_height=20, offset_width=20, target_height=80, target_width=80)
    image_flip2=tf.image.flip_left_right(image_resize2)
    image_sat=tf.image.adjust_saturation(image_resize, 0.8)

with graph.as_default():
    with tf.Session() as sess:
        init_op=tf.global_variables_initializer().run()
        image_resize=sess.run(image_resize)
        image_resize1=sess.run(image_resize1)
        image_resize2=sess.run(image_resize2)
        image_flip2=sess.run(image_flip2)
        image_sat=sess.run(image_sat)
        image_with_box=sess.run( image_with_box)
        cv.namedWindow("Raw Image:",cv.WINDOW_AUTOSIZE)
        cv.namedWindow("image_resize is:",cv.WINDOW_AUTOSIZE)
        cv.imshow("Raw Image",raw_image)
        cv.imshow("image_resize is:",image_sat)
        cv.waitKey(0)
        cv.destroyAllWindows()
保存TFRecord文件
TensorFlow学习(十一):保存TFRecord文件
知识总结:
1、API:
tf.python_io.TFRecordWriter 类,把记录写入到TFRecords文件的类.
他又两个属性
close(),作用:关闭对象.
write(record),作用:把字符串形式的记录写到文件中去,参数:record: 字符串,待写入的记录
2、tf.train.Example
TFRecord文件中的数据都是通过tf.train.Example Protocol Buffer的格式存储的,属性features,一般我们使用的时候,是传入一个tf.train.Features对象进去.
SerializeToString(),作用:把example序列化为一个字符串,因为在写入到TFRcorde的时候,write方法的参数是字符串的。
3、tf.train.Features
传入一个字典,字典的键是一个字符串,表示名字,字典的值是一个tf.train.Feature对象.
tf.train.Int64List, tf.train.BytesList, tf.train.FloatList
使用的时候,一般传入一个具体的值,比如学习任务中的标签就可以传进value=tf.train.Int64List,而图片就可以先转为字符串的格式之后,传入value=tf.train.BytesList中.
数据:
import tensorflow as tf
import pandas as pd
import numpy as np
data=pd.read_csv("D:\\BaiduNetdiskDownload\\mnist\\mnist_train.csv")
train_label=data.pop(item="label").values
train_sample=data.loc[:,data.columns!="label"].values
train_size=train_sample.shape[0]

writer=tf.python_io.TFRecordWriter(path="D:\\BaiduNetdiskDownload\\mnist\\1.tfrecords")
for i in range(train_size):
    raw_image=train_sample[i].tostring()
    example=tf.train.Example(
            features=tf.train.Features(
                    feature={

                            "raw_image":tf.train.Feature(bytes_list=tf.train.BytesList(value=[raw_image])),
                            "label":tf.train.Feature(int64_list=tf.train.Int64List(value=[train_label[i]]))
                            }
                    )
            )
    writer.write(record=example.SerializeToString())
    writer.writer(record=example.SerializeToString())

writer.close()
CIFAR_10保存为TF的实例
# -*- coding: utf-8 -*-
"""
Created on Tue Jun  2 13:00:18 2020

@author: User
"""
import matplotlib.pyplot as plt
import matplotlib.image as mpimg
import numpy as np
import tensorflow as tf
import pandas as pd
import os


#get the amount of files in folder
def sizeOfFolder(folder_path):
    fileNameList = os.listdir(path=folder_path)
    size = 0
    for fileName in fileNameList:
        if (os.path.isfile(path=os.path.join(folder_path, fileName))):
            size += 1
    return size

def pics_to_TFRecord(folder_path,labels=None,isTrain=False):
    size=sizeOfFolder(folder_path=folder_path)

    #train set
    if isTrain:
        if labels is None:
            print("labels can't be None!!!")
            return None
        if labels.shape[0]!=size:
            print("something wrong with shape!!!")
            return None
        writer=tf.python_io.TFRecordWriter("D:/BaiduNetdiskDownload/data/train.tfrecords")
        for i in range(1,size+1):
            print("----------processing the ",i,"\'th image----------")
            filename=folder_path+str(i)+".png"
            img=mpimg.imread(fname=filename)#每张图片
            width=img.shape[0]
            print(width)
            #trans to string
            img_raw=img.tostring()

            example=tf.train.Example(
                features=tf.train.Features(
                    feature={

                        "img_raw":tf.train.Feature(bytes_list=tf.train.BytesList(value=[img_raw])),
                        "label":tf.train.Feature(int64_list=tf.train.Int64List(value=[labels[i-1]])),
                        "width":tf.train.Feature(int64_list=tf.train.Int64List(value=[width]))
                    }
                )

            )
            writer.write(record=example.SerializeToString())
        writer.close()

    #test set
    else:
        writer = tf.python_io.TFRecordWriter(".D:/BaiduNetdiskDownload/data/test.tfrecords")
        for i in range(1, size + 1):
            print("----------processing the ", i, "\'th image----------")
            filename = folder_path + str(i) + ".png"
            img = mpimg.imread(fname=filename)
            width = img.shape[0]
            print(width)
            # trans to string
            img_raw = img.tostring()

            example = tf.train.Example(
                features=tf.train.Features(
                    feature={

                        "img_raw": tf.train.Feature(bytes_list=tf.train.BytesList(value=[img_raw])),
                        "width": tf.train.Feature(int64_list=tf.train.Int64List(value=[width]))
                    }
                )

            )
            writer.write(record=example.SerializeToString())
        writer.close()

if __name__=="__main__":

    train_labels_frame=pd.read_csv("D:/BaiduNetdiskDownload/data/trainLabels.csv")
    train_labels_frame_dummy=pd.get_dummies(data=train_labels_frame)#利用pandas实现one hot encode
    train_labels_frame_dummy.pop(item="id")
    train_labels_values_dummy=train_labels_frame_dummy.values
    train_labels_values=np.argmax(train_labels_values_dummy,axis=1)

    folder_path="D:\\BaiduNetdiskDownload\\data\\train\\"
    print(sizeOfFolder(folder_path))
    #write train record
    pics_to_TFRecord(folder_path,labels=train_labels_values,isTrain=True)

   #write test record
    pics_to_TFRecord(folder_path)
模型的保存与恢复(上)基本操作
1、tf.train.Saver
属性:(模型保存)
save(sess,save_path,global_step=None,latest_filename=None,meta_graph_suffix=’meta’,write_meta_graph=True,write_state=True,strip_default_attrs=False)
作用就是保存变量
restore(sess,save_path)(模型恢复)
恢复变量,同时要求图运行在这个session里面。
参数:
sess: 用来恢复参数的session
save_path: 保存模型的地址,一般来说,常常使用save() 函数返回的地址后者使用latest_checkpoint() 来得到地址。
2、tf.train.export_meta_graph
tf.train.export_meta_graph(filename=None,meta_info_def=None,graph_def=None,saver_def=None,collection_list=None,as_text=False,graph=None,export_scope=None,clear_devices=False,clear_extraneous_savers=False,strip_default_attrs=False,**kwargs)
此函数将图形、保护程序和集合对象导出到MetaGraphDef协议缓冲区,目的是在稍后的时间或位置导入它,以重新启动训练、运行推理或成为子图。
3、tf.train.import_meta_graph
tf.train.import_meta_graph(meta_graph_or_file,clear_devices=False,import_scope=None,**kwargs)
作用是把MetaGraphDef proto 中存储的图重新创建出来。这个函数使用MetaGraphDef protocol buffer 作为输入,如果当前参数是一个包含 MetaGraphDef protocol buffer 的文件, 那么它会从文件内容中构建一个protocol buffer 然后把graph_def 域中所有的结点添加到当前图,重新构建所有的集合,同时返回一个从 saver_def 中构建的saver对象。
一般这个函数结合export_meta_graph() 函数来使用。用作对于以保存的图的恢复。
4、get_tensor_by_name
get_tensor_by_name(name)
作用是用给定的名字返回对应的Tensor,(这个函数能够同时被多个线程调用)
Mask RCNN建筑物检测代码
import datetime
import os
import sys
import tarfile
import zipfile
from collections import defaultdict
from io import StringIO

import numpy as np
import six.moves.urllib as urllib
from matplotlib import pyplot as plt
from PIL import Image

import cv2
import tensorflow as tf
from object_detection.utils import ops as utils_ops
from utils import label_map_util
from utils import visualization_utils as vis_util

# import matplotlib
# matplotlib.use('Agg')
# import matplotlib
# matplotlib.use('TkAgg')
# import matplotlib.pyplot as plt


# This is needed since the notebook is stored in the object_detection folder.
sys.path.append("..")

# if tf.__version__ < '1.4.0':
#      raise ImportError('Please upgrade your tensorflow installation to v1.4.* or later!')

# This is needed to display the images.
# %matplotlib inline

config = tf.ConfigProto()
config.gpu_options.allow_growth = True
session = tf.Session(config=config)

CWD_PATH = os.getcwd()  # 1、定位到代码路径
# What model to download.
MODEL_NAME = 'building_inference_graph'
# MODEL_NAME = 'mask_rcnn_inception_v2_coco_2018_01_28'
# MODEL_FILE = MODEL_NAME + '.tar.gz'

# Path to frozen detection graph. This is the actual model that is used for the object detection.
PATH_TO_CKPT = os.path.join(CWD_PATH, MODEL_NAME, 'frozen_inference_graph.pb')

# List of the strings that is used to add correct label for each box.
# PATH_TO_LABELS = os.path.join('data', 'mscoco_label_map.pbtxt')
# PATH_TO_LABELS = 'building.pbtxt'
PATH_TO_LABELS = os.path.join(CWD_PATH, 'training4', 'building.pbtxt')
NUM_CLASSES = 1

''' 将(frozen)TensorFlow模型载入内存
将创建的detection_graph作为默认图:detection_graph.as_default()
tf.gfile.GFile(),# 获取文本操作句柄,类似于python提供的文本操作open()函数,filename是要打开的文件名,mode是以何种方式去读写,将会返回一个文本操作句柄
tf.import_graph_def(),将保存的模型导入进来
'''

detection_graph = tf.Graph()
with detection_graph.as_default():
    od_graph_def = tf.GraphDef()  # 创建序列化的TensorFlow GraphDef协议缓冲区
    with tf.gfile.GFile(PATH_TO_CKPT,
                        'rb') as fid:  # 获取文本操作句柄,类似于python提供的文本操作open()函数,filename是要打开的文件名,mode是以何种方式去读写,将会返回一个文本操作句柄
        serialized_graph = fid.read()
        od_graph_def.ParseFromString(serialized_graph)  # 并将GraphDef中的各个对象提取为tf
        tf.import_graph_def(od_graph_def, name='')  # 这些对象就会被放到当前的默认detection_graph图形中

label_map = label_map_util.load_labelmap(PATH_TO_LABELS)
categories = label_map_util.convert_label_map_to_categories(label_map, max_num_classes=NUM_CLASSES,
                                                            use_display_name=True)
category_index = label_map_util.create_category_index(categories)


def load_image_into_numpy_array(image):
    (im_width, im_height) = image.size
    return np.array(image.getdata()).reshape(
        (im_height, im_width, 3)).astype(np.uint8) #将数据转换维度和数据类型转换


# For the sake of simplicity we will use only 2 images:
# image1.jpg
# image2.jpg
# If you want to test the code with your images, just add path to the images to the TEST_IMAGE_PATHS.
# PATH_TO_TEST_IMAGES_DIR = 'test_images'
# TEST_IMAGE_PATHS = [ os.path.join(PATH_TO_TEST_IMAGES_DIR, 'image{}.jpg'.format(i)) for i in range(1, 7) ]
img_path = 'images'
TEST_IMAGE_PATHS = os.listdir(img_path)
os.chdir(img_path)

# Size, in inches, of the output images.
IMAGE_SIZE = (12, 8)


def run_inference_for_single_image(image, graph):
    with graph.as_default():
        with tf.Session() as sess:
            # Get handles to input and output tensors
            #tf.get_default_graph()获取当前默认计算图,get_operations()返回图中的操作
            #op.outputs,返回所有的Tensor变量的名字
            ops = tf.get_default_graph().get_operations()
            all_tensor_names = {
     output.name for op in ops for output in op.outputs}
            tensor_dict = {
     }
            for key in [
                'num_detections', 'detection_boxes', 'detection_scores',
                'detection_classes', 'detection_masks'
            ]:
                tensor_name = key + ':0'
                if tensor_name in all_tensor_names:
                    tensor_dict[key] = tf.get_default_graph().get_tensor_by_name(
                        tensor_name)#tensor_name必须是字符串
            if 'detection_masks' in tensor_dict:
                # The following processing is only for single image
                detection_boxes = tf.squeeze(tensor_dict['detection_boxes'], [0])
                detection_masks = tf.squeeze(tensor_dict['detection_masks'], [0])
                # Reframe is required to translate mask from box coordinates to image coordinates and fit the image size.
                real_num_detection = tf.cast(tensor_dict['num_detections'][0], tf.int32)#转化数据类型
                detection_boxes = tf.slice(detection_boxes, [0, 0], [real_num_detection, -1])#进行数据切片
                detection_masks = tf.slice(detection_masks, [0, 0, 0], [real_num_detection, -1, -1])
                detection_masks_reframed = utils_ops.reframe_box_masks_to_image_masks(
                    detection_masks, detection_boxes, image.shape[0], image.shape[1])
                detection_masks_reframed = tf.cast(
                    tf.greater(detection_masks_reframed, 0.1), tf.uint8)
                # Follow the convention by adding back the batch dimension
                tensor_dict['detection_masks'] = tf.expand_dims(
                    detection_masks_reframed, 0)
            image_tensor = tf.get_default_graph().get_tensor_by_name('image_tensor:0')

            # Run inference
            print("start")
            b = datetime.datetime.now()
            output_dict = sess.run(tensor_dict,
                                   feed_dict={
     image_tensor: np.expand_dims(image, 0)})

            e = datetime.datetime.now()
            k = e - b
            print("%f ms" % (k.total_seconds() * 1000))
            # all outputs are float32 numpy arrays, so convert types as appropriate
            output_dict['num_detections'] = int(output_dict['num_detections'][0])
            output_dict['detection_classes'] = output_dict[
                'detection_classes'][0].astype(np.uint8)
            output_dict['detection_boxes'] = output_dict['detection_boxes'][0]
            output_dict['detection_scores'] = output_dict['detection_scores'][0]
            if 'detection_masks' in output_dict:
                output_dict['detection_masks'] = output_dict['detection_masks'][0]
    return output_dict


# for image_path in TEST_IMAGE_PATHS:
image_path = 'D:/tf2/Models/research/object_detection/images/test1.jpg'
output_image_path = 'D:/tf2/Models/research/object_detection/images'
# image = Image.open(image_path)

image = Image.open(image_path)
width, height = image.size
image_np = load_image_into_numpy_array(image)
# image_expanded = np.expand_dims(image_np, axis=0)
output_dict = run_inference_for_single_image(image_np, detection_graph)
# (boxes, scores, classes, num)=sess.run(
#              [detection_boxes, detection_scores, detection_classes, num_detections],
#              feed_dict={image_tensor: image_np_expanded})

vis_util.visualize_boxes_and_labels_on_image_array(
    image_np,
    output_dict['detection_boxes'],
    output_dict['detection_classes'],
    output_dict['detection_scores'],
    category_index,#类别信息
    instance_masks=output_dict.get('detection_masks'),
    use_normalized_coordinates=True,
    line_thickness=8)
cv2.imshow('Object detector', image_np)
cv2.imwrite(output_image_path + '\\' + image_path.split('\\')[-1], image_np)

# Press any key to close the image
cv2.waitKey(0)

# Clean up
cv2.destroyAllWindows()
tf.app.run()使用方法的解释
def run(main=None, argv=None):
  """Runs the program with an optional 'main' function and 'argv' list."""
  f = flags.FLAGS

  # Extract the args from the optional `argv` list.
  args = argv[1:] if argv else None

  # Parse the known flags from that list, or from the command
  # line otherwise.
  # pylint: disable=protected-access
  flags_passthrough = f._parse_flags(args=args)
  # pylint: enable=protected-access

  main = main or _sys.modules['__main__'].main

  # Call the main function, passing through any arguments
  # to the final program.
  _sys.exit(main(_sys.argv[:1] + flags_passthrough))


_allowed_symbols = [
    'run',
    # Allowed submodule.
    'flags',
]

remove_undocumented(__name__, _allowed_symbols)
源码中写的很清楚,首先加载flags的参数项,然后执行main()函数,其中参数使用tf.app.flags.FLAGS定义的
import tensorflow as tf
FLAGS = tf.app.flags.FLAGS
tf.app.flags.DEFINE_string('string', 'train', 'This is a string')
tf.app.flags.DEFINE_float('learning_rate', 0.001, 'This is the rate in training')
tf.app.flags.DEFINE_boolean('flag', True, 'This is a flag')

def main(unuse_args):
    print('string: ', FLAGS.string)
    print('learning_rate: ', FLAGS.learning_rate)
    print('flag: ', FLAGS.flag)

if __name__ == '__main__':
    tf.app.run()
主函数中的tf.app.run()会调用main,并传递参数,因此必须在main函数中设置一个参数位置。如果要更换main名字,只需要在tf.app.run()中传入一个指定的函数名即可。
条件随机场CRF
TensorFlow学习(十四):条件随机场CRF
假设你有许多小明同学一天内不同时段的照片,从小明提裤子起床到脱裤子睡觉各个时间段都有(小明是照片控!)。现在的任务是对这些照片进行分类。比如有的照片是吃饭,那就给它打上吃饭的标签;有的照片是跑步时拍的,那就打上跑步的标签;有的照片是开会时拍的,那就打上开会的标签。问题来了,你准备怎么干?
一个简单直观的办法就是,不管这些照片之间的时间顺序,想办法训练出一个多元分类器。就是用一些打好标签的照片作为训练数据,训练出一个模型,直接根据照片的特征来分类。例如,如果照片是早上6:00拍的,且画面是黑暗的,那就给它打上睡觉的标签;如果照片上有车,那就给它打上开车的标签。
这样可行吗?
乍一看可以!但实际上,由于我们忽略了这些照片之间的时间顺序这一重要信息,我们的分类器会有缺陷的。举个例子,假如有一张小明闭着嘴的照片,怎么分类?显然难以直接判断,需要参考闭嘴之前的照片,如果之前的照片显示小明在吃饭,那这个闭嘴的照片很可能是小明在咀嚼食物准备下咽,可以给它打上吃饭的标签;如果之前的照片显示小明在唱歌,那这个闭嘴的照片很可能是小明唱歌瞬间的抓拍,可以给它打上唱歌的标签。
所以,为了让我们的分类器能够有更好的表现,在为一张照片分类时,我们必须将与它相邻的照片的标签信息考虑进来。这——就是条件随机场(CRF)大显身手的地方!
Ⅰ tf.contrib.crf.crf_log_likelihood
crf_log_likelihood(inputs,tag_indices,sequence_lengths,transition_params=None)
在一个条件随机场里面计算标签序列的log-likelihood
参数:
inputs: 一个形状为[batch_size, max_seq_len, num_tags] 的tensor,一般使用BILSTM处理之后输出转换为他要求的形状作为CRF层的输入.
tag_indices: 一个形状为[batch_size, max_seq_len] 的矩阵,其实就是真实标签.
sequence_lengths: 一个形状为 [batch_size] 的向量,表示每个序列的长度.
transition_params: 形状为[num_tags, num_tags] 的转移矩阵
返回:
log_likelihood: 标量,log-likelihood
transition_params: 形状为[num_tags, num_tags] 的转移矩阵
Ⅱ tf.contrib.crf.viterbi_decode
viterbi_decode(score,transition_params)
通俗一点,作用就是返回最好的标签序列.这个函数只能够在测试时使用,在tensorflow外部解码
参数:
score: 一个形状为[seq_len, num_tags] matrix of unary potentials.
transition_params: 形状为[num_tags, num_tags] 的转移矩阵
返回:
viterbi: 一个形状为[seq_len] 显示了最高分的标签索引的列表.
viterbi_score: A float containing the score for the Viterbi sequence.
Ⅲ.tf.contrib.crf.crf_decode
crf_decode(potentials,transition_params,sequence_length)
在tensorflow内解码
参数:
potentials: 一个形状为[batch_size, max_seq_len, num_tags] 的tensor,
transition_params: 一个形状为[num_tags, num_tags] 的转移矩阵
sequence_length: 一个形状为[batch_size] 的 ,表示batch中每个序列的长度
返回:
decode_tags:一个形状为[batch_size, max_seq_len] 的tensor,类型是tf.int32.表示最好的序列标记.
best_score: 有个形状为[batch_size] 的tensor, 包含每个序列解码标签的分数.
a−−√b∫yx
使用tf.data来创建输入流(上)
1、Ⅰ.创建Dataset对象
首先其实只要重点掌握from_tensor_slices 这个函数就差不多了.当然还有一些相似的函数,可以自己看文档来使用.
tf.data.Data.from_tensor_slices(tensors)
参数:
tensors: 嵌套结构的tensors,在第0维上面都有想用的size.
返回:
一个Dataset对象
Dataset对象有一个常见的属性:output_shapes,这个属性的作用是现实dataset对象中 一个元素的形状.
import tensorflow as tf
import numpy as np

dataset1=tf.data.Dataset.from_tensors(np.array([1.,2.,3.,4.,5.]))
dataset2=tf.data.Dataset.from_tensor_slices(tensors=np.array([[1.,2.,3.,4.,5.],[3.,4.,5.,6.,7.]]))

print("element shape of dataset1:",dataset1.output_shapes)
print("element shape of dataset2:",dataset2.output_shapes)
print("element type of dataset2:",dataset2.output_types)
element shape of dataset1: (5,)
element shape of dataset2: (5,)
element type of dataset2:
from_tensors() 这个函数会把传入的tensor当做一个元素,但是from_tensor_slices() 会把传入的tensor除开第一维之后的大小当做元素个数.比如上面2x5 的向量,我们得到的元素是其中每一个形状为(5,)的tensor.
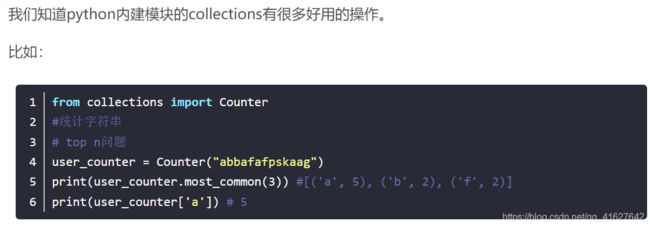
6Collection库
数据字典
一个字典对象是可变的,它是一个容器类型,能存储任意个数的Python 对象,其中也包括其他容器类型。
字典类型和序列类型容器类(列表、元组)的区别是存储和访问数据的方式不同:
序列类型:
只用数字类型的键(从序列的开始起按数值顺序索引)。
映射类型:
可以用其他对象类型做键;一般最常见的是用字符串做键(keys)。和序列类型的键不同,映射类型的键(keys)直接,或间接地和存储的数据值相关联。但因为在映射类型中,我们不再用"序列化排序"的键(keys),所以映射类型中的数据是无序排列的。
1)创建字典
dict3 = {
     'chengdu':{
     'province':'sichuan','pop':'500万'},'shanghai':{
     'pop':'2000万'}}
dict4 = {
     'chengdu':[500,10000],'shanghai':[2000,30000]}
2)访问字典
dict3['chengdu']['pop']  #与后面讲到的JSON数据格式相似
dict4['chengdu'][1]
#访问关键字
for key in dict3.keys():
    print(key)
#获取键里面的数值
dict2.values()
#获取每一个键值所对应的值
for key in dict2:
    print(key,dict2[key])
3)更新字典
dict2 = {
     'chengdu':'025','shanghai':'021'}
dict2['chengdu'] = '028'
4)删除字典元素和字典
Python 删除字典元素的4种方法
1、Python字典的clear()方法(删除字典内所有元素)
dict = {
     'name': '我的博客地址', 'alexa': 10000, 'url': 'http://blog.csdn.net/uuihoo/'}
dict.clear();  # 清空词典所有条目
2.、Python字典的pop()方法(删除字典给定键 key 所对应的值,返回值为被删除的值)
#!/usr/bin/python
# -*- coding: UTF-8 -*-
site= {
     'name': '我的博客地址', 'alexa': 10000, 'url':'http://blog.csdn.net/uuihoo/'}
pop_obj=site.pop('name') # 删除要删除的键值对,如{'name':'我的博客地址'}这个键值对
print pop_obj   # 输出 :我的博客地址
- Python字典的popitem()方法(随机返回并删除字典中的一对键和值)
#!/usr/bin/python
# -*- coding: UTF-8 -*-
site= {
     'name': '我的博客地址', 'alexa': 10000, 'url':'http://blog.csdn.net/uuihoo/'}
pop_obj=site.popitem() # 随机返回并删除一个键值对
print pop_obj   # 输出结果可能是{'url','http://blog.csdn.net/uuihoo/'}
- del 全局方法(能删单一的元素也能清空字典,清空只需一项操作)
#!/usr/bin/python
# -*- coding: UTF-8 -*-
site= {
     'name': '我的博客地址', 'alexa': 10000, 'url':'http://blog.csdn.net/uuihoo/'}
del site['name'] # 删除键是'name'的条目
del site  # 清空字典所有条目
读取与写入文档
1、读取文件
python中有神奇的三种读操作:read、readline和readlines
read() : 一次性读取整个文件内容。推荐使用read(size)方法,size越大运行时间越长
readline() :每次读取一行内容。内存不够时使用,一般不太用
readlines() :一次性读取整个文件内容,并按行返回到list,方便我们遍历
fl = open('data/open1.txt','r')
txt = fl.read()
print(txt)
fl.close()

fl = open('data/open1.txt','r')
txt = fl.readline()
print(txt)
fl.close()

fl = open('data/open1.txt','r')
txt = fl.readlines()
print(txt)
fl.close()
2、写入文件
lst = ['suzhou', 'nanjing', 'chengdu', 'shanghai', 'beijing', 'wuxi']
fl = open('data/open3.txt','w')
for city in lst:
    fl.write(city + '\n')
fl.close()
a 追加模式
lst = ['suzhou', 'nanjing', 'chengdu', 'shanghai', 'beijing', 'wuxi']
fl = open('data/open5.txt','a')
for city in lst:
    fl.write(city + '\n')
fl.close()
