超详细Openstack核心组件——Keystone介绍及部署
目录
- Keystone身份服务
-
- Keystone职能
- Keystone提供路径指引服务前提
- 主要功能
- 主要管理对象
- Keystone认证流程图
- 注:
- 项目:配置Keystone
-
- 创建数据库实例和数据库用户
- 安装、配置keystone、数据库、Apache
- 创建OpenStack 域、项目、用户和角色
- 总结
Keystone身份服务
Keystone职能
- Keystone (OpenStack ldentityService)是OpenStack中的一个独立的提供安全认证的模块,主要负责openstack用户的身份认证、令牌管理、提供访问资源的服务目录(指引路径)、以及基于用户角色的访问控制。
Keystone提供路径指引服务前提
- Keystone类似一个服务总线,或者说是整个Openstack框架的注册表,其他服务通过keystone来注册其服务的Endpoint(服务访问的URL),任何服务之间相互的调用,需要经过Keystone的身份验证,来获得目标服务的Endpoint来找到目标服务。
主要功能
- 身份认证(Authentication) :令牌的发放和校验
- 用户授权(Authorization):授予用户在一个服务中所拥有权限
- 用户管理(Account) :管理用户账户
- 服务目录(Service Catalog):提供可用服务的API端点
主要管理对象
User、Credentials、Authentication、Token、Project、Service、Endpoint、Role
- User:指使用Openstack service的用户。
- Project(Tenant):可以理解为一个人、或服务所拥有的资源集合。
- Role:用于划分权限。通过给User指定Role,使User获得Role对应操作权限
- Authentication:确定用户身份的过程。
- Token:是一个字符串表示,作为访问资源的令牌。Token包含了在指定范围和有效时间内,可以被访问的资源。
- Credentials:用于确认用户身份的凭证。用户的用户名和密码,或者是用户名和API密钥,或者身份管理服务提供的认证令牌。
- Service: Openstack service,即Openstack中运行的组件服务。如swift、glance、neutron、cinder等。
- Endpoint:一个可以通过网络来访问和定位某个Openstack service的地址,通常是一个URL。
Keystone认证流程图
注:
部署openstack过程中需先部署Keystone
项目:配置Keystone
继OpenStack环境部署-初步搭建进一步部署
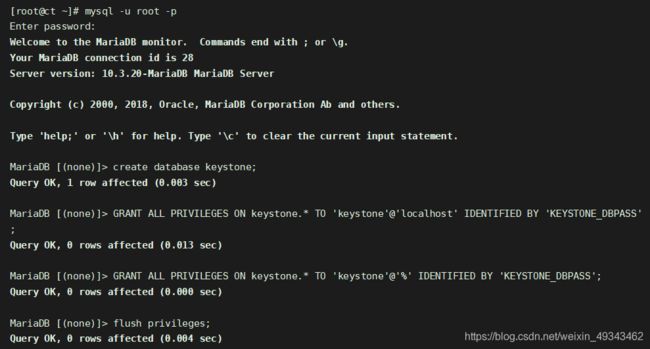
创建数据库实例和数据库用户
[root@ct ~]# mysql -u root -p
Enter password:
Welcome to the MariaDB monitor.  Commands end with ; or \g.
Your MariaDB connection id is 28
Server version: 10.3.20-MariaDB MariaDB Server

Copyright (c) 2000, 2018, Oracle, MariaDB Corporation Ab and others.

Type 'help;' or '\h' for help. Type '\c' to clear the current input statement.

MariaDB [(none)]> create database keystone;
Query OK, 1 row affected (0.003 sec)

MariaDB [(none)]> GRANT ALL PRIVILEGES ON keystone.* TO 'keystone'@'localhost' IDENTIFIED BY 'KEYSTONE_DBPASS';
Query OK, 0 rows affected (0.013 sec)

MariaDB [(none)]> GRANT ALL PRIVILEGES ON keystone.* TO 'keystone'@'%' IDENTIFIED BY 'KEYSTONE_DBPASS';
Query OK, 0 rows affected (0.000 sec)

MariaDB [(none)]> flush privileges;
Query OK, 0 rows affected (0.004 sec)

MariaDB [(none)]> exit
Bye
安装、配置keystone、数据库、Apache
1. 安装keystone、httpd、mod_wsgi
- #mod_wsgi包的作用是让apache能够代理pythone程序的组件;openstack的各个组件,包括API都是用python写的,但访问的是apache,apache会把请求转发给python去处理,这些包只安装在controler节点
[root@ct ~]# yum -y install openstack-keystone httpd mode_wsgi
[root@ct ~]# cp -a /etc/keystone/keystone.conf{
     ,.bak}
[root@ct ~]# grep -Ev "^$|#" /etc/keystone/keystone.conf.bak > /etc/keystone/keystone.conf     //通过pymysql模块访问mysql,指定用户名密码、数据库的域名、数据库名
[root@ct ~]# openstack-config --set /etc/keystone/keystone.conf database connection mysql+pymysql://keystone:KEYSTONE_DBPASS@ct/keystone   //指定token的提供者;提供者就是keystone自己本身
[root@ct ~]# openstack-config --set /etc/keystone/keystone.conf token provider fernet
//Fernet:一种安全的消息传递格式
2. 初始化认证服务数据库
[root@ct ~]# su -s /bin/sh -c "keystone-manage db_sync" keystone
3. 初始化fernet 密钥存储库(以下命令会生成两个密钥,生成的密钥放于/etc/keystone/目录下,用于加密数据)
[root@ct ~]# keystone-manage fernet_setup --keystone-user keystone --keystone-group keystone
[root@ct ~]# keystone-manage credential_setup --keystone-user keystone --keystone-group keystone
4. 配置bootstrap身份认证服务
[root@ct ~]# keystone-manage bootstrap --bootstrap-password ADMIN_PASS \
> --bootstrap-admin-url http://ct:5000/v3/ \
> --bootstrap-internal-url http://ct:5000/v3/ \
> --bootstrap-public-url http://ct:5000/v3/ \
> --bootstrap-region-id RegionOne   //指定一个区域名称
- 此步骤是初始化openstack,会把openstack的admin用户的信息写入到mysql的user表中,以及url等其他信息写入到mysql的相关表中;
- admin-url是管理网(如公有云内部openstack管理网络),用于管理虚拟机的扩容或删除;如果共有网络和管理网是一个网络,则当业务量大时,会造成无法通过openstack的控制端扩容虚拟机,所以需要一个管理网;
- internal-url是内部网络,进行数据传输,如虚拟机访问存储和数据库、zookeeper等中间件,这个网络是不能被外网访问的,只能用于企业内部访问
- public-url是共有网络,可以给用户访问的(如公有云) ,但是此环境没有这些网络,则公用同一个网络
- 5000端口是keystone提供认证的端口
- 需要在haproxy服务器上添加一条listen
- 各种网络的url需要指定controler节点的域名,一般是haproxy的vip的域名(高可用模式)
5. 配置Apache HTTP服务器
[root@ct ~]# echo "ServerName controller" >> /etc/httpd/conf/httpd.conf
6. 创建配置文件
安装完mod_wsgi包后,会生成 wsgi-keystone.conf 这个文件,文件中配置了虚拟主机及监听了5000端口,mod_wsgi就是python的网关
[root@ct ~]# ln -s /usr/share/keystone/wsgi-keystone.conf /etc/httpd/conf.d/
7. 开启服务
[root@ct ~]# systemctl enable httpd
Created symlink from /etc/systemd/system/multi-user.target.wants/httpd.service to /usr/lib/systemd/system/httpd.service.
[root@ct ~]# systemctl start httpd
[root@ct ~]# systemctl status httpd
● httpd.service - The Apache HTTP Server
   Loaded: loaded (/usr/lib/systemd/system/httpd.service; enabled; vendor preset: disabled)
   Active: active (running) since 四 2021-02-18 16:04:16 CST; 14s ago
     Docs: man:httpd(8)
           man:apachectl(8)
 Main PID: 21557 (httpd)
   Status: "Total requests: 0; Current requests/sec: 0; Current traffic:   0 B/sec"
   CGroup: /system.slice/httpd.service
           ├─21557 /usr/sbin/httpd -DFOREGROUND
           ├─21558 (wsgi:keystone- -DFOREGROUND
           ├─21559 (wsgi:keystone- -DFOREGROUND
           ├─21560 (wsgi:keystone- -DFOREGROUND
           ├─21561 (wsgi:keystone- -DFOREGROUND
           ├─21562 (wsgi:keystone- -DFOREGROUND
           ├─21567 /usr/sbin/httpd -DFOREGROUND
           ├─21570 /usr/sbin/httpd -DFOREGROUND
           ├─21574 /usr/sbin/httpd -DFOREGROUND
           ├─21578 /usr/sbin/httpd -DFOREGROUND
           └─21582 /usr/sbin/httpd -DFOREGROUND

2月 18 16:04:16 ct systemd[1]: Starting The Apache HTTP Server...
2月 18 16:04:16 ct systemd[1]: Started The Apache HTTP Server.
8. 配置管理员账户的环境变量
- 这些环境变量用于创建角色和项目使用,但是创建角色和项目需要有认证信息,所以通过环境变量声明用户名和密码等认证信息,欺骗openstack已经登录且通过认证,这样就可以创建项目和角色;也就是把admin用户的验证信息通过声明环境变量的方式传递给openstack进行验证,实现针对openstack的非交互式操作
[root@ct ~]# cat >> ~/.bashrc << EOF
> export OS_USERNAME=admin    //控制台登陆用户名
> export OS_PASSWORD=ADMIN_PASS     //控制台登陆密码
> export OS_PROJECT_NAME=admin
> export OS_USER_DOMAIN_NAME=Default
> export OS_PROJECT_DOMAIN_NAME=Default
> export OS_AUTH_URL=http://ct:5000/v3
> export OS_IDENTITY_API_VERSION=3
> export OS_IMAGE_API_VERSION=2
> EOF

[root@ct ~]# source ~/.bashrc
9. 通过配置环境变量,可以使用openstack命令进行一些操作,示例:
[root@ct ~]# openstack user list
+----------------------------------+-------+
| ID                               | Name  |
+----------------------------------+-------+
| 09a752a6b18d48f2ae1f472599e94c5a | admin |
+----------------------------------+-------+
创建OpenStack 域、项目、用户和角色
1. 创建一个项目(project),创建在指定的domain(域)中,指定描述信息,project名称为service(可使用openstack domain list 查询)
[root@ct ~]# openstack project create --domain default --description "Service Project" service
+-------------+----------------------------------+
| Field       | Value                            |
+-------------+----------------------------------+
| description | Service Project                  |
| domain_id   | default                          |
| enabled     | True                             |
| id          | 70a6fc6eb82f48dfa3d66d5389dcea3e |
| is_domain   | False                            |
| name        | service                          |
| options     | {
     }                               |
| parent_id   | default                          |
| tags        | []                               |
+-------------+----------------------------------+
2. 创建角色(可使用openstack role list查看)
[root@ct ~]# openstack project create --domain default --description "Service Project" service
+-------------+----------------------------------+
| Field       | Value                            |
+-------------+----------------------------------+
| description | Service Project                  |
| domain_id   | default                          |
| enabled     | True                             |
| id          | 70a6fc6eb82f48dfa3d66d5389dcea3e |
| is_domain   | False                            |
| name        | service                          |
| options     | {
     }                               |
| parent_id   | default                          |
| tags        | []                               |
+-------------+----------------------------------+
[root@ct ~]# openstack role create user
+-------------+----------------------------------+
| Field       | Value                            |
+-------------+----------------------------------+
| description | None                             |
| domain_id   | None                             |
| id          | d0e42f995f29415c87705af0e7754ddc |
| name        | user                             |
| options     | {
     }                               |
+-------------+----------------------------------+
3. 查看openstack 角色列表
[root@ct ~]# openstack role list
+----------------------------------+--------+
| ID                               | Name   |
+----------------------------------+--------+
| 06feb1be0b964169bffa214af2435c56 | reader |
| 34755268537741189a3f9242010e1e68 | member |
| d0e42f995f29415c87705af0e7754ddc | user   |
| d9523d7587d54236ab48b6e9f1e7462f | admin  |
+----------------------------------+--------+
admin为管理员
member为 租户
user:用户
4. 查看是否可以不指定密码就可以获取到token信息(验证认证服务)
[root@ct ~]# openstack token issue
+------------+-----------------------------------------------------------------------------------------------------------------------------------------------------------------------------------------+
| Field      | Value                                                                                                                                                                                   |
+------------+-----------------------------------------------------------------------------------------------------------------------------------------------------------------------------------------+
| expires    | 2021-02-18T09:27:10+0000                                                                                                                                                                |
| id         | gAAAAABgLiTedvBu5lIbeJPJ-gUoWoIJx_NpRWcaTFjWf-oN_x5q6AhkYN0WUBvlLKR8nO9RJRJmczdvOlD9h7Kl-Cp-d3Fvd3knzrhY8nEKKW2TA16JTd6KmN9UeczQtQL9nLJn5wnum8AQ6OLp_mfYukFMC7tlBKDfYa8Eugxoj164BwTfeTg |
| project_id | 667d2c1d9fca46a690b830e6864580c9                                                                                                                                                        |
| user_id    | 09a752a6b18d48f2ae1f472599e94c5a                                                                                                                                                        |
+------------+-----------------------------------------------------------------------------------------------------------------------------------------------------------------------------------------+
至此,keystone部署完成
总结
Keystone 组件是作为OpenStack 集群中统一认证、授权的模块,其核心功能就是针对于User(用户)、Tenant(租户)、Role(角色)、Token(令牌/凭证)的控制(手工编译部署即围绕此功能展开的)
- User:使用 openstack 的用户。
- Tenant:租户,可以理解为一个人、项目或者组织拥有的资源的合集。在一个租户中可以拥有很多个用户,这些用户可以根据权限的划分使用租户中的资源。
- Role:角色,用于分配操作的权限。角色可以被指定给用户,使得该用户获得角色对应的操作权限。
- Token:指的是一串比特值或者字符串,用来作为访问资源的记号。Token 中含有可访问资源的范围和有效时间,token
是用户的一种凭证,需要使用正确的用户名和密码向 Keystone 服务申请才能得到 token。

