CentOS7.4搭建OpenStack-Ocata
文章目录
- 1.环境准备
- 2.基础环境准备
-
- 2.1 安装配置NTP服务
- 2.2 启用OpenStack库
- 2.3 安装部署MySQL(controller)
-
- 2.3.1 软件包安装
- 2.3.2 修改配置文件
- 2.3.3 启动服务并设置为开机自启
- 2.3.4 初始化数据库
- 2.4 安装部署RabbitMQ(controller)
-
- 2.4.1 软件包安装
- 2.4.2 启动服务并设置为开机自启
- 2.4.3 添加openstack用户
- 2.5 安装部署memcached(controller)
-
- 2.5.1 软件包安装
- 2.5.2 修改配置文件
- 2.5.3 启动服务并设置为开机自启
- 2.6 安装部署etcd(controller)
-
- 2.6.1 软件包安装
- 2.6.2 修改配置文件
- 2.6.3 启动服务并设置为开机自启
- 3.部署keystone认证服务(controller)
-
- 3.1 配置MySQL数据库及授权
- 3.2 软件包安装
- 3.3 修改配置文件
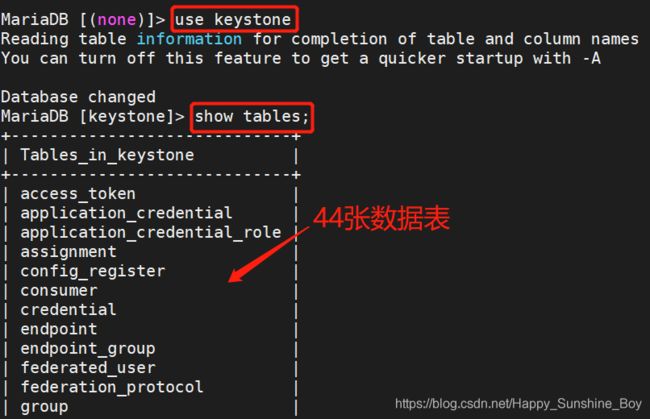
- 3.4 同步数据
- 3.5 初始化fernet
- 3.6 创建服务注册api
- 3.7 配置httpd
-
- 3.7.1 修改主机名
- 3.7.2 创建软连接
- 3.7.3 启动服务并设置为开机自启
- 3.8 设置环境变量脚本
- 4.创建域、项目、用户和角色(contorller)
-
- 4.1 创建域
- 4.2 创建项目
- 4.3 创建平台demo项目
- 4.4 创建demo用户
- 4.5 创建用户角色
- 4.6 关联项目、用户、角色
- 5.验证keystone(contorller)
-
- 5.1 取消环境变量
- 5.2 admin用户返回的认证token
- 5.3 demo用户返回的认证token
- 6.创建openstack客户端环境脚本(contorller)
-
- 6.1 创建admin-openrc脚本
- 6.2 创建demo-openrc脚本
- 7.镜像服务glance(controller)
-
- 7.1 配置MySQL数据库及授权
- 7.2 获取admin用户的环境变量
- 7.3 创建glance用户
- 7.4 admin用户添加到glance用户和项目中
- 7.5 创建glance服务
- 7.6 创建镜像服务API端点
- 7.7 安装glance包
- 7.8 创建images文件夹,并修改属性
- 7.9 修改配置文件
-
- 7.9.1 glance-api.conf
- 7.9.2 glance-registry.conf
- 7.10 同步镜像数据库
- 7.11 启动服务并设置为开机自启
- 7.12 验证上传镜像
-
- 7.12.1 获取admin用户的环境变量并下载镜像
- 7.12.2 上传镜像
- 7.12.3 查看上传的镜像
- 8.部署compute服务(controller)
-
- 8.1 配置MySQL数据库及授权
- 8.2 创建nova用户
- 8.3 添加admin用户为nova用户
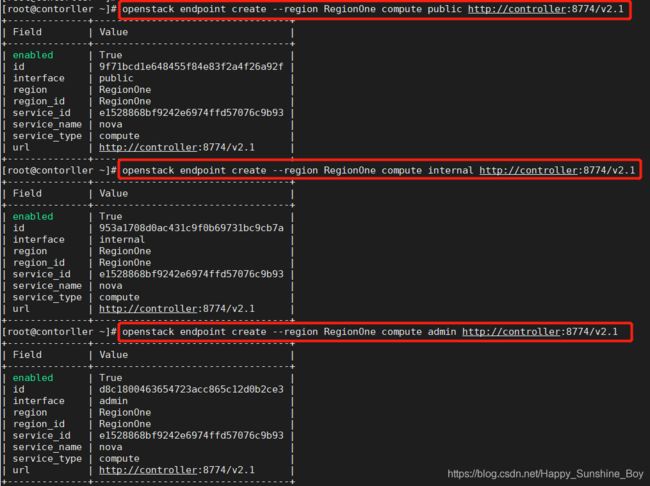
- 8.4 创建nova服务端点
- 8.5 创建compute API 服务端点
- 8.6 创建一个placement服务用户
- 8.7 添加placement用户为项目服务admin角色
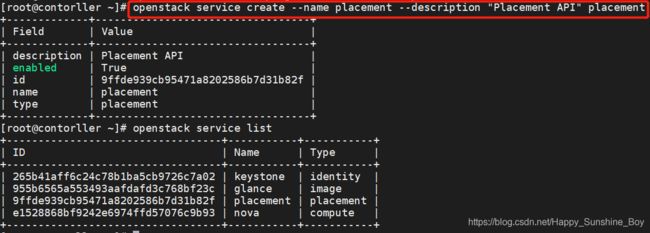
- 8.8 在服务目录创建Placement API服务
- 8.9 创建Placement API服务端点
- 8.10 安装软件包
- 8.11 修改nova.conf配置文件
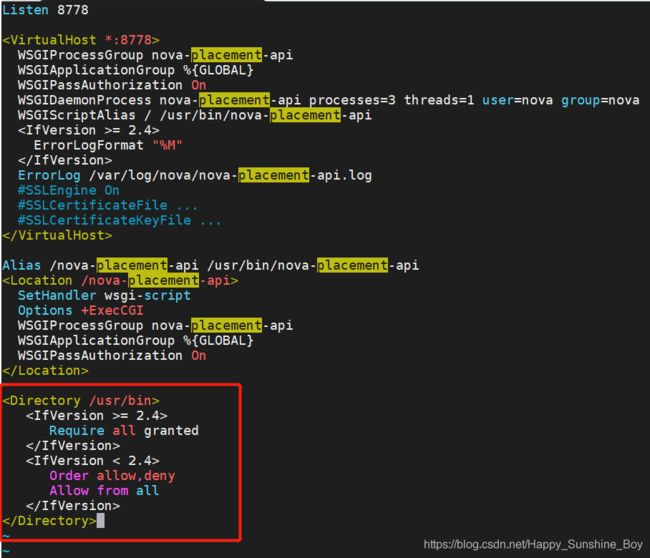
- 8.12 启用placement API访问
- 8.13 重启httpd服务
- 8.14 同步nova-api数据库
- 8.15 注册cell0数据库
- 8.16 创建cell1 cell
- 8.17 同步nova数据库
- 8.18 验证数据库是否注册正确
- 8.19 启动并将服务添加为开机自启
- 9.安装和配置compute节点(compute)
-
- 9.1 软件包安装
- 9.2 修改nova.conf配置文件
- 9.3 启动服务同时添加为开机自启
- 10.添加compute节点到cell数据库(controller)
-
- 10.1 验证在数据库中的计算节点
- 10.2 发现计算节点
- 10.3 在controller节点验证计算服务操作
- 10.4 列出身份服务中的API端点以验证与身份服务的连接
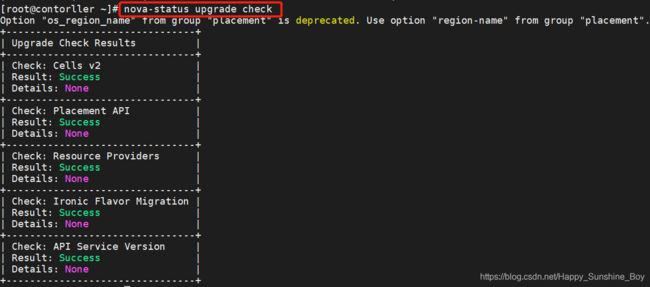
- 10.5 检查cells和placement API是否正常
- 11 安装和配置neutron网络服务(controller)
-
- 11.1 创建nuetron数据库并授权
- 11.2 创建用户
- 11.3 创建neutron服务
- 11.4 创建网络服务端点
- 11.5 安装软件包
- 11.6 修改配置文件
- 11.7 配置网络二层插件
- 11.8 配置Linux网桥
- 11.9 配置DHCP
- 11.10 配置metadata
- 11.11 配置计算服务使用网络服务
- 11.12 建立服务软连接
- 11.13 同步数据库
- 11.14 重启compute API服务
- 11.15 启动neutron服务并添加为开机自启
- 12.配置compute节点网络服务(compute)
-
- 12.1 软件包安装
- 12.2 配置公共组件
- 12.3 配置Linux网桥
- 12.4 配置计算节点网络服务
- 12.5 启动服务
- 12.6 验证操作
-
- 12.6.1 验证neutron-server进程是否正常启动
- 13.部署Horizon服务(controller)
-
- 13.1 软件包安装
- 13.2 修改配置文件
- 13.3 解决网页无法打开检查
- 13.4 重启web服务和会话存储
- 14.登陆测试
- 15.块cinder服务(contorller)
-
- 15.1 创建cinder数据库并授权
- 15.2 创建cinder用户
- 15.2 创建cinderv2、cinderv3实体
- 15.3 创建块设备存储服务的 API 入口点
- 15.4 软件包安装
- 15.5 修改配置文件
- 15.6 初始化块设备服务的数据库
- 15.7 配置计算节点以使用块设备存储
- 15.8 重启计算API服务
- 15.9 启动块设备存储服务,并将其配置为开机自启
- 16.安装并配置一个存储节点(cinder)
-
- 16.1 安装启动LVM包
- 16.2 创建LVM 物理卷 /dev/sdb
- 16.3 创建 LVM 卷组 cinder-volumes
- 16.4 修改配置
- 16.5 软件包安装
- 16.6 修改配置文件
- 16.7 启动块存储卷服务及其依赖的服务,并将其配置为随系统启动
- 16.8 验证操作(contorller)
1.环境准备
搭建虚拟机参考:https://blog.csdn.net/Happy_Sunshine_Boy/article/details/89039806
| Hostname | IP | 操作系统 | CPU | 虚拟化引擎 | 内存 | 磁盘 | 功能 |
|---|---|---|---|---|---|---|---|
controller |
192.168.120.111 | CentOS-7.4-x86_64 | 2 | 启用 AMD-H或intel VT |
4G | 50G | 控制节点 |
compute |
192.168.120.112 | CentOS-7.4-x86_64 | 2 | 启用 AMD-H或intel VT |
2G | 50G | 计算节点 |
cinder |
192.168.121.113 | CentOS-7.4-x86_64 | 2 | 启用 AMD-H或intel VT |
2G | 50G | 块存储节点 |
2.基础环境准备
在接下来的操作中若无特别说明,则表示在三台主机上均进行相同操作
关闭防火墙
systemctl stop firewalld
systemctl disable firewalld
关闭selinux
sestatus # 查看状态
vim /etc/sysconfig/selinux
SELINUX=disabled# 将enforcing修改为disable,永久关闭
设置hosts
vim /etc/hosts
192.168.120.111 controller
192.168.120.112 compute
192.168.120.113 cinder
设置阿里yum源
mv /etc/yum.repos.d/CentOS-Base.repo /etc/yum.repos.d/CentOS-Base.repo.backup
wget -O /etc/yum.repos.d/CentOS-Base.repo http://mirrors.aliyun.com/repo/Centos-7.repo
2.1 安装配置NTP服务
在controller节点安装配置chrony
yum install chrony -y
vim /etc/chrony.conf
server controller iburst# 所有节点向controller节点同步时间
allow 192.168.120.0/24# 设置时间同步网段
systemctl enable chronyd
systemctl restart chronyd
在compute节点安装配置chrony
yum install chrony -y
vim /etc/chrony.conf
server controller iburst
systemctl enable chronyd
systemctl restart chronyd
在cinder节点安装配置chrony
yum install chrony -y
vim /etc/chrony.conf
server controller iburst
systemctl enable chronyd
systemctl restart chronyd
验证时钟同步服务
chronyc sources
2.2 启用OpenStack库
yum install centos-release-openstack-queens -y
yum upgrade -y # 在主机上升级包
yum install python-openstackclient -y # 安装openstack客户端
yum install openstack-selinux -y # 安装openstack-selinux,便于自动管理openstack的安全策略
2.3 安装部署MySQL(controller)
2.3.1 软件包安装
yum install mariadb mariadb-server python2-PyMySQL -y
2.3.2 修改配置文件
vim /etc/my.cnf.d/mariadb-server.cnf
[mysqld]
bind-address = 192.168.120.111 // 修改为控制节点IP,使其他节点可以通过管理网络访问数据库
default-storage-engine = innodb
innodb_file_per_table = on
max_connections = 4096
collation-server = utf8_general_ci
character-set-server = utf8
2.3.3 启动服务并设置为开机自启
systemctl enable mariadb
systemctl start mariadb
2.3.4 初始化数据库
mysql_secure_installation
设置数据库密码:bigdata
都是:y
2.4 安装部署RabbitMQ(controller)
2.4.1 软件包安装
yum install rabbitmq-server -y
2.4.2 启动服务并设置为开机自启
systemctl enable rabbitmq-server
systemctl start rabbitmq-server
systemctl status rabbitmq-server
netstat -nltp | grep 5672
2.4.3 添加openstack用户
rabbitmqctl add_user openstack bigdata # 创建openstack用户,密码为bigdata
rabbitmqctl set_permissions openstack “." ".” “.*” # 授予新建用户权限
2.5 安装部署memcached(controller)
2.5.1 软件包安装
yum install memcached python-memcached -y
2.5.2 修改配置文件
vim /etc/sysconfig/memcached
PORT=“11211”
USER=“memcached”
MAXCONN=“1024”
CACHESIZE=“64”
OPTIONS="-l 127.0.0.1,::1,controller"
2.5.3 启动服务并设置为开机自启
systemctl enable memcached
systemctl start memcached
2.6 安装部署etcd(controller)
2.6.1 软件包安装
yum install etcd -y
2.6.2 修改配置文件
vim /etc/etcd/etcd.conf
#[Member]
ETCD_DATA_DIR="/var/lib/etcd/default.etcd"
ETCD_LISTEN_PEER_URLS=“http://192.168.120.111:2380”
ETCD_LISTEN_CLIENT_URLS=“http://192.168.120.111:2379”
ETCD_NAME=“controller”
#[Clustering]
ETCD_INITIAL_ADVERTISE_PEER_URLS=“http://192.168.120.111:2380”
ETCD_ADVERTISE_CLIENT_URLS=“http://192.168.120.111:2379”
ETCD_INITIAL_CLUSTER=“controller=http://192.168.120.111:2380”
ETCD_INITIAL_CLUSTER_TOKEN=“etcd-cluster-01”
ETCD_INITIAL_CLUSTER_STATE=“new”
2.6.3 启动服务并设置为开机自启
systemctl enable etcd
systemctl start etcd
systemctl status etcd
3.部署keystone认证服务(controller)
3.1 配置MySQL数据库及授权
登陆数据库
mysql -uroot -p
创建keystone数据库
CREATE DATABASE keystone;
授权本地登陆
GRANT ALL PRIVILEGES ON keystone.* TO ‘keystone’@‘localhost’ IDENTIFIED BY ‘bigdata’;
授权任意地址登陆
GRANT ALL PRIVILEGES ON keystone.* TO ‘keystone’@’%’ IDENTIFIED BY ‘bigdata’;
FLUSH PRIVILEGES;
3.2 软件包安装
yum install openstack-keystone httpd mod_wsgi -y
3.3 修改配置文件
cp /etc/keystone/keystone.conf{,.bak}
grep -Ev ‘^$|#’ /etc/keystone/keystone.conf.bak > /etc/keystone/keystone.conf
yum install openstack-utils -y
openstack-config --set /etc/keystone/keystone.conf DEFAULT admin_token ADMIN_TOKEN
openstack-config --set /etc/keystone/keystone.conf database connection mysql+pymysql://keystone:bigdata@controller/keystone
openstack-config --set /etc/keystone/keystone.conf token provider fernet
[DEFAULT]
admin_token = ADMIN_TOKEN
[database]
connection = mysql+pymysql://keystone:bigdata@controller/keystone
[token]
provider = fernet
3.4 同步数据
3.5 初始化fernet
keystone-manage fernet_setup --keystone-user keystone --keystone-group keystone
keystone-manage credential_setup --keystone-user keystone --keystone-group keystone
3.6 创建服务注册api
keystone-manage bootstrap --bootstrap-password bigdata --bootstrap-admin-url http://controller:35357/v3/ --bootstrap-internal-url http://controller:5000/v3/ --bootstrap-public-url http://controller:5000/v3/ --bootstrap-region-id RegionOne
3.7 配置httpd
3.7.1 修改主机名
vim /etc/httpd/conf/httpd.conf
ServerName controller
3.7.2 创建软连接
ln -s /usr/share/keystone/wsgi-keystone.conf /etc/httpd/conf.d/
3.7.3 启动服务并设置为开机自启
systemctl enable httpd
systemctl start httpd
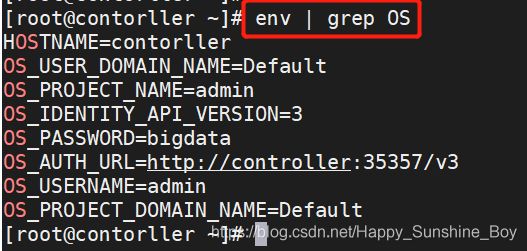
3.8 设置环境变量脚本
export OS_USERNAME=admin
export OS_PASSWORD=bigdata
export OS_PROJECT_NAME=admin
export OS_USER_DOMAIN_NAME=Default
export OS_PROJECT_DOMAIN_NAME=Default
export OS_AUTH_URL=http://controller:35357/v3
export OS_IDENTITY_API_VERSION=3
4.创建域、项目、用户和角色(contorller)
4.1 创建域
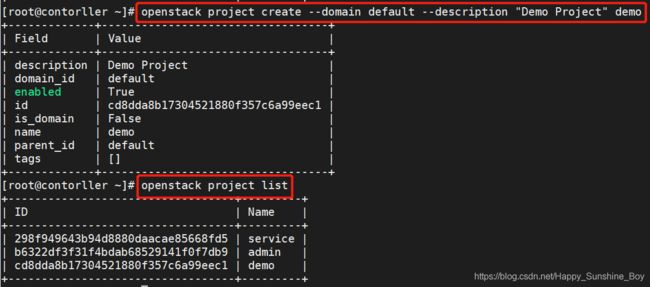
4.2 创建项目
openstack project create --domain default --description "Service Project" service
4.3 创建平台demo项目
openstack project create --domain default --description "Demo Project" demo
4.4 创建demo用户
openstack user create --domain default --password bigdata demo
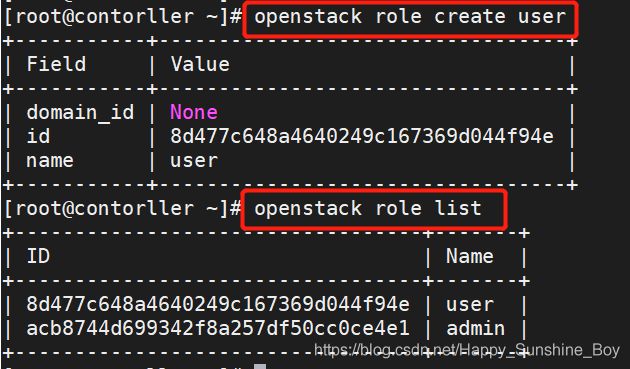
4.5 创建用户角色
4.6 关联项目、用户、角色
openstack role add --project demo --user demo user
在demo项目上,给demo用户,赋予user角色
5.验证keystone(contorller)
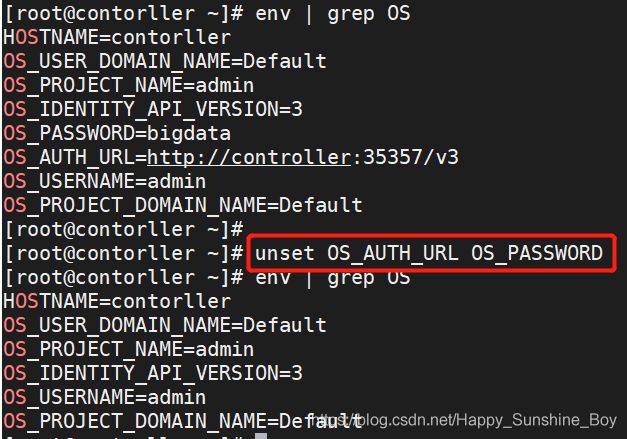
5.1 取消环境变量
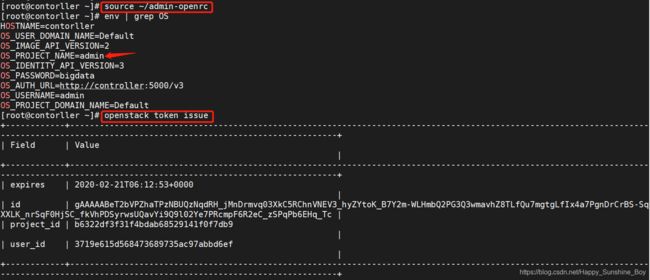
5.2 admin用户返回的认证token
openstack --os-auth-url http://controller:35357/v3 --os-project-domain-name Default --os-user-domain-name Default --os-project-name admin --os-username admin token issue
openstack --os-auth-url http://controller:35357/v3 --os-project-domain-name default --os-user-domain-name default --os-project-name admin --os-username admin token issue
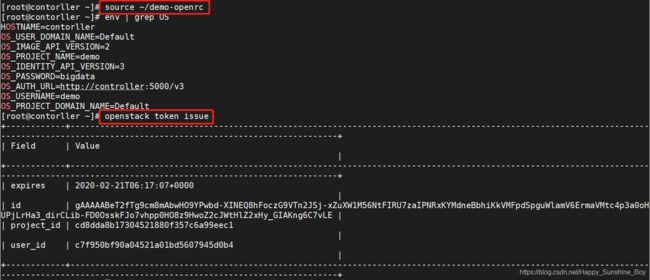
5.3 demo用户返回的认证token
openstack --os-auth-url http://controller:5000/v3 --os-project-domain-name Default --os-user-domain-name Default --os-project-name demo --os-username demo token issue
openstack --os-auth-url http://controller:5000/v3 --os-project-domain-name default --os-user-domain-name default --os-project-name demo --os-username demo token issue
6.创建openstack客户端环境脚本(contorller)
6.1 创建admin-openrc脚本
vim admin-openrc
export OS_PROJECT_DOMAIN_NAME=Default
export OS_USER_DOMAIN_NAME=Default
export OS_PROJECT_NAME=admin
export OS_USERNAME=admin
export OS_PASSWORD=bigdata
export OS_AUTH_URL=http://controller:5000/v3
export OS_IDENTITY_API_VERSION=3
export OS_IMAGE_API_VERSION=2
6.2 创建demo-openrc脚本
vim demo-openrc
export OS_PROJECT_DOMAIN_NAME=Default
export OS_USER_DOMAIN_NAME=Default
export OS_PROJECT_NAME=demo
export OS_USERNAME=demo
export OS_PASSWORD=bigdata
export OS_AUTH_URL=http://controller:5000/v3
export OS_IDENTITY_API_VERSION=3
export OS_IMAGE_API_VERSION=2
7.镜像服务glance(controller)
7.1 配置MySQL数据库及授权
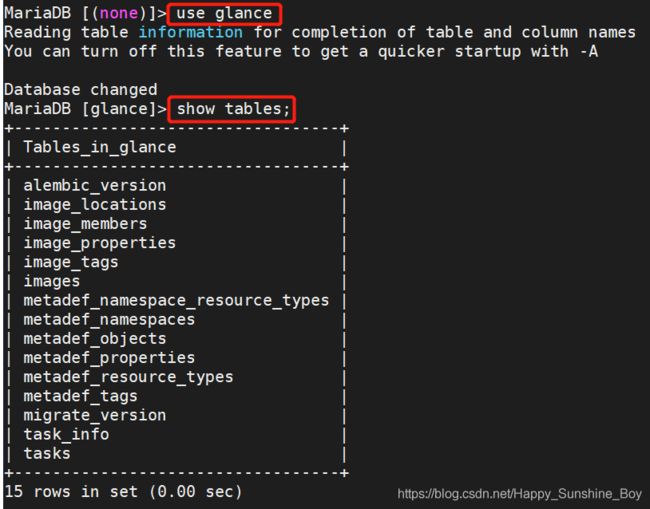
mysql -u root -p
CREATE DATABASE glance;
GRANT ALL PRIVILEGES ON glance.* TO ‘glance’@‘localhost’ IDENTIFIED BY ‘bigdata’;
GRANT ALL PRIVILEGES ON glance.* TO ‘glance’@’%’ IDENTIFIED BY ‘bigdata’;
FLUSH PRIVILEGES;
7.2 获取admin用户的环境变量
7.3 创建glance用户
openstack user create --domain default --password bigdata glance
7.4 admin用户添加到glance用户和项目中
openstack role add --project service --user glance admin
7.5 创建glance服务
openstack service create --name glance --description "OpenStack Image" image
7.6 创建镜像服务API端点
openstack endpoint create --region RegionOne image public http://controller:9292
openstack endpoint create --region RegionOne image internal http://controller:9292
openstack endpoint create --region RegionOne image admin http://controller:9292
7.7 安装glance包
yum install openstack-glance -y
7.8 创建images文件夹,并修改属性
mkdir /var/lib/glance/images
cd /var/lib
chown -hR glance:glance glance
7.9 修改配置文件
7.9.1 glance-api.conf
vim /etc/glance/glance-api.conf
[database]
connection = mysql+pymysql://glance:bigdata@controller/glance
[keystone_authtoken]
auth_uri = http://controller:5000
auth_url = http://controller:35357
memcached_servers = controller:11211
auth_type = password
project_domain_name = default
user_domain_name = default
project_name = service
username = glance
password = bigdata
[paste_deploy]
flavor = keystone
[glance_store]
stores = file,http
default_store = file
filesystem_store_datadir = /var/lib/glance/images
7.9.2 glance-registry.conf
vim /etc/glance/glance-registry.conf
[database]
connection = mysql+pymysql://glance:bigdata@controller/glance
[keystone_authtoken]
auth_uri = http://controller:5000
auth_url = http://controller:35357
memcached_servers = controller:11211
auth_type = password
project_domain_name = default
user_domain_name = default
project_name = service
username = glance
password = bigdata
[paste_deploy]
flavor = keystone
7.10 同步镜像数据库
7.11 启动服务并设置为开机自启
systemctl enable openstack-glance-api
systemctl start openstack-glance-api
systemctl status openstack-glance-api
systemctl enable openstack-glance-registry
systemctl start openstack-glance-registry
systemctl status openstack-glance-registry
7.12 验证上传镜像
7.12.1 获取admin用户的环境变量并下载镜像
source ~/admin-openrc
wget http://download.cirros-cloud.net/0.3.5/cirros-0.3.5-x86_64-disk.img
//下载一个小型linux镜像进行测试,最好使用迅雷下载
7.12.2 上传镜像
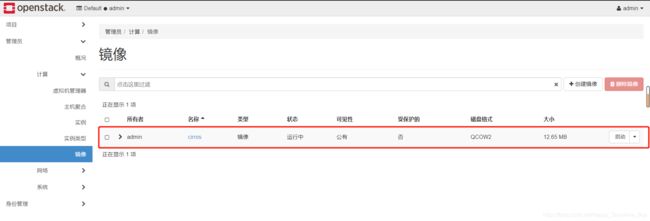
openstack image create "cirros" --file cirros-0.3.5-x86_64-disk.img --disk-format qcow2 --container-format bare --public
7.12.3 查看上传的镜像
8.部署compute服务(controller)
8.1 配置MySQL数据库及授权
mysql -uroot -p
CREATE DATABASE nova;
CREATE DATABASE nova_api;
CREATE DATABASE nova_cell0;
GRANT ALL PRIVILEGES ON nova.* TO ‘nova’@‘localhost’ IDENTIFIED BY ‘bigdata’;
GRANT ALL PRIVILEGES ON nova.* TO ‘nova’@’%’ IDENTIFIED BY ‘bigdata’;
GRANT ALL PRIVILEGES ON nova_api.* TO ‘nova’@‘localhost’ IDENTIFIED BY ‘bigdata’;
GRANT ALL PRIVILEGES ON nova_api.* TO ‘nova’@’%’ IDENTIFIED BY ‘bigdata’;
GRANT ALL PRIVILEGES ON nova_cell0.* TO ‘nova’@‘localhost’ IDENTIFIED BY ‘bigdata’;
GRANT ALL PRIVILEGES ON nova_cell0.* TO ‘nova’@’%’ IDENTIFIED BY ‘bigdata’;
8.2 创建nova用户
source ~/admin-openrc //加载admin环境变量
openstack user create --domain default --password bigdata nova
8.3 添加admin用户为nova用户
openstack role add --project service --user nova admin
8.4 创建nova服务端点
openstack service create --name nova --description “OpenStack Compute” compute
8.5 创建compute API 服务端点
openstack endpoint create --region RegionOne compute public http://controller:8774/v2.1
openstack endpoint create --region RegionOne compute internal http://controller:8774/v2.1
openstack endpoint create --region RegionOne compute admin http://controller:8774/v2.1
8.6 创建一个placement服务用户
openstack user create --domain default --password bigdata placement
8.7 添加placement用户为项目服务admin角色
openstack role add --project service --user placement admin
8.8 在服务目录创建Placement API服务
openstack service create --name placement --description “Placement API” placement
8.9 创建Placement API服务端点
openstack endpoint create --region RegionOne placement public http://controller:8778
openstack endpoint create --region RegionOne placement internal http://controller:8778
openstack endpoint create --region RegionOne placement admin http://controller:8778
8.10 安装软件包
yum install openstack-nova-api openstack-nova-conductor openstack-nova-console openstack-nova-novncproxy openstack-nova-scheduler openstack-nova-placement-api -y
8.11 修改nova.conf配置文件
vim /etc/nova/nova.conf
[DEFAULT]
enabled_apis=osapi_compute,metadata
transport_url=rabbit://openstack:bigdata@controller
my_ip=192.168.120.111
use_neutron=true
firewall_driver=nova.virt.firewall.NoopFirewallDriver
[api_database]
connection=mysql+pymysql://nova:bigdata@controller/nova_api
[database]
connection=mysql+pymysql://nova:bigdata@controller/nova
[api]
auth_strategy=keystone
[keystone_authtoken]
auth_uri=http://controller:5000
auth_url=http://controller:35357
memcached_servers=controller:11211
auth_type=password
project_domain_name = default
user_domain_name = default
project_name = service
username = nova
password = bigdata
[vnc]
enabled=true
server_listen=$my_ip
server_proxyclient_address=$my_ip
[glance]
api_servers=http://controller:9292
[oslo_concurrency]
lock_path=/var/lib/nova/tmp
[placement]
os_region_name=RegionOne
auth_type=password
auth_url=http://controller:35357/v3
project_name=service
project_domain_name=Default
username=placement
user_domain_name=Default
password=bigdata
8.12 启用placement API访问
由于软件包错误,必须启用对Placement API的访问,在配置文件末尾添加即可。
vim /etc/httpd/conf.d/00-nova-placement-api.conf
   = 2.4>
      Require all granted


      Order allow,deny
      Allow from all
8.13 重启httpd服务
systemctl restart httpd
8.14 同步nova-api数据库
su -s /bin/sh -c “nova-manage api_db sync” nova
8.15 注册cell0数据库
su -s /bin/sh -c “nova-manage cell_v2 map_cell0” nova
8.16 创建cell1 cell
su -s /bin/sh -c “nova-manage cell_v2 create_cell --name=cell1 --verbose” nova
8.17 同步nova数据库
su -s /bin/sh -c “nova-manage db sync” nova
8.18 验证数据库是否注册正确
8.19 启动并将服务添加为开机自启
systemctl enable openstack-nova-api.service
systemctl enable openstack-nova-consoleauth.service
systemctl enable openstack-nova-scheduler.service
systemctl enable openstack-nova-conductor.service
systemctl enable openstack-nova-novncproxy.service
systemctl start openstack-nova-api.service
systemctl status openstack-nova-api.service
systemctl start openstack-nova-consoleauth.service
systemctl status openstack-nova-consoleauth.service
systemctl start openstack-nova-scheduler.service
systemctl status openstack-nova-scheduler.service
systemctl start openstack-nova-conductor.service
systemctl status openstack-nova-conductor.service
systemctl start openstack-nova-novncproxy.service
systemctl status openstack-nova-novncproxy.service
9.安装和配置compute节点(compute)
9.1 软件包安装
yum install openstack-nova-compute -y
9.2 修改nova.conf配置文件
vim /etc/nova/nova.conf
[DEFAULT]
my_ip = 192.168.120.112 //输入compute节点IP
use_neutron=true
firewall_driver=nova.virt.firewall.NoopFirewallDriver
enabled_apis = osapi_compute,metadata
transport_url = rabbit://openstack:bigdata@controller
[api]
auth_strategy=keystone
[keystone_authtoken]
auth_uri = http://192.168.120.111:5000 //controller节点IP
auth_url = http://controller:35357
memcached_servers=controller:11211
auth_type=password
project_domain_name=default
user_domain_name=default
project_name=service
username=nova
password=bigdata
[vnc]
enabled=true
server_listen=0.0.0.0
server_proxyclient_address=$my_ip
novncproxy_base_url=http://controller:6080/vnc_auto.html
[glance]
api_servers=http://controller:9292
[oslo_concurrency]
lock_path=/var/lib/nova/tmp
[placement]
os_region_name=RegionOne
auth_type = password
auth_url=http://controller:35357/v3
project_name = service
project_domain_name = Default
user_domain_name = Default
username = placement
password = bigdata
[libvirt]
virt_type = qemu
9.3 启动服务同时添加为开机自启
systemctl enable libvirtd.service
systemctl restart libvirtd.service
systemctl enable openstack-nova-compute.service
systemctl start openstack-nova-compute.service
10.添加compute节点到cell数据库(controller)
10.1 验证在数据库中的计算节点
source ~/admin-openrc //在重启虚拟机时需重新加载环境变量
openstack compute service list --service nova-compute
10.2 发现计算节点
su -s /bin/sh -c “nova-manage cell_v2 discover_hosts --verbose” nova
10.3 在controller节点验证计算服务操作
10.4 列出身份服务中的API端点以验证与身份服务的连接
10.5 检查cells和placement API是否正常
11 安装和配置neutron网络服务(controller)
11.1 创建nuetron数据库并授权
mysql -uroot -p
CREATE DATABASE neutron;
GRANT ALL PRIVILEGES ON neutron.* TO ‘neutron’@‘localhost’ IDENTIFIED BY ‘bigdata’;
GRANT ALL PRIVILEGES ON neutron.* TO ‘neutron’@’%’ IDENTIFIED BY ‘bigdata’;
11.2 创建用户
source ~/admin-openrc
openstack user create --domain default --password bigdata neutron
openstack role add --project service --user neutron admin
11.3 创建neutron服务
openstack service create --name neutron --description “OpenStack Networking” network
11.4 创建网络服务端点
openstack endpoint create --region RegionOne network public http://controller:9696
openstack endpoint create --region RegionOne network internal http://controller:9696
openstack endpoint create --region RegionOne network admin http://controller:9696
11.5 安装软件包
yum install -y openstack-neutron openstack-neutron-ml2 openstack-neutron-linuxbridge ebtables
11.6 修改配置文件
vim /etc/neutron/neutron.conf
[database]
connection = mysql+pymysql://neutron:bigdata@controller/neutron
[DEFAULT]
auth_strategy = keystone
core_plugin = ml2
service_plugins = //不写代表禁用其他插件
transport_url = rabbit://openstack:bigdata@controller
notify_nova_on_port_status_changes = true
notify_nova_on_port_data_changes = true
[keystone_authtoken]
auth_uri = http://controller:5000
auth_url = http://controller:35357
memcached_servers = controller:11211
auth_type = password
project_domain_name = default
user_domain_name = default
project_name = service
username = neutron
password = bigdata
[nova]
auth_url = http://controller:35357
auth_type = password
project_domain_name = default
user_domain_name = default
region_name = RegionOne
project_name = service
username = nova
password = bigdata
[oslo_concurrency]
lock_path = /var/lib/neutron/tmp
11.7 配置网络二层插件
vim /etc/neutron/plugins/ml2/ml2_conf.ini
[ml2]
type_drivers = flat,vlan
tenant_network_types = //设置空是禁用本地网络
mechanism_drivers = linuxbridge
extension_drivers = port_security
[ml2_type_flat]
flat_networks = provider
[securitygroup]
enable_ipset = true
11.8 配置Linux网桥
vim /etc/neutron/plugins/ml2/linuxbridge_agent.ini
[linux_bridge]
physical_interface_mappings = provider:ens33
[vxlan]
enable_vxlan = false
[securitygroup]
enable_security_group = true
firewall_driver = neutron.agent.linux.iptables_firewall.IptablesFirewallDriver
11.9 配置DHCP
vim /etc/neutron/dhcp_agent.ini
interface_driver = linuxbridge
dhcp_driver = neutron.agent.linux.dhcp.Dnsmasq
enable_isolated_metadata = true
11.10 配置metadata
vim /etc/neutron/metadata_agent.ini
nova_metadata_host = controller
metadata_proxy_shared_secret = bigdata
11.11 配置计算服务使用网络服务
vim /etc/nova/nova.conf
[neutron]
url = http://controller:9696
auth_url = http://controller:35357
auth_type = password
project_domain_name = default
user_domain_name = default
region_name = RegionOne
project_name = service
username = neutron
password = bigdata
service_metadata_proxy = true
metadata_proxy_shared_secret = bigdata
11.12 建立服务软连接
ln -s /etc/neutron/plugins/ml2/ml2_conf.ini /etc/neutron/plugin.ini
11.13 同步数据库
su -s /bin/sh -c “neutron-db-manage --config-file /etc/neutron/neutron.conf --config-file /etc/neutron/plugins/ml2/ml2_conf.ini upgrade head” neutron
11.14 重启compute API服务
systemctl restart openstack-nova-api.service
11.15 启动neutron服务并添加为开机自启
systemctl enable neutron-server.service
systemctl enable neutron-linuxbridge-agent.service
systemctl enable neutron-dhcp-agent.service
systemctl enable neutron-metadata-agent.service
systemctl start neutron-server.service
systemctl status neutron-server.service
systemctl start neutron-linuxbridge-agent.service
systemctl status neutron-linuxbridge-agent.service
systemctl start neutron-dhcp-agent.service
systemctl status neutron-dhcp-agent.service
systemctl start neutron-metadata-agent.service
systemctl status neutron-metadata-agent.service
12.配置compute节点网络服务(compute)
12.1 软件包安装
yum install openstack-neutron-linuxbridge ebtables ipset -y
12.2 配置公共组件
vim /etc/neutron/neutron.conf
[DEFAULT]
auth_strategy = keystone
transport_url = rabbit://openstack:bigdata@controller
[keystone_authtoken]
auth_uri = http://controller:5000
auth_url = http://controller:35357
memcached_servers = controller:11211
auth_type = password
project_domain_name = default
user_domain_name = default
project_name = service
username = neutron
password = bigdata
[oslo_concurrency]
lock_path = /var/lib/neutron/tmp
12.3 配置Linux网桥
vim /etc/neutron/plugins/ml2/linuxbridge_agent.ini
[linux_bridge]
physical_interface_mappings = provider:ens33
[vxlan]
enable_vxlan = false
[securitygroup]
enable_security_group = true
firewall_driver = neutron.agent.linux.iptables_firewall.IptablesFirewallDriver
12.4 配置计算节点网络服务
vim /etc/nova/nova.conf
[neutron]
url = http://controller:9696
auth_url = http://controller:35357
auth_type = password
project_domain_name = default
user_domain_name = default
region_name = RegionOne
project_name = service
username = neutron
password = bigdata
12.5 启动服务
systemctl restart openstack-nova-compute.service
systemctl enable neutron-linuxbridge-agent.service
systemctl start neutron-linuxbridge-agent.service
12.6 验证操作
12.6.1 验证neutron-server进程是否正常启动
13.部署Horizon服务(controller)
13.1 软件包安装
yum install openstack-dashboard -y
13.2 修改配置文件
vim /etc/openstack-dashboard/local_settings
OPENSTACK_HOST = "controller"
OPENSTACK_KEYSTONE_DEFAULT_ROLE = "admin"
ALLOWED_HOSTS = ['*']

# 配置memcache会话存储
SESSION_ENGINE = 'django.contrib.sessions.backends.cache'
CACHES = {
     			//注释166-170 去掉注释159-164
    'default': {

        'BACKEND': 'django.core.cache.backends.memcached.MemcachedCache',
        'LOCATION': 'controller:11211',
    },
}

OPENSTACK_KEYSTONE_URL = "http://%s:5000/v3" % OPENSTACK_HOST //开启身份认证API版本v3
OPENSTACK_KEYSTONE_MULTIDOMAIN_SUPPORT = True    //开启domains版本支持

OPENSTACK_API_VERSIONS = {
         //配置API版本
    "identity": 3,
    "image": 2,
    "volume": 2,
}
OPENSTACK_KEYSTONE_DEFAULT_DOMAIN = "Default"

OPENSTACK_NEUTRON_NETWORK = {

    'enable_router': False,
    'enable_quotas': False,
    'enable_distributed_router': False,
    'enable_ha_router': False,
    'enable_lb': False,
    'enable_firewall': False,
    'enable_***': False,
    'enable_fip_topology_check': False,
}
13.3 解决网页无法打开检查
vim /etc/httpd/conf.d/openstack-dashboard.conf
WSGISocketPrefix run/wsgi
WSGIApplicationGroup %{GLOBAL}
13.4 重启web服务和会话存储
systemctl restart httpd.service
systemctl restart memcached.service
14.登陆测试
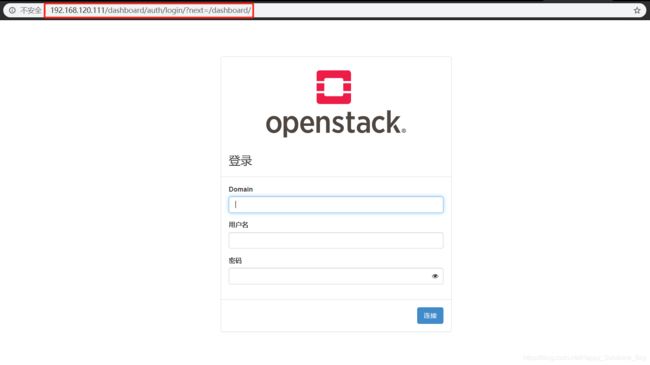
http://192.168.120.111/dashboard
domain: default
用户名:admin
密码:bigdata
15.块cinder服务(contorller)
15.1 创建cinder数据库并授权
mysql -uroot -p
CREATE DATABASE cinder;
GRANT ALL PRIVILEGES ON cinder.* TO ‘cinder’@‘localhost’ IDENTIFIED BY ‘bigdata’;
GRANT ALL PRIVILEGES ON cinder.* TO ‘cinder’@’%’ IDENTIFIED BY ‘bigdata’;
15.2 创建cinder用户
openstack user create --domain default --password bigdata cinder
openstack role add --project service --user cinder admin
15.2 创建cinderv2、cinderv3实体
openstack service create --name cinderv2 --description “OpenStack Block Storage” volumev2
openstack service create --name cinderv3 --description “OpenStack Block Storage” volumev3
15.3 创建块设备存储服务的 API 入口点
openstack endpoint create --region RegionOne volumev2 public http://controller:8776/v2/%(project_id)s
openstack endpoint create --region RegionOne volumev2 internal http://controller:8776/v2/%(project_id)s
openstack endpoint create --region RegionOne volumev2 admin http://controller:8776/v2/%(project_id)s
openstack endpoint create --region RegionOne volumev3 public http://controller:8776/v3/%(project_id)s
openstack endpoint create --region RegionOne volumev3 internal http://controller:8776/v3/%(project_id)s
openstack endpoint create --region RegionOne volumev3 admin http://controller:8776/v3/%(project_id)s
15.4 软件包安装
yum install openstack-cinder -y
15.5 修改配置文件
vim /etc/cinder/cinder.conf
[database]
connection = mysql+pymysql://cinder:bigdata@controller/cinder
[DEFAULT]
my_ip = 192.168.120.111
auth_strategy = keystone
transport_url = rabbit://openstack:bigdata@controller
[keystone_authtoken]
auth_uri = http://controller:5000
auth_url = http://controller:35357
memcached_servers = controller:11211
auth_type = password
project_domain_name = default
user_domain_name = default
project_name = service
username = cinder
password = bigdata
[oslo_concurrency]
lock_path = /var/lib/cinder/tmp
15.6 初始化块设备服务的数据库
15.7 配置计算节点以使用块设备存储
vim /etc/nova/nova.conf
[cinder]
os_region_name = RegionOne
15.8 重启计算API服务
systemctl restart openstack-nova-api.service
15.9 启动块设备存储服务,并将其配置为开机自启
systemctl enable openstack-cinder-api.service openstack-cinder-scheduler.service
systemctl start openstack-cinder-api.service openstack-cinder-scheduler.service
systemctl status openstack-cinder-api.service openstack-cinder-scheduler.service
16.安装并配置一个存储节点(cinder)
16.1 安装启动LVM包
yum install lvm2 -y
systemctl enable lvm2-lvmetad.service
systemctl start lvm2-lvmetad.service
16.2 创建LVM 物理卷 /dev/sdb
16.3 创建 LVM 卷组 cinder-volumes
16.4 修改配置
vim /etc/lvm/lvm.conf
filter = [ “a/sdb/”, “r/.*/”]
16.5 软件包安装
yum install openstack-cinder targetcli python-keystone -y
16.6 修改配置文件
vim /etc/cinder/cinder.conf
[database]
connection = mysql+pymysql://cinder:bigdata@controller/cinder
[DEFAULT]
enabled_backends = lvm
my_ip = 192.168.120.111
auth_strategy = keystone
transport_url = rabbit://openstack:bigdata@controller
glance_api_servers = http://controller:9292
[keystone_authtoken]
auth_uri = http://controller:5000
auth_url = http://controller:35357
memcached_servers = controller:11211
auth_type = password
project_domain_name = default
user_domain_name = default
project_name = service
username = cinder
password = bigdata
[lvm]
volume_driver = cinder.volume.drivers.lvm.LVMVolumeDriver
volume_group = cinder-volumes
iscsi_protocol = iscsi
iscsi_helper = lioadm
[oslo_concurrency]
lock_path = /var/lib/cinder/tmp
16.7 启动块存储卷服务及其依赖的服务,并将其配置为随系统启动
systemctl enable openstack-cinder-volume.service target.service
systemctl start openstack-cinder-volume.service target.service
systemctl status openstack-cinder-volume.service target.service
16.8 验证操作(contorller)
参考:
https://docs.openstack.org/ocata/zh_CN/install-guide-rdo
https://blog.51cto.com/13643643/2171262


