超详细OpenStack环境部署-初步搭建
目录
- OpenStack 环境配置
- 总体思路
- 配置
-
- 基础环境配置
- 系统环境配置
-
- 安装、配置MariaDB
- 安装RabbitM
- 安装memcached
OpenStack 环境配置
虚拟机资源信息
 1. 控制节点ct
CPU:双核双线程-CPU虚拟化开启
内存:8G	硬盘:300G+1024G(CEPH块存储)
双网卡:VM1-(局域网)192.168.100.10  NAT-20.0.0.17
操作系统:Centos 7.6(1810)-最小化安装
PS:最小内存8G
 2. 计算节点c1
CPU:双核双线程-CPU虚拟化开启
内存:8G	硬盘:300G+1024G(CEPH块存储)
双网卡:VM1(局域网)-192.168.100.11  NAT-20.0.0.18
操作系统:Centos 7.6(1810)-最小化安装
PS:最小内存8G
 3. 计算节点c2
CPU:双核双线程-CPU虚拟化开启
内存:8G	硬盘:300G+1024G(CEPH块存储)
双网卡:VM1(局域网)-192.168.100.12  NAT-20.0.0.19
操作系统:Centos 7.6(1810)-最小化安装
PS:最小内存8G
总体思路
- 配置操作系统+OpenStack运行环境
- 配置OpenStack平台基础服务(rabbitmq、mariadb、memcache、Apache)
配置
基础环境配置
配置项(所有节点):
1、主机名
2、防火墙、核心防护
3、免交互
4、基础环境依赖包
yum -y install net-tools bash-completion vim gcc gcc-c++ make pcre  pcre-devel expat-devel cmake  bzip2
yum -y install centos-release-openstack-train python-openstackclient openstack-selinux openstack-utils
5、时间同步+周期性计划任务
[root@ct ~]# hostnamectl set-hostname ct
[root@ct ~]# su
另外两台
[root@ct ~]# hostnamectl set-hostname c1
[root@ct ~]# su
[root@ct ~]# hostnamectl set-hostname c2
[root@ct ~]# su
控制节点配置(ct)
vi /etc/sysconfig/network-scripts/ifcfg-eth0

BOOTPROTO=static
ONBOOT=yes
IPADDR=192.168.100.11
NETMASK=255.255.255.0
#GATEWAY=192.168.100.2

vi /etc/sysconfig/network-scripts/ifcfg-eth1
BOOTPROTO=static
IPV4_ROUTE_METRIC=90				//调由优先级,NAT网卡优先
ONBOOT=yes
IPADDR=192.168.226.150
NETMASK=255.255.255.0
GATEWAY=192.168.226.2

systemctl restart network		//重启网卡
配置Hosts
[root@ct ~]# vi /etc/hosts
192.168.100.10  ct
192.168.100.11  c1
192.168.100.12  c2
PS:以上为局域网IP
[root@ct ~]# systemctl stop firewalld
[root@ct ~]# systemctl disable firewalld
[root@ct ~]# setenforce 0
[root@ct ~]# vim /etc/sysconfig/selinux
SELINUX=disabled
三台节点做免交互,非对称密钥
[root@ct ~]#  ssh-keygen -t rsa
[root@ct ~]#  ssh-copy-id ct
[root@ct ~]#  ssh-copy-id c1
[root@ct ~]#  ssh-copy-id c2
配置DNS(所有节点)
[root@ct ~]# vim /etc/resolv.conf
nameserver 114.114.114.114
安装基础环境包,控制节点ct时间同步配置
[root@ct ~]# yum install chrony -y
[root@ct ~]# vim /etc/chrony.conf
server ntp.aliyun.com iburst  //将其他server前加#进行注释,下一行添加

allow 192.168.100.0/24   //修改

[root@ct ~]# systemctl enable chronyd
[root@ct ~]# systemctl restart chronyd
使用 chronyc sources 命令查询时间同步信息
[root@ct ~]# chronyc sources
210 Number of sources = 1
MS Name/IP address         Stratum Poll Reach LastRx Last sample
===============================================================================
^* 203.107.6.88                  2   6    17     8   -772us[-4557us] +/-   23ms
● 设置周期性任务
[root@ct ~]# crontab -e
*/2 * * * * /usr/bin/chronyc sources >> /var/log/chronyc.log   //添加
注:
OpenStack 的 train 版本仓库源安装 包,同时安装 OpenStack 客户端和 openstack-selinux 安装包
compute节点做时间同步(c1、c2)
[root@c1~]# yum install chrony -y
[root@c1 ~]# vim /etc/chrony.conf
server ct iburst //用#注释server,并在下方添加

[root@c1 ~]# systemctl enable chronyd
[root@c1 ~]# systemctl restart chronyd
[root@c1 ~]# chronyc sources
210 Number of sources = 1
MS Name/IP address         Stratum Poll Reach LastRx Last sample
===============================================================================
^* ct                            3   6    17     2  +1303ns[  +31us] +/-   41ms
系统环境配置
配置服务(控制节点)
安装、配置MariaDB
[root@ct ~]# yum -y install mariadb mariadb-server python2-PyMySQL
注:
此包用于openstack的控制端连接mysql所需要的模块,如果不安装,则无法连接数据库;此包只安装在控制端
[root@ct ~]# yum -y install libibverbs
添加MySQL子配置文件,增加如下内容
[root@ct ~]# vim /etc/my.cnf.d/openstack.cnf
[mysqld]
bind-address = 192.168.100.11
default-storage-engine = innodb
innodb_file_per_table = on
max_connections = 4096
collation-server = utf8_general_ci
character-set-server = utf8
附:
bind-address = 192.168.100.11 #控制节点局域网地址
default-storage-engine = innodb #默认存储引擎
innodb_file_per_table = on #每张表独立表空间文件
max_connections = 4096 #最大连接数
collation-server = utf8_general_ci #默认字符集
character-set-server = utf8
开机自启动、开启服务
[root@ct my.cnf.d]# systemctl enable mariadb
[root@ct my.cnf.d]# systemctl start mariadb
执行MariaDB 安全配置脚本
[root@ct my.cnf.d]# mysql_secure_installation
Enter current password for root (enter for none): 			#回车
OK, successfully used password, moving on...
Set root password? [Y/n] Y
Remove anonymous users? [Y/n] Y
 ... Success!
Disallow root login remotely? [Y/n] N
 ... skipping.
Remove test database and access to it? [Y/n] Y
Reload privilege tables now? [Y/n] Y
安装RabbitM
所有创建虚拟机的指令,控制端都会发送到rabbitmq,node节点监听rabbitmq
[root@ct ~]# yum -y install rabbitmq-server
● 配置服务,启动RabbitMQ服务,并设置其开机启动。
[root@ct ~]# systemctl enable rabbitmq-server.service
[root@ct ~]# systemctl start rabbitmq-server.service
● 创建消息队列用户,用于controler和node节点连接rabbitmq的认证
[root@ct ~]# rabbitmqctl add_user openstack RABBIT_PASS
Creating user "openstack"
● 配置openstack用户的操作权限(正则,配置读写权限)
[root@ct ~]# rabbitmqctl set_permissions openstack ".*" ".*" ".*"
Setting permissions for user "openstack" in vhost "/"
#可查看25672和5672 两个端口(5672是Rabbitmq默认端口,25672是Rabbit的测试工具CLI的端口)
● 选择配置:
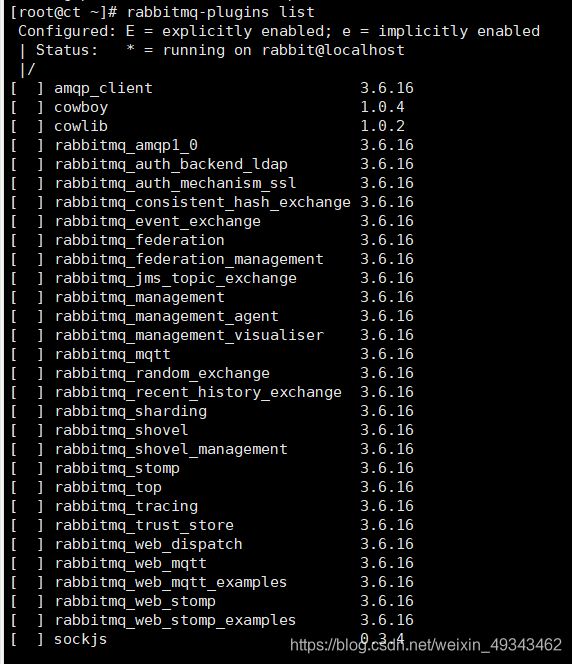
● 查看rabbitmq插件列表
[root@ct ~]# rabbitmq-plugins list
● 开启rabbitmq的web管理界面的插件,端口为15672
[root@ct ~]# rabbitmq-plugins enable rabbitmq_management
● 检查端口(25672 5672 15672)
[root@ct my.cnf.d]# ss -natp | grep 5672
[root@ct ~]# ss -natp | grep 5672
LISTEN     0      128          *:25672                    *:*                   users:(("beam.smp",pid=31701,fd=46))
LISTEN     0      128          *:15672                    *:*                   users:(("beam.smp",pid=31701,fd=57))
LISTEN     0      128         :::5672                    :::*                   users:(("beam.smp",pid=31701,fd=55))
● 可访问192.168.226.150:15672
默认账号密码均为guest

安装memcached
● 作用:
安装memcached是用于存储session信息;服务身份验证机制使用Memcached来缓存令牌 在登录openstack的dashboard时,会产生一些session信息,这些session信息会存放到memcached中
● 操作:
● 安装Memcached
[root@ct ~]# yum install -y memcached python-memcached
注:
python-*模块在OpenStack中起到连接数据库的作用
修改Memcached配置文件
[root@ct ~]# cat /etc/sysconfig/memcached
PORT="11211"
USER="memcached"
MAXCONN="1024"
CACHESIZE="64"
OPTIONS="-l 127.0.0.1,::1,ct"   //最后加ct
[root@ct ~]# systemctl enable memcached
[root@ct ~]# systemctl start memcached
[root@ct ~]# netstat -nautp | grep 11211
tcp        0      0 192.168.100.10:11211    0.0.0.0:*               LISTEN      32719/memcached
tcp        0      0 127.0.0.1:11211         0.0.0.0:*               LISTEN      32719/memcached
tcp6       0      0 ::1:11211               :::*                    LISTEN      32719/memcached
● 安装etcd
[root@ct ~]# yum -y install etcd
● 修改etcd配置文件
[root@ct ~]# cd /etc/etcd/
[root@ct etcd]# ls
etcd.conf
[root@ct etcd]# vim etcd.conf
#数据目录位置
#监听其他etcd member的url(2380端口,集群之间通讯,域名为无效值)
#对外提供服务的地址(2379端口,集群内部的通讯端口)
#集群中节点标识(名称)
#该节点成员的URL地址,2380端口:用于集群之间通讯。
ETCD_DATA_DIR="/var/lib/etcd/default.etcd"
ETCD_LISTEN_PEER_URLS="http://192.168.100.11:2380"
ETCD_LISTEN_CLIENT_URLS="http://192.168.100.11:2379"
ETCD_NAME="ct"
ETCD_INITIAL_ADVERTISE_PEER_URLS="http://192.168.100.11:2380"
ETCD_ADVERTISE_CLIENT_URLS="http://192.168.100.11:2379
ETCD_INITIAL_CLUSTER="ct=http://192.168.100.11:2380"
ETCD_INITIAL_CLUSTER_TOKEN="etcd-cluster-01"		#集群唯一标识
ETCD_INITIAL_CLUSTER_STATE="new"   #初始集群状态,new为静态,若为existing,则表示此ETCD服务将尝试加入已有的集群
若为DNS,则表示此集群将作为被加入的对象
#开机自启动、开启服务,检测端口
[root@ct ~]# systemctl enable etcd.service
[root@ct ~]# systemctl start etcd.service
[root@ct etcd]# netstat -anutp |grep 2379
tcp        0      0 192.168.100.10:2379     0.0.0.0:*               LISTEN      32949/etcd
tcp        0      0 192.168.100.10:2379     192.168.100.10:43140    ESTABLISHED 32949/etcd
tcp        0      0 192.168.100.10:43140    192.168.100.10:2379     ESTABLISHED 32949/etcd
[root@ct etcd]# netstat -anutp |grep 2380
tcp        0      0 192.168.100.10:2380     0.0.0.0:*               LISTEN      32949/etcd
以上,OpebStack基础配置完成


