2020先电云计算 2.4 iaas部分搭建
本文转自小蜗牛耶
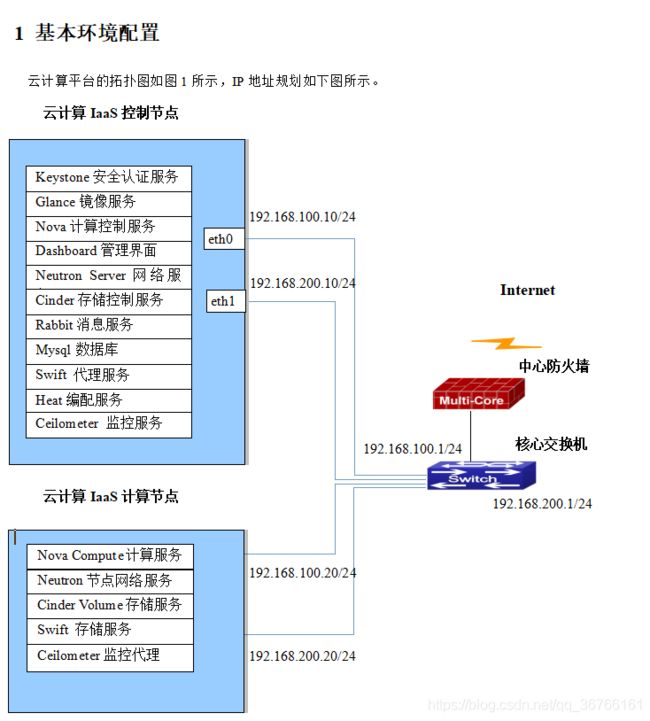
1.基本拓扑如下
一、私有云部署运维
1 划分compute磁盘
[root@compute ~]# parted /dev/md126
GNU Parted 3.1
Using /dev/md126
Welcome to GNU Parted! Type 'help' to view a list of commands.
(parted) p
Model: Linux Software RAID Array (md)
Disk /dev/md126: 3801GB
Sector size (logical/physical): 512B/512B
Partition Table: gpt
Disk Flags: pmbr_boot

Number  Start   End     Size    File system  Name    Flags
 1      1049kB  2097kB  1049kB                       bios_grub
 2      2097kB  1076MB  1074MB  xfs
 3      1076MB  1083GB  1082GB                       lvm

(parted) mkpart cinder 1084G 1184G
(parted) mkpart swift 1185G 1285G
(parted) p
Model: Linux Software RAID Array (md)
Disk /dev/md126: 3801GB
Sector size (logical/physical): 512B/512B
Partition Table: gpt
Disk Flags: pmbr_boot

Number  Start   End     Size    File system  Name    Flags
 1      1049kB  2097kB  1049kB                       bios_grub
 2      2097kB  1076MB  1074MB  xfs
 3      1076MB  1083GB  1082GB                       lvm
 4      1084GB  1184GB  100GB              cinder
 5      1185GB  1285GB  100GB             swift


[root@compute ~]# mkfs.xfs /dev/md126p4
meta-data=/dev/md126p6           isize=512    agcount=8, agsize=30496 blks
         =                       sectsz=512   attr=2, projid32bit=1
         =                       crc=1        finobt=0, sparse=0
data     =                       bsize=4096   blocks=243968, imaxpct=25
         =                       sunit=32     swidth=64 blks
naming   =version 2              bsize=4096   ascii-ci=0 ftype=1
log      =internal log           bsize=4096   blocks=1056, version=2
         =                       sectsz=512   sunit=32 blks, lazy-count=1
realtime =none                   extsz=4096   blocks=0, rtextents=0
[root@compute ~]# mkfs.xfs /dev/md126p5
meta-data=/dev/md126p6           isize=512    agcount=8, agsize=30496 blks
         =                       sectsz=512   attr=2, projid32bit=1
         =                       crc=1        finobt=0, sparse=0
data     =                       bsize=4096   blocks=243968, imaxpct=25
         =                       sunit=32     swidth=64 blks
naming   =version 2              bsize=4096   ascii-ci=0 ftype=1
log      =internal log           bsize=4096   blocks=1056, version=2
         =                       sectsz=512   sunit=32 blks, lazy-count=1
realtime =none                   extsz=4096   blocks=0, rtextents=0
2 配置网络、主机名
修改和添加/etc/sysconfig/network-scripts/ifcfg-enp*(具体的网口)文件。
修改控制节点第一张网卡第二张网卡 分别为 192.168.100.10 192.168.200.10
修改计算节点第一张网卡第二张网卡 分别为 192.168.100.20 192.168.200.20
3.配置本地源
使用ftp工具完成镜像上传后
删除各个节点的默认yum源文件
rm -rf /etc/yum.repos.d/*
创建repo文件
【controller】
在/etc/yum.repos.d创建centos.repo源文件
# vi /etc/yum.repos.d/local.repo
[centos]
name=centos
baseurl=file:///opt/centos
gpgcheck=0
enabled=1
[iaas]
name=iaas
baseurl=file:///opt/iaas/iaas-repo
gpgcheck=0
enabled=1
【compute】
在/etc/yum.repos.d创建centos.repo源文件
# vi /etc/yum.repos.d/local.repo
[root@compute ~]# vi /etc/yum.repos.d/local.repo

[centos]
name=centos
baseurl=ftp://controller/centos
gpgcheck=0
enabled=1
[iaas]
name=iaas
baseurl=ftp://controller/iaas/iaas-repo
gpgcheck=0
enabled=1

主机名映射
[root@controller ~]# vi /etc/hosts

127.0.0.1   localhost localhost.localdomain localhost4 localhost4.localdomain4
::1         localhost localhost.localdomain localhost6 localhost6.localdomain6
192.168.100.10 controller
192.168.100.20 compute

 [root@compute ~]# vi /etc/hosts

127.0.0.1   localhost localhost.localdomain localhost4 localhost4.localdomain4
::1         localhost localhost.localdomain localhost6 localhost6.localdomain6
192.168.100.10 controller
192.168.100.20 compute
(3)挂载iso文件
【挂载CentOS-7-x86_64-DVD-1804.iso】
[root@controller ~]# mount -o loop CentOS-7-x86_64-DVD-1804.iso  /mnt/
[root@controller ~]# mkdir /opt/centos
[root@controller ~]# mkdir /opt/iaas
[root@controller ~]# cp -rvf /mnt/* /opt/centos/
[root@controller ~]# umount  /mnt/
【挂载XianDian-IaaS-v2.4.iso】
[root@controller ~]# mount -o loop chinaskills_cloud_iaas.iso  /mnt/
mount: /dev/loop0 is write-protected, mounting read-only
[root@controller ~]# cp -rvf /mnt/* /opt/iaas
(4)搭建ftp服务器,开启并设置自启
[root@controller ~]# yum install vsftpd -y
[root@controller ~]# vi /etc/vsftpd/vsftpd.conf
添加anon_root=/opt/
保存退出
[root@controller ~]# systemctl start vsftpd
[root@controller ~]# systemctl enable vsftpd
(5)配置防火墙和Selinux
【controller/compute】
编辑selinux文件
# vi /etc/selinux/config
SELINUX=permissive
[root@controller ~]# setenforce 0
关闭防火墙并设置开机不自启
# systemctl stop firewalld.service
# systemctl disable firewalld.service

(6)清除缓存,验证yum源
【controller/compute】
# yum clean all
# yum list
4 编辑环境变量
# controller和compute节点
# yum install iaas-xiandian -y
编辑文件/etc/xiandian/openrc.sh,此文件是安装过程中的各项参数,根据每项参数上一行的说明及服务器实际情况进行配置。
Vim模式删除所有内容:%d

##--------------------system Config--------------------##
##Controller Server Manager IP. example:x.x.x.x
HOST_IP=192.168.100.10

##Controller HOST Password. example:000000
HOST_PASS=000000

##Controller Server hostname. example:controller
HOST_NAME=controller

##Compute Node Manager IP. example:x.x.x.x
HOST_IP_NODE=192.168.100.20

##Compute HOST Password. example:000000
HOST_PASS_NODE=000000

##Compute Node hostname. example:compute
HOST_NAME_NODE=compute

##--------------------Chrony Config-------------------##
##Controller network segment IP.  example:x.x.0.0/16(x.x.x.0/24)
network_segment_IP=192.168.100.0/24

##--------------------Rabbit Config ------------------##
##user for rabbit. example:openstack
RABBIT_USER=openstack

##Password for rabbit user .example:000000
RABBIT_PASS=000000

##--------------------MySQL Config---------------------##
##Password for MySQL root user . exmaple:000000
DB_PASS=000000

##--------------------Keystone Config------------------##
##Password for Keystore admin user. exmaple:000000
DOMAIN_NAME=demo
ADMIN_PASS=000000
DEMO_PASS=000000

##Password for Mysql keystore user. exmaple:000000
KEYSTONE_DBPASS=000000

##--------------------Glance Config--------------------##
##Password for Mysql glance user. exmaple:000000
GLANCE_DBPASS=000000

##Password for Keystore glance user. exmaple:000000
GLANCE_PASS=000000

##--------------------Nova Config----------------------##
##Password for Mysql nova user. exmaple:000000
NOVA_DBPASS=000000

##Password for Keystore nova user. exmaple:000000
NOVA_PASS=000000

##--------------------Neturon Config-------------------##
##Password for Mysql neutron user. exmaple:000000
NEUTRON_DBPASS=000000

##Password for Keystore neutron user. exmaple:000000
NEUTRON_PASS=000000

##metadata secret for neutron. exmaple:000000
METADATA_SECRET=000000

##Tunnel Network Interface. example:x.x.x.x
INTERFACE_IP=192.168.100.10

##External Network Interface. example:eth1
INTERFACE_NAME=enp8s0

##External Network The Physical Adapter. example:provider
Physical_NAME=provider

##First Vlan ID in VLAN RANGE for VLAN Network. exmaple:101
minvlan=2

##Last Vlan ID in VLAN RANGE for VLAN Network. example:200
maxvlan=300

##--------------------Cinder Config--------------------##
##Password for Mysql cinder user. exmaple:000000
CINDER_DBPASS=000000

##Password for Keystore cinder user. exmaple:000000
CINDER_PASS=000000

##Cinder Block Disk. example:md126p3
BLOCK_DISK=md126p4

##--------------------Swift Config---------------------##
##Password for Keystore swift user. exmaple:000000
SWIFT_PASS=000000

##The NODE Object Disk for Swift. example:md126p4.
OBJECT_DISK=md126p5

##The NODE IP for Swift Storage Network. example:x.x.x.x.
STORAGE_LOCAL_NET_IP=192.168.100.20

##--------------------Heat Config----------------------##
##Password for Mysql heat user. exmaple:000000
HEAT_DBPASS=000000

##Password for Keystore heat user. exmaple:000000
HEAT_PASS=000000

##--------------------Zun Config-----------------------##
##Password for Mysql Zun user. exmaple:000000
ZUN_DBPASS=000000

##Password for Keystore Zun user. exmaple:000000
ZUN_PASS=000000

##Password for Mysql Kuryr user. exmaple:000000
KURYR_DBPASS=000000

##Password for Keystore Kuryr user. exmaple:000000
KURYR_PASS=000000

##--------------------Ceilometer Config----------------##
##Password for Gnocchi ceilometer user. exmaple:000000
CEILOMETER_DBPASS=000000

##Password for Keystore ceilometer user. exmaple:000000
CEILOMETER_PASS=000000

##--------------------AODH Config----------------##
##Password for Mysql AODH user. exmaple:000000
AODH_DBPASS=000000

##Password for Keystore AODH user. exmaple:000000
AODH_PASS=000000

##--------------------Barbican Config----------------##
##Password for Mysql Barbican user. exmaple:000000
BARBICAN_DBPASS=000000

##Password for Keystore Barbican user. exmaple:000000
BARBICAN_PASS=000000
# scp /etc/xiandian/openrc.sh root@compute://etc/xiandian/
The authenticity of host 'compute (192.168.100.20)' can't be established.
ECDSA key fingerprint is SHA256:RShHiJfjbyvHe3iH59hzhlPJAA2GdgjbtyvrgvbBiQ4.
ECDSA key fingerprint is MD5:a1:50:ff:a2:d0:6a:5b:2d:f0:ee:07:d5:f4:12:d3:71.
Are you sure you want to continue connecting (yes/no)? yes
Warning: Permanently added 'compute,192.168.100.20' (ECDSA) to the list of known hosts.
root@compute's password:
openrc.sh 100% 3881 2.5MB/s 00:00
Compute节点修改tunnel IP5 通过脚本安装私有云平台
以下脚本按顺序执行!
Controller:
iaas-pre-host.sh
iaas-install-mysql.sh
iaas-install-keystone.sh
iaas-install-glance.sh
iaas-install-nova-controller.sh
iaas-install-neutron-controller.sh
iaas-install-dashboard.sh
iaas-install-nova-compute.sh(修改配置之后运行)
iaas-install-cinder-controller.sh
iaas-install-swift-controller.sh

Compute:
iaas-install-nova-compute.sh
iaas-install-neutron-compute.sh
iaas-install-cinder-compute.sh
iaas-install-swift-compute.sh
6 创建云主机
流程:
(1)管理员->资源管理->云主机类型->创建云主机类型

(2)管理员->网络->网络->创建网络

(2)项目->网络->安全组->管理规则->添加规则(ICMP、TCP、UDP)

(3)项目->资源管理->云主机->创建云主机
具体网络根据具体要求
上传镜像
[root@controller ~]# source /etc/keystone/admin-openrc.sh
[root@controller ~]# glance image-create --name "CentOS7.5" --disk-format qcow2  --container-format bare --progress < /opt/iaas/images/CentOS_7.5_x86_64_XD.qcow2
[=============================>] 100%
+------------------+--------------------------------------+