python语音识别
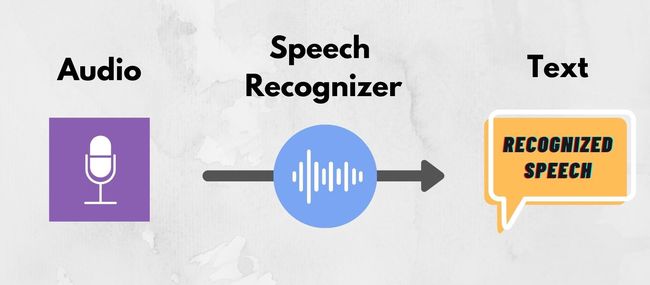
Welcome to The Complete Beginner’s Guide to Speech Recognition in Python.
欢迎使用Python语音识别完整入门指南。
In this post, I will walk you through some great hands-on exercises that will help you to have some understanding of speech recognition and the use of machine learning. Speech recognition helps us to save time by speaking instead of typing. It also gives us the power to communicate with our devices without even writing one line of code. This makes technological devices more accessible and easier to use. Speech recognition is a great example of using machine learning in real life.
在本文中,我将引导您完成一些动手实践,以帮助您对语音识别和机器学习的使用有所了解。 语音识别可以帮助我们通过说话而不是打字来节省时间。 它还使我们无需编写一行代码即可与我们的设备进行通信。 这使技术设备更易于访问且更易于使用。 语音识别是在现实生活中使用机器学习的一个很好的例子。
Another nice example of speech recognition: Google Meet web application, did you know that from the settings you can turn on the subtitles? When you turn on subtitles, a program in the back will recognize your speech and convert it to text in real life. It’s really impressive to see how fast it happens. Another cool feature of this Google Meet recognizer is that it also knows who is speaking. In this walkthrough, we will use Google’s Speech API. I can’t wait to show you how to build your own speech recognizer. Let’s get started!
语音识别的另一个很好的例子:Google Meet Web应用程序,您是否知道可以通过设置打开字幕? 当您打开字幕时,后面的程序将识别您的语音并将其转换为现实生活中的文本。 看到它发生的速度真的很令人印象深刻。 此Google Meet识别器的另一个很酷的功能是它也知道谁在讲话。 在本演练中,我们将使用Google的Speech API。 我迫不及待地向您展示如何构建自己的语音识别器。 让我们开始吧!
目录 (Table of contents)
Speech Recognition Libraries
语音识别库
Recognizer Class
识别器类别
Speech Recognition Functions
语音识别功能
Audio Preprocessing
音频预处理
Bonus (Different Scenarios)
奖金(不同方案)
语音识别库 (Speech Recognition Libraries)
- CMU Sphinx CMU狮身人面像
- Kaldi 卡尔迪
- SpeechRecognition 语音识别
- wav2letter++ wav2letter ++
“CMU Sphinx collects over 20 years of the CMU research. Some advantage of this library: CMUSphinx tools are designed specifically for low-resource platforms, flexible design, and focus on practical application development and not on research.” (
“ CMU Sphinx收集了20多年的CMU研究成果。 该库的一些优势:CMUSphinx工具专为低资源平台而设计,设计灵活,并且专注于实际应用程序开发而不是研究。” (
“Kaldi is a toolkit for speech recognition, intended for use by speech recognition researchers and professionals.” (
“ Kaldi是语音识别工具包,旨在供语音识别研究人员和专业人员使用。” (
“Speech Recognition is a library for performing speech recognition, with support for several engines and APIs, online and offline.” (
“语音识别是一个用于执行语音识别的库,支持在线和离线的多个引擎和API。” (
“wav2letter++ is a fast, open source speech processing toolkit from the Speech team at Facebook AI Research built to facilitate research in end-to-end models for speech recognition.” (
“ wav2letter ++是Facebook AI Research语音团队提供的一种快速,开源的语音处理工具包,旨在促进语音识别的端到端模型的研究。” (
From these libraries, we will be working with SpeechRecogntion library because of it’s low barrier to entry and it’s compatibility with much available speech recognition APIs. We can install SpeechRecogntion library by running the following line in our terminal window:
在这些库中,我们将使用SpeechRecogntion库,因为它的进入门槛低,并且与许多可用的语音识别API兼容。 我们可以通过在终端窗口中运行以下行来安装SpeechRecogntion库:
pip install SpeechRecognition识别器类别 (Recognizer Class)
SpeechRecognition library has many classes but we will be focusing on a class called Recognizer. This is the class that will help us to convert audio files into text. To access the Recognizer class, first, let’s import the library.
SpeechRecognition库有很多类,但我们将重点介绍一个名为Recognizer的类。 该类将帮助我们将音频文件转换为文本。 要访问Recognizer类,首先,让我们导入库。
import speech_recognition as srNow, let’s define a variable and assign an instance of recognizer class by calling it.
现在,让我们定义一个变量,并通过调用它来分配识别器类的实例。
recognizer = sr.Recognizer()Now, let’s set the energy threshold to 300. You can think of the energy threshold as the loudness of the audio files. The values below the threshold are considered silent, and the values above the threshold are considered speech. This will improve the recognition of the speech when working with the audio file.
现在,将能量阈值设置为300。您可以将能量阈值视为音频文件的响度。 低于阈值的值被认为是无声的,而高于阈值的值被认为是语音。 使用音频文件时,这将改善语音的识别能力。
recognizer.energy_threshold = 300SpeechRecognition’s documentation recommends 300 as a threshold value which works great with most of the audio files. Also, keep in mind that the energy threshold value will adjust automatically as the recognizer listens to audio files.
SpeechRecognition的文档建议使用300作为阈值,该阈值适用于大多数音频文件。 另外,请记住,能量阈值将在识别器收听音频文件时自动调整。
语音识别功能 (Speech Recognition Functions)
In this step, we will see our recognizer in action but before we get it to work let’s see some cool functions of this instance. Speech Recognition has a built-in function to make it work with many of the APIs out there:
在这一步中,我们将看到识别器在起作用,但是在使它起作用之前,让我们看一下该实例的一些很酷的功能。 语音识别具有内置功能,使其可以与许多API一起使用:
- recognize_bing() ognize_bing()
- recognize_google() ognize_google()
- recognize_google_cloud() ognize_google_cloud()
- recognize_wit() ognize_wit()
Bing Recognizer function uses Microsoft’s cognitive services.
Bing Recognizer功能使用Microsoft的认知服务。
Google Recognizer function uses Google’s free web search API.
Google Recognizer功能使用Google的免费网络搜索API。
Google Cloud Recognizer function uses Google’s cloud speech API.
Google Cloud Recognizer功能使用Google的云语音API。
Wit Recognizer function uses the wit.ai platform.
机智识别器功能使用wit.ai平台。
We will use the Google Recognizer function, which is recognize_google(). It’s free and doesn’t require an API key to use. There is one drawback about this recognizer, it limits you when you want to work with longer audio files. In my experience, I didn’t have any issues when working with audio files under 5 minutes. I don’t recommend using this recognizer with long audio files. There are different techniques to work with longer audio files, I am planning to cover it in a different post.
我们将使用Google Recognizer函数,即Recognize_google ()。 它是免费的,不需要使用API密钥。 此识别器有一个缺点,当您要使用更长的音频文件时,它会限制您。 根据我的经验,使用5分钟以下的音频文件时没有任何问题。 我不建议将此识别器用于长音频文件。 有多种方法可以处理更长的音频文件,我打算在另一篇文章中介绍。
例 (Example)
import speech_recognition as srrecognizer = sr.Recognizer()recognizer.recognize_google(audio_data="my_audio.wav", language="en-US")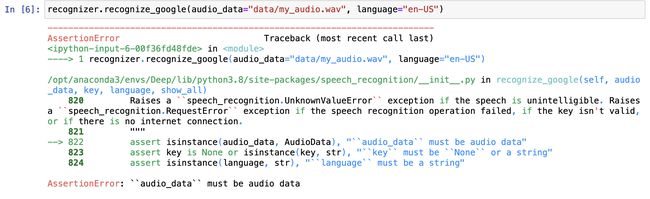
音频预处理 (Audio Preprocessing)
The previous example was just a try without doing any audio preprocessing and as you can it has caused an error. The problem is the data type of our audio file. To avoid this kind of issues, a preprocessing step is necessary. You can think of it like data preprocessing that we usually do before doing data analysis. There is a special class that we will use for this step, which is called AudioFile.
前面的示例只是尝试而没有进行任何音频预处理,并且您已经造成了错误。 问题是音频文件的数据类型。 为避免此类问题,必须执行预处理步骤。 您可以将其视为我们在进行数据分析之前通常进行的数据预处理。 我们将在此步骤中使用一个特殊的类,称为AudioFile。
音频文件 (AudioFile)
import speech_recognition as srrecognizer = sr.Recognizer()audio_file_ = sr.AudioFile("data/my_audio.wav")type(audio_file)
When we try to pass the audio_file variable inside recognize_google() function it will not accept it. The reason is the function accepts audiodata but our current variable type is audiofile. To convert it to an audio data type, we will use the recognizer class’s built-in method called record.
当我们尝试在Recognize_google()函数中传递audio_file变量时,它将不会接受它。 原因是该函数接受音频数据,但是我们当前的变量类型是音频文件。 要将其转换为音频数据类型,我们将使用识别器类的内置方法(称为record)。
记录方式 (Record Method)
Here is how to use record method:
这是使用记录方法的方法:
with audio_file as source:
  audio_file = recognizer.record(source)
  recognizer.recognize_google(audio_data=audio_file)type(audio_file)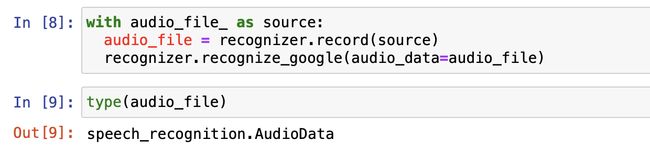
There are two parameters of the record method that we can also use.
我们也可以使用记录方法的两个参数。
By default, these both parameters are equal to None. And in default mode, the record method will record the audio data from the beginning of the file until there is no more audio. But we can change this by giving them float values.
默认情况下,这两个参数均等于“无”。 在默认模式下,record方法将从文件开头开始记录音频数据,直到没有更多音频为止。 但是我们可以通过给它们赋予浮点值来改变它。
Duration: let’s say we want only the first 7 seconds of the whole audio file, we have to set the duration parameter to 7.0
持续时间 :假设我们只需要整个音频文件的前7秒,我们必须将duration参数设置为7.0
Offset: it is used to cut off or skip over a specified amount of second at the start of an audio file. Let’s say we don’t want the first 1second of the audio files, we have to set the offset parameter to 1.0
偏移 :用于在音频文件开始时截断或跳过指定的秒数。 假设我们不希望音频文件的前1秒,我们必须将offset参数设置为1.0
Duration
持续时间
with audio_file_ as source:
  audio_file = recognizer.record(source, duration = 7.0)
  result = recognizer.recognize_google(audio_data=audio_file)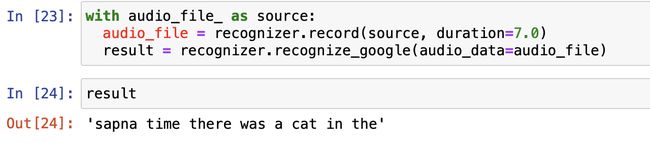
Offset
抵消
with audio_file_ as source:
  audio_file = recognizer.record(source, offset = 1.0)
  result = recognizer.recognize_google(audio_data=audio_file)
奖金(不同方案) (Bonus (Different Scenarios))
无声音频 (Speechless Audio)
# Import the silent audio file
silent_audio_file = sr.AudioFile("silent_audio.wav")# Convert the AudioFile to AudioData
with silent_audio_file as source:
  silent_audio = recognizer.record(source)# Recognize the AudioData with show_all turned on
recognizer.recognize_google(silent_audio, show_all=True)
多名发言人 (Multiple Speakers)
This process of understanding the different speakers in a single audio file is known as speaker diarization. This is a really cool function to have but unfortunately, it is not available in this library. One solution to do this is to have different audio files for different speakers, go through them using for loop.
了解单个音频文件中不同说话者的过程称为说话者二值化。 这是一个非常酷的功能,但是不幸的是,该库中没有该功能。 一种解决方案是为不同的扬声器使用不同的音频文件,并使用for循环进行遍历。
recognizer = sr.Recognizer()# Multiple speakers on different files
speakers = [sr.AudioFile("speaker_0.wav"), sr.AudioFile("speaker_1.wav"), sr.AudioFile("speaker_2.wav")]# Transcribe each speaker individually
for i, speaker in enumerate(speakers):
  with speaker as source:
    speaker_audio = recognizer.record(source)

 print(f"Text from speaker {i}:")
 print(recognizer.recognize_google(speaker_audio,language="en-US"))
背景噪音 (Background Noise)
To handle the background noise, the recognizer class has a built-in function called adjust_for_ambient_noise function, which also takes a parameter of duration. Using this function the recognizer class listens to the audio for the specified duration seconds from the beginning of the audio and then adjusts the energy threshold value so that the whole audio is more recognizable.
为了处理背景噪音,识别器类具有一个内置的函数,称为Adjust_for_ambient_noise函数,该函数还带有一个duration参数。 使用此功能,识别器类会在从音频开始的指定持续时间(秒)内收听音频,然后调整能量阈值,以便更容易识别整个音频。
# Import audio file with background nosie
noisy_audio_file = sr.AudioFile("noisy_audio.wav")# Adjust for ambient noise and record
with noisy_audio_file as source:
  recognizer.adjust_for_ambient_noise(source, duration=0.5)
  noisy_audio_file = recognizer.record(source)# Recognize the audio
recognizer.recognize_google(noisy_audio_file)
视频示范 (Video Demonstration)
Just started my journey on YouTube, I am doing video demonstrations in following topics: Machine Learning, Data Science, Artificial Intelligence. Enjoy!
刚开始我在YouTube上的旅程,我正在以下主题中进行视频演示:机器学习,数据科学,人工智能。 请享用!
Thank you for reading this post, I hope you enjoyed and learned something new today. Feel free to contact me if you have any questions while implementing the code, will be more than happy to help.
感谢您阅读这篇文章,希望您今天喜欢并学到一些新东西。 实施代码时如有任何疑问,请随时与我联系 ,我们将竭诚为您服务。
Follow my blog and Towards Data Science to stay inspired.
关注 我的博客 和 迈向数据科学 ,保持灵感。
相关内容 (Related Content)
翻译自: https://towardsdatascience.com/speech-recognition-in-python-the-complete-beginners-guide-de1dd7f00726
python语音识别