CSS基础:浅谈position
浅谈position
定位(position)允许您从正常的文档流布局中取出元素,并使它们具有不同的行为,例如放在另一个元素的上面,或者始终保持在浏览器视窗内的同一位置—— MDN
一、文档流
什么是文档流?
"文档流"是在对布局进行任何更改之前,在页面上显示"块"和"内联"元素的方式。通常是从上至下,从左到右的形式。
这个"流"本质上是一系列的事物,它们都在你的布局中一起工作,并且互相了解。 一旦某部分脱离了"流",它就会独立地工作
还记得我们提到了盒模型(块级元素和行级元素),这些单个的元素是如何组合到一起的呢
正常的布局流(在布局介绍文章中提到)是将元素放置在浏览器视口内的系统。默认情况下:
- 块级元素在视口中垂直布局——每个都将显示在上一个元素下面的新行上,并且它们的外边距将分隔开它们。
- 内联元素表现不一样——它们不会出现在新行上;相反,它们互相之间以及任何相邻(或被包裹)的文本内容位于同一行上,只要在父块级元素的宽度内有空间可以这样做。如果没有空间,那么溢流的文本或元素将向下移动到新行。
如果两个相邻元素都在其上设置外边距,并且两个外边距接触,则两个外边距中的较大者保留,较小的一个消失——这叫外边距折叠(margin塌陷), 我们之前也提到过。
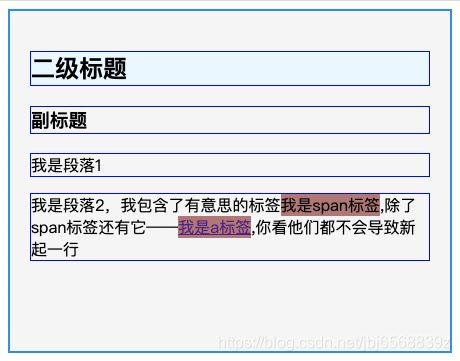
让我们来看一个简单的例子来解析这一切:
.box{

    border: 2px solid #1790FF;
    padding: 20px;
    width: 400px;
    height: 300px;
}
h2, h3, p{

    border: 1px solid blue;
}
span, a{

    background: rgb(185, 116, 116);
}
<div class="box">
    <h2>二级标题h2>
    <h3>副标题h3>
    <p>我是段落1p>
    <p>我是段落2,我包含了有意思的标签<span>我是span标签span>,除了span标签还有它——<a href="https://www.baidu.com">我是a标签a>,你看他们都不会导致新起一行p>
div>
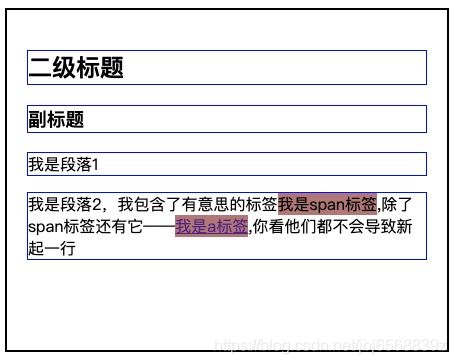
在不影响他们布局方式的情况下,文档流就是默认的规则,从上至下,从左到右。
二、定位(position)
定位的整个想法是允许我们覆盖上面描述的基本文档流行为,以产生有趣的效果。
有许多不同类型的定位,您可以对HTML元素生效。要使某个元素上的特定类型的定位,我们使用position属性。
2.1 静态定位(static)
静态定位是每个元素获取的默认值——它只是意味着“将元素放入它在文档布局流中的正常位置 ——这里没有什么特别的。
为了演示这一点,还是刚才的例子,我们给h2标签添加静态定位
<h2 class="positioned"> ... h2>
现在,将以下规则添加到CSS的底部:
.positioned {

  position: static;
  background: #E6F7FF;
}
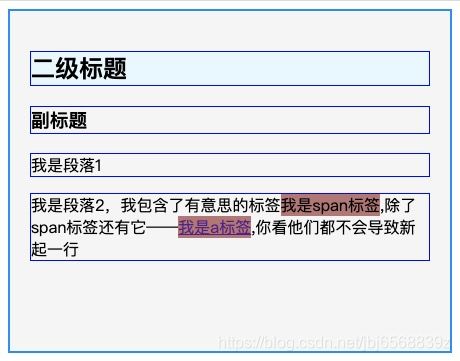
除了背景色,根本没有差别~
2.2 相对定位(relative)
相对定位是我们将要看的第一个位置类型。 它与静态定位非常相似,占据在正常的文档流中,除了你仍然可以修改它的最终位置,包括让它与页面上的其他元素重叠。 让我们将上一例子中的position: static; 替换成position: relative;
没有发生变化,这是因为relative,需要配合top, bottom, left, right 来精确指定要将定位元素移动到的位置。例如:
.box {

    position: relative;
    border: 2px solid #1790FF;
    padding: 20px;
    width: 400px;
    height: 300px;
    background: #f5f5f5;
}
h2, h3, p {

    border: 1px solid blue;
}
span, a {

    background: rgb(185, 116, 116);
}
.positioned {

    position: relative;
    top: 30px;
    left: 40px;
    background: #E6F7FF;
}
.positioned::after{

// 此为模拟样式
    content: '';
    position: absolute;
    top: -30px;
    left: -40px;
    width: 100%;
    height: 100%;
    border: 1px dashed #ccc;
}
<div class="box">
    <h2 class="positioned">二级标题h2>
    <h3>副标题h3>
    <p>我是段落1p>
    <p>我是段落2,我包含了有意思的标签<span>我是span标签span>,除了span标签还有它——<a href="https://www.baidu.com">我是a标签a>,你看他们都不会导致新起一行
    p>
div>
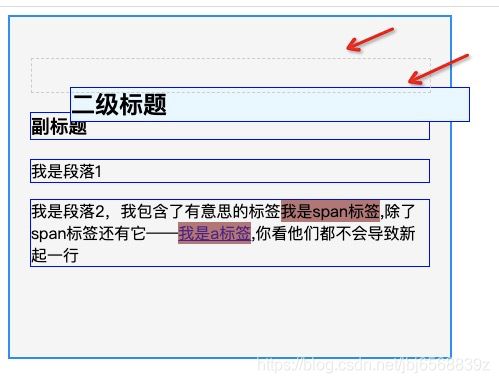
- top和left属性分别起了作用,且参照物是元素原来的位置,即相对于自己在标准文档流中的位置进行移动的;
- 其他元素仍然以为二级标题在原位置(看模拟的虚线)。也就是说相对定位并没有脱离标准文档流;
结论:
使用position: relative,不会让元素脱离文档流,目标元素会基于自己原本的位置进行定位
2.3 绝对定位(absolute)
绝对定位带来了非常不同的结果。让我们尝试改变代码中的位置声明如下:
.box {

    position: relative;
    border: 2px solid #1790FF;
    padding: 20px;
    width: 400px;
    height: 300px;
    background: #f5f5f5;
}
h2, h3, p {

    border: 1px solid blue;
}
span, a {

    background: rgb(185, 116, 116);
}
.positioned {

    position: absolute;
    top: 30px;
    left: 40px;
    background: #E6F7FF;
}
<div class="box">
    <h2 class="positioned">二级标题h2>
    <h3>副标题h3>
    <p>我是段落1p>
    <p>我是段落2,我包含了有意思的标签<span>我是span标签span>,除了span标签还有它——<a href="https://www.baidu.com">我是a标签a>,你看他们都不会导致新起一行
    p>
div>
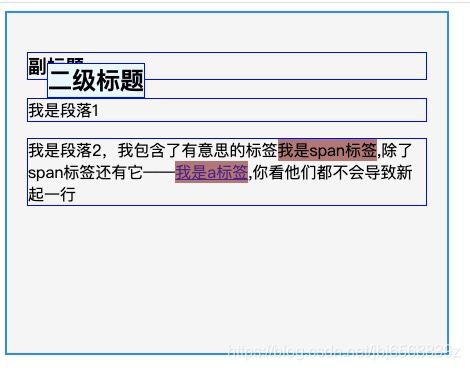
- 绝对定位的元素不再存在于正常文档布局流中。相反,它坐在它自己的层独立于一切;
- 注意元素的位置已经改变——这是因为top,bottom,left和right以不同的方式在绝对定位;
结论:
position:absolute(表示绝对定位),这条语句的作用将元素从文档流中拖出来,然后使用left、right、top、bottom属性相对于其最接近的一个具有定位属性的父包含块进行绝对定位。如果不存在这样的包含块,则相对于body元素,即相对于浏览器窗口。
2.4 固定定位(fixed)
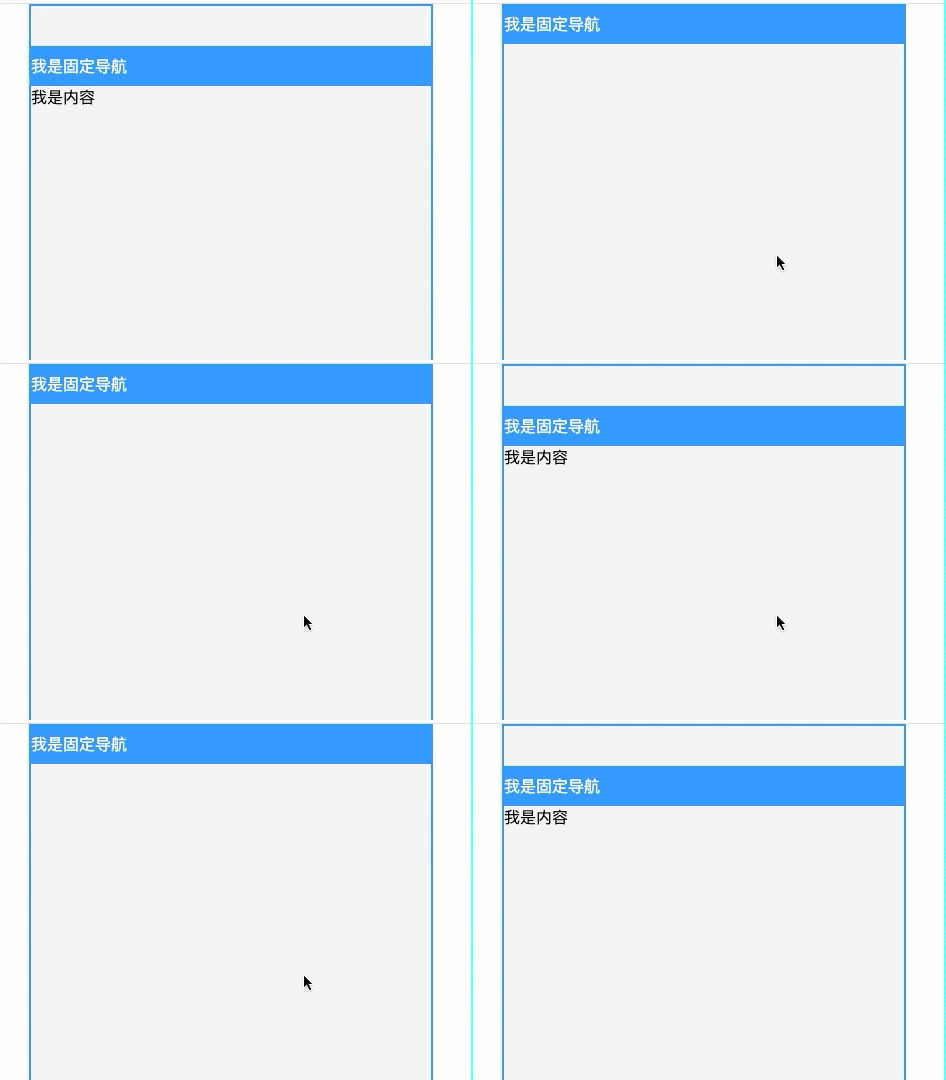
这与绝对定位的工作方式完全相同,只有一个主要区别:绝对定位固定元素是相对于 元素或其最近的定位祖先,而固定定位固定元素则是相对于浏览器视口本身。 这意味着您可以创建固定的有用的UI项目,如持久导航菜单。
*{

    margin: 0;
}
.box {

    position: relative;
    margin: 0 auto;
    border: 2px solid #1790FF;
    padding-top: 40px;
    width: 400px;
    height: 1500px;
    background: #f5f5f5;
}
.head{

    position: fixed;
    top: 0;
    left: 0;
    width: 100%;
    line-height: 40px;
    color: #fff;
    background: #1790FF;
}
<div class="box">
    <div class="head">我是固定导航div>
    我是内容
div>
- 与absolute定位类型类似,但它的相对移动的坐标是视图(屏幕内的网页窗口)本身;
- 不会受文档流动影响;
2.5 粘性定位(sticky)
*{

    margin: 0;
}
.box {

    position: relative;
    margin: 0 auto;
    border: 2px solid #1790FF;
    padding-top: 40px;
    width: 400px;
    height: 1500px;
    background: #f5f5f5;
}
.head{

    position: sticky;
    top: 0;
    left: 0;
    width: 100%;
    line-height: 40px;
    color: #fff;
    background: #1790FF;
}
<div class="box">
    <div class="head">我是固定导航div>
    我是内容
div>
- 固定导航开始没有脱离文档流,当满足top:0,left:0的规则时,脱离了文档流
结论:
sticky允许被定位的元素表现得像相对定位一样,直到它滚动到某个阈值点(例如,从视口顶部起10像素)为止,此后它就变得固定了。例如,它可用于使导航栏随页面滚动直到特定点,然后粘贴在页面顶部。
三、z-index与定位
我们在前文已经意识到了,一旦使用定位,就可能使元素重叠,有没有什么方法,可以控制哪一个元素在顶层(不被遮盖)呢?
我们在定位上下文中只有一个定位的元素,它出现在顶部,因为定位的元素胜过未定位的元素。 当我们有不止一个的时候呢?
我们先看下面一段代码:
<html lang="en">
<head>
    <meta charset="UTF-8">
    <meta name="viewport" content="width=device-width, initial-scale=1.0">
    <title>Documenttitle>
    <style>
        .box{

            width: 300px;
            border: 1px solid red;
        }
        .div{

            /* position: absolute; */
            width: 100px;
            height: 100px;
        }
        .div:nth-child(1){

            background: chartreuse;
        }
        .div:nth-child(2){

            background: rgb(92, 153, 135);
        }
        .div:nth-child(3){

            background: rgb(194, 142, 84);
        }
        .div:nth-child(4){

            background: rgb(56, 41, 97);
        }
    style>
head>
<body>
    <div class="box">
        <div class="div">div>
        <div class="div">div>
        <div class="div">div>
        <div class="div">div>
    div>
body>
html>
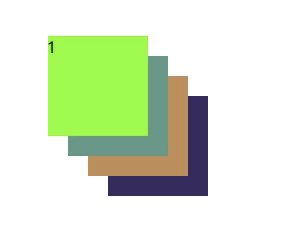
四个元素从上至下排列,如果这样呢?
<html lang="en">
<head>
    <meta charset="UTF-8">
    <meta name="viewport" content="width=device-width, initial-scale=1.0">
    <title>Documenttitle>
    <style>
        .box{

            position: relative;
            width: 300px;
            margin: 50px;
        }
        .div{

            position: absolute;
            width: 100px;
            height: 100px;
        }
        .div:nth-child(1){

            top: 0;
            left: 0;
            background: chartreuse;
        }
        .div:nth-child(2){

            background: rgb(92, 153, 135);
            top: 20px;
            left: 20px;
        }
        .div:nth-child(3){

            top: 40px;
            left: 40px;
            background: rgb(194, 142, 84);
        }
        .div:nth-child(4){

            top: 60px;
            left: 60px;
            background: rgb(56, 41, 97);
        }
    style>
head>
<body>
    <div class="box">
        <div class="div">1div>
        <div class="div">2div>
        <div class="div">3div>
        <div class="div">4div>
    div>
body>
html>
我们通过调整z-index,可以让元素1、2、3、4的层叠顺序交换
<html lang="en">
<head>
    <meta charset="UTF-8">
    <meta name="viewport" content="width=device-width, initial-scale=1.0">
    <title>Documenttitle>
    <style>
        .box{

            position: relative;
            width: 300px;
            margin: 50px;
        }
        .div{

            position: absolute;
            width: 100px;
            height: 100px;
        }
        .div:nth-child(1){

            z-index: 4;
            top: 0;
            left: 0;
            background: chartreuse;
        }
        .div:nth-child(2){

            z-index: 3;
            background: rgb(92, 153, 135);
            top: 20px;
            left: 20px;
        }
        .div:nth-child(3){

            z-index: 2;
            top: 40px;
            left: 40px;
            background: rgb(194, 142, 84);
        }
        .div:nth-child(4){

            z-index: 1;
            top: 60px;
            left: 60px;
            background: rgb(56, 41, 97);
        }
    style>
head>
<body>
    <div class="box">
        <div class="div">1div>
        <div class="div">2div>
        <div class="div">3div>
        <div class="div">4div>
    div>
body>
html>
注意,这是z-index的效果,更多样式需要大家自己去探索哦~
写在最后
本文是《CSS基础系列》第三篇文章
如果对你有所帮助不妨给本项目的github 点个 star,这是对我最大的鼓励!
关于我
- 花名:余光
- WX:j565017805
- 沉迷 JS,水平有限,虚心学习中
其他沉淀
- Github: Js 版 LeetCode 题解
- 前端进阶笔记
- CSDN 博客汇总
![]()
