Flutter笔记(12)flutter中swiper实现轮播图
实现方式
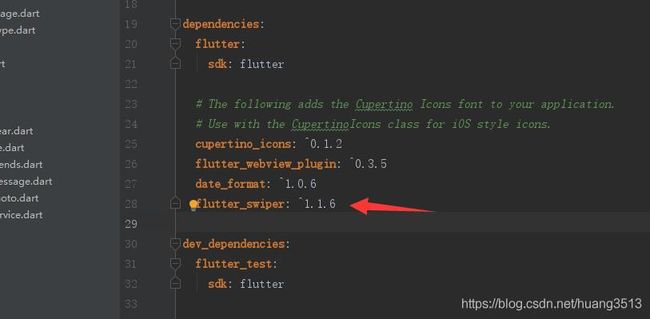
flutter_swiper利用的是这个库,可以实现多样式的布局。先说说库的导入。 之前的文章有提到过本地图片的加载方式,是进入到pubspec.yaml文件里添加,同时,引入三方库也是一样。

在配置文件中找到箭头所指的位置,flutter_swiper: ^1.1.6添加依赖,要记得点击packages get导入。
实现代码
import 'package:flutter/material.dart';
import 'package:flutter_swiper/flutter_swiper.dart';

///好友动态-图片轮播
class MineFriends extends StatefulWidget {
  @override
  MineFriendsState createState() => MineFriendsState();
}

class MineFriendsState extends State {
  // 声明一个list,存放image Widget
  List imageList = List();

  @override
  void initState() {
    // TODO: implement initState
    imageList.add(Image.network(
      'https://pics1.baidu.com/feed/08f790529822720e6aa6f6410a5a4d43f31fabb3.jpeg?token=8fb7f32253df1531c46bfa67fe21cc75&s=EC836E99524B10E7113DF0C1030070D0',
      fit: BoxFit.fill,
    ));
    imageList.add(Image.network(
      'https://pics7.baidu.com/feed/9213b07eca80653884f4b8bfe74ce641ac348292.jpeg?token=f1c223af398963687fc1d41ca058526b&s=5A25A944114213E7D66D0917030040C9',
      fit: BoxFit.fill,
    ));
    imageList.add(Image.network(
      'https://pics4.baidu.com/feed/3b87e950352ac65caf49b4788863f51492138a80.jpeg?token=a7dd7eb878a6fbb92255c263cac17547&s=6BA00D89440B0AEF5180B9930100E081',
      fit: BoxFit.fill,
    ));
    imageList.add(Image.network(
      'https://pics7.baidu.com/feed/f11f3a292df5e0fea0f01a102ef173ad5fdf7249.jpeg?token=1908e5b736e045888160bf77893ac19e&s=EE924C83428A3EE50894C09303004093',
      fit: BoxFit.fill,
    ));
    super.initState();
  }

  @override
  Widget build(BuildContext context) {
    // TODO: implement build
    return Scaffold(
      backgroundColor: Colors.black12,
      appBar: new AppBar(
        title: new Text('轮播图'),
      ),
      body: ListView(
        children: [firstSwiperView(), firstSwiperView()],
      ),
    );
  }

  ///实现android中ViewPager轮播的效果
  Widget firstSwiperView() {
    return Container(
      padding: const EdgeInsets.fromLTRB(0, 0, 0, 0),
      width: MediaQuery.of(context).size.width,
      height: 250,
      child: Swiper(
        itemCount: 4,
        itemBuilder: _swiperBuilder,
        pagination: SwiperPagination(
          alignment: Alignment.bottomRight,
          margin: const EdgeInsets.fromLTRB(0, 0, 15, 10),
          builder: DotSwiperPaginationBuilder(
              color: Colors.black54, activeColor: Colors.white),
        ),
        controller: SwiperController(),
        scrollDirection: Axis.horizontal,
        autoplay: true,
        //是否自动播放
        onTap: (index) => print('您点击了第$index'),
      ),
    );
  }

  Widget _swiperBuilder(BuildContext context, int index) {
    return (imageList[index]);
  }
}
其中Swiper的属性
下面主要是介绍Swiper的属性():
Swiper({
    this.itemBuilder,
    this.indicatorLayout: PageIndicatorLayout.NONE,
    ///
    this.transformer,
    @required this.itemCount,                               // 个数
    this.autoplay: false,                                   // 是否自动播放,默认false
    this.layout: SwiperLayout.DEFAULT,                      // 设置样式,后面会介绍,default就是上面轮播的样式
    this.autoplayDelay: kDefaultAutoplayDelayMs,
    this.autoplayDisableOnInteraction: true,                // 用户拖拽的时候,是否停止自动播放
    this.duration: kDefaultAutoplayTransactionDuration,     // 动画时间,默认300.0毫秒
    this.onIndexChanged,                                    // 当用户手动拖拽或自动播放引起下标改变的时候调用
    this.index,                                             // 初始播放轮播时的下标位置
    this.onTap,                                             // 点击轮播的事件
    this.control,                                           // 分页按钮(一般是左右或上下两边的箭头按钮)
    this.loop: true,                                        // 无限轮播模式开关
    this.curve: Curves.ease,                                // 动画的方式
    this.scrollDirection: Axis.horizontal,                  // 滚动方式
    this.pagination,                                        // 分页指示器(下面跟着滚动的点)
    this.plugins,
    this.physics,
    Key key,
    this.controller,
    this.customLayoutOption,

    /// since v1.0.0
    this.containerHeight,
    this.containerWidth,
    this.viewportFraction: 1.0,
    this.itemHeight,
    this.itemWidth,
    this.outer: false,
    this.scale,
    this.fade,
  })
仅作为学习笔记,不喜勿喷!
文章参考
