SpringBoot--简化Spring开发的框架
目录:
-
- 一、Spring Boot 简介
- 二、Spring Boot 快速入门
- 三、Spring Boot 的热部署
- 四、Spring Boot 原理
-
-
- 1. 起步依赖
- 2. 自动装配
-
- 五、Spring Boot 的配置文件
- 六、SpringBoot的WEB开发
-
-
- 1. Springboot和freemarker的集成
- 2. Springboot集成Mybatis
- 3. Springboot错误统一处理(@ControllerAdvice)
-
一、Spring Boot 简介
官网:https://spring.io/projects/spring-boot
SpringBoot是由Pivotal团队在2013年开始研发、2014年4月发布第一个版本的全新开源的轻量级框架。它基于Spring4.0设计,不仅继承了Spring框架原有的优秀特性,而且还通过简化配置来进一步简化了Spring应用的整个搭建和开发过程。另外SpringBoot通过集成大量的框架使得依赖包的版本冲突,以及引用的不稳定性等问题得到了很好的解决。
SpringBoot 的定位:
它是一个服务于spring框架的框架,能够简化配置文件,快速构建web应用,内置tomcat,无需打包部署,直接运行。
Spring Boot 对 Spring 的缺点进行了改善和优化,基于约定大于配置的思想( 用来简化新 Spring 应用的初始搭建以及开发过程。),可以让开发人员不必在配置和业务逻辑之间做思维的切换,可以全身心投入到业务逻辑的代码编 写中,从而可以大大提高开发的效率,一定程度上可以缩短项目周期。
SpringBoot 的特点:
(1)为所有Spring开发提供了一个更快更广泛的入门体验。
(2)零配置。无冗余代码生成和XML强制配置,遵循“ 约定大于配置 ”。
(3)集成了大量常用的第三方库的配置,SpringBoot应用为这些第三方库提供了几乎可以零配置的开箱即用的能力。
(4)提供了一系列大型项目常用的非功能性特征,如嵌入式服务器、安全性、度量、运行状况检查、外部化配置等。
(5) SpringBoot 不是Spring的替代者,Spring框架是通过IOC机制来管理Bean的。SpringBoot依赖Spring框架来管理对象的依赖。SpringBoot并不是Spring的精简版本,而是为使用Spring做好各种产品级准备。
SpringBoot 的优缺点:
优点:
(1)可以创建独立的Spring应用程序,并且基于其Maven或Gradle插件,可以创建可执行的JARs和WARs;
(2)内嵌Tomcat或Jetty等Servlet容器;
(3)提供自动装配的“ startter ”项目对象模型(POMS)以简化Maven配置;
(4)尽可能自动配置Spring容器;
(5)提供准备好的特性,如指标、健康检查和外部化配置;
(6)绝对没有代码生成,不需要XML配置。
缺点:
(1)版本更新比较快,可能出现较大变化;
(2)因为约定大于配置,所以经常出现一些很难解决的问题。
二、Spring Boot 快速入门
1. 构建项目(Maven、Idea)
Maven构建项目:
1、访问 http://start.spring.io/
2、选择构建工具 Maven Project、Java、Spring Boot 版本 2.1.3 以及一些工程基本信息,可参考下图所示:
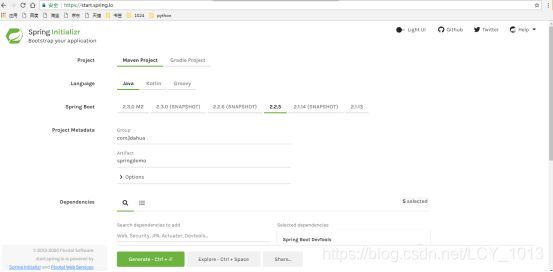
3、点击 Generate Project 下载项目压缩包
4、解压后,使用 Idea 导入项目,File -> New -> Model from Existing Source… -> 选择解压后的文件夹 -> OK,选择 Maven 一路 Next,OK done!
5、如果使用的是 Eclipse,Import -> Existing Maven Projects -> Next -> 选择解压后的文件夹 -> Finsh,OK done!
Idea构建项目:
1、选择 File -> New —> Project… 弹出新建项目的框
2、选择 Spring Initializr,Next 也会出现上述类似的配置界面,Idea 帮我们做了集成
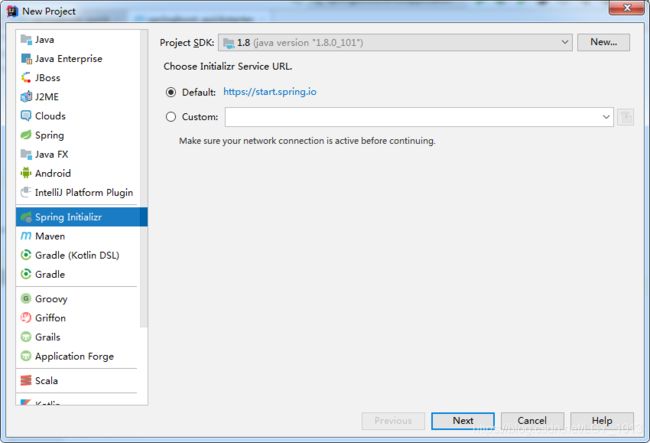
3、填写相关内容后,点击 Next 选择依赖的包再点击 Next,最后确定信息无误点击 Finish。
2. 添加SpringBoot的起步依赖
SpringBoot常用工具包:
spring-boot-starter:核心的工具包,提供了自动配置的支持,日志和YAML配置支持;
spring-boot-starter-activemq:针对快速集成ActiveMQ的工具包;
spring-boot-starter-aop:提供了快速集成SpringAOP和AspectJ的工具包;
spring-boot-starter-data-redis:提供了快速集成Redis和Jedis的工具包;
spring-boot-starter-freemarker:提供了快速集成Freemarker的工具包;
spring-boot-starter-mail:提供了快速集成邮件发送的工具包;
spring-boot-starter-test:提供了对Springboot应用的测试工具包;
spring-boot-starter-web:提供了对web开发的工具包,包括基于SpringMVC的RESTful应用开发,内置的tomcat服务器等;
spring-boot-starter-actuator:提供了对生产环境中应用监控的工具包;
spring-boot-starter-logging:提供了对日志的工具包,默认使用Logback;
        org.springframework.boot
        spring-boot-starter-parent
        2.0.1.RELEASE


            org.springframework.boot
            spring-boot-starter-web
3. SpringBoot引导类(项目模块包必须和引导类处于同一目录)
package com.demo;

import org.springframework.boot.SpringApplication;
import org.springframework.boot.autoconfigure.SpringBootApplication;

/**
 * 编写Spring Boot引导类
 * 注解@SpringBootApplication:标识SpringBoot的引导类
 */
@SpringBootApplication
public class SpringBootApplicationDemo {

    //java程序的入口
    public static void main(String[] args) {

        //run()用于执行Spring Boot的引导类,其参数就是Spring Boot引导类的字节码对象(class对象)
        SpringApplication.run(SpringBootApplicationDemo.class);
    }
}
4. 编写Controller插件
package com.demo.controller;

import org.springframework.stereotype.Controller;
import org.springframework.web.bind.annotation.RequestMapping;
import org.springframework.web.bind.annotation.ResponseBody;

@Controller
public class TestController {

    @RequestMapping("/test")
    @ResponseBody
    public String test(){

        return "hello,Spring Boot。";
    }
}
分析:
1、继承spring-boot-starter-parent,引入基本的依赖管理配置;
2、引入spring-boot-starter-web,自动引入了springweb相关的包;
3、@SpringBootApplication:这个注解告诉springboot自动的去完成相关配置,包括基础类的加载,bean的扫描等等,简单理解为这个标签为我们的应用配置完成了很多基本功能;
4、SpringApplication.run:服务启动入口。springboot默认把tomcat打包到应用中,我们可以以正常的运行jar的方式来运行springboot应用。
三、Spring Boot 的热部署
在实际开发中往往需要反复修改类、页面、配置等资源,每次修改后都是需要重启服务器才能生效,这样将浪费大量的时间,我们希望可以在修改之后不重启服务器也能生效,在 pom.xml 中添加相关配置即可实现该功能,我们称之为热部署。
            org.springframework.boot
            spring-boot-devtools
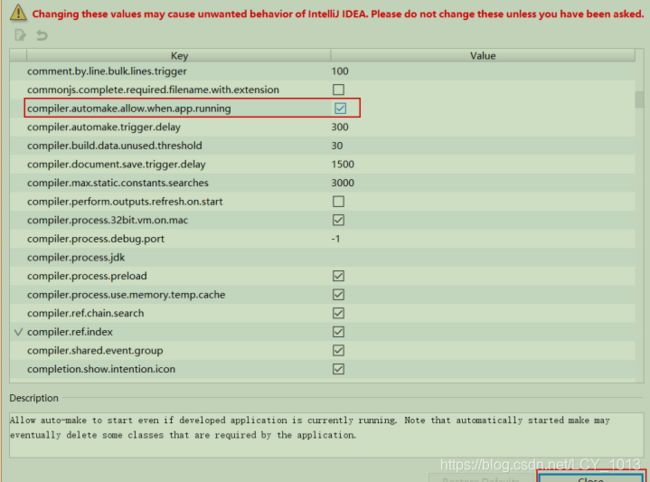
在 IntelliJ IDEA 中配置热部署失败的原因:IDEA 在默认情况下不会自动编译工程,需要对IDEA 进行自动编译的设置。
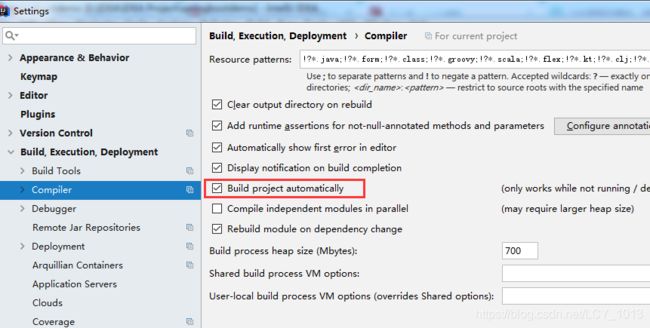
然后按组合键 Ctrl+Shift+Alt+/
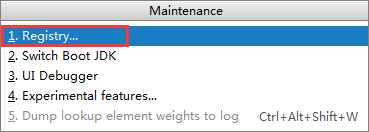
四、Spring Boot 原理
1. 起步依赖
在起步依赖上,spring boot帮我们管理了各个依赖的版本,使各个依赖不会出现版本冲突;另外,帮我们打包了各个依赖让我们不用再像之前那样自己导入一大堆的依赖,只要引入起步依赖的坐标就可以进行web开发了,同样体现了依赖传递的用。
在Spring Boot项目中,必须继承依赖spring-boot-starter-parent,所以从这个继承依赖开始。
1) spring-boot-starter-parent
其中有对配置文件的引入配置:
        true
        ${basedir}/src/main/resources

          **/application*.yml
          **/application*.yaml
          **/application*.properties
可以看到,默认maven会去项目src/main/resource下寻找配置文件,可以是.yml,.yaml,.properties文件,且加载顺序是先加载yml文件,然后yaml,最后properties,所以如果存在覆盖(即有相同属性的配置),properties文件的配置会覆盖前两者。
在点击进入spring-boot-starter-parent后,其pom文件又继承了一个依赖spring-boot-starter-dependencies
2) spring-boot-starter-dependencies
在spring-boot-dependencies 这个pom文件中,可以看到该文件管理了所有依赖的版本号。
    5.15.9
    2.7.7
    1.9.75
    2.6.4
    1.9.4
    3.11.1
    4.0.6
    2.1.4
    3.0.0
    1.9.13
    2.6.2
    ...
解决了我们原有项目中可能存在依赖版本冲突问题,它来真正管理spring boot应用里面的所有依赖版本。
3) spring-boot-starter-web
在spring-boot-starter-web这个pom文件中,它帮我们导入了web模块正常运行所依赖的组件,这个依赖的版本由父项目进行管理。
      org.springframework.boot
      spring-boot-starter
      2.1.6.RELEASE
      compile


      org.springframework.boot
      spring-boot-starter-json
      2.1.6.RELEASE
      compile


      org.springframework.boot
      spring-boot-starter-tomcat
      2.1.6.RELEASE
      compile


      org.hibernate.validator
      hibernate-validator
      6.0.17.Final
      compile


      org.springframework
      spring-web
      5.1.8.RELEASE
      compile


      org.springframework
      spring-webmvc
      5.1.8.RELEASE
      compile
2. 自动装配
spring boot要求每一个启动类上都需要加上解@SpringBootApplication的注解,所以来看下它的源码。
@Target(ElementType.TYPE)
@Retention(RetentionPolicy.RUNTIME)
@Documented
@Inherited
@SpringBootConfiguration
@EnableAutoConfiguration
@ComponentScan(excludeFilters = {

		@Filter(type = FilterType.CUSTOM, classes = TypeExcludeFilter.class),
		@Filter(type = FilterType.CUSTOM, classes = AutoConfigurationExcludeFilter.class) })
public @interface SpringBootApplication {
@SpringBootApplication由三个主要的注解构成:@SpringBootConfiguration,@EnableAutoConfiguration,@ComponentScan
1)@SpringBootConfiguration:本质就是一个@Configuration,代表这是spring IOC容器的主配置类;
@Target(ElementType.TYPE)
@Retention(RetentionPolicy.RUNTIME)
@Documented
@Configuration
public @interface SpringBootConfiguration {


}
2)@EnableAutoConfiguration:开启自动配置,Springboot使用这个注解自动的把内置的符合条件的@Configuration类加载进入应用;
@Target(ElementType.TYPE)
@Retention(RetentionPolicy.RUNTIME)
@Documented
@Inherited
@AutoConfigurationPackage
@Import(AutoConfigurationImportSelector.class)
public @interface EnableAutoConfiguration {
SpringBoot自动配置功能开启,是自动装配的核心注解。首先让我们来看一下@AutoConfigurationPackage注解
@EnableAutoConfiguration》@AutoConfigurationPackage
@Target(ElementType.TYPE)
@Retention(RetentionPolicy.RUNTIME)
@Documented
@Inherited
@Import(AutoConfigurationPackages.Registrar.class)
public @interface AutoConfigurationPackage {


}
@AutoConfigurationPackage在这里导入了一个AutoConfigurationPackages.Registrar.class的组件,下面是AutoConfigurationPackages.Registrar的源码
@EnableAutoConfiguration》@AutoConfigurationPackage》AutoConfigurationPackages.Registrar
static class Registrar implements ImportBeanDefinitionRegistrar, DeterminableImports {

		@Override
		public void registerBeanDefinitions(AnnotationMetadata metadata, BeanDefinitionRegistry registry) {

			register(registry, new PackageImport(metadata).getPackageName());
		}
		@Override
		public Set<Object> determineImports(AnnotationMetadata metadata) {

			return Collections.singleton(new PackageImport(metadata));
		}
	}
在这个类中,我们关注的是registerBeanDefinitions方法,metadata是注解的源信息,包括@SpringBootConfiguration配置的类名等信息;
register方法会扫描主配置类所在的包及其子包下的组件,并注册到IOC容器中(这就是@AutoConfigurationPackage的作用)。
下面再来探索下@Import(AutoConfigurationImportSelector.class)
@EnableAutoConfiguration》@Import(AutoConfigurationImportSelector.class)
首先来看看AutoConfigurationImportSelector源码
@Override
	public String[] selectImports(AnnotationMetadata annotationMetadata) {

		if (!isEnabled(annotationMetadata)) {

			return NO_IMPORTS;
		}
		AutoConfigurationMetadata autoConfigurationMetadata = AutoConfigurationMetadataLoader
				.loadMetadata(this.beanClassLoader);
		AutoConfigurationEntry autoConfigurationEntry = getAutoConfigurationEntry(autoConfigurationMetadata,
				annotationMetadata);
		return StringUtils.toStringArray(autoConfigurationEntry.getConfigurations());
	}

	/**
	 * Return the {@link AutoConfigurationEntry} based on the {@link AnnotationMetadata}
	 * of the importing {@link Configuration @Configuration} class.
	 * @param autoConfigurationMetadata the auto-configuration metadata
	 * @param annotationMetadata the annotation metadata of the configuration class
	 * @return the auto-configurations that should be imported
	 */
	protected AutoConfigurationEntry getAutoConfigurationEntry(AutoConfigurationMetadata autoConfigurationMetadata,
			AnnotationMetadata annotationMetadata) {

		if (!isEnabled(annotationMetadata)) {

			return EMPTY_ENTRY;
		}
		AnnotationAttributes attributes = getAttributes(annotationMetadata);
		List<String> configurations = getCandidateConfigurations(annotationMetadata, attributes);
		configurations = removeDuplicates(configurations);
		Set<String> exclusions = getExclusions(annotationMetadata, attributes);
		checkExcludedClasses(configurations, exclusions);
		configurations.removeAll(exclusions);
		configurations = filter(configurations, autoConfigurationMetadata);
		fireAutoConfigurationImportEvents(configurations, exclusions);
		return new AutoConfigurationEntry(configurations, exclusions);
	}
在这里selectImports根据注解源信息获取需要导入容器的组件的全类名,并返回,而获取就在getAutoConfigurationEntry方法中。
根据Debug发现,这里的configurations就是获取的全类名集合,所以我们重点来看下getCandidateConfigurations是如何获取这些类名的。下面是getCandidateConfigurations的源码。
@EnableAutoConfiguration》@Import(AutoConfigurationImportSelector.class)》getCandidateConfigurations
protected List<String> getCandidateConfigurations(AnnotationMetadata metadata, AnnotationAttributes attributes) {

		List<String> configurations = SpringFactoriesLoader.loadFactoryNames(getSpringFactoriesLoaderFactoryClass(),
				getBeanClassLoader());
		Assert.notEmpty(configurations, "No auto configuration classes found in META-INF/spring.factories. If you "
				+ "are using a custom packaging, make sure that file is correct.");
		return configurations;
	}
继续跟进loadFactoryNames方法
@EnableAutoConfiguration》@Import(AutoConfigurationImportSelector.class)》getCandidateConfigurations》loadFactoryNames
public static List<String> loadFactoryNames(Class<?> factoryClass, @Nullable ClassLoader classLoader) {

		String factoryClassName = factoryClass.getName();
		return loadSpringFactories(classLoader).getOrDefault(factoryClassName, Collections.emptyList());
	}
在loadSpringFactories方法中到了答案
@EnableAutoConfiguration》@Import(AutoConfigurationImportSelector.class)》getCandidateConfigurations》loadFactoryNames》loadSpringFactories
private static Map<String, List<String>> loadSpringFactories(@Nullable ClassLoader classLoader) {

		MultiValueMap<String, String> result = cache.get(classLoader);
		if (result != null) {

			return result;
		}

		try {

			Enumeration<URL> urls = (classLoader != null ?
					classLoader.getResources(FACTORIES_RESOURCE_LOCATION) :
					ClassLoader.getSystemResources(FACTORIES_RESOURCE_LOCATION));
			result = new LinkedMultiValueMap<>();
			while (urls.hasMoreElements()) {

				URL url = urls.nextElement();
				UrlResource resource = new UrlResource(url);
				Properties properties = PropertiesLoaderUtils.loadProperties(resource);
				for (Map.Entry<?, ?> entry : properties.entrySet()) {

					String factoryClassName = ((String) entry.getKey()).trim();
					for (String factoryName : StringUtils.commaDelimitedListToStringArray((String) entry.getValue())) {

						result.add(factoryClassName, factoryName.trim());
					}
				}
			}
			cache.put(classLoader, result);
			return result;
		}
看到这个方法后,就比较清晰了,首先读取类路径下的配置文件,然后循环遍历URL集合,并将URL加载为resource后读取为properties对象,最后将键和值存入LinkedMultiValueMap中并返回。
这里的FACTORIES_RESOURCE_LOCATION即是所有组件的配置文件,它在类路径下的:
![]()
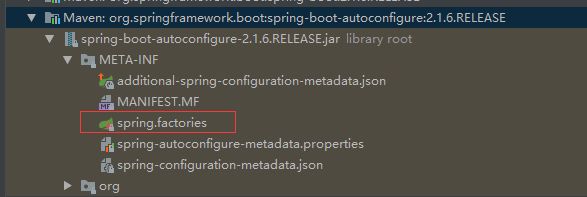
查看spring-boot-autoconfigure包中的META-INF/spring.factories文件中的配置项
(原理,由@EnableAutoConfiguration标签引入的AutoConfigurationImportSelector类中,使用Spring的SpringFactoriesLoader类实现加载)
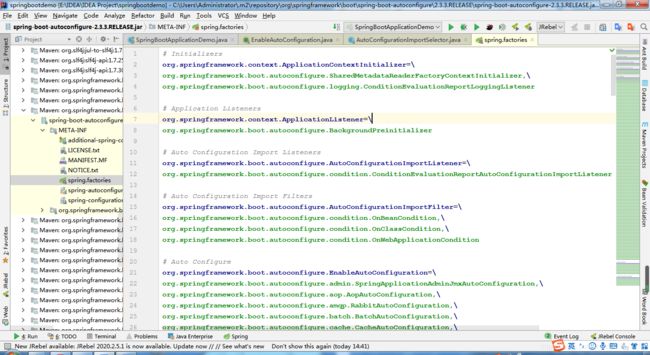
上面配置文件存在大量的以Configuration为结尾的类名称,这些类就是存有自动配置信息的类,而 SpringApplication在获取这些类名后再加载。
总结:
自动配置,
第一得益于能扫描主配置类所在包及其子包的组件,将这些组件注册到IOC容器中;
第二它能借助spring框架原有的SpringFactoriesLoader的支持,加载META-INF/spring.factories获取组件的全类名并通过反射实例化为对应的标注了@Configuration的JavaConfig形式,并且符合要求@Conditional要求的IOC容器配置类,同时还有需要的Properties类和方法返回的@Bean类。
3)@ComponentScan:组件扫描(引导类所在包及其子包下的组件);
五、Spring Boot 的配置文件
1. SpringBoot 配置文件类型:

1)application.properties
application.properties是一种key-value类型的文件。

注意:
- 等号前后不能有空格
- 即使 key 或 value 是字符串类型,也不能用引号包裹
- 每一行结束不加分号
- 注释语句使用”#”
2)application.yml(yaml)
YAML 是"YAML Ain’t a Markup Language"(YAML 不是一种标记语言)的递归缩写;
YAML 的语法和其他高级语言类似,并且可以简单表达清单、散列表、标量等数据形态;
YAML 是一种直观的能够被计算机识别的数据序列化格式,易读,容易和脚本语言交互,可以被支持 YAML 库的不同编程语言程序导入;
YAML 的配置文件扩展名为.yml 或.yaml,如 application.yml 或 application.yaml。
yml配置文件的语法:
- 大小写敏感
- 使用缩进表示层级关系
- 缩进不允许使用 tab,只允许空格
- 缩进的空格数不重要,只要相同层级的元素左对齐即可
- '#'表示注释
2. 获取配置文件的信息
1)使用@Value 注解映射
package com.demo.controller;

import org.springframework.beans.factory.annotation.Value;
import org.springframework.web.bind.annotation.RequestMapping;
import org.springframework.web.bind.annotation.RestController;

@RestController
public class YamlTestController {

    /*
    //获取普通数据
    @Value("${name}")
    private String name;

    @RequestMapping("/say")
    public String sayName() {
        return "name:" + name;
    }*/

    //获取对象的属性值
    @Value("${person.name}")
    private String name;
    @Value("${person.age}")
    private Integer age;
    @Value("${person.sex}")
    private String sex;

    @RequestMapping("/hello")
    public String helloPerson(){

        return "person[name: "+name+",age: "+age+",sex: "+sex+"]";
    }
}
2)使用@ConfigurationProperties 注解映射
package com.demo.controller;

import org.springframework.boot.context.properties.ConfigurationProperties;
import org.springframework.web.bind.annotation.RequestMapping;
import org.springframework.web.bind.annotation.RestController;

@RestController
@ConfigurationProperties(prefix = "person")
public class ConfigurationPropertiesTestController {

    private String name;
    private Integer age;
    private String sex;

    @RequestMapping("/hi")
    public String hiPerson(){

        return "person[name: "+name+",age: "+age+",sex: "+sex+"]";
    }

    public String getName() {

        return name;
    }
    public void setName(String name) {

        this.name = name;
    }
    public Integer getAge() {

        return age;
    }
    public void setAge(Integer age) {

        this.age = age;
    }
    public String getSex() {

        return sex;
    }
    public void setSex(String sex) {

        this.sex = sex;
    }
}
六、SpringBoot的WEB开发
1. Springboot和freemarker的集成
1)添加依赖
    1.8


    org.springframework.boot
    spring-boot-starter-parent
    1.5.6.RELEASE


        org.springframework.boot
        spring-boot-starter-web


        org.springframework.boot
        spring-boot-starter-freemarker


        org.springframework.boot
        spring-boot-devtools


            org.springframework.boot
            spring-boot-maven-plugin
2)创建模板hello.ftl
<!DOCTYPE html PUBLIC "-//W3C//DTD HTML 4.01 Transitional//EN" "http://www.w3.org/TR/html4/loose.dtd">
<html>
<head>
<meta http-equiv="Content-Type" content="text/html; charset=UTF-8">
<title>Insert title here</title>
</head>
<body>
<h1>${
     msg}</h1>
</body>
</html>
3)编写Controller层FreemarkerController
@Controller
public class FreemarkerController {


@RequestMapping("hello")
public String hello(Model model){

    model.addAttribute("msg","hello 我是 freemarker");
    return "hello";
}
}
4)运行启动类App.java
//运行main
@SpringBootApplication
public class App {

public static void main(String[] args) {

    SpringApplication.run(App.class, args);
}
}
Springboot对freemarker的配置:
1,spring.freemarker.enabled=true:是否开启freemarker支持;
2,spring.freemarker.allow-request-override:是否允许request中的属性覆盖model中同名属性;默认false;
3,spring.freemarker.allow-session-override:是否允许session中的属性覆盖model中同名属性;默认false;
4,spring.freemarker.cache:是否支持模板缓存;默认false;
5,spring.freemarker.charset=UTF-8:模板编码
6,spring.freemarker.content-type=text/html:模板contenttype;
7,spring.freemarker.expose-request-attributes:是否开启request属性expose,默认false;
8,spring.freemarker.expose-session-attributes:是否开启session属性expose,默认false;
9,spring.freemarker.expose-spring-macro-helpers:是否开启spring的freemarker宏支持;默认为false;
10,spring.freemarker.prefer-file-system-access:默认为true,支持实时检查模板修改;
11,spring.freemarker.prefix:加载模板时候的前缀;
12,spring.freemarker.settings.*:直接配置freemarker参数
13,spring.freemarker.suffix:模板文件后缀;
14,spring.freemarker.template-loader-path=classpath:/templates/:模板加载地址
一般application.properties文件会加入以下配置
spring.freemarker.charset=UTF-8
spring.freemarker.content-type=text/html;charset=UTF-8
spring.freemarker.expose-session-attributes=true
2. Springboot集成Mybatis
mybatis集成:
使用mybatis-spring-boot-starter来完成mybatis集成;
1)引入依赖
<dependency>
	<groupId>org.mybatis.spring.boot</groupId>
	<artifactId>mybatis-spring-boot-starter</artifactId>
	<version>1.3.0</version>
</dependency>
2)正常完成mapper接口和mapper.xml
3)mybatis-spring-boot-starter提供了以下配置(具体参考MyBatisProperties对象):
mybatis.configLocation:mybatis的配置文件地址;
mybatis.mapperLocations:映射文件地址;
mybatis.typeAliasesPackage:别名扫描包;
spring.datasource.username=root
spring.datasource.password=123456
spring.datasource.url=jdbc:mysql:///p2p
spring.datasource.driverClassName=com.mysql.jdbc.Driver
spring.datasource.initialSize=3
spring.datasource.type=com.alibaba.druid.pool.DruidDataSource
mybatis.mapperLocation=classpath:com/jd/springboot/mybatis3/*Mapper.xml
mybatis.typeAliasesPackage=com.jd.springboot.mybatis3
4)使用@MapperScan标签扫描mapper接口
@SpringBootApplication
@MapperScan(basePackages="com.jd.springboot.mybatis3")
 public class App {

public static void main(String[] args) {

    SpringApplication.run(App.class, args);
}
}
3. Springboot错误统一处理(@ControllerAdvice)
1)@ControllerAdvice
通过使用@ControllerAdvice定义统一的异常处理类,而不是在每个Controller中逐个定义。@ExceptionHandler用来定义函数针对的异常类型。
定义统一异常处理类GlobalExceptionHandler.java
@ControllerAdvice
public class GlobalExceptionHandler {

    //@ExceptionHandler(logicException.class)也可以分情况处理异常
@ExceptionHandler(Exception.class)
public String errorHandler(Model model, Exception e) {

    model.addAttribute("error", e.getMessage());
    //到模板找到err.ftl将错误信息显示出来
    return "err";
    }
}
2)统一的异常页面
① SpringBoot默认情况下,把所有错误都重新定位到/error这个处理路径上,由BasicErrorController类完成处理;
② SpringBoot提供了默认的替换错误页面的路径:
-
静态错误页面默认结构:(按照这个目录结构放置错误页面报错时就会自动找到相应的界面)
src/ resources/public/error/404.html
src/ resources/public/error/ 403.html
src/ resources/public/error/ 5xx.html -
也可以使用模板页面:
src/resources/templates/error/5xx.ftl
该路径方式是通过ErrorMvcAutoConfiguration中的DefaultErrorViewResolver完成的;

