windows下使用libtorch对yolov5模型重构(CPU和GPU双版本)
首先是对项目的环境配置
win10
libtorch1.6 debug版本 使用release或者gpu版本的自己设置就可以
opencv4.1
libtorch下载网址
https://download.pytorch.org/libtorch/cu101/libtorch-win-shared-with-deps-1.6.0%2Bcu101.zip一、使用CPU版本
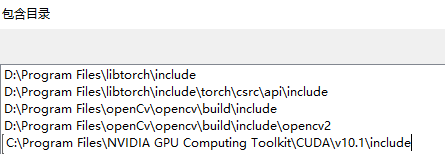
1.将opencv和libtorch的包含目录
2 第二步引入库目录
3 第三步骤引入动态链接库 这里列一个清单 其实libtorch只要三个就可以 加上opencv的dll一个四个 可以自己选择
c10.lib
asmjit.lib
caffe2_detectron_ops_gpu.lib
torch.lib
torch_cpu.lib
opencv_world410d.lib
注意这里使用的是debug版本的libtorch,如果选择发现版本的需要自己在另外设置
4 使用c++版本的yolov5 代码github上有很多,大家可以自己去下载
main.cpp
#include
#include
#include "torch/script.h"
#include"detector.h"

const int input_image_size = 416;
const std::string weights = "E:/best.torchscript.pt";
const float conf_threshold = 0.4;
const float iou_thres = 0.5;
const bool view_img = true;
using namespace cv;

std::vector LoadNames(const std::string& path)
{
	std::vector class_names;
	std::ifstream inflie(path);
	if (inflie.is_open())
	{
		std::string line;
		while (getline(inflie, line))
		{
			class_names.emplace_back(line);
		}
	}
	else
	{
		std::cerr<< "Error loading the class names!\n";
	}
	return class_names;
}

void Demo(cv::Mat& img,
	const std::vector& detections,
	const std::vector& class_names,
	bool label = true) {
	for (const auto& detection : detections) {
		const auto& box = detection.bbox;
		float score = detection.score;
		int class_idx = detection.class_idx;

		cv::rectangle(img, box, cv::Scalar(0, 0, 255), 2);

		if (label) {
			std::stringstream ss;
			ss << std::fixed << std::setprecision(2) << score;
			std::string s = class_names[class_idx] + " " + ss.str();

			auto font_face = cv::FONT_HERSHEY_DUPLEX;
			auto font_scale = 1.0;
			int thickness = 1;
			int baseline = 0;
			auto s_size = cv::getTextSize(s, font_face, font_scale, thickness, &baseline);
			cv::rectangle(img,
				cv::Point(box.tl().x, box.tl().y - s_size.height - 5),
				cv::Point(box.tl().x + s_size.width, box.tl().y),
				cv::Scalar(0, 0, 255), -1);
			cv::putText(img, s, cv::Point(box.tl().x, box.tl().y - 5),
				font_face, font_scale, cv::Scalar(255, 255, 255), thickness);
		}
	}

	cv::namedWindow("Result", cv::WINDOW_AUTOSIZE);
	cv::imshow("Result", img);
	cv::waitKey(0);
}

int main(int argc, const char* argv[])
{
	/*if (argc != 2)
	{
		std::cout << "usage-app";
		return -1;
	}*/

	//选择cpu或gpu
	torch::DeviceType device_type;
	if (torch::cuda::is_available())
	{
		device_type = torch::kCUDA;
	}
	else
	{
		device_type = torch::kCPU;
	}
	//device_type = torch::kCPU;
	torch::Device device(device_type);

	//std::vector class_name = LoadNames();
	//load input image
	Mat src = imread("D:/2/labelImg/new/314.png");
	if (src.empty()) {
		std::cout << "img empty" << std::endl;
		return -1;
	}
	//load net
	auto detceter = Detector(weights, device_type);


	std::vector class_names = LoadNames("D:/cppProject/my_yolov5/my_yolov5/coco.names");

	//run once to warm up
	std::cout << "run once to warm up" << std::endl;
	auto tmp_img = cv::Mat::zeros(src.rows, src.cols, CV_32F);
	//后面两个参数分别是置信度和iou参数
	detceter.Run(tmp_img, 1.0f, 1.0f);

	auto result = detceter.Run(src, conf_threshold, iou_thres);
	if (view_img)
	{
		Demo(src, result, class_names);
	}
	Demo(src, result, class_names);
	cv::destroyAllWindows();
	cv::waitKey(0);
	return 0;
}
5 接下来将yolov5 Python训练好的权重转换下,方式在yolov5的官方代码中export.py中,自己设置好路径
best.pt是自己训练好的模型,转换后生成一个best.torchscript.pt
6 在main.cpp中设置好路径,然后接可以起飞了
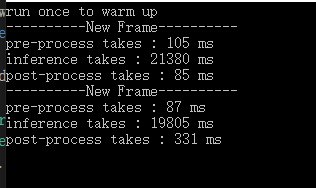
检测结果图
二、更新加入GPU版本
使用gpu版本需要将训练好的模型转换为对用的cuda版本,将模型转换以后,直接调用
1 在vs2019中分别加入libtorch、opencv、cuda的include、lib和对应的依赖文件即可
include
库文件
对应的依赖文件、为了防止意外这里我全部加了进去
asmjit.lib
c10.lib
c10_cuda.lib
caffe2_module_test_dynamic.lib
caffe2_detectron_ops_gpu.lib
caffe2_nvrtc.lib
clog.lib
cpuinfo.lib
dnnl.lib
fbgemm.lib
libprotobufd.lib
libprotobuf-lited.lib
libprotocd.lib
mkldnn.lib
torch.lib
torch_cpu.lib
torch_cuda.lib
kernel32.lib
opencv_world410d.lib
user32.lib
gdi32.lib
winspool.lib
comdlg32.lib
advapi32.lib
shell32.lib
ole32.lib
oleaut32.lib
uuid.lib
odbc32.lib
odbccp32.lib
cublas.lib
cuda.lib
cudadevrt.lib
cudart.lib
cudart_static.lib
OpenCL.lib
2 windows下可能默认走cpu,需要在链接器的命令行中加入
/INCLUDE:?warp_size@cuda@at@@YAHXZ
3 以上步骤操作完即可成功
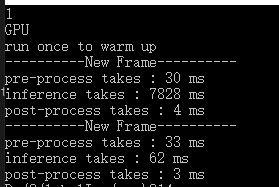
直接运行输出结构


