Window与WindowManager
相关类:
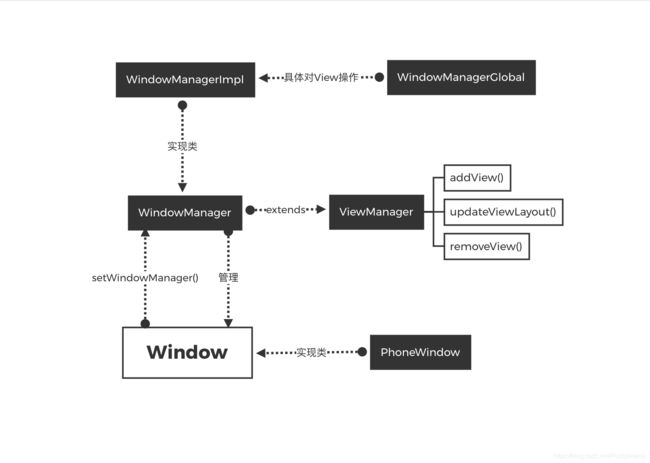
- Window:是一个抽象类,只是一个概念并不实际存在,唯一实现类是PhoneWindow,其对View进行管理
- WindowManager:一个接口类,继承自ViewManager,字面意思对Window进行管理,实际上是对View进行添加,删除及更新操作.实现类是WindowManagerImpl
/**
  * code 1
  */
public interface ViewManager
{

    public void addView(View view, ViewGroup.LayoutParams params);
    public void updateViewLayout(View view, ViewGroup.LayoutParams params);
    public void removeView(View view);
}
- WindowManagerService(WMS):实际对View进行处理的类,通过IPC与WindowManager进行通信
Activity通过ActivityThread中的performLaunchActivity()方法完成整个启动流程,并通过ClassLoader类加载器创建Activity的实例,并调用attach方法关联其运行过程所依赖的一系列上下文环境变量:
frameworks/base/core/java/android/app/ActivityThread.java
/**
  * code 2
  */
private Activity performLaunchActivity(ActivityClientRecord r, Intent customIntent) {

	ContextImpl appContext = createBaseContextForActivity(r);
    Activity activity = null;
    java.lang.ClassLoader cl = appContext.getClassLoader();
    activity = mInstrumentation.newActivity(cl, component.getClassName(), r.intent);
    if (activity != null) {

    	Window window = null;
    	//如果保存Activity信息的ActivityClientRecord实例中mPendingRemoveWindow不为空,则使用使用已保存的window对象
	    if (r.mPendingRemoveWindow != null && r.mPreserveWindow) {

	        window = r.mPendingRemoveWindow;
	        r.mPendingRemoveWindow = null;
	        r.mPendingRemoveWindowManager = null;
	    }
	    appContext.setOuterContext(activity);
	    activity.attach(appContext, this, getInstrumentation(), r.token,
	                        r.ident, app, r.intent, r.activityInfo, title, r.parent,
	                        r.embeddedID, r.lastNonConfigurationInstances, config,
	                        r.referrer, r.voiceInteractor, window, r.configCallback);
    }
}
- ActivityClientRecord中的mPendingRemoveWindow只在handleDestroyActivity方法中出现过赋值代码,而用于判断的mPreserveWindow(是否保留window)则出现在handleRelaunchActivity方法中,relaunch也就是先销毁再启动,将mPreserveWindow改为true,再调用handleDestroyActivity把延迟销毁的window和wms对象进行保存,然后将Activity销毁,最后调用handleLaunchActivity,走performLaunchActivity方法重新拉起Activity,这时就走到了上面这段代码,attach方法中的window对象就由刚才销毁Activity后保存的window对象赋值.
/**
 *  code 3
 *  此处ActivityThread会回调Activitiy的onDestroy方法
 */
private void handleDestroyActivity(IBinder token, boolean finishing,
            int configChanges, boolean getNonConfigInstance) {

            ...
            if (r.activity.mWindowAdded) {

                    if (r.mPreserveWindow) {

                        // 延迟移除window和wms对象,直到新Activity中的window被添加
                        r.mPendingRemoveWindow = r.window;
                        r.mPendingRemoveWindowManager = wm;
                        // We can only keep the part of the view hierarchy that we control,
                        // everything else must be removed, because it might not be able to
                        // behave properly when activity is relaunching.
                        r.window.clearContentView();
                    } else {

                        wm.removeViewImmediate(v);
                    }
            ...
	}
- 那么如果是正常的启动Activity呢?attach方法中传参window将为空,现在走进attach方法,可以看到Window的具体实现类就是PhoneWindow,PhoneWindow直接在attach方法中创建实例,并设置回调接口,在Callback接口中有诸如dispatchTouchEvent,onAttachToWindow等方法
/**
  * code 4
  */
final void attach(Context context, ActivityThread aThread,
            Instrumentation instr, IBinder token, int ident,
            Application application, Intent intent, ActivityInfo info,
            CharSequence title, Activity parent, String id,
            NonConfigurationInstances lastNonConfigurationInstances,
            Configuration config, String referrer, IVoiceInteractor voiceInteractor,
            Window window, ActivityConfigCallback activityConfigCallback) {

    attachBaseContext(context);

    mFragments.attachHost(null /*parent*/);

	mWindow = new PhoneWindow(this, window, activityConfigCallback);
	mWindow.setWindowControllerCallback(this);
	mWindow.setCallback(this);
	mWindow.setOnWindowDismissedCallback(this);
	...
	mWindow.setWindowManager(
                (WindowManager)context.getSystemService(Context.WINDOW_SERVICE),
                mToken, mComponent.flattenToString(),
                (info.flags & ActivityInfo.FLAG_HARDWARE_ACCELERATED) != 0);
	...
在attach方法中直接实例化了PhoneWindow,并在下面的setWindowManager方法为Window设置WindowManager,此方法在PhoneWindow父类Window中:
frameworks/base/core/java/android/view/Window.java
	/**
	  * code 5
	  */
    public void setWindowManager(WindowManager wm, IBinder appToken, String appName,
            boolean hardwareAccelerated) {

        mAppToken = appToken;
        mAppName = appName;
        mHardwareAccelerated = hardwareAccelerated
                || SystemProperties.getBoolean(PROPERTY_HARDWARE_UI, false);
        if (wm == null) {

            wm = (WindowManager)mContext.getSystemService(Context.WINDOW_SERVICE);
        }
        mWindowManager = ((WindowManagerImpl)wm).createLocalWindowManager(this);
    }
如果传入的WindowManager为空,则通过mContext.getSystemService(Context.WINDOW_SERVICE)来获取,此处Context实现类是ContextImpl,为什么呢?这里要先找到Activity实例化的地方,也就是ActivityThread的performLaunchActivity方法,即文章的第一段代码code1,其中第一行代码:
ContextImpl appContext = createBaseContextForActivity(r);
/**
  * code 6
  */
private ContextImpl createBaseContextForActivity(ActivityClientRecord r) {

        final int displayId;
        try {

            displayId = ActivityManager.getService().getActivityDisplayId(r.token);
        } catch (RemoteException e) {

            throw e.rethrowFromSystemServer();
        }
		//annotation 1
        ContextImpl appContext = ContextImpl.createActivityContext(
                this, r.packageInfo, r.activityInfo, r.token, displayId, r.overrideConfig);

        final DisplayManagerGlobal dm = DisplayManagerGlobal.getInstance();
        // For debugging purposes, if the activity's package name contains the value of
        // the "debug.use-second-display" system property as a substring, then show
        // its content on a secondary display if there is one.
        String pkgName = SystemProperties.get("debug.second-display.pkg");
        if (pkgName != null && !pkgName.isEmpty()
                && r.packageInfo.mPackageName.contains(pkgName)) {

            for (int id : dm.getDisplayIds()) {

                if (id != Display.DEFAULT_DISPLAY) {

                    Display display =
                            dm.getCompatibleDisplay(id, appContext.getResources());
                    appContext = (ContextImpl) appContext.createDisplayContext(display);
                    break;
                }
            }
        }
        return appContext;
    }
这里appContext是ClassLoader获取的来源,而Activity又是通过类加载器生成,也就是说Activity中的context来源于ContextImpl的
createActivityContext方法,即注释1,看到这里也就明白了getSystemService的来源,让我们继续顺着ContextImpl往下看
frameworks/base/core/java/android/app/ContextImpl.java
/**
  * code 7
  */
@Override
public Object getSystemService(String name) {

        return SystemServiceRegistry.getSystemService(this, name);
    }
这里会调用SystemServiceRegistry.getSystemService(this, name),点进这个类会发现这个类是管理所有可以被返回也就是可以被调用的系统服务
frameworks/base/core/java/android/app/SystemServiceRegistry.java
private static final HashMap<String, ServiceFetcher<?>> SYSTEM_SERVICE_FETCHERS =
            new HashMap<String, ServiceFetcher<?>>();
/**
  * code 8
  */
public static Object getSystemService(ContextImpl ctx, String name) {

        ServiceFetcher<?> fetcher = SYSTEM_SERVICE_FETCHERS.get(name);
        return fetcher != null ? fetcher.getService(ctx) : null;
    }
查看代码发现,getSystemService传入的name相当于key,还记得传入的是什么吗?
Context.WINDOW_SERVICE
public static final String WINDOW_SERVICE = "window";
也就是说当我们传入对应的上下文及key时会返回给我们fetcher.getService方法返回的对象,那"window"返回的是什么呢?已知systemservice来源于名为SYSTEM_SERVICE_FETCHERS的HashMap,那么全局查找该map的put方法,定位如下:
/**
  * code 9
  */
private static <T> void registerService(String serviceName, Class<T> serviceClass,
            ServiceFetcher<T> serviceFetcher) {

        SYSTEM_SERVICE_NAMES.put(serviceClass, serviceName);
        SYSTEM_SERVICE_FETCHERS.put(serviceName, serviceFetcher);
    }
查找registerService方法的调用发现,SystemServiceRegistry存在一个静态代码块,里面通过registerService方法注册了所有的系统服务,而我们要找的WINDOW_SERVICE就在其中:
/**
  * code 10
  */
static {

	registerService(Context.WINDOW_SERVICE, WindowManager.class,
	                new CachedServiceFetcher<WindowManager>() {

	            @Override
	            public WindowManager createService(ContextImpl ctx) {

	                return new WindowManagerImpl(ctx);
	            }});
}
CachedServiceFetcher是一个抽象类,真正返回的是WindowManagerImpl,也就是说getSystemService(Context.WINDOW_SERVICE)最终返回的是WindowManagerImpl对象,这样我们结束ContextImpl及SystemServiceRegistry源码的查看,重新返回到Window抽象类的setWindowManager方法中,也就是code 5,在获得WindowManagerImpl对象后继续向下走,会发现调用了createLocalWindowManager方法,点进去看看
frameworks/base/core/java/android/view/WindowManagerImpl.java
/**
  * code 11
  */
public WindowManagerImpl createLocalWindowManager(Window parentWindow) {

        return new WindowManagerImpl(mContext, parentWindow);
}

private WindowManagerImpl(Context context, Window parentWindow) {

        mContext = context;
        mParentWindow = parentWindow;
}
这里还是实例化了一个WindowManagerImpl,和前面的区别在于SystemServiceRegistry静态代码块中实例化的WindowManagerImpl构造函数只有上下文,而这次构造方法中传入了Window,也就是说WindowManagerImpl持有了Window的引用,这样的话就可以在window中进行增加删除view的操作了,接下来看addView方法:
/**
  * code 12
  */
private final WindowManagerGlobal mGlobal = WindowManagerGlobal.getInstance();

@Override
public void addView(@NonNull View view, @NonNull ViewGroup.LayoutParams params) {

	applyDefaultToken(params);
	mGlobal.addView(view, params, mContext.getDisplay(), mParentWindow);
}
- 本以为WindowManagerImpl就是终点,没想到真正对View操作的并不是它,而是WindowManagerGlobal,这里通过单例模式获取其实例,并对view进行实际操作
到目前为止,我们可以大概梳理一下Window与WindowManager之间的关系:
- PhoneWindow继承于Window抽象类,本质上也是View.其内部通过setWindowManager方法与WindowManager产生关联(实例化WindowManagerImpl)
- ViewManager接口内部有对view进行添加删除更新的方法,WindowManager继承ViewManager,WindowManagerImpl又继承WindowManager
- Window与WindowManager产生关联,最后也就是两者的实现类PhoneWindow与WindowManagerImpl绑定
- 在WindowManagerImpl内部实际处理view的其实是WindowManagerGlobal(桥接模式)
参考:
- http://liuwangshu.cn/framework/wm/1-windowmanager.html
- https://blog.csdn.net/weixin_41101173/article/details/79685305
- https://blog.csdn.net/tonyandroid1984/article/details/71046368
- Android开发艺术探索
