CPU利用率高的定位思路和方法
1. top命令
通过top命令,可以快速查看各cpu利用率,以及进程按利用率从高到底排列的列表。
输入top回车,然后按键盘数字1。
[root@cpe ~]# top
top - 10:55:00 up 2 days, 23:41,  5 users,  load average: 1.03, 0.65, 0.31
Tasks: 120 total,   2 running, 118 sleeping,   0 stopped,   0 zombie
%Cpu0  :  0.0 us,  0.3 sy,  0.0 ni, 99.7 id,  0.0 wa,  0.0 hi,  0.0 si,  0.0 st
%Cpu1  :100.0 us,  0.0 sy,  0.0 ni,  0.0 id,  0.0 wa,  0.0 hi,  0.0 si,  0.0 st
KiB Mem :  1909524 total,    94268 free,  1295204 used,   520052 buff/cache
KiB Swap:  2097148 total,  2069500 free,    27648 used.   379788 avail Mem

  PID USER      PR  NI    VIRT    RES    SHR S  %CPU %MEM     TIME+ COMMAND
57231 root      20   0    4208    352    280 R 100.0  0.0   4:51.40 a.out
57286 root      20   0  162004   2260   1556 R   0.3  0.1   0:00.03 top
    1 root      20   0  191052   2924   1696 S   0.0  0.2   0:24.82 systemd
    2 root      20   0       0      0      0 S   0.0  0.0   0:00.13 kthreadd
    3 root      20   0       0      0      0 S   0.0  0.0   0:33.62 ksoftirqd/0
    7 root      rt   0       0      0      0 S   0.0  0.0   0:01.80 migration/0
    8 root      20   0       0      0      0 S   0.0  0.0   0:00.00 rcu_bh
    9 root      20   0       0      0      0 S   0.0  0.0   0:09.73 rcu_sched
   10 root      rt   0       0      0      0 S   0.0  0.0   0:04.97 watchdog/0
   11 root      rt   0       0      0      0 S   0.0  0.0   0:05.33 watchdog/1
   12 root      rt   0       0      0      0 S   0.0  0.0   0:00.95 migration/1
   13 root      20   0       0      0      0 S   0.0  0.0   0:00.91 ksoftirqd/1
   17 root      20   0       0      0      0 S   0.0  0.0   0:00.00 kdevtmpfs
   18 root       0 -20       0      0      0 S   0.0  0.0   0:00.00 netns
   19 root      20   0       0      0      0 S   0.0  0.0   0:00.14 khungtaskd
   20 root       0 -20       0      0      0 S   0.0  0.0   0:00.00 writeback
   21 root       0 -20       0      0      0 S   0.0  0.0   0:00.00 kintegrityd
   22 root       0 -20       0      0      0 S   0.0  0.0   0:00.00 bioset
   23 root       0 -20       0      0      0 S   0.0  0.0   0:00.00 kblockd
   24 root       0 -20       0      0      0 S   0.0  0.0   0:00.00 md
   30 root      20   0       0      0      0 S   0.0  0.0   0:06.64 kswapd0
   31 root      25   5       0      0      0 S   0.0  0.0   0:00.00 ksmd
   32 root      39  19       0      0      0 S   0.0  0.0   0:01.97 khugepaged
我们通过查看top结果,来初步进行问题判断。
1.1 kswapd0 进程占用cpu过高
如果是kswapd0占用cpu过高,大多数情况下是系统内存不足,于是kswapd0进程频繁操作swap分区与内存换页操作交换数据,导致CPU占用过高。
这种情况下我们需要查看内存占用情况,并做相应处理。内存占用下降后,cpu利用率自然就降下来了。
1.2 ksoftirqd 进程占用cpu过高
这种一般是软中断处理太多,在软中断中处理不了的部分,转由ksoftirqd来处理。
想要确认是那些中断处理占用cpu过高,需要perf工具进一步分析。
1.3 特定应用进程或者脚本占用cpu过高
这时需要分析进程或脚本是否存在异常逻辑,导致cpu占用过高。
如果从代码层面无法确认,则需要perf工具进一步分析。
例如我们top显示cpu1利用率100%,通过查看发现进程a.out占用了100%的cpu。这时就需要查看a.out相关代码,确认是否存在bug。
2. perf命令
perf是一款Linux性能分析工具,它的功能非常全面。我们主要使用它来做性能分析。
2.1 使用perf top对cpu进行性能分析
以下是对cpu0进行性能分析的展示,它能显示出各模块具体函数占用的cpu比例。
[root@localhost ~]# perf top -C 1 -e cpu-clock
PS:
部分平台上perf会引起奇怪的crash。使用 -e cpu-clock 参数可以避免这个问题。
通过查看perf top可以看到那个具体函数的执行占用了最多的cpu利用率。然后分析该函数,确认是代码BUG还是性能瓶颈。
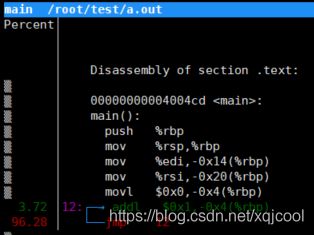
在Annotate中,我们可以看到函数中具体那些汇编指令占用的cpu比例最高。确定性能瓶颈,然后再考虑如何优化。
例如图片中显示a.out进程的main函数中,存在死循环,占用了95%以上的cpu处理时间。
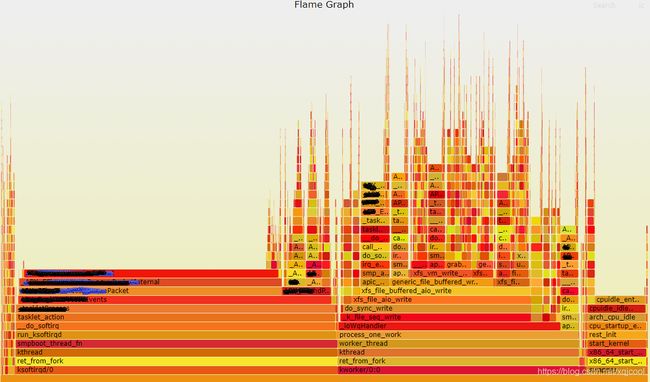
2.2 使用perf 火焰图进行性能分析
perf 火焰图反映了一段时间内用户程序/内核模块在 CPU 上运行的热点,其绘制原理是对 Perf 采集到的 samples 进行解析,对函数调用栈进行归纳合并,以柱状图的形式呈现出来。
这里需要使用到FlameGraph辅助工具。下载地址:https://github.com/brendangregg/FlameGraph.git
生成火焰图需要分为两部分操作:
第一部分在问题设备上进行执行
//记录10s中cpu0的性能数据
[root@localhost ~]# perf record -C 1 -e cpu-clock -g sleep 10
[ perf record: Woken up 4 times to write data ]
[ perf record: Captured and wrote 1.124 MB perf.data (6321 samples) ]
//生成perf.folded
[root@localhost ~]# perf script -i perf.data > perf.folded
第二部分在下载了FlameGraph的设备上执行
[root@localhost FlameGraph]# ./stackcollapse-perf.pl perf.folded > perf.unfold
[root@localhost FlameGraph]# ./flamegraph.pl perf.unfold > perf.svg
这时就可以用浏览器直接打开perf.svg火焰图文件了。

从火焰图上可以很直观的看到各函数占用cpu比例,以及栈的调用层级,配合perf top,可以更好的定位一些公共函数占用cpu高的问题,然后进行性能优化。
3. 中断亲和性调整
现网环境大多是多核设备,在实际应用中经常出现cpu利用率不均衡问题。
此时我们需要调整网卡中断亲和性,尽量使各cpu负载相对平均,避免部分cpu利用率很高,而其他cpu利用率空闲的情况。
3.1 关闭 irqbalance 服务
因为irqbalance会动态调整中断亲和性,可能会造成中断自动漂移,影响性能稳定,所以我们需要将其关闭。
//查看irqbalance进程
[root@localhost ~]#ps aux|grep irqbalance
root       663  0.0  0.0  21672   972 ?        Ss   Aug23   0:18 /usr/sbin/irqbalance --foreground
//停止irqbalance服务
[root@localhost ~]# systemctl stop irqbalance
//关闭irqbalance服务
[root@localhost ~]# systemctl disable irqbalance
Removed symlink /etc/systemd/system/multi-user.target.wants/irqbalance.service.
3.2 查看中断分配/proc/interrupts
通过查看/proc/interrupts,我们可以知道网卡收发对应的中断号。
[root@localhost ~]# cat /proc/interrupts
            CPU0       CPU1       CPU2       CPU3
   0:         83          0          0          0   IO-APIC-edge      timer
   1:          2          0          0          0   IO-APIC-edge      i8042
   4:       7825          0          0          0   IO-APIC-edge      serial
   5:          0          0          0          0   IO-APIC-edge      parport0
   8:          0          0          0          0   IO-APIC-fasteoi   rtc0
   9:          0          0          0          0   IO-APIC-fasteoi   acpi
  12:          4          0          0          0   IO-APIC-edge      i8042
  23:         25          0          0          0   IO-APIC-fasteoi   ehci_hcd:usb1
  93:     512333      63029       1856        999   PCI-MSI-edge      0000:00:13.0
  94:     176372      40901      17014       7926   PCI-MSI-edge      i915
  95:          0          0          0          0   PCI-MSI-edge      eth0
  96:     233336      40854      20950      12253   PCI-MSI-edge      eth0-TxRx-0
  97:          5          0          0          0   PCI-MSI-edge      eth1
  98:          3          0 1024153271          0   PCI-MSI-edge      eth1-TxRx-0
  99:          2          2          0          0   PCI-MSI-edge      eth2
 100:      37336  652758795          0      13437   PCI-MSI-edge      eth2-TxRx-0
 101:          0          0          0          0   PCI-MSI-edge      eth3
 102:     222837      51264      22140      11143   PCI-MSI-edge      eth3-TxRx-0
 103:          2          2          0          0   PCI-MSI-edge      eth4
 104:         13          0          0  597077157   PCI-MSI-edge      eth4-TxRx-0
 105:          0          0          0          0   PCI-MSI-edge      eth5
 106:     221078      53075      20830      12397   PCI-MSI-edge      eth5-TxRx-0
 NMI:     114857      22488     164694     144069   Non-maskable interrupts
 LOC:  631617848  639672413  671254937  633416868   Local timer interrupts
 SPU:          0          0          0          0   Spurious interrupts
 PMI:     114857      22488     164694     144069   Performance monitoring interrupts
 IWI:    2246140    2553778    1454384    1637762   IRQ work interrupts
 RTR:          0          0          0          0   APIC ICR read retries
 RES:   10967350   10867791   22446215    8787350   Rescheduling interrupts
 CAL:      56889      31236     114202     176696   Function call interrupts
 TLB:     711378    1799520     948549    1629026   TLB shootdowns
 TRM:          0          0          0          0   Thermal event interrupts
 THR:          0          0          0          0   Threshold APIC interrupts
 DFR:          0          0          0          0   Deferred Error APIC interrupts
 MCE:          0          0          0          0   Machine check exceptions
 MCP:       2050       2050       2050       2050   Machine check polls
 ERR:          0
 MIS:          0
 PIN:          0          0          0          0   Posted-interrupt notification event
 PIW:          0          0          0          0   Posted-interrupt wakeup event
间隔几秒再cat一下,通过对比,找到中断变化值比较高的中断。
3.3 调整中断亲和度
我们通过调整网卡中断亲和度,可以将网卡的硬中断绑定在指定的cpu上,从而达到调整cpu利用率的效果。
例如:
cpu0利用率较高,cpu3利用率较低,我们想把 eth0-TxRx-0(中断号96) 的绑定迁移到cpu3上。
cpu2利用率较高,cpu1利用率较低,我们想把 eth1-TxRx-0(中断号98) 的绑定迁移到cpu1上。
我们需要做的操作如下:
//8 (2^3)表示绑定到cpu3。如果绑定cpu2,则是 4 (2^2)
[root@cpe ~]# echo 8 > /proc/irq/96/smp_affinity
//2 (2^1)表示绑定到cpu1。如果绑定cpu0,则是 1 (2^0)
[root@cpe ~]# echo 2 > /proc/irq/98/smp_affinity
通过对网卡中断亲和度的调整,我们可以使不通cpu的负载相对平均,更好地发挥设备性能。

