本文介绍Ocelot中的请求头传递(Headers Transformation),其可以改变上游request传递给下游/下游response传递给上游的header。
1、修改ValuesController
修改WebApiA和WebApiB中ValuesController.Get()方法如下:
[HttpGet]
public IEnumerable Get()
{
      var headers = Request.Headers.Select(x => $"{x.Key}:{x.Value}");
      return headers;
}
2、修改Ocelot配置,添加如下路由:
{
    "DownstreamPathTemplate": "/api/Values",
    "DownstreamScheme": "http",
    "DownstreamHostAndPorts": [
      {
          "Host": "localhost",
          "Port": 5001
      },
      {
          "Host": "localhost",
          "Port": 5002
      }
    ],
    "UpstreamPathTemplate": "/RequestHeader",
    "UpstreamHttpMethod": [
      "Get"
    ],
    "LoadBalancerOptions": {
      "Type": "RoundRobin"
    }
}
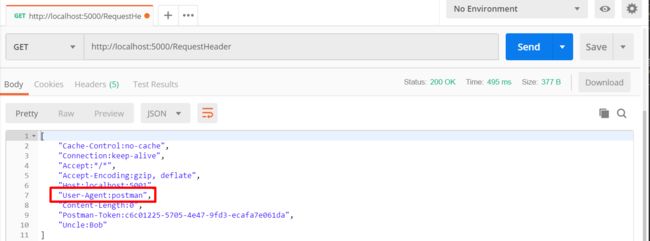
启动WebApiA、WebApiB、OcelotGetWay3个项目,然后使用Postman请求http://localhost:5000/RequestHeader
得到的response body(上游headers)如下:
上图中Host的值可能为localhost:5001或localhost:5002,因为使用了负载均衡。
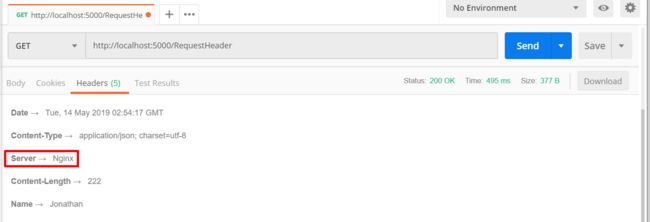
得到的response headers(下游headers)如下:
3、添加headers
修改Ocelot配置,在第2步中添加的路由中添加如下配置:
"DownstreamHeaderTransform": {
    "Name": "Jonathan"
},
"UpstreamHeaderTransform": {
    "Uncle": "Bob"
}
该配置在上游中添加了一个Uncle: Bob的header,在下游中添加了一个Name: Jonathan的header,再次请求得到的上游及下游headers如下:
可以看到我们刚才添加的headers已经出现。
4、查找和替换
修改Ocelot配置,修改上一步中添加的路由中添加的DownstreamHeaderTransform和UpstreamHeaderTransform如下:
"DownstreamHeaderTransform": {
    "Name": "Jonathan",
    "Server": "Kestrel, Nginx"
},
"UpstreamHeaderTransform": {
    "Uncle": "Bob",
    "User-Agent": "PostmanRuntime/7.11.0, postman"
}
上边的配置修改了下游返回的Server和上游发送的User-Agent,注意:有的同学使用的Postman版本不一样,所以根据自己的版本修改要替换的值。
再次请求得到的headers如下:
5、占位符
Ocelot在请求头传递中支持占位符
- {RemoteIpAddress}: 使用_httpContextAccessor.HttpContext.Connection.RemoteIpAddress.ToString()获取客户端IP
- {BaseUrl}: Ocelot的baseurl
- {DownstreamBaseUrl}: 下游服务的baseurl,当前仅支持在DownstreamHeaderTransform中使用
- {TraceId}: 使用Butterfly APM trace id,当前仅支持在DownstreamHeaderTransform中使用,本文不做介绍
6、处理302重定向
Ocelot默认遵循重定向,因此你可能会想向客户端返回Ocelot的地址而不是下游服务的地址,你可以进行如下配置来返回Location header:
"DownstreamHeaderTransform": {
    "Name": "Jonathan",
    "Server": "Kestrel, Nginx",
    "Location": "http://localhost:5000"
},
"HttpHandlerOptions": {
    "AllowAutoRedirect": false
}
再次请求得到的headers如下:
或者,添加如下配置进行替换:
"DownstreamHeaderTransform": {
    "Location": "{DownstreamBaseUrl}, {BaseUrl}"
},
 "HttpHandlerOptions": {
    "AllowAutoRedirect": false,
}
注意:该配置在我的测试下并没有生效,不知道是不是我的配置问题,后续再深入了解源码补充,此处先略过。有知道原因的同学欢迎评论。
7、X-Forwarded-For
如下是使用{RemoteIpAddress}的示例:
"DownstreamHeaderTransform": {
    "Name": "Jonathan",
    "Server": "Kestrel, Nginx",
    "X-Forwarded-For": "{RemoteIpAddress}",
    "Location": "{DownstreamBaseUrl}, {BaseUrl}"
}
请求返回如下:
8、Future
当前只支持header只有一个值的情况,但是在一些情况下一个header key会有多个值,如果能有多个值的查找和替换就会很完美:)类似如下配置:
"DownstreamHeaderTransform": {
    "Location": "[{one,one},{two,two}"
},
 "HttpHandlerOptions": {
    "AllowAutoRedirect": false,
}
官方文档的原话:
If anyone wants to have a go at this please help yourself!!
如果你需要这个功能请自己实现,哈哈哈。
源码下载


