Django 2.1.7 全文检索
全文检索
全文检索不同于特定字段的模糊查询,使用全文检索的效率更高,并且能够对于中文进行分词处理。
- haystack:全文检索的框架,支持whoosh、solr、Xapian、Elasticsearc四种全文检索引擎,点击查看官方网站。
- whoosh:纯Python编写的全文搜索引擎,虽然性能比不上sphinx、xapian、Elasticsearc等,但是无二进制包,程序不会莫名其妙的崩溃,对于小型的站点,whoosh已经足够使用,点击查看whoosh文档。
- jieba:一款免费的中文分词包,如果觉得不好用可以使用一些收费产品。
安装配置示例
1)在虚拟环境中依次安装需要的包。
pip3 install django-haystack
pip3 install whoosh
pip3 install jieba
2)修改项目的settings.py文件,安装应用haystack。
INSTALLED_APPS = [
    ...

    # Added.
    'haystack',

]
3)在项目的settings.py文件中配置搜索引擎。
在settings.py中,需要添加一个设置来指示项目的站点配置文件将存在的位置以及要使用的后端,以及该后端的其他设置。
因为这里演示是使用whoosh,所以下面是关于whoosh作为后端的示例:
HAYSTACK_CONNECTIONS = {
    'default': {
        #使用whoosh引擎
        'ENGINE': 'haystack.backends.whoosh_backend.WhooshEngine',
        #索引文件路径
        'PATH': os.path.join(BASE_DIR, 'whoosh_index'),
    }
}

#当添加、修改、删除数据时,自动生成索引
HAYSTACK_SIGNAL_PROCESSOR = 'haystack.signals.RealtimeSignalProcessor'
其他后端更多配置参考官网文档:http://docs.haystacksearch.org/en/master/tutorial.html
4)修改whoosh使用jieba中文分词
上面的默认whoosh只能够对英文单词进行分词,无法对中文语句进行分词。
例如:将 我爱中国 拆分成 我 爱 中国
jieba示例示例:
In [1]: import jieba

In [2]: str = '我爱中国'

In [4]: res = jieba.cut(str, cut_all=True)

In [5]: res
Out[5]:

In [6]: for val in res:
   ...:     print(val)
   ...:
Building prefix dict from the default dictionary ...
Dumping model to file cache C:\Users\ADMINI~1\AppData\Local\Temp\jieba.cache
Loading model cost 0.643 seconds.
Prefix dict has been built succesfully.
我
爱
中国

In [7]:
下面来改写whoosh的后端文件。
5)改写whoosh的后端库文件
- 首先需要安装号jieba的分词库
pip3 install jieba
- 找到haystack的库文件目录
因为我这次安装在虚拟环境中,所以需要到库文件中寻找。
- 打开haystack下的backends目录
在haystack/backends目录下创建ChineseAnalyzer.py文件
import jieba
from whoosh.analysis import Tokenizer, Token

class ChineseTokenizer(Tokenizer):
    def __call__(self, value, positions=False, chars=False,
                 keeporiginal=False, removestops=True,
                 start_pos=0, start_char=0, mode='', **kwargs):
        t = Token(positions, chars, removestops=removestops, mode=mode, **kwargs)
        seglist = jieba.cut(value, cut_all=True)
        for w in seglist:
            t.original = t.text = w
            t.boost = 1.0
            if positions:
                t.pos = start_pos + value.find(w)
            if chars:
                t.startchar = start_char + value.find(w)
                t.endchar = start_char + value.find(w) + len(w)
            yield t

def ChineseAnalyzer():
    return ChineseTokenizer()
- 复制whoosh_backend.py文件,改为如下名称whoosh_cn_backend.py
- 打开复制出来的新文件whoosh_cn_backend.py,引入中文分析类,内部采用jieba分词。
from .ChineseAnalyzer import ChineseAnalyzer
- 更改词语分析类。
查找
analyzer=StemmingAnalyzer()
改为
analyzer=ChineseAnalyzer()
- 修改settings.py文件中的配置项。
# 全文检索框架的配置
HAYSTACK_CONNECTIONS = {
    'default': {
        # 使用whoosh引擎
        # 'ENGINE': 'haystack.backends.whoosh_backend.WhooshEngine',
        'ENGINE': 'haystack.backends.whoosh_cn_backend.WhooshEngine',
        # 索引文件路径
        'PATH': os.path.join(BASE_DIR, 'whoosh_index'),
    }
}

# 当添加、修改、删除数据时,自动生成索引
HAYSTACK_SIGNAL_PROCESSOR = 'haystack.signals.RealtimeSignalProcessor'

# 指定搜索结果每页显示的条数
HAYSTACK_SEARCH_RESULTS_PER_PAGE=1
好了,到这里已经配置好了中文分词的全文检索。下面来看看怎么使用。
- 在项目/urls.py中添加搜索的配置。
path('search/', include('haystack.urls')), # 导入haystack应用的urls.py
创建引擎及索引
1)在应用目录下创建search_indexes.py文件。
在search_indexes.py定义一个服务器索引类。
from haystack import indexes
from assetinfo.models import ServerInfo # 服务器信息类

#指定对于某个类的某些数据建立索引
class ServerInfoIndex(indexes.SearchIndex, indexes.Indexable):
    text = indexes.CharField(document=True, use_template=True)

    def get_model(self):
        return ServerInfo

    def index_queryset(self, using=None):
        return self.get_model().objects.all()
2)在templates目录下创建"search/indexes/assetinfo/"目录,在目录中创建"serverinfo_text.txt"文件
- 在"serverinfo_text.txt"文件设置字段索引
字段索引格式如下:
#指定索引的属性
{
    {object.gcontent}}
查看一下全文索引的模型类ServerInfo
可以看到,可以使用红色框住的三个字段作为索引。
# 指定根据表中的哪些字段建立索引数据
{
    { object.server_hostname }} # 根据服务器的名称建立索引
{
    { object.server_intranet_ip }} # 根据服务器的内网IP建立索引
{
    { object.server_internet_ip }} # 根据服务器的外网IP建立索引
4)初始化索引数据。
python3 manage.py rebuild_index
5)索引生成后目录结构如下图:
使用全文检索
1)在assetinfo/views.py中定义视图query。
def query(request):
    return render(request,'assetinfo/query.html')
2)在assetinfo/urls.py中配置。
urlpatterns = [
    # ex:/assetinfo/query
    path('query', views.query , name='query'),
]
3)在templates/assetinfo/目录中创建模板query.html。
全文检索
4)自定义搜索结果模板:在templates/search/目录下创建search.html。
搜索结果进行分页,视图向模板中传递的上下文如下:
- query:搜索关键字
- page:当前页的page对象
- paginator:分页paginator对象
视图接收的参数如下:
- 参数q表示搜索内容,传递到模板中的数据为query
- 参数page表示当前页码
全文检索--结果页
搜索 {
{query}} 结果如下:
{%for item in page%}
- {
{item.object.id}}--{
{item.object.gcontent|safe}}
- {
{item.object.id}}--{
{item.object.server_hostname|safe}}
{%empty%}
- 啥也没找到
{%endfor%}
{%for pindex in page.paginator.page_range%}
{%if pindex == page.number%}
{
{pindex}}
{%else%}
{
{pindex}}
{%endif%}
{%endfor%}
5)运行服务器,在浏览器中输入如下地址:
http://127.0.0.1:8000/assetinfo/query
在文本框中填写要搜索的信息,点击”搜索“按钮。
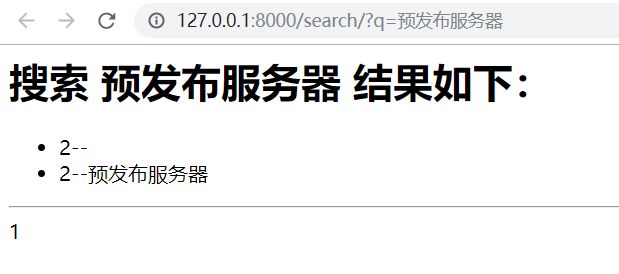
搜索结果如下:


