Hadoop 3.x安装部署详细手顺
一、准备工作
-
- Ambari、HDP版本介绍
Ambari 2.7.3仅支持HDP-3.1.0,HDP-3.0.1,HDP-3.0.0使用以下URL确定对每个产品版本的支持https://supportmatrix.hortonworks.com/,以及下载报告
![]()
![]()
-
- 工具包下载
ambari-2.7.3.0:
http://public-repo-1.hortonworks.com/ambari/centos7/2.x/updates/2.7.3.0/ambari-2.7.3.0-centos7.tar.gz
HDP-3.1.0:
http://public-repo-1.hortonworks.com/HDP/centos7/3.x/updates/3.1.0.0/HDP-3.1.0.0-centos7-rpm.tar.gz
HDP-UTILS-1.1.0.22:
http://public-repo-1.hortonworks.com/HDP-UTILS-1.1.0.22/repos/centos7/HDP-UTILS-1.1.0.22-centos7.tar.gz
JDK:1.8版本
操作系统:centos7任意版本,系统为英文,64位,内存最好每台都10G以上。
-
- 服务器防火墙关闭
-
-
- 关闭掉linux防火墙(所有机器)
-
systemctl stop firewalld.service
-
- 修改主机名及机器隐射(hosts)
-
-
- 通过vi /etc/hostname 进行修改
-
各个节点修改成相应的名称,建议使用主机名.域名.com
-
-
- 修改/etc/hosts文件(所有机器)
-
这里主要是为了可以实现通过名称来查找相应的服务器
[root@test1 ~]# cat /etc/hosts
192.168.98.35 test1.xiaoke.com test1
192.168.98.36 test2.xiaoke.com test2
192.168.98.37 test3.xiaoke.com test3
192.168.98.38 test4.xiaoke.com test4
192.168.98.39 test5.xiaoke.com test5
-
-
- 服务器的免登陆(所有机器)
-
1.4.3.1 配置ambari节点无密码登录到其他节点,master节点上操作
[root@ test1 ~]# ssh-keygen -t rsa ## 一路回车即可
将authorized_keys 复制到各节点
[root@test1 ~]# ssh-copy-id test3
/usr/bin/ssh-copy-id: INFO: attempting to log in with the new key(s), to filter out any that are already installed
/usr/bin/ssh-copy-id: INFO: 1 key(s) remain to be installed -- if you are prompted now it is to install the new keys
root@test3's password:
Number of key(s) added: 1
Now try logging into the machine, with: "ssh 'test3'"
and check to make sure that only the key(s) you wanted were added.
[root@test1 ~]# ssh-copy-id test4
/usr/bin/ssh-copy-id: INFO: attempting to log in with the new key(s), to filter out any that are already installed
/usr/bin/ssh-copy-id: INFO: 1 key(s) remain to be installed -- if you are prompted now it is to install the new keys
root@test4's password:
Number of key(s) added: 1
Now try logging into the machine, with: "ssh 'test4'"
and check to make sure that only the key(s) you wanted were added.
[root@test1 ~]# ssh-copy-id test5
/usr/bin/ssh-copy-id: INFO: attempting to log in with the new key(s), to filter out any that are already installed
/usr/bin/ssh-copy-id: INFO: 1 key(s) remain to be installed -- if you are prompted now it is to install the new keys
root@test5's password:
Number of key(s) added: 1
Now try logging into the machine, with: "ssh 'test5'"
and check to make sure that only the key(s) you wanted were added.
1.4.3.2、测试所有机器是否SSH免登陆互通
[root@test1~]#ssh test3 date;ssh test4 date;ssh test5 date;ssh test02 date;
Wed Sep 9 15:30:50 CST 2020
Wed Sep 9 15:30:51 CST 2020
Wed Sep 9 15:30:51 CST 2020
Wed Sep 9 15:30:51 CST 2020
-
- 配置jdk
进入配置JAVA环境(所以机器) 或者 修改好主机 再scp过去source /etc/profile
vi /etc/profile
JAVA_HOME=/opt/jdk1.8.0_91
export PATH=$JAVA_HOME/bin:$PATH
export CLASSPATH=.:$JAVA_HOME/lib/dt.jar:$JAVA_HOME/lib/tools.jar
使环境变量生效
source /etc/profile
-
- 时间同步配置
- ntp时间同步
- 时间同步配置
1.6.1.1搭建时钟服务器
vi /etc/ntp.conf
内容如下
restrict 0.0.0.0 mask 0.0.0.0 nomodify notrap noquery
拒绝其它主机同步
restrict 192.168.0.0 mask 255.255.0.0 nomodify
这一行的含义是授权192.168.0.0网段上的所有机器可以从这台机器上查询和同步时间。
restrict 127.0.0.1
其中parameter的参数主要有:
ignore : 拒绝所有类型的ntp连接
nomodify : 客户端不能使用ntpc与ntpq两支程式来修改服务器的时间参数
noquery : 客户端不能使用ntpq、ntpc等指令来查询服务器时间,等于不提供ntp的网络校时
notrap : 不提供trap这个远程时间登录的功能
notrust : 拒绝没有认证的客户端
nopeer : 不与其他同一层的ntp服务器进行时间同步
server 210.72.145.44 prefer
server 127.127.1.0
fudge 127.127.1.0 stratum 8
driftfile /var/lib/ntp/drift
keys /etc/ntp/keys
statsdir /var/log/ntp/
logfile /var/log/ntp/ntp.log
1.6.1.2 启动
chkconfig ntpd on
service ntpd start
service ntpd status
1.6.1.3 同步
一次同步:各主机执行命令(其他主机时间都和002主机同步):
/usr/sbin/ntpdate -u 192.168.98.35
crontab -e
0 * * * * /usr/sbin/ntpdate -u 192.168.98.35
1.6.2 chrony时间同步
1.6.2.1 配置/etc/chrony.conf、
vi /etc/chrony.conf <---- server 192.168.64.131 iburst(对应的时间同步服务器)
1.6.2.2 启动服务
systemctl restart chronyd systemctl status chronyd
1.7禁用SELinux和PackageKit将检查umask值
1.7.1禁用sellinux(所有机器)
# This file controls the state of SELinux on the system.
# SELINUX= can take one of these three values:
# enforcing - SELinux security policy is enforced.
# permissive - SELinux prints warnings instead of enforcing.
# disabled - No SELinux policy is loaded.
SELINUX=disabled
# SELINUXTYPE= can take one of three two values:
# targeted - Targeted processes are protected,
# minimum - Modification of targeted policy. Only selected processes are protected.
# mls - Multi Level S
ecurity protection.
SELINUXTYPE=targeted
主要就是把SELINUX改为disabled。
1.7.2 umask值(所有机器)
echo umask 0022 >> /etc/profile
使环境变量生效
source /etc/profile
1.8服务器的文件句柄数设置
1.8.1永久设置(所有机器)
[root@ test1~]# vi /etc/security/limits.conf
# End of file
* soft nofile 65536
* hard nofile 65536
* soft nproc 131072
* hard nproc 131072
1.8.1打开ulimit -a查看是否设置成功
core file size (blocks, -c) 0
data seg size (kbytes, -d) unlimited
scheduling priority (-e) 0
file size (blocks, -f) unlimited
pending signals (-i) 2061587
max locked memory (kbytes, -l) unlimited
max memory size (kbytes, -m) unlimited
open files (-n) 65536
pipe size (512 bytes, -p) 8
POSIX message queues (bytes, -q) 819200
real-time priority (-r) 0
stack size (kbytes, -s) 8192
cpu time (seconds, -t) unlimited
max user processes (-u) 16384
virtual memory (kbytes, -v) unlimited
file locks (-x) unlimited
1.9 yum配置
1.9.1 配置yum源
将前面下载的HDP-3.1.0.tar.gz、AMBARI-2.7.3.0.tar.gz 、HDP-UTILS-1.1.0.22.tar.gz 解压到/var/www/html/目录下,注意路径
/var/www/html/HDP-3.1.0
var/www/html/AMBARI-2.7.3.0
/var/www/html/HDP-UTILS-1.1.0.22
1.9.2 repo文件配置
[root@test1 yum.repos.d]# cat *.repo
ambari.repo 配置
[ambari-2.x]
name=Ambari 2.x
baseurl=http://192.168.98.35/AMBARI-2.7.3.0/centos7/2.7.3.0-139
gpgcheck=1
gpgkey=http://192.168.98.35/AMBARI-2.7.3.0/centos7/2.7.3.0-139/RPM-GPG-KEY/RPM-GPG-KEY-Jenkins
enabled=1
HDP-3.1.repo 配置
[HDP-3.1]
name=HDP-3.1
baseurl=http://192.168.98.35/HDP-3.1.0/centos7/3.1.0.0-78/
path=/
enabled=1
gpgcheck=0
HDP-UTILS-1.1.0.22.repo 配置
[HDP-UTILS-1.1.0.22]
name=HDP-UTILS-1.1.0.22
baseurl=http://192.168.98.35/HDP-UTILS-1.1.0.22/centos7/1.1.0.22/
path=/
enabled=1
gpgcheck =0
1.9.3 测试yum联通性
yum clean all
yum makecache
yum repolist
1.10 安装服务端
To install packages for a Kerberos server: ---服务端命令
yum install krb5-server krb5-libs krb5-auth-dialog
To install packages for a Kerberos client: ---客户端命令
yum install krb5-workstation krb5-libs krb5-auth-dialog
安装开始
yum install -y krb5-workstation krb5-libs krb5-auth-dialog
[email protected]'s password:
Loaded plugins: fastestmirror
Loading mirror speeds from cached hostfile
No package krb5-auth-dialog available.
Resolving Dependencies
--> Running transaction check
---> Package krb5-libs.x86_64 0:1.15.1-8.el7 will be updated
--> Processing Dependency: krb5-libs(x86-64) = 1.15.1-8.el7 for package: krb5-devel-1.15.1-8.el7.x86_64
--> Processing Dependency: krb5-libs(x86-64) = 1.15.1-8.el7 for package: krb5-server-1.15.1-8.el7.x86_64
--> Processing Dependency: krb5-libs(x86-64) = 1.15.1-8.el7 for package: libkadm5-1.15.1-8.el7.x86_64
---> Package krb5-libs.x86_64 0:1.15.1-34.el7 will be an update
---> Package krb5-workstation.x86_64 0:1.15.1-34.el7 will be installed
--> Running transaction check
---> Package krb5-devel.x86_64 0:1.15.1-8.el7 will be updated
---> Package krb5-devel.x86_64 0:1.15.1-34.el7 will be an update
---> Package krb5-server.x86_64 0:1.15.1-8.el7 will be updated
---> Package krb5-server.x86_64 0:1.15.1-34.el7 will be an update
---> Package libkadm5.x86_64 0:1.15.1-8.el7 will be updated
---> Package libkadm5.x86_64 0:1.15.1-34.el7 will be an update
--> Finished Dependency Resolution
Dependencies Resolved
================================================================================
Package Arch Version Repository Size
===============================================================================
Installing:
krb5-workstation x86_64 1.15.1-34.el7 c7-media 816 k
Updating:
krb5-libs x86_64 1.15.1-34.el7 c7-media 763 k
Updating for dependencies:
krb5-devel x86_64 1.15.1-34.el7 c7-media 271 k
krb5-server x86_64 1.15.1-34.el7 c7-media 1.0 M
libkadm5 x86_64 1.15.1-34.el7 c7-media 177 k
Transaction Summary
===============================================================================
Install 1 Package
Upgrade 1 Package (+3 Dependent packages)
Total download size: 3.0 M
Downloading packages:
Delta RPMs disabled because /usr/bin/applydeltarpm not installed.
--------------------------------------------------------------------------------
Total 31 MB/s | 3.0 MB 00:00
Running transaction check
Running transaction test
Transaction test succeeded
Running transaction
Updating : krb5-libs-1.15.1-34.el7.x86_64 1/9
Updating : libkadm5-1.15.1-34.el7.x86_64 2/9
Updating : krb5-devel-1.15.1-34.el7.x86_64 3/9
Installing : krb5-workstation-1.15.1-34.el7.x86_64 4/9
Updating : krb5-server-1.15.1-34.el7.x86_64 5/9
Cleanup : krb5-server-1.15.1-8.el7.x86_64 6/9
Cleanup : krb5-devel-1.15.1-8.el7.x86_64 7/9
Cleanup : libkadm5-1.15.1-8.el7.x86_64 8/9
Cleanup : krb5-libs-1.15.1-8.el7.x86_64 9/9
Verifying : krb5-devel-1.15.1-34.el7.x86_64 1/9
Verifying : krb5-libs-1.15.1-34.el7.x86_64 2/9
Verifying : libkadm5-1.15.1-34.el7.x86_64 3/9
Verifying : krb5-workstation-1.15.1-34.el7.x86_64 4/9
Verifying : krb5-server-1.15.1-34.el7.x86_64 5/9
Verifying : krb5-devel-1.15.1-8.el7.x86_64 6/9
Verifying : krb5-libs-1.15.1-8.el7.x86_64 7/9
Verifying : krb5-server-1.15.1-8.el7.x86_64 8/9
Verifying : libkadm5-1.15.1-8.el7.x86_64 9/9
Installed:
krb5-workstation.x86_64 0:1.15.1-34.el7
Updated:
krb5-libs.x86_64 0:1.15.1-34.el7
Dependency Updated:
krb5-devel.x86_64 0:1.15.1-34.el7 krb5-server.x86_64 0:1.15.1-34.el7
libkadm5.x86_64 0:1.15.1-34.el7
Complete!
1.10.1 配置文件:/etc/krb5.conf
[logging]
default = FILE:/var/log/krb5libs.log
kdc = FILE:/var/log/krb5kdc.log
admin_server = FILE:/var/log/kadmind.log
[libdefaults]
default_realm =XIAOKE.COM
dns_lookup_realm = false
dns_lookup_kdc = false
ticket_lifetime = 90d 0h 2m 0s
renew_lifetime = 500d
default_tgs_enctypes = des3-hmac-sha1
default_tkt_enctypes = des3-hmac-sha1
permitted_enctypes = des3-hmac-sha1
forwardable = true
allow_weak_crypto =true
kdc_timeout = 3000
max_retries = 3
[realms]
XIAOKE.COM = {
kdc = test1.xiaoke.com
kdc = test2.xiaoke.com
admin_server = test1.xiaoke.com
default_domain =xiaoke.com
}
[domain_realm]
. xiaoke.com = XIAOKE.COM
xiaoke.com = XIAOKE.COM
[kdc]
profile = /var/kerberos/krb5kdc/kdc.conf
1.10.2 配置文件:/var/kerberos/krb5kdc/kdc.conf
vi /var/kerberos/krb5kdc/kdc.conf
[kdcdefaults]
kdc_ports = 750,88
kdc_tcp_ports = 88
v4_mode = nopreauth
[realms]
XIAOKE.COM = {
master_key_type = des3-hmac-sha1
database_name = /var/kerberos/krb5kdc/principal
key_stash_file = /var/kerberos/krb5kdc/. XIAOKE.COM
acl_file = /var/kerberos/krb5kdc/kadm5.acl
kdc_ports = 750,88
max_life = 2d 0h 2m 0s
max_renewable_life = 500d 0h 0m 0s
dict_file = /usr/share/dict/words
admin_keytab = /var/kerberos/krb5kdc/kadm5.keytab
supported_enctypes = des3-hmac-sha1:normal arcfour-hmac:normal des-hmac-sha1:normal des-cbc-md5:normal des-cbc-crc:normal
}
1.10.3 建kerberos数据库
#配置如上2个文件后再在主机上创建数据库
#备机不需要建数据库
创建一个kerberos数据库
kerbers数据库文件都放在/var/kerberos/krb5kdc/下面
命令:
kdb5_util create -r XIAOKE.COM –s
kdb5_util 命令可以创建 KDC 数据库。此外,使用 -s 选项时,该命令会在启动 kadmind 和 krb5kdc 守护进程之前,创建一个用于向自己验证 KDC 的存储文件。
1.10.4创建超级管理用户root及kadm5.keytab文件
运行kadmin.local
执行:
| [root@test1 ~]# kadmin.local Authenticating as principal root/[email protected] with password. kadmin.local: addprinc root/admin WARNING: no policy specified for root/[email protected]; defaulting to no policy Enter password for principal "root/[email protected]": Re-enter password for principal "root/[email protected]": Principal "root/[email protected]" created. kadmin.local: ktadd -k /var/kerberos/krb5kdc/kadm5.keytab kadmin/admin kadmin/changepw Entry for principal kadmin/admin with kvno 2, encryption type aes256-cts-hmac-sha1-96 added to keytab WRFILE:/var/kerberos/krb5kdc/kadm5.keytab. Entry for principal kadmin/admin with kvno 2, encryption type aes128-cts-hmac-sha1-96 added to keytab WRFILE:/var/kerberos/krb5kdc/kadm5.keytab. Entry for principal kadmin/changepw with kvno 2, encryption type aes256-cts-hmac-sha1-96 added to keytab WRFILE:/var/kerberos/krb5kdc/kadm5.keytab. Entry for principal kadmin/changepw with kvno 2, encryption type aes128-cts-hmac-sha1-96 added to keytab WRFILE:/var/kerberos/krb5kdc/kadm5.keytab. kadmin.local: |
|
|
注:可以用kadd来增加用户的权限
注意kadm5.keytab的路径要与kdc.conf中的路径一致
验证:
| [root@test1 ~]# kinit root/admin kinit: Cannot contact any KDC for realm 'XIAOKE.COM' while getting initial credentials 错误 [root@test1 krb5kdc]# systemctl status krb5kdc.service ● krb5kdc.service - Kerberos 5 KDC Loaded: loaded (/usr/lib/systemd/system/krb5kdc.service; disabled; vendor preset: disabled) Active: inactive (dead)
Oct 20 10:29:34 test1 systemd[1]: Starting Kerberos 5 KDC... Oct 20 10:29:34 test1 systemd[1]: Started Kerberos 5 KDC. Oct 20 10:33:44 test1 systemd[1]: Stopping Kerberos 5 KDC... Oct 20 10:33:44 test1 systemd[1]: Starting Kerberos 5 KDC... Oct 20 10:33:44 test1 systemd[1]: Failed to read PID from file /var/run/krb5kdc.pid: Invalid argument Oct 20 10:33:44 test1 systemd[1]: Started Kerberos 5 KDC. Oct 20 10:41:53 test1 systemd[1]: Stopping Kerberos 5 KDC... Oct 20 10:41:53 test1 systemd[1]: Stopped Kerberos 5 KDC. [root@test1 krb5kdc]# systemctl start krb5kdc.service ----启动kdc服务 [root@test1 krb5kdc]# kinit root/admin Password for root/[email protected]: |
1.10.5新增配置:kadm5.acl
cd /var/kerberos/krb5kdc
vi kadm5.acl
以下加入配置文件
*/admin@XIAOKE.COM *
1.10.6 KDC启动服务
执行命令:
krb5kdc
kadmind
或者启动命令
systemctl start krb5kdc.service
systemctl start kadmin.service
重启命令:
systemctl restart krb5kdc.service
systemctl restart kadmin.service
1.10.7拷贝kerberos配置文件到所有主机
scp /etc/krb5.conf x.x.x.x:/etc
1.10.8主备主机配置
1、创建主机host
在主机上登录,
kadmin
addprinc -randkey host/[email protected]
ktadd host/[email protected]
会生成/etc/ krb5.keytab
klist -kt /etc/krb5.keytab
Keytab name: FILE:krb5.keytab
KVNO Timestamp Principal
---- ------------------- ------------------------------------------------------
2 10/21/2020 01:38:22 host/[email protected]
2 10/21/2020 01:38:22 host/[email protected]
2 10/21/2020 01:38:22 host/[email protected]
2 10/21/2020 01:38:22 host/[email protected]
2、创建备机host
在备机上登录,
kadmin
addprinc -randkey host/[email protected]
ktadd host/[email protected]
会生成/etc/ krb5.keytab
klist -kt /etc/krb5.keytab
Keytab name: FILE:krb5.keytab
KVNO Timestamp Principal
---- ------------------- ------------------------------------------------------
2 10/21/2020 01:38:22 host/[email protected]
2 10/21/2020 01:38:22 host/[email protected]
2 10/21/2020 01:38:22 host/[email protected]
2 10/21/2020 01:38:22 host/[email protected]
3、从机上配置以下文件
cd /var/kerberos/krb5kdc/
vi
host/[email protected]
host/[email protected]
4、将主机上的下面文件拷贝该文件到备机(一个都不能少,尤其是隐藏文件.XIAOKE.COM)
cd /var/kerberos/krb5kdc/
scp kdc.conf kadm5.acl .XIAOKE.COM kpropd.acl
5、备机启动服务
kpropd –S
ps -ef |grep kpropd
root 11204 1 0 01:44 00:00:00 kpropd –S
6、主机配置prop.sh
cd /var/kerberos/krb5kdc/
vi prop.sh
#!/bin/sh
kdclist=' test2.XIAOKE.com' #备机域名
/usr/sbin/kdb5_util dump /var/kerberos/krb5kdc/slave_datatrans
for kdc in $kdclist
do
/usr/sbin/kprop -f /var/kerberos/krb5kdc/slave_datatrans $kdc
done
chmod 700 prop.sh
crontab -e
0 0 * * * /var/kerberos/krb5kdc/prop.sh
7.执行脚本
[root@test1 krb5kdc]# systemctl restart krb5kdc.service
[root@test1 krb5kdc]# systemctl restart kadmin.service
[root@test1 krb5kdc]# sh prop.sh
Database propagation to test2.XIAOKE.com: SUCCEEDED
8、/etc/krb5.conf配置文件新增kdc备机地址
9、验证
9.1 查看备机
/var/kerberos/krb5kdc/目录下有没有生成对应的配置文件
9.2 主机停掉krb5kdc服务(无需停止kadmin进程)
systemctl stop krb5kdc.service
验证备机启动krb5kdc服务
systemctl start krb5kdc.service
建议测试方案:
首先stop主机kdc服务,在其他客户端节点使用kadmin进入库,此时无法进入,
在备机节点启动kdc服务,在其他客户端节点使用kadmin进入库,此时正常进入,
kdc主备机安装成功。
二、ambari安装
2.1 安装ambari-server
执行yum -y install ambari-server
2.1 初始化设置ambari-server并启动
-
-
- 配置文件:/etc/ambari-server/conf/ambari.properties
-
vi /etc/ambari-server/conf/ambari.properties
添加
java.home=/opt/jdk1.7.0_79
client.threadpool.size.max = 50
-
-
- 各个主机安装ambari-agent
-
安装命令:
yum install -y ambari-agent
校验版本:
ambari-agent --version
-
-
- 配置文件 /etc/ambari-agent/conf/ambari-agent.ini
-
vi /etc/ambari-agent/conf/ambari-agent.ini
修改
hostname= test1.xiaoke.com
配置文件拷贝到各个主机:
/etc/ambari-agent/conf/ambari-agent.ini /etc/ambari-agent/conf/
校验:
cat /etc/ambari-agent/conf/ambari-agent.ini|grep hostname
2.1.1 开始配置ambari
[root@test1~]# ambari-server setup
下面是配置执行流程,按照提示操作
(1) 提示是否自定义设置。输入:y
Customize user account for ambari-server daemon [y/n] (n)? y
(2)ambari-server 账号。
Enter user account for ambari-server daemon (root):
如果直接回车就是默认选择root用户
如果输入已经创建的用户就会显示:
Enter user account for ambari-server daemon (root):root ---à一定默认或者root
Adjusting ambari-server permissions and ownership...
(3)检查防火墙是否关闭
Adjusting ambari-server permissions and ownership...
Checking firewall...
WARNING: iptables is running. Confirm the necessary Ambari ports are accessible. Refer to the Ambari documentation for more details on ports.
OK to continue [y/n]
直接回车
(4)设置JDK。输入:2
Checking JDK...
Do you want to change Oracle JDK [y/n] (n)? y
[1] Oracle JDK 1.8 + Java Cryptography Extension (JCE) Policy Files 8
[2] Custom JDK
==============================================================================
Enter choice (1): 2
如果上面选择3自定义JDK,则需要设置JAVA_HOME。输入:/opt/jdk1.8.0_91
WARNING: JDK must be installed on all hosts and JAVA_HOME must be valid on all hosts.
WARNING: JCE Policy files are required for configuring Kerberos security. If you plan to use Kerberos,please make sure JCE Unlimited Strength Jurisdiction Policy Files are valid on all hosts.
Path to JAVA_HOME: /opt/jdk1.8.0_91
Validating JDK on Ambari Server...done.
Completing setup...
Checking GPL software agreement...
GPL License for LZO: https://www.gnu.org/licenses/old-licenses/gpl-2.0.en.html
Enable Ambari Server to download and install GPL Licensed LZO packages [y/n] (n)? y (如果需要安装小文件系统,选y)
Completing setup...
Configuring database...
(5)数据库配置。选择:y
Configuring database...
Enter advanced database configuration [y/n] (n)? y
(6)选择数据库类型。输入:3
Configuring database...
==============================================================================
Choose one of the following options:
[1] - PostgreSQL (Embedded)
[2] - Oracle
[3] - MySQL
[4] - PostgreSQL
[5] - Microsoft SQL Server (Tech Preview)
[6] - SQL Anywhere
==============================================================================
Enter choice (3): 1
(7)设置数据库的具体配置信息,根据实际情况输入,如果和括号内相同,则可以直接回车。如果想重命名,就输入。
Database admin user (postgres):
Database name (ambari):
Postgres schema (ambari):
Username (ambari):
Enter Database Password (bigdata):
Default properties detected. Using built-in database.
Configuring ambari database...
Checking PostgreSQL...
Configuring local database...
Configuring PostgreSQL...
Backup for pg_hba found, reconfiguration not required
Creating schema and user...
done.
Creating tables...
done.
Extracting system views...
.....
Ambari repo file doesn't contain latest json url, skipping repoinfos modification
Adjusting ambari-server permissions and ownership...
Ambari Server 'setup' completed successfully.
2.1.2 安装hive的话一定要执行
安装hive的话一定要执行
[root@test1~]# ambari-server setup --jdbc-db=mysql --jdbc-driver=/usr/share/java/mysql-connector-java.jar
启动ambari-server
ambari-server start
三、安装配置部署HDP集群
3.1 访问Ambari web页面
默认端口8080,Username:admin;Password:admin;http://192.168.98.35:8080
3.2 开始集群安装
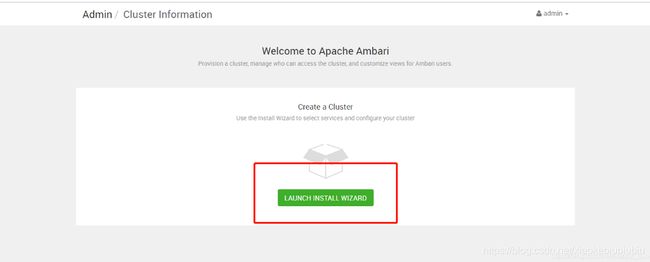
点击启用安装向导,点击开始安装
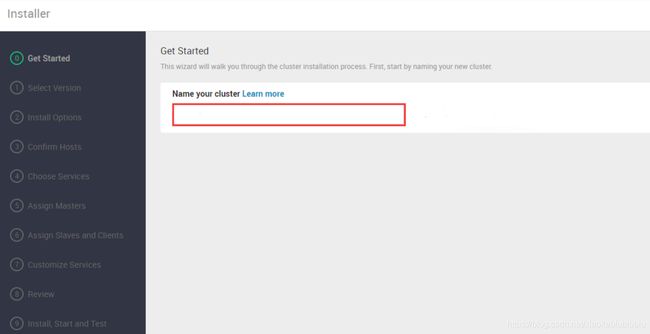
3.3 配置集群名称
尽量使用小写,不要用下划线!!!!!!!!!!!!!
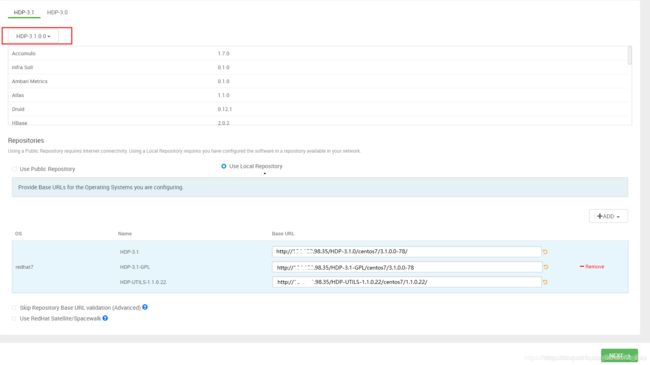
3.4 版本选择
下面的两个选项都不选
3.5 添加需要纳入集群的节点
也可以选择右边的,不用免密
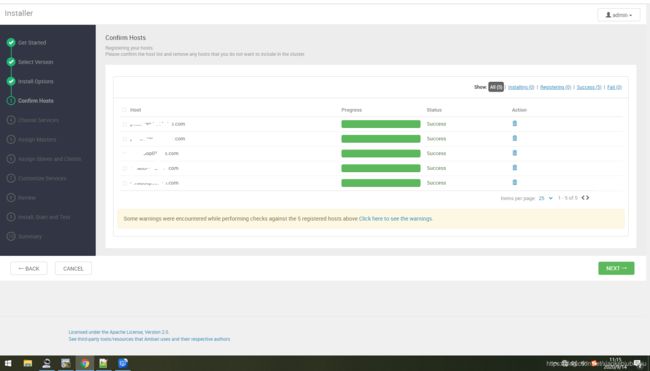
3.6 主机确认
3.7 选择需要安装的组件
3.8 资源节点分配(合理分配资源)
3.9 分配各节点需要安装的服务客户端
3.10 配置信息、设置密码、集群服务文件路径
下载集群节点服务部署信息
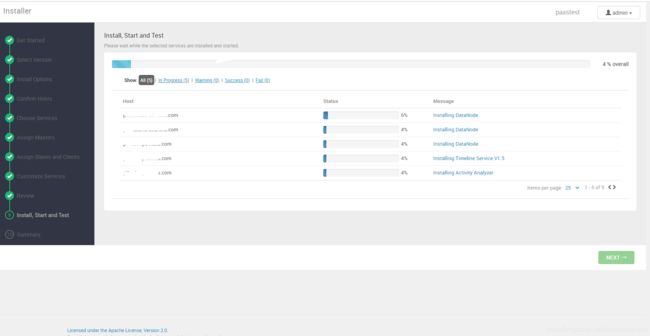
3.11 开始安装(不一定会顺利完成,一个个问题解决完再往下一步)
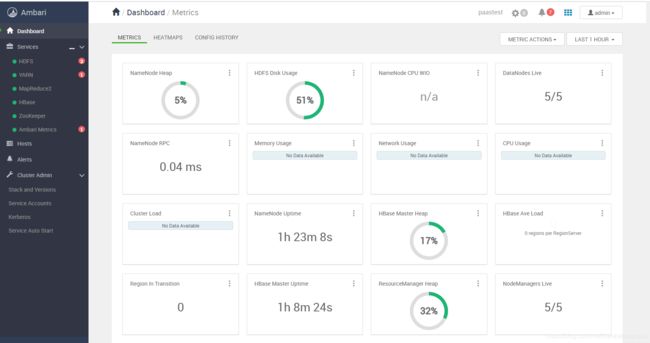
3.12 安装成功
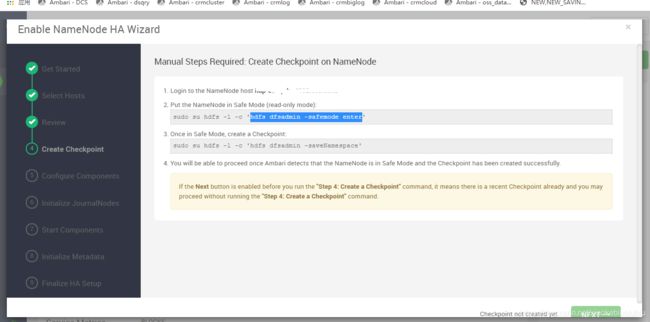
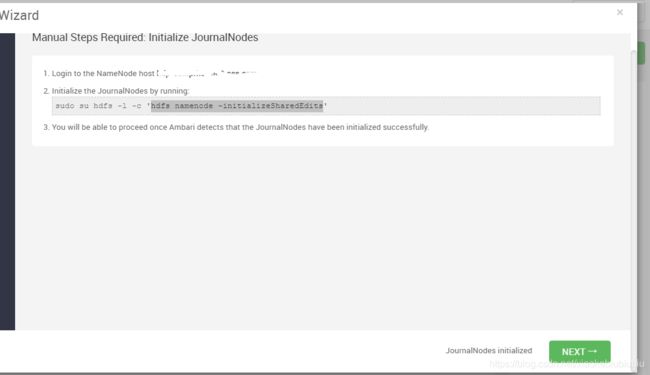
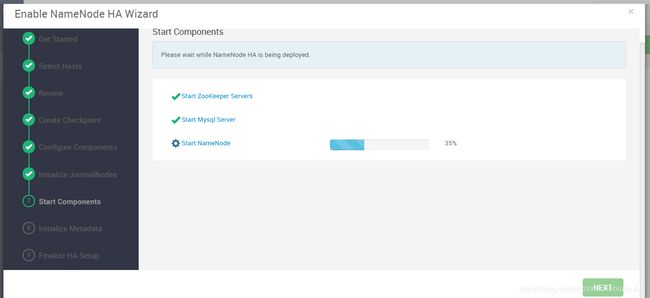
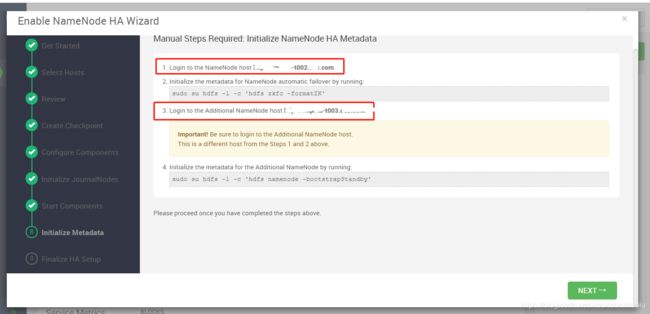
4. hdfs高可用配置
到此集群搭建完成。有部署过程中遇到问题的小伙伴,欢迎留言。


