一、elasticsearch 安装
1、下载elasticsearch 7.6.2
下载链接: https://www.elastic.co/cn/dow...
2、直接解压 tar -zxvf XXX (xxx就是对应的elasticSearch的文件名)
3、修改配置文件 : /conf/elasticsearch.yml
在这里主要是开放远程连接 0.0.0.0 放开 9200端口 配置 节点信息 ,我们是单机so配置一个结点就行
#
# ----------------------------------- Paths ------------------------------------
#
# Path to directory where to store the data (separate multiple locations by comma):
#
#path.data: /path/to/data
#
# Path to log files:
#
#path.logs: /path/to/logs
#
# ----------------------------------- Memory -----------------------------------
#
# Lock the memory on startup:
#
#bootstrap.memory_lock: true
#
# Make sure that the heap size is set to about half the memory available
# on the system and that the owner of the process is allowed to use this
# limit.
#
# Elasticsearch performs poorly when the system is swapping the memory.
#
# ---------------------------------- Network -----------------------------------
#
# Set the bind address to a specific IP (IPv4 or IPv6):
#
network.host: 0.0.0.0
#
# Set a custom port for HTTP:
#
http.port: 9200
#
# For more information, consult the network module documentation.
#
# --------------------------------- Discovery ----------------------------------
#
# Pass an initial list of hosts to perform discovery when this node is started:
# The default list of hosts is ["127.0.0.1", "[::1]"]
#
#discovery.seed_hosts: ["host1", "host2"]
#
# Bootstrap the cluster using an initial set of master-eligible nodes:
#
cluster.initial_master_nodes: ["node-1"]
#
# For more information, consult the discovery and cluster formation module documentation.
#
# ---------------------------------- Gateway -----------------------------------
#
# Block initial recovery after a full cluster restart until N nodes are started:
#
#gateway.recover_after_nodes: 3
#
# For more information, consult the gateway module documentation.
#
# ---------------------------------- Various -----------------------------------
#
# Require explicit names when deleting indices:
#
#action.destructive_requires_name: true
#用于head
http.cors.enabled: true
http.cors.allow-origin: "*"
4、出现各种错误解决
问题1:JDK8不能运行7.X的es,将jdk换为jdk 11
问题2:不允许root用户启动es,解决方式创建一个新的用户
参考:
https://bigjun2017.github.io/...
1、新增用户组
groupadd elasticsearch
2、新增用户并将其加入新增的用户组中
useradd elasticsearch -g elasticsearch -p /usr/local/elasticsearch-7.6.2
3、更改elasticsearch文件夹及内部文件的所属用户及组为elasticsearch:elasticsearch
cd elasticsearch-7.6.2
chown -R elasticsearch:elasticsearch  /usr/local/elasticsearch-7.6.2
4、启动
sudo elasticsearch
./bin/elasticsearch
或后台启动
./bin/elasticsearch -d
问题3:elasticsearch占用内存过多,默认使用1GB内存
cd config
vim jvm.options
将内存改为
-Xms512m
-Xmx512m
还有其他可以百度哈哈
二、elasticsearch-head 界面工具 直接google插件搜索
elasticsearch-head 界面工具 如同Navicat一样可以操作es,但是只能简单操作一般用来查看,操作最好使用kibana三、kibana安装介绍 (所有安装的内容版本号必须一致,不一致请自行测试)
elk : elasticsearch logstash kinbana
收集清洗loastash-> 搜索,存储 E ->展示 k
安装kibana我用的是windows版解压后修改配置文件直接运行就行,修改config/kibana.yml文件
https://www.elastic.co/cn/dow...
1、kinbana安装(测试开发时建议使用windows版本)
配置kibana.yml 中 开启5601 端口 配置elasticsearch的9200端口的host,开启kibnana中文配置找到Kibana配置文件所在:config/kibana.yml,找到配置:i18n.locale: "en" 并将en修改为zh-CN(简体中文)。
四、ik分词器安装
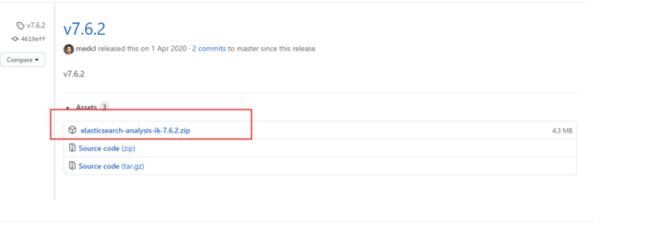
https://github.com/medcl/elasticsearch-analysis-ik/releases/tag/v7.6.2
一定要下第一个zip包,在es文件中执行

在elasticsearch的plugin中创建
mkdir analysis-ik/
cd analysis-ik/
上传文件
unzip XXX.zip  XXX.zip是你的elasticsearch 文件
rm -rf XXX.zip 删除zip文件
2、自定义解析词
由于库分词器不可能包含所有在中文词语我们可以自定义
在 analysis-ik 的config文件中vim test.dic 文件其中添加自定义的分词
vim IKAnalyzer.cfg.xml 在这里设置自定的文件如何设置下面有哈哈
出现如图所示则说明启用插件成功

最少切分

GET _analyze
{
  "analyzer": "ik_smart",
  "text": "中国共产党"
}

最细粒度划分
GET _analyze
{
  "analyzer": "ik_max_word",
  "text": "文烨大帅逼"
}
ik分词器自带的分词库远远不能满足我们所以我们可以自己加入分词:例如下面 未添加自定义时
{
  "tokens" : [
    {
      "token" : "文",
      "start_offset" : 0,
      "end_offset" : 1,
      "type" : "CN_CHAR",
      "position" : 0
    },
    {
      "token" : "烨",
      "start_offset" : 1,
      "end_offset" : 2,
      "type" : "CN_CHAR",
      "position" : 1
    },
    {
      "token" : "大帅",
      "start_offset" : 2,
      "end_offset" : 4,
      "type" : "CN_WORD",
      "position" : 2
    },
    {
      "token" : "逼",
      "start_offset" : 4,
      "end_offset" : 5,
      "type" : "CN_CHAR",
      "position" : 3
    }
  ]
}

添加自定义分词
{
  "tokens" : [
    {
      "token" : "文烨",
      "start_offset" : 0,
      "end_offset" : 2,
      "type" : "CN_WORD",
      "position" : 0
    },
    {
      "token" : "大帅",
      "start_offset" : 2,
      "end_offset" : 4,
      "type" : "CN_WORD",
      "position" : 1
    },
    {
      "token" : "逼",
      "start_offset" : 4,
      "end_offset" : 5,
      "type" : "CN_CHAR",
      "position" : 2
    }
  ]
}
ik分词器字典中加自己的词组,在ik插件文档中创建 wenye.dic 在此文件中加入需要的词组
然后 vim IKAnalyzer.cfg.xml
        IK Analyzer 扩展配置

        wenye.dic
2、logstash安装
安装winows版
参考来源:感谢大佬
https://www.elastic.co/cn/downloads/past-releases/logstash-7-6-2
https://my.oschina.net/TomcatJack/blog/3224536
logstash -e "input { stdin {} } output { stdout {} }"

上面的命令用来测试logstash是否可以正常运行,在bin中用cmd输入这行命令即可

vim logstash.conf  在 bin中创建logstash.conf ,当然也可在其他文件,这里是用来将日志文件传入到es中。

input {
    file {
        path => "D:/tool/elk/logstash-7.6.2/temp/idea.log"
        type => "systemlog"
        start_position => "beginning"
        stat_interval => "3"
    }
}

output {
  elasticsearch {
      hosts => ["es服务器的ip:9200"]
      index => "es_index"
  }

    stdout {
      codec => json_lines
  }
}

同样cmd到logstash的bin目录下执行下面命令。
./logstash -f logstash.conf