黑马RabbitMQ高级学习笔记
RabbitMQ高级内容介绍
RabbitMQ高级特性
- 消息可靠性投递
- Consumer ACK
- 消费端限流
- TTL
- 死信队列
- 延迟队列
- 日志与监控
- 消息可靠性分析与追踪
- 管理
RabbitMQ应用问题
- 消息可靠请保障
- 消息幂等性处理
RabbitMQ集群搭建
- RabbitMQ高可用集群
1、RabbitMQ高级特性
1.1、消息的可靠投递
1、定义
在使用RabbitMQ的时候,作为消息发送方希望杜绝任何消息丢失或投递失败场景。RabbitMQ为我们提供了两种方式用来控制消息的投递可靠性模式。
- confirm 确认模式
- return退回模式
rabbitMQ整个消息投递的路径为:
pruducer —>rabbitMQ broker ---->exchange------>queue ----> consumer
- 消息从producer到exchange则会返回一个confirmCallback。
- 消息从exchange–>queue投递失败则会返回一个returnCallback。
我们将利用这两个callback控制消息的可靠性投递。
2、生产者端代码实现
1)新建spring工程rabbitmq-producer-spring
2) 配置pom.xml
<project xmlns="http://maven.apache.org/POM/4.0.0"
         xmlns:xsi="http://www.w3.org/2001/XMLSchema-instance"
         xsi:schemaLocation="http://maven.apache.org/POM/4.0.0 http://maven.apache.org/xsd/maven-4.0.0.xsd">
    <modelVersion>4.0.0modelVersion>

    <groupId>org.examplegroupId>
    <artifactId>rabbitmq-producer-springartifactId>
    <version>1.0-SNAPSHOTversion>

    <properties>
        <maven.compiler.source>8maven.compiler.source>
        <maven.compiler.target>8maven.compiler.target>
    properties>

    <dependencies>
        <dependency>
            <groupId>org.springframeworkgroupId>
            <artifactId>spring-contextartifactId>
            <version>5.1.7.RELEASEversion>
        dependency>

        <dependency>
            <groupId>org.springframework.amqpgroupId>
            <artifactId>spring-rabbitartifactId>
            <version>2.1.8.RELEASEversion>
        dependency>

        <dependency>
            <groupId>junitgroupId>
            <artifactId>junitartifactId>
            <version>4.12version>
        dependency>

        <dependency>
            <groupId>org.springframeworkgroupId>
            <artifactId>spring-testartifactId>
            <version>5.1.7.RELEASEversion>
        dependency>
    dependencies>

    <build>
        <plugins>
            <plugin>
                <groupId>org.apache.maven.pluginsgroupId>
                <artifactId>maven-compiler-pluginartifactId>
                <version>3.8.0version>
                <configuration>
                    <source>1.8source>
                    <target>1.8target>
                configuration>
            plugin>
        plugins>
    build>
project>
3) 配置rabbitmq相关信息
rabbitmq.properties
rabbitmq.host=172.16.98.133
rabbitmq.port=5672
rabbitmq.username=heima
rabbitmq.password=heima
rabbitmq.virtual-host=/itcast
4)spring配置文件,定义队列和交换机
spring-rabbitmq-producer.xml
<beans xmlns="http://www.springframework.org/schema/beans"
       xmlns:xsi="http://www.w3.org/2001/XMLSchema-instance"
       xmlns:context="http://www.springframework.org/schema/context"
       xmlns:rabbit="http://www.springframework.org/schema/rabbit"
       xsi:schemaLocation="http://www.springframework.org/schema/beans
       http://www.springframework.org/schema/beans/spring-beans.xsd
       http://www.springframework.org/schema/context
       https://www.springframework.org/schema/context/spring-context.xsd
       http://www.springframework.org/schema/rabbit
       http://www.springframework.org/schema/rabbit/spring-rabbit.xsd">

    <context:property-placeholder location="classpath:rabbitmq.properties"/>


    <rabbit:connection-factory id="connectionFactory" host="${rabbitmq.host}"
                               port="${rabbitmq.port}"
                               username="${rabbitmq.username}"
                               password="${rabbitmq.password}"
                               virtual-host="${rabbitmq.virtual-host}"
                               publisher-confirms="true"
                               publisher-returns="true"
    />

    <rabbit:admin connection-factory="connectionFactory" />


    <rabbit:template id="rabbitTemplate" connection-factory="connectionFactory"/>


    <rabbit:queue id="test_queue_confirm" name="queue_confirm_test">rabbit:queue>
    <rabbit:direct-exchange name="exchange_confirm_test">
        <rabbit:bindings>
            <rabbit:binding queue="queue_confirm_test" key="confirm">rabbit:binding>
        rabbit:bindings>
    rabbit:direct-exchange>


beans>
5) 编写测试类进行测试
ProducerTest.java
import org.junit.Test;
import org.junit.runner.RunWith;
import org.springframework.amqp.core.Message;
import org.springframework.amqp.rabbit.connection.CorrelationData;
import org.springframework.amqp.rabbit.core.RabbitTemplate;
import org.springframework.beans.factory.annotation.Autowired;
import org.springframework.context.annotation.Configuration;
import org.springframework.test.context.ContextConfiguration;
import org.springframework.test.context.junit4.SpringJUnit4ClassRunner;

@RunWith(SpringJUnit4ClassRunner.class)
@ContextConfiguration(locations = "classpath:spring-rabbitmq-producer.xml")
public class ProducerTest {

    @Autowired
    private RabbitTemplate rabbitTemplate;

    /*
    确认模式:
        步骤:
            1、确认模式开启:ConnectionFactory中开启,publisher-confirms="true"
            2、在rabbitTamplate中定义ConfirmCallback回调函数

    */

    @Test
    public void testConfirm(){

        //2、定义回调
        rabbitTemplate.setConfirmCallback(new RabbitTemplate.ConfirmCallback() {

            /***
             *
             * @param correlationData 相关配置信息,在convertAncSend中参数配置信息
             * @param ack exchange交换机,是否成功收到了消息。true成功,false代表失败
             * @param cause 失败原因
             */
            @Override
            public void confirm(CorrelationData correlationData, boolean ack, String cause) {

                System.out.println("confirm方法被执行了...");
                if(ack){

                    //接收成功
                    System.out.println("接收成功:"+cause);
                }else{

                    //接收失败
                    System.out.println("接收失败消息:"+cause);
                    //做一些处理,让消息再次发送
                }
            }
        });

        //3、发送消息
        rabbitTemplate.convertAndSend("exchange_confirm_test111","confirm","message confirm...");
    }


    /**
     * 回退模式:当消息发送给exchange后,exchange路由到Queue失败时,才会执行returnCallback
     *  步骤:
     *      1、开启回退模式:也是在ConnectionFactory中开启,publisher-returns="true"
     *      2、设置ReturnCallback
     *      3、设置Exchange处理消息的模式:
     *          ①如果消息没有路由到Queue,则丢弃消息(默认)
     *          ②如果消息没有路由到Queue,返回给消息发送方ReturnCallback
     *
     */
    @Test
    public void testReturn(){

        //设置交换机处理失败消息的模式
        //不设置该项的话,默认将消息丢弃,也不会触发回调
        rabbitTemplate.setMandatory(true);

        //设置ReturnCallback
        rabbitTemplate.setReturnCallback(new RabbitTemplate.ReturnCallback() {

            /**
             *
             * @param message   消息对象
             * @param replyCode 错误码
             * @param replyText 错误信息
             * @param exchange  交换机
             * @param routingKey    路由键
             */
            @Override
            public void returnedMessage(Message message, int replyCode, String replyText, String exchange, String routingKey) {

                System.out.println("执行了return");
                System.out.println(message);
                System.out.println(replyCode);
                System.out.println(replyText);
                System.out.println(exchange);
                System.out.println(routingKey);
            }
        });

        //3、发送消息
        rabbitTemplate.convertAndSend("exchange_confirm_test","confirm111","message confirm...");
    }
}
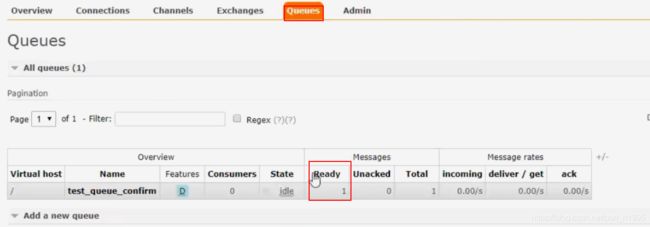
6)测试结果
小结:
- 设置ConnectionFactory的publisher-confirms=“true” 开启确认模式。
- 使用rabbitTemplate.setConfirmCallback设置回调函数。当消息发送到exchange后回调confirm方法。在方法中判断ack,如果为true,则发送成功,如果为false,则发送失败,需要处理。
- 设置ConnectionFactory的publisher-returns=“true” 开启回退模式。
- 使用rabbitTemplate.setReturnCallback设置退回函数。当消息从exchange路由到queue失败后,如果设置rabbitTemplate.setMandatory(true)参数,则会将消息退回给producer。并执行回调函数returnedMessage。
- 在RabbitMQ中也提供了事务机制,但是性能较差,此处不作讲解。
使用channel下列方法,完成事务控制
- txSelect(),用于将当前channel设置成transaction模式
- txCommit(),用于提交事务
- txRollback(),用于回滚事务
1.2、Consumer Ack
1、定义
ack指Acknowledge,确认。表示消费端收到消息后的确认方式。
有三种确认方式:
- 自动确认:
acknowledge = "none" - 手动确认:
acknowledge = "manual" - 根据异常情况确认:
acknowledge = "auto",(这种方式使用麻烦,不作讲解)
其中自动确认是指,当消息一旦被Consumer接收到,则自动确认收到,并将相应message从RabbitMQ的消息缓存中移除。
但在实际业务处理中,很可能消息接收到, 业务处理出现异常,那么该消息就会丢失。
如果设置了手动确认方式,则需要在业务处理成功后,调用channel.basicAck(),手动签收,如果出现异常,则调用channel.basicNack()方法,让其自动重新发送消息。
2、消费端代码实现
1)新建rabbitmq-consumer-spring工程
2)编写pom.xml导入依赖
<project xmlns="http://maven.apache.org/POM/4.0.0"
         xmlns:xsi="http://www.w3.org/2001/XMLSchema-instance"
         xsi:schemaLocation="http://maven.apache.org/POM/4.0.0 http://maven.apache.org/xsd/maven-4.0.0.xsd">
    <modelVersion>4.0.0modelVersion>

    <groupId>org.examplegroupId>
    <artifactId>rabbitmq-consumer-springartifactId>
    <version>1.0-SNAPSHOTversion>

    <properties>
        <maven.compiler.source>8maven.compiler.source>
        <maven.compiler.target>8maven.compiler.target>
    properties>

    <dependencies>
        <dependency>
            <groupId>org.springframeworkgroupId>
            <artifactId>spring-contextartifactId>
            <version>5.1.7.RELEASEversion>
        dependency>

        <dependency>
            <groupId>org.springframework.amqpgroupId>
            <artifactId>spring-rabbitartifactId>
            <version>2.1.8.RELEASEversion>
        dependency>

        <dependency>
            <groupId>junitgroupId>
            <artifactId>junitartifactId>
            <version>4.12version>
        dependency>

        <dependency>
            <groupId>org.springframeworkgroupId>
            <artifactId>spring-testartifactId>
            <version>5.1.7.RELEASEversion>
        dependency>
    dependencies>

    <build>
        <plugins>
            <plugin>
                <groupId>org.apache.maven.pluginsgroupId>
                <artifactId>maven-compiler-pluginartifactId>
                <version>3.8.0version>
                <configuration>
                    <source>1.8source>
                    <target>1.8target>
                configuration>
            plugin>
        plugins>
    build>
project>
3)MQ连接配置rabbitmq.properties
rabbitmq.host=172.16.98.133
rabbitmq.port=5672
rabbitmq.username=heima
rabbitmq.password=heima
rabbitmq.virtual-host=/itcast
4)spring配置文件,设置监听容器
spring-rabbitmq-consumer.xml
<beans xmlns="http://www.springframework.org/schema/beans"
       xmlns:xsi="http://www.w3.org/2001/XMLSchema-instance"
       xmlns:context="http://www.springframework.org/schema/context"
       xmlns:rabbit="http://www.springframework.org/schema/rabbit"
       xsi:schemaLocation="http://www.springframework.org/schema/beans
       http://www.springframework.org/schema/beans/spring-beans.xsd
       http://www.springframework.org/schema/context
       https://www.springframework.org/schema/context/spring-context.xsd
       http://www.springframework.org/schema/rabbit
       http://www.springframework.org/schema/rabbit/spring-rabbit.xsd">

    <context:property-placeholder location="classpath:rabbitmq.properties"/>


    <rabbit:connection-factory id="connectionFactory" host="${rabbitmq.host}"
                               port="${rabbitmq.port}"
                               username="${rabbitmq.username}"
                               password="${rabbitmq.password}"
                               virtual-host="${rabbitmq.virtual-host}"/>

    <context:component-scan base-package="com.itheima.listener">context:component-scan>


    <rabbit:listener-container connection-factory="connectionFactory" acknowledge="manual">
        <rabbit:listener ref="ackListener" queue-names="queue_confirm_test">rabbit:listener>
    rabbit:listener-container>

beans>
5)编写监听类AckListener.java
package com.itheima.listener;

import com.rabbitmq.client.Channel;
import org.springframework.amqp.core.Message;
import org.springframework.amqp.core.MessageListener;
import org.springframework.amqp.rabbit.listener.api.ChannelAwareMessageListener;
import org.springframework.stereotype.Component;

import java.io.IOException;


/*
* Consumer ACK机制:
*   1、设置手动签收。acknowledge=“manual”
*   2、让监听器类实现ChannelAwareMessageListener接口
*   3、如果消息成功处理,调用channel的basicAck()签收
*   4、如果消息处理失败,则调用channel的basicNack()拒绝签收,broker重新发送给consumer
* */
@Component
public class AckListener implements ChannelAwareMessageListener {


    @Override
    public void onMessage(Message message, Channel channel) throws Exception {

    	Thread.sleep(1000);
        long deliveryTag = message.getMessageProperties().getDeliveryTag();

        try{

            //1.接收转换消息
            System.out.println(new String(message.getBody()));

            //2.处理业务逻辑
            System.out.println("处理业务逻辑...");
            int i = 3/0;//出现错误
            //3.手动签收
            channel.basicAck(deliveryTag,true);
        }catch (Exception e){


            //4.拒绝签收
            /*
            * 第三个参数:requeue:重回队列。如果设置为true,则消息重新回到queue,broker会重新发送该消息给消费端
            *
            * */
            channel.basicNack(deliveryTag,true,true);
            //channel.basicReject(deliveryTag,true);只允许单挑确认
        }
    }
}
6)编写测试类进行测试ConsumerTest.java
import org.junit.Test;
import org.junit.runner.RunWith;
import org.springframework.test.context.ContextConfiguration;
import org.springframework.test.context.junit4.SpringJUnit4ClassRunner;

@RunWith(SpringJUnit4ClassRunner.class)
@ContextConfiguration(locations = "classpath:spring-rabbitmq-consumer.xml")
public class ConsumerTest {


    @Test
    public void test1(){

        while(true){


        }
    }
}
7)测试结果
Consumer Ack 小结
- 在
rabbit:listener-container标签中设置acknowledge属性,设置ack方式none:自动确认,manual:手动确认- 如果在消费端没有出现异常,则调用channel.basicAck(deliveryTag,false);方法确认签收消息
- 如果出现异常,则在catch中调用basicNack或basicReject,拒绝消息,让MQ重新发消息。
消息可靠性总结
- 持久化
- exchange要持久化
- queue要持久化
- message要持久化 - 生产方要确认confirm
- 消费方要确认Ack
- Broker高可用
1.3、消费端限流
1、定义
2、代码实现:
1)新建QosListener.java
package com.itheima.listener;

import com.rabbitmq.client.Channel;
import org.springframework.amqp.core.Message;
import org.springframework.amqp.rabbit.listener.api.ChannelAwareMessageListener;
import org.springframework.stereotype.Component;


/*
* Consumer 限流机制
*   1、确保Ack机制为手动确认
*   2、listener-container配置属性
*       preFetch = 1,表示消费端每次从mq中拉取1条消息来消费,直到手动确认消费完毕后,才会继续拉取下一条消息。
* */
@Component
public class QosListener implements ChannelAwareMessageListener {


    @Override
    public void onMessage(Message message, Channel channel) throws Exception {

        Thread.sleep(1000);

        //1、获取消息
        System.out.println(new String(message.getBody()));

        //2、处理业务逻辑

        //3、签收
        channel.basicAck(message.getMessageProperties().getDeliveryTag(),true);
    }
}
2)配置监听容器spring-rabbitmq-consumer.xml
<beans xmlns="http://www.springframework.org/schema/beans"
       xmlns:xsi="http://www.w3.org/2001/XMLSchema-instance"
       xmlns:context="http://www.springframework.org/schema/context"
       xmlns:rabbit="http://www.springframework.org/schema/rabbit"
       xsi:schemaLocation="http://www.springframework.org/schema/beans
       http://www.springframework.org/schema/beans/spring-beans.xsd
       http://www.springframework.org/schema/context
       https://www.springframework.org/schema/context/spring-context.xsd
       http://www.springframework.org/schema/rabbit
       http://www.springframework.org/schema/rabbit/spring-rabbit.xsd">

    <context:property-placeholder location="classpath:rabbitmq.properties"/>


    <rabbit:connection-factory id="connectionFactory" host="${rabbitmq.host}"
                               port="${rabbitmq.port}"
                               username="${rabbitmq.username}"
                               password="${rabbitmq.password}"
                               virtual-host="${rabbitmq.virtual-host}"/>

    <context:component-scan base-package="com.itheima.listener">context:component-scan>


    <rabbit:listener-container connection-factory="connectionFactory" acknowledge="manual" prefetch="1">

        <rabbit:listener ref="qosListener" queue-names="queue_confirm_test">rabbit:listener>
    rabbit:listener-container>

beans>
3)测试类ConsumerTest.java
import org.junit.Test;
import org.junit.runner.RunWith;
import org.springframework.test.context.ContextConfiguration;
import org.springframework.test.context.junit4.SpringJUnit4ClassRunner;

@RunWith(SpringJUnit4ClassRunner.class)
@ContextConfiguration(locations = "classpath:spring-rabbitmq-consumer.xml")
public class ConsumerTest {


    @Test
    public void test1(){

        while(true){


        }
    }
}
4)生产端发送10条消息测试
 @Test
    public void testSend(){

        for (int i = 0; i < 10; i++) {

            //3、发送消息
            rabbitTemplate.convertAndSend("exchange_confirm_test","confirm","message confirm...");
        }
    }
5)测试结果
①当消费端未进行手动签收消息,preFetch = 1时,消费端只会接收一条消息。


②当消费端未设置preFetch 数量,并且没有进行手动签收时,消费端一次性将10条消息都获取到了

③当prefetch=1,并且设置消费端手动签收时,消息端会一条一条的拉取消息

消费端限流小结
- 在
中配置prefetch属性设置消费端一次拉取多少消息- 消费端的确认模式一定为手动确认。
acknowledge="manual"
1.4、TTL
1、定义
- TTL全称 Time To Live(存活时间/过期时间)。
- 当消息到达存活时间后,还没有被消费,会被自动清除。
- RabbitMQ可以对消息设置过期时间,也可以对整个队列(Queue)设置过期时间。
小结:
① 设置队列过期时间使用参数:x-message-ttl,单位:ms(毫秒),会对整个队列消息统一过期
② 设置消息过期时间使用参数:expiration。单位:ms(毫秒),当该消息在对列头部时(消费时),会单独判断这一消息是否过期。
③ 如果两者都进行了设置,以时间段的为准。
2、代码实现:
1)新建工程rabbitmq-ttl-producer-spring
2)pom.xml
<project xmlns="http://maven.apache.org/POM/4.0.0"
         xmlns:xsi="http://www.w3.org/2001/XMLSchema-instance"
         xsi:schemaLocation="http://maven.apache.org/POM/4.0.0 http://maven.apache.org/xsd/maven-4.0.0.xsd">
    <modelVersion>4.0.0modelVersion>

    <groupId>org.examplegroupId>
    <artifactId>rabbitmq-producer-springartifactId>
    <version>1.0-SNAPSHOTversion>

    <properties>
        <maven.compiler.source>8maven.compiler.source>
        <maven.compiler.target>8maven.compiler.target>
    properties>

    <dependencies>
        <dependency>
            <groupId>org.springframeworkgroupId>
            <artifactId>spring-contextartifactId>
            <version>5.1.7.RELEASEversion>
        dependency>

        <dependency>
            <groupId>org.springframework.amqpgroupId>
            <artifactId>spring-rabbitartifactId>
            <version>2.1.8.RELEASEversion>
        dependency>

        <dependency>
            <groupId>junitgroupId>
            <artifactId>junitartifactId>
            <version>4.12version>
        dependency>

        <dependency>
            <groupId>org.springframeworkgroupId>
            <artifactId>spring-testartifactId>
            <version>5.1.7.RELEASEversion>
        dependency>
    dependencies>

    <build>
        <plugins>
            <plugin>
                <groupId>org.apache.maven.pluginsgroupId>
                <artifactId>maven-compiler-pluginartifactId>
                <version>3.8.0version>
                <configuration>
                    <source>1.8source>
                    <target>1.8target>
                configuration>
            plugin>
        plugins>
    build>
project>
3)配置spring-rabbitmq-producer.xml
<beans xmlns="http://www.springframework.org/schema/beans"
       xmlns:xsi="http://www.w3.org/2001/XMLSchema-instance"
       xmlns:context="http://www.springframework.org/schema/context"
       xmlns:rabbit="http://www.springframework.org/schema/rabbit"
       xsi:schemaLocation="http://www.springframework.org/schema/beans
       http://www.springframework.org/schema/beans/spring-beans.xsd
       http://www.springframework.org/schema/context
       https://www.springframework.org/schema/context/spring-context.xsd
       http://www.springframework.org/schema/rabbit
       http://www.springframework.org/schema/rabbit/spring-rabbit.xsd">

    <context:property-placeholder location="classpath:rabbitmq.properties"/>


    <rabbit:connection-factory id="connectionFactory" host="${rabbitmq.host}"
                               port="${rabbitmq.port}"
                               username="${rabbitmq.username}"
                               password="${rabbitmq.password}"
                               virtual-host="${rabbitmq.virtual-host}"
                               publisher-confirms="true"
                               publisher-returns="true"
    />

    <rabbit:admin connection-factory="connectionFactory" />


    <rabbit:template id="rabbitTemplate" connection-factory="connectionFactory"/>


    <rabbit:queue id="test_queue_confirm" name="queue_confirm_test">rabbit:queue>
    <rabbit:direct-exchange name="exchange_confirm_test">
        <rabbit:bindings>
            <rabbit:binding queue="queue_confirm_test" key="confirm">rabbit:binding>
        rabbit:bindings>
    rabbit:direct-exchange>


    <rabbit:queue id="test_queue_ttl" name="test_queue_ttl">

        <rabbit:queue-arguments>

            <entry key="x-message-ttl" value="10000" value-type="java.lang.Integer">entry>
        rabbit:queue-arguments>
    rabbit:queue>
    <rabbit:topic-exchange name="test-exchange-ttl">
        <rabbit:bindings>
            <rabbit:binding pattern="ttl.#" queue="test_queue_ttl">rabbit:binding>
        rabbit:bindings>
    rabbit:topic-exchange>


beans>
4)进行测试:
ProducerTest.java
/*
    * TTL:过期时间
    * 1、队列统一过期时间
    *
    * 2、消息单独过期时间
    *
    * 注意:
    *   ①如果设置了消息的过期时间,也设置了队列的过期时间,以短的为准
    *   ②队列过期后,会将队列所有消息全部移除
    *   ③消息过期后,只有消息在队列顶端,才会判断其是否过期(移除掉)
    * */
    @Test
    public void testTTl(){

        /*
        1、队列统一过期时间
        for (int i = 0; i < 10; i++) {
            //3、发送消息
            rabbitTemplate.convertAndSend("test-exchange-ttl","ttl.hehe","message ttl...");
        }*/


        //消息的后处理对象
        MessagePostProcessor messagePostProcessor = new MessagePostProcessor() {


            @Override
            public Message postProcessMessage(Message message) throws AmqpException {

                //1、设置message的消息
                message.getMessageProperties().setExpiration("5000");
                //2、返回该消息
                return message ;
            }
        };
        /*2、消息单独过期时间*/
        rabbitTemplate.convertAndSend("test-exchange-ttl","ttl.hehe","message ttl...",messagePostProcessor);

    }
5)结果:
①队列统一过期:
②消息单独过期
1.5、死信队列
1、定义
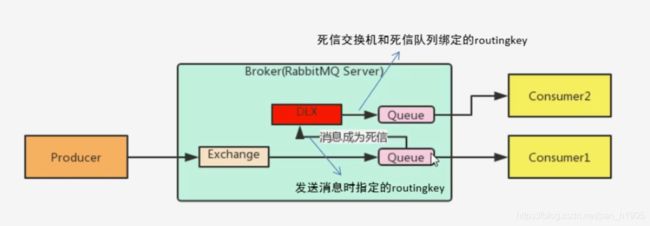
死信队列,英文缩写:DLX。Dead Letter Exchange(死信交换机),当消息成为Dead Message后,可以被重新发送到另一个交换机,这个交换机就是DLX。

2、消息成为死信的三种情况:
1、队列消息长度达到限制;
2、消费者拒接消费消息,basicNack/basicReject,并且不把消息放入原目标队列,requeue = false;
3、原队列存在消息过期设置,消息到达超时时间未被消费;
3、队列绑定死信交换机:
给队列设置参数:x-dead-lette-exchange和x-dead-letter-routing-key
4、代码实现
1)spring-rabbitmq-producer.xml
<beans xmlns="http://www.springframework.org/schema/beans"
       xmlns:xsi="http://www.w3.org/2001/XMLSchema-instance"
       xmlns:context="http://www.springframework.org/schema/context"
       xmlns:rabbit="http://www.springframework.org/schema/rabbit"
       xsi:schemaLocation="http://www.springframework.org/schema/beans
       http://www.springframework.org/schema/beans/spring-beans.xsd
       http://www.springframework.org/schema/context
       https://www.springframework.org/schema/context/spring-context.xsd
       http://www.springframework.org/schema/rabbit
       http://www.springframework.org/schema/rabbit/spring-rabbit.xsd">

    <context:property-placeholder location="classpath:rabbitmq.properties"/>


    <rabbit:connection-factory id="connectionFactory" host="${rabbitmq.host}"
                               port="${rabbitmq.port}"
                               username="${rabbitmq.username}"
                               password="${rabbitmq.password}"
                               virtual-host="${rabbitmq.virtual-host}"
                               publisher-confirms="true"
                               publisher-returns="true"
    />

    <rabbit:admin connection-factory="connectionFactory" />


    <rabbit:template id="rabbitTemplate" connection-factory="connectionFactory"/>


    <rabbit:queue name="test_queue_dlx" id="test_queue_dlx">

        <rabbit:queue-arguments>

            <entry key="x-dead-letter-exchange" value="exchange_dlx">entry>

            <entry key="x-dead-letter-routing-key" value="dlx.hehe">entry>

            <entry key="x-message-ttl" value="10000" value-type="java.lang.Integer">entry>

            <entry key="x-max-length" value="10" value-type="java.lang.Integer">entry>
        rabbit:queue-arguments>
    rabbit:queue>
    <rabbit:topic-exchange name="test_exchange_dlx">
        <rabbit:bindings>
            <rabbit:binding pattern="test.dlx.#" queue="test_queue_dlx">rabbit:binding>
        rabbit:bindings>
    rabbit:topic-exchange>


    <rabbit:queue name="queue_dlx" id="queue_dlx">rabbit:queue>
    <rabbit:topic-exchange name="exchange_dlx">
        <rabbit:bindings>
            <rabbit:binding pattern="dlx.#" queue="queue_dlx">rabbit:binding>
        rabbit:bindings>
    rabbit:topic-exchange>
beans>
2)Producer.java
import org.junit.Test;
import org.junit.runner.RunWith;
import org.springframework.amqp.AmqpException;
import org.springframework.amqp.core.Message;
import org.springframework.amqp.core.MessagePostProcessor;
import org.springframework.amqp.rabbit.connection.CorrelationData;
import org.springframework.amqp.rabbit.core.RabbitTemplate;
import org.springframework.beans.factory.annotation.Autowired;
import org.springframework.context.annotation.Configuration;
import org.springframework.test.context.ContextConfiguration;
import org.springframework.test.context.junit4.SpringJUnit4ClassRunner;

@RunWith(SpringJUnit4ClassRunner.class)
@ContextConfiguration(locations = "classpath:spring-rabbitmq-producer.xml")
public class ProducerTest {

    @Autowired
    private RabbitTemplate rabbitTemplate;

    /*
    * 发送测试死信消息
    *   1、过期时间
    *   2、长度限制
    *   3、消息拒收
    *
    * */

    @Test
    public void testDlx(){

       //1、测试过期时间,死信消息
        //rabbitTemplate.convertAndSend("test_exchange_dlx","test.dlx.haha","测试过期时间,死信消息");

        //2、测试长度限制后,消息死信
       /* for (int i = 0; i < 20; i++) {
            rabbitTemplate.convertAndSend("test_exchange_dlx","test.dlx.haha","测试过期时间,死信消息");
        }*/

        //3、测试消息拒收,死信消息
        rabbitTemplate.convertAndSend("test_exchange_dlx","test.dlx.haha","测试过期时间,死信消息");

    }
}
3)消费端:DlxListener.java
package com.itheima.listener;

import com.rabbitmq.client.Channel;
import org.springframework.amqp.core.Message;
import org.springframework.amqp.rabbit.listener.api.ChannelAwareMessageListener;
import org.springframework.stereotype.Component;


@Component
public class DlxListener implements ChannelAwareMessageListener {


    @Override
    public void onMessage(Message message, Channel channel) throws Exception {

        Thread.sleep(1000);
        long deliveryTag = message.getMessageProperties().getDeliveryTag();

        try{

            //1.接收转换消息
            System.out.println(new String(message.getBody()));

            //2.处理业务逻辑
            System.out.println("处理业务逻辑...");
            int i = 3/0;//出现错误
            //3.手动签收
            channel.basicAck(deliveryTag,true);
        }catch (Exception e){


            //4.拒绝签收
            /*
            * 第三个参数:requeue:重回队列。如果设置为true,则消息重新回到queue,broker会重新发送该消息给消费端
            *
            * */
            System.out.println("出现异常,拒绝接收!");
            //拒绝接收,不重回队列requeue=false
            channel.basicNack(deliveryTag,true,false);
            //channel.basicReject(deliveryTag,true);只允许单挑确认
        }
    }
}
4) 消费端:spring-rabbitmq-consumer.xml
<beans xmlns="http://www.springframework.org/schema/beans"
       xmlns:xsi="http://www.w3.org/2001/XMLSchema-instance"
       xmlns:context="http://www.springframework.org/schema/context"
       xmlns:rabbit="http://www.springframework.org/schema/rabbit"
       xsi:schemaLocation="http://www.springframework.org/schema/beans
       http://www.springframework.org/schema/beans/spring-beans.xsd
       http://www.springframework.org/schema/context
       https://www.springframework.org/schema/context/spring-context.xsd
       http://www.springframework.org/schema/rabbit
       http://www.springframework.org/schema/rabbit/spring-rabbit.xsd">

    <context:property-placeholder location="classpath:rabbitmq.properties"/>


    <rabbit:connection-factory id="connectionFactory" host="${rabbitmq.host}"
                               port="${rabbitmq.port}"
                               username="${rabbitmq.username}"
                               password="${rabbitmq.password}"
                               virtual-host="${rabbitmq.virtual-host}"/>

    <context:component-scan base-package="com.itheima.listener">context:component-scan>


    <rabbit:listener-container connection-factory="connectionFactory" acknowledge="manual" prefetch="1">


        <rabbit:listener ref="dlxListener" queue-names="test_queue_dlx">rabbit:listener>
    rabbit:listener-container>

beans>
5)结果
a)消息过期生成死信队列
b)长度限制生成死信队列
因长度限制,后面发送的10条消息变成死信
c)消息拒收生成死信
小结:
1、死信交换机和死信队列和普通的没有区别
2、当消息成为死信后,如果该队列绑定了死信交换机,则消息会被死信交换机重新路由到死信队列
3、消息成为死信的三种情况
(1)队列消息长度达到限制
(2)消费者拒绝消费消息,并且不重回队列
(3)原队列存在消息过期设置,消息到达超时时间未被消费
1.6、延迟队列
1、定义
延迟队列,即消息进入队列后不会立即被消费,只有到达制定时间后,才会被消费。
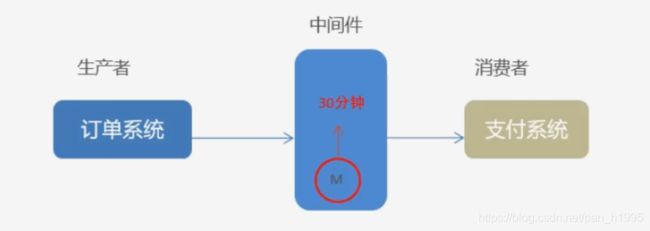
需求:
1、下单后,30分钟未支付,取消订单,回滚库存。
2、新用户注册7天后,发送短信问候。
实现方式:
1、定时器
2、延迟队列

很可惜,在rabbitMQ中并未提供延迟队列功能。
但是可以使用:TTL+死信队列组合实现延迟队列的效果。

2、代码实现
1)生产端:spring-rabbitmq-producer.xml
<beans xmlns="http://www.springframework.org/schema/beans"
       xmlns:xsi="http://www.w3.org/2001/XMLSchema-instance"
       xmlns:context="http://www.springframework.org/schema/context"
       xmlns:rabbit="http://www.springframework.org/schema/rabbit"
       xsi:schemaLocation="http://www.springframework.org/schema/beans
       http://www.springframework.org/schema/beans/spring-beans.xsd
       http://www.springframework.org/schema/context
       https://www.springframework.org/schema/context/spring-context.xsd
       http://www.springframework.org/schema/rabbit
       http://www.springframework.org/schema/rabbit/spring-rabbit.xsd">

    <context:property-placeholder location="classpath:rabbitmq.properties"/>


    <rabbit:connection-factory id="connectionFactory" host="${rabbitmq.host}"
                               port="${rabbitmq.port}"
                               username="${rabbitmq.username}"
                               password="${rabbitmq.password}"
                               virtual-host="${rabbitmq.virtual-host}"
                               publisher-confirms="true"
                               publisher-returns="true"
    />

    <rabbit:admin connection-factory="connectionFactory" />


    <rabbit:template id="rabbitTemplate" connection-factory="connectionFactory"/>


    <rabbit:queue name="order_queue" id="order_queue">

        <rabbit:queue-arguments>
            <entry key="x-dead-letter-exchange" value="order_exchange_dlx">entry>
            <entry key="x-dead-letter-routing-key" value="dlx.order.cancel">entry>
            <entry key="x-message-ttl" value="10000" value-type="java.lang.Integer"/>
        rabbit:queue-arguments>
    rabbit:queue>
    <rabbit:topic-exchange name="order_exchange">
        <rabbit:bindings>
            <rabbit:binding pattern="order.#" queue="order_queue">rabbit:binding>
        rabbit:bindings>
    rabbit:topic-exchange>


    <rabbit:queue name="order_queue_dlx" id="order_queue_dlx">rabbit:queue>
    <rabbit:topic-exchange name="order_exchange_dlx">
        <rabbit:bindings>
            <rabbit:binding pattern="dlx.order.#" queue="order_queue_dlx">rabbit:binding>
        rabbit:bindings>
    rabbit:topic-exchange>
beans>
2)生产端:ProducerTest.java
import org.junit.Test;
import org.junit.runner.RunWith;
import org.springframework.amqp.AmqpException;
import org.springframework.amqp.core.Message;
import org.springframework.amqp.core.MessagePostProcessor;
import org.springframework.amqp.rabbit.connection.CorrelationData;
import org.springframework.amqp.rabbit.core.RabbitTemplate;
import org.springframework.beans.factory.annotation.Autowired;
import org.springframework.context.annotation.Configuration;
import org.springframework.test.context.ContextConfiguration;
import org.springframework.test.context.junit4.SpringJUnit4ClassRunner;

@RunWith(SpringJUnit4ClassRunner.class)
@ContextConfiguration(locations = "classpath:spring-rabbitmq-producer.xml")
public class ProducerTest {

    @Autowired
    private RabbitTemplate rabbitTemplate;

    @Test
    public void testDelay() throws InterruptedException {

        //1、发送订单消息。将来是在订单系统中,下单成功后,发送消息
        rabbitTemplate.convertAndSend("order_exchange","order.msg","订单信息:id=1,time=333333");

        //2、打印倒计时
        for (int i = 0; i < 10; i++) {

            System.out.println(i+"...");
            Thread.sleep(1000);
        }
    }
}
3)消费端:OrderListener.java
package com.itheima.listener;

import com.rabbitmq.client.Channel;
import org.springframework.amqp.core.Message;
import org.springframework.amqp.rabbit.listener.api.ChannelAwareMessageListener;
import org.springframework.stereotype.Component;


@Component
public class OrderListener implements ChannelAwareMessageListener {


    @Override
    public void onMessage(Message message, Channel channel) throws Exception {

        Thread.sleep(1000);
        long deliveryTag = message.getMessageProperties().getDeliveryTag();

        try{

            //1.接收转换消息
            System.out.println(new String(message.getBody()));

            //2.处理业务逻辑
            System.out.println("处理业务逻辑...");
            System.out.println("根据订单id查询其状态...");
            System.out.println("判断状态是否为支付成功?");
            System.out.println("取消订单,回滚库存!");
            //3.手动签收
            channel.basicAck(deliveryTag,true);
        }catch (Exception e){


            //4.拒绝签收
            /*
            * 第三个参数:requeue:重回队列。如果设置为true,则消息重新回到queue,broker会重新发送该消息给消费端
            *
            * */
            System.out.println("出现异常,拒绝接收!");
            //拒绝接收,不重回队列requeue=false
            channel.basicNack(deliveryTag,true,false);
            //channel.basicReject(deliveryTag,true);只允许单挑确认
        }
    }
}
4)消费端:spring-rabbitmq-consumer.xml
<beans xmlns="http://www.springframework.org/schema/beans"
       xmlns:xsi="http://www.w3.org/2001/XMLSchema-instance"
       xmlns:context="http://www.springframework.org/schema/context"
       xmlns:rabbit="http://www.springframework.org/schema/rabbit"
       xsi:schemaLocation="http://www.springframework.org/schema/beans
       http://www.springframework.org/schema/beans/spring-beans.xsd
       http://www.springframework.org/schema/context
       https://www.springframework.org/schema/context/spring-context.xsd
       http://www.springframework.org/schema/rabbit
       http://www.springframework.org/schema/rabbit/spring-rabbit.xsd">

    <context:property-placeholder location="classpath:rabbitmq.properties"/>


    <rabbit:connection-factory id="connectionFactory" host="${rabbitmq.host}"
                               port="${rabbitmq.port}"
                               username="${rabbitmq.username}"
                               password="${rabbitmq.password}"
                               virtual-host="${rabbitmq.virtual-host}"/>

    <context:component-scan base-package="com.itheima.listener">context:component-scan>


    <rabbit:listener-container connection-factory="connectionFactory" acknowledge="manual" prefetch="1">


        <rabbit:listener ref="orderListener" queue-names="order_queue_dlx">rabbit:listener>
    rabbit:listener-container>

beans>
5)消费端:ConsumerTest.java
import org.junit.Test;
import org.junit.runner.RunWith;
import org.springframework.test.context.ContextConfiguration;
import org.springframework.test.context.junit4.SpringJUnit4ClassRunner;

@RunWith(SpringJUnit4ClassRunner.class)
@ContextConfiguration(locations = "classpath:spring-rabbitmq-consumer.xml")
public class ConsumerTest {


    @Test
    public void test1(){

        while(true){


        }
    }
}
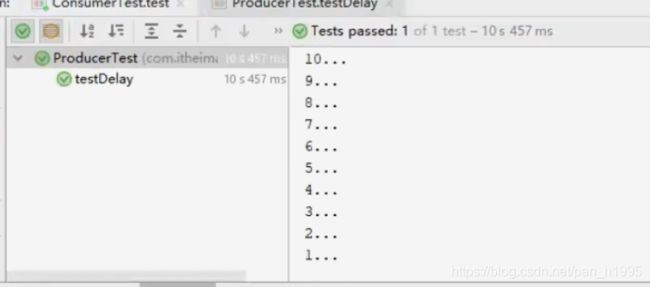
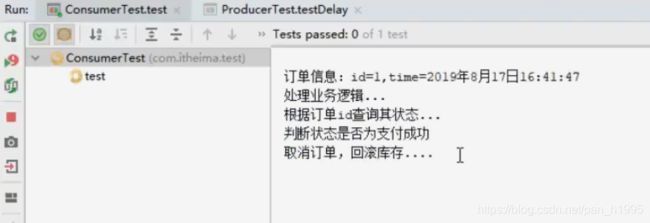
6)结果
小结
1、延迟队列,指消息进入队列后,可以被延迟一定时间,再进行消费
2、RabbitMQ没有提供延迟队列功能,但是可以使用:TTL+死信队列组合实现延迟队列的效果。
2、RabbitMQ应用问题
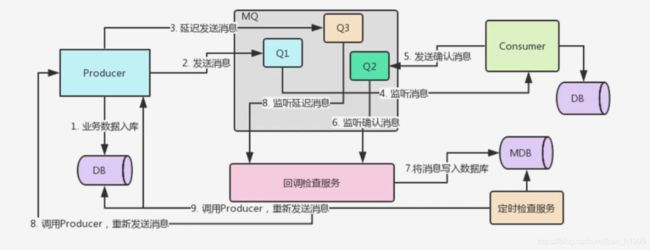
2.1、消息可靠性保障——消息补偿
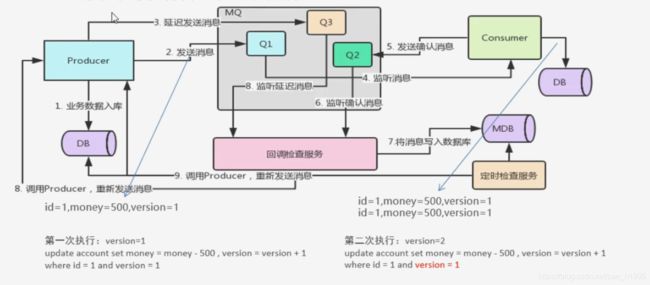
2.2、消息幂等性保障
1、定义
幂等性指一次和多次请求某一资源,对于资源本身应该具有同样的结果。也就是说,其任意多次执行对资源本身所产生的影响均与第一次执行的影响相同。
在MQ中是指,消费多条相同的消息,得到与消费该消息一次相同的结果。


