vue-cli+webpack搭建一个多页面应用
vue-cli+webpack搭建一个多页面应用
- 什么是单页面应用和多页面应用?
-
- 单页面和多页面的区别
- 如何使用vue-cli+webpack初始化一个项目?
- vue-cli+webpack搭建多页面应用
-
- 项目结构调整
- webpack配置更改
什么是单页面应用和多页面应用?
SPA单页面应用:指的是只有一个主页面的应用(只有一个html页面),项目启动时加载主页面时会一次性加载所有的js、css等相关资源(需要进行首屏优化)。所有内容都包含在主页面中,对每一个功能模块组件化。单页面的跳转实质上就是切换相关组件,仅仅刷新局部资源。
MPA多页面应用:指的是有多个独立的页面(多个HTML页面),打开不同的页面时会加载相关的js以及css资源,公共资源会重复加载。多页面应用跳转,需要整个页面进行刷新。
单页面和多页面的区别
1、刷新方式
- SPA:相关组件的切换,页面局部刷新;
- MPA:整个页面进行刷新。
2、路由模式
- SPA:可以使用hash,也可以使用history;
- MPA:普通链接跳转。
3、用户体验
- SPA:页面片段间切换快,用户体验效果好,但初次加载文件过多,需要做相关优化;
- MPA:页面切换缓慢,流畅度不够,用户体验效果较差;
4、数据传递
- SPA:容易实现数据传递(路由带参数传值、Vuex传值等);
- MPA:依赖url传值、cookie、本地session。
5、使用范围
- SPA:高要求的体验度,追求界面流畅的应用;
- MPA:适用于追求高度支持搜索引擎的应用。
如何使用vue-cli+webpack初始化一个项目?
1、使用vue init webpack "项目名"
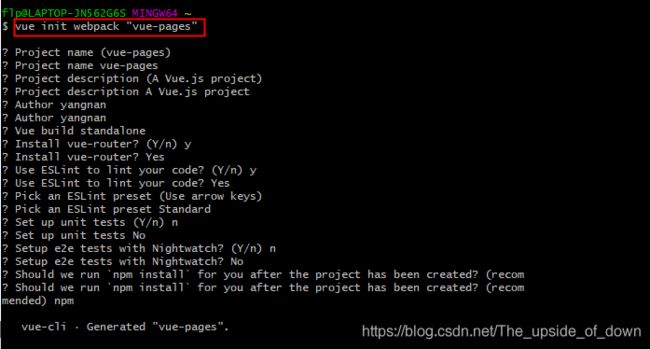
2、完成后,使用cd "项目文件名" 及 npm isntall 安装依赖,最后使用npm run dev启动项目。
vue-cli+webpack搭建多页面应用
有了上面的概念以及项目基础搭建,我们可以在vue-cli脚手架搭建的SPA项目上做一些修改,使其变成MPA应用。
项目结构调整

首先,可以创建一下下面红色方框的目录结构,需要注意的是我们需要把mian.js文件改名为index.js,保证页面入口js文件和模板文件名保持一致,上面红色方框的文件是webpack初始化的文件。
webpack配置更改
1、在build/utils.js中我们添加两个方法,分别为多入口文件和多页面输出。
const path = require('path')
const glob = require('glob')
const PAGE_PATH = path.resolve(__dirname, '../src/pages');
const HtmlWebpackPlugin = require('html-webpack-plugin');   //对每个页面单独打包生成一个新页面的插件
const merge = require('webpack-merge')
// 多入口配置
exports.entries = function() {

  var entryFiles = glob.sync(PAGE_PATH + '/*/*.js')
  var map = {
     }
  entryFiles.forEach((filePath) => {

    // /index.js
    var filename = filePath.substring(filePath.lastIndexOf('\/') + 1, filePath.lastIndexOf('.'))     // index
    map[filename] = filePath;           // map[index] = PAGE_PATH + /index/index.js
  })
  return map;
}

// 多页面输出配置
exports.htmlPlugin  = function() {

  let entryHtml = glob.sync(PAGE_PATH + '/*/*.html')
  let arr = []
  entryHtml.forEach((filePath) => {

    let filename = filePath.substring(filePath.lastIndexOf('\/') + 1, filePath.lastIndexOf('.'))
    let conf = {

      template: filePath,
      filename: filename + '.html',
      chunks: [filename],
      inject: true
    }
    if(process.env.NODE_ENV === 'production') {

      conf = merge(conf, {

        chunks: ['manifest', 'vendor', filename],
        minify: {

          removeComments: true,
          collapseWhitespace: true,
          removeAttributeQuotes: true
        },
        chunksSortMode: 'dependency'
      })
    }
    arr.push(new HtmlWebpackPlugin(conf))
  })
  return arr
}
2、修改build/webpack.base.conf.js的入口配置。
 entry: {

    app: './src/main.js',
    }
   更换为
 entry: utils.entries(),
3、修改build/webpack.dev.conf.js和build/webpack.prod.conf.js的多页面配置:把原有的页面模板配置注释或删除,并把多页面配置添加到plugins。
  plugins: [
    // http://vuejs.github.io/vue-loader/en/workflow/production.html
    new webpack.DefinePlugin({

      'process.env': env
    }),
    new UglifyJsPlugin({

      uglifyOptions: {

        compress: {

          warnings: false
        }
      },
      sourceMap: config.build.productionSourceMap,
      parallel: true
    }),
    // extract css into its own file
    new ExtractTextPlugin({

      filename: utils.assetsPath('css/[name].[contenthash].css'),
      // Setting the following option to `false` will not extract CSS from codesplit chunks.
      // Their CSS will instead be inserted dynamically with style-loader when the codesplit chunk has been loaded by webpack.
      // It's currently set to `true` because we are seeing that sourcemaps are included in the codesplit bundle as well when it's `false`,
      // increasing file size: https://github.com/vuejs-templates/webpack/issues/1110
      allChunks: true,
    }),
    // Compress extracted CSS. We are using this plugin so that possible
    // duplicated CSS from different components can be deduped.
    new OptimizeCSSPlugin({

      cssProcessorOptions: config.build.productionSourceMap
        ? {
      safe: true, map: {
      inline: false } }
        : {
      safe: true }
    }),
    // generate dist index.html with correct asset hash for caching.
    // you can customize output by editing /index.html
    // see https://github.com/ampedandwired/html-webpack-plugin
  //   new HtmlWebpackPlugin({

  //     filename: config.build.index,
  //     template: 'index.html',
  //     inject: true,
  //     minify: {

  //       removeComments: true,
  //       collapseWhitespace: true,
  //       removeAttributeQuotes: true
  //       // more options:
  //       // https://github.com/kangax/html-minifier#options-quick-reference
  //     },
  //     // necessary to consistently work with multiple chunks via CommonsChunkPlugin
  //     chunksSortMode: 'dependency',
  //     chunks: ['manifest', 'vendor', 'app'],
  //   }),
    // keep module.id stable when vendor modules does not change
    new webpack.HashedModuleIdsPlugin(),
    // enable scope hoisting
    new webpack.optimize.ModuleConcatenationPlugin(),
    // split vendor js into its own file
    new webpack.optimize.CommonsChunkPlugin({

      name: 'vendor',
      minChunks (module) {

        // any required modules inside node_modules are extracted to vendor
        return (
          module.resource &&
          /\.js$/.test(module.resource) &&
          module.resource.indexOf(
            path.join(__dirname, '../node_modules')
          ) === 0
        )
      }
    }),
    // extract webpack runtime and module manifest to its own file in order to
    // prevent vendor hash from being updated whenever app bundle is updated
    new webpack.optimize.CommonsChunkPlugin({

      name: 'manifest',
      minChunks: Infinity
    }),
    // This instance extracts shared chunks from code splitted chunks and bundles them
    // in a separate chunk, similar to the vendor chunk
    // see: https://webpack.js.org/plugins/commons-chunk-plugin/#extra-async-commons-chunk
    new webpack.optimize.CommonsChunkPlugin({

      name: 'app',
      async: 'vendor-async',
      children: true,
      minChunks: 3
    }),

    // copy custom static assets
    new CopyWebpackPlugin([
      {

        from: path.resolve(__dirname, '../static'),
        to: config.build.assetsSubDirectory,
        ignore: ['.*']
      }
    ])
  ].concat(utils.htmlPlugin())    // 重点
文章参考资料:
Vue单页面与多页面的区别
码云地址