-
 火狐截图_2020-02-11T08-36-22.554Z.png
Articles - ggpubr: Publication Ready Plots
-
ggplot2 - Easy Way to Mix Multiple Graphs on The Same Page
作者: kassambara
日期:01/09/2017
翻译:谢俊飞
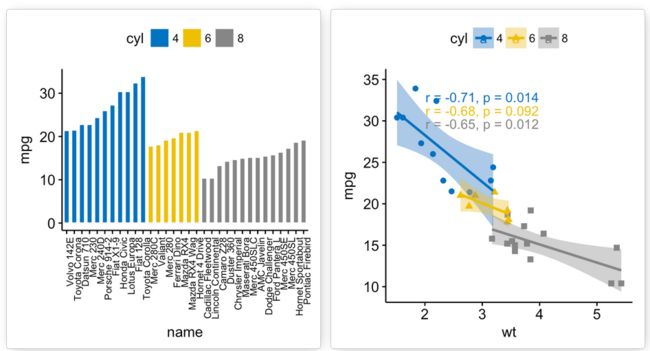
在同一页面上排列多个ggplot2图形,标准R函数 par()和 layout()并不能满足需求。
基本解决方案是使用gridExtra 包,该软件包具有以下功能:
- grid.arrange() 和 arrangeGrob()在一页上排列多个ggplots;
- marrangeGrob() 用于在多个页面上排列多个ggplots。
但是,这些功能并不能对齐绘图面板 ; 取而代之的是,将图简单地按原样放置到网格中,因此轴并不能对齐。
如果需要进行轴对齐,则可以切换到Cowplot包,该程序包包含带有align参数的函数 plot_grid()。 但是,Cowplot包不包含任何用于多页布局的解决方案。 因此,我们提供了函数ggarrange() [ggpubr包],这是对plot_grid()函数的包装,可在多个页面上排列多个ggplots。 它还可以为多个图创建通用的唯一图例。
 #组织架构图
 R base package
        par()和 layout()
gridExtra package
        一页排图:grid.arrange()  和 arrangeGrob()
        多页排图:marrangeGrob()
Cowplot package
        轴对齐:plot_grid( align = " ")
ggpubr package
        多页布局:ggarrange()
本文将逐步向你展示如何使用以下R包(ggpubr,cowplot和gridExtra)中的帮助功能,在同一页面上以及在多个页面上组合多个ggplots图形。 我们还将介绍如何将已排列的图片导出到文件中。
准备工作
-
需要的R包
你需要安装R包ggpubr(版本> = 0.1.3),以轻松创建基于ggplot2的发布就绪图。
我们建议从GitHub安装最新的开发版本,如下所示:
if (!requireNamespace("BiocManager", quietly = TRUE))
    install.packages("BiocManager")
BiocManager::install("ggpubr")
请注意,安装ggpubr会自动安装gridExtra和cowplot软件包。 因此无需重新安装。
加载ggpubr
library(ggpubr)
-
数据集演示
数据: ToothGrowth 和 mtcars 数据集.
# ToothGrowth
data("ToothGrowth")
head(ToothGrowth)

# mtcars
data("mtcars")
mtcars$name <- rownames(mtcars)
mtcars$cyl <- as.factor(mtcars$cyl)
head(mtcars[, c("name", "wt", "mpg", "cyl")])
绘制图片
在这里,我们将使用ggpubr中基于ggplot2的绘图功能。 你可以使用任何ggplot2函数来创建所需的绘图,以便以后进行排列。
我们先创建4个不同的图
- 使用ToothGrowth数据集的箱形图和点图
- 使用mtcars数据集的条形图和散点图
在下一部分中,你将学习如何使用特定功能来组合这些图。 - 绘制箱形图和点图:
# Box plot (bp)
bxp <- ggboxplot(ToothGrowth, x = "dose", y = "len",
                 color = "dose", palette = "jco")
bxp
# Dot plot (dp)
dp <- ggdotplot(ToothGrowth, x = "dose", y = "len",
                color = "dose",palette = "jco", binwidth = 1)
dp
- 绘制排序的条形图和散点图:
创建有序的条形图。 通过分组变量"cyl"更改填充颜色。 排序将在整体范围内进行,但不会按组进行。
# 条形图(bp)
bp <- ggbarplot(mtcars, x = "name", y = "mpg",
          fill = "cyl",               # 通过"cyl"更改填充颜色
          color = "white",            # 将栏边框颜色设置为白色
          palette = "jco",            #  jco颜色板. 查看 ?ggpar
          sort.val = "asc",           # 按升序排序
          sort.by.groups = TRUE,      # 每个组内排序
          x.text.angle = 90           #垂直旋转x轴文本
          )
bp + font("x.text", size = 8)
# 散点图 (sp)
sp <- ggscatter(mtcars, x = "wt", y = "mpg",
                add = "reg.line",               # 添加回归线
                conf.int = TRUE,                #添加置信区间
                color = "cyl", palette = "jco", # 按组"cyl"更改颜色
                shape = "cyl"                   # 按组"cyl"更改点的形状
                )+
  stat_cor(aes(color = cyl), label.x = 3)       # 添加相关系数
sp
在一页上排列图片
要在一个页面上排列多个图片,我们将使用ggarrange()[在ggpubr中],它是对plot_grid()[在cowplot包中]函数的包装。 与标准函数plot_grid()相比,ggarange()可以在多个页面上排列多个图片。
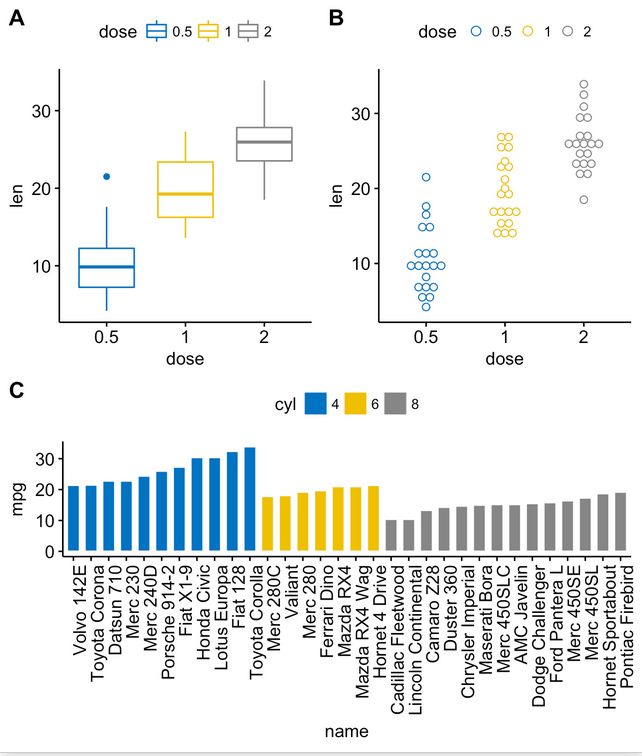
ggarrange(bxp, dp, bp + rremove("x.text"),
          labels = c("A", "B", "C"),
          ncol = 2, nrow = 2)
另外,你也可以使用功能* plot_grid()* [cowplot包]:
library(cowplot)
plot_grid(bxp, dp, bp + rremove("x.text"),
          labels = c("A", "B", "C"),
          ncol = 2, nrow = 2)
或者,函数grid.arrange() [gridExtra包]:
library("gridExtra")
grid.arrange(bxp, dp, bp + rremove("x.text"),
             ncol = 2, nrow = 2)
注释排列的图形
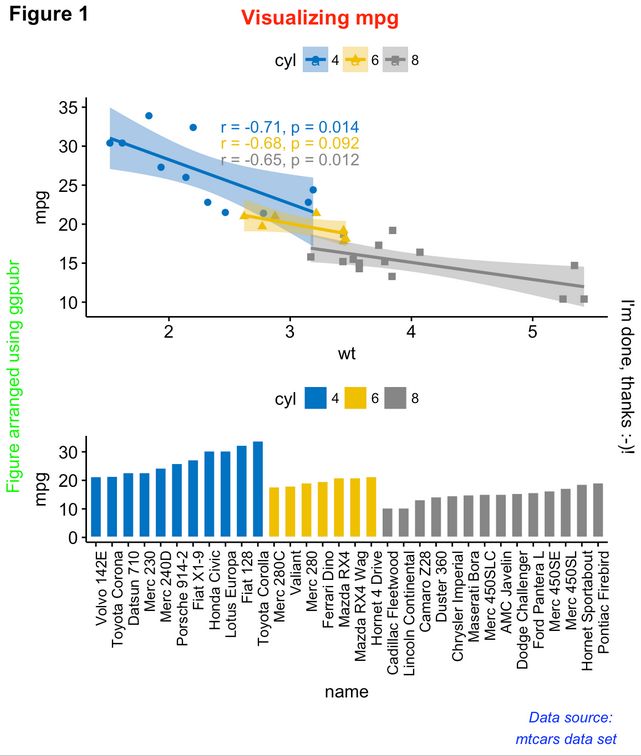
R函数:annotate_figure() [ ggpubr包]
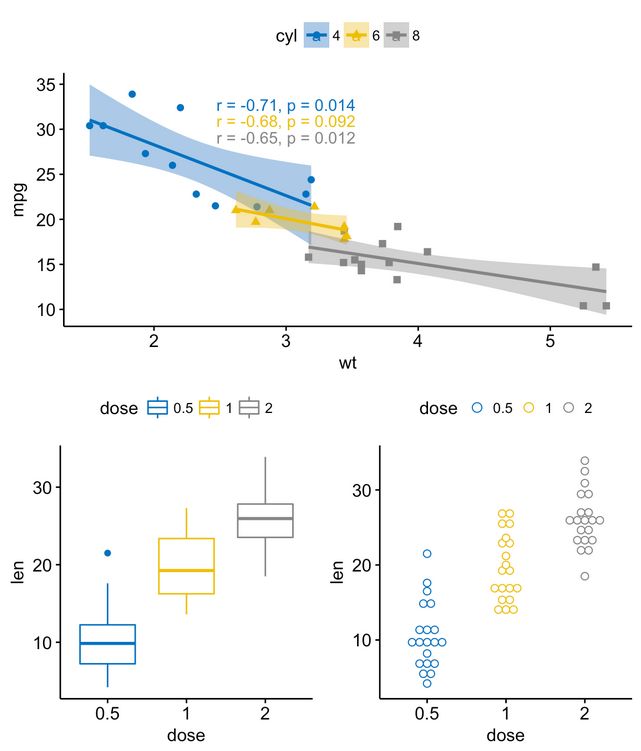
figure <- ggarrange(sp, bp + font("x.text", size = 10),
                    ncol = 1, nrow = 2)
annotate_figure(figure,
                top = text_grob("Visualizing mpg", color = "red", face = "bold", size = 14),
                bottom = text_grob("Data source: \n mtcars data set", color = "blue",
                                   hjust = 1, x = 1, face = "italic", size = 10),
                left = text_grob("Figure arranged using ggpubr", color = "green", rot = 90),
                right = "I'm done, thanks :-)!",
                fig.lab = "Figure 1", fig.lab.face = "bold"
                )
注意,函数annotate_figure()支持任何ggplots。
对齐绘图面板
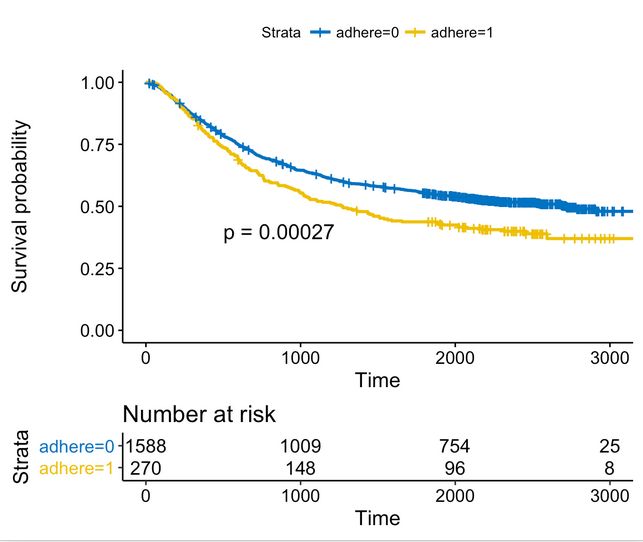
一个真实的例子是,例如,当绘制生存曲线并将风险表放置在主图下时。
为了说明这种情况,我们将使用survminer包。 首先,使用install.packages("survminer")安装,然后键入以下内容:
# 拟合生存曲线
library(survival)
fit <- survfit( Surv(time, status) ~ adhere, data = colon )
# 绘制生存曲线
library(survminer)
ggsurv <- ggsurvplot(fit, data = colon,
                     palette = "jco",                              # jco颜色板
                     pval = TRUE, pval.coord = c(500, 0.4),        # 添加p值
                     risk.table = TRUE                             # 添加风险表
                     )
names(ggsurv)
ggsurv是一个包含以下组件的列表:
- 图:生存曲线
- 表格:风险表图
你可以如下安排生存图和风险表:
ggarrange(ggsurv$plot, ggsurv$table, heights = c(2, 0.7),
          ncol = 1, nrow = 2)
可以看出,生存图和风险表的轴未垂直对齐。 要对齐它们,请指定参数align,如下所示。
ggarrange(ggsurv$plot, ggsurv$table, heights = c(2, 0.7),
          ncol = 1, nrow = 2, align = "v")
更改图的列/行跨度
-
使用ggpubr包
我们将使用嵌套的ggarrange()函数来更改图表的列/行跨度。
例如,使用下面的R代码:
- 散点图(sp)将位于第一行并跨越两列
- 箱形图(bxp)和点形图(dp)将首先进行排列,并分别存在于第二行和两列中
ggarrange(sp,                                                 # 第一行散点图
          ggarrange(bxp, dp, ncol = 2, labels = c("B", "C")), # 第二行箱线图和点图
          nrow = 2,
          labels = "A"                                        # 散点图的标签
          )
-
使用cowplot包
- ggdraw()* + draw_plot() + draw_plot_label() [cowplot包]函数的组合可用于将图形放置在具有特定大小的特定位置。
ggdraw(), 初始化一个空的绘图画布:
ggdraw()
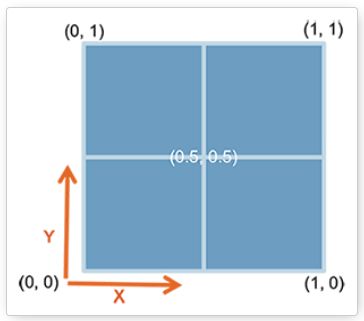
请注意,默认情况下,坐标从0到1,并且点(0,0)在画布的左下角(请参见下图)。
draw_plot(). 将绘图放置在绘图画布上的某个位置:
draw_plot(plot, x = 0, y = 0, width = 1, height = 1)
- plot:要放置的绘图(ggplot2或gtable)
- x,y:绘图左下角的x / y位置。
- width, height:图的宽度和高度
draw_plot_label()。 在图的左上角添加图标签。 它可以处理带有关联坐标的标签向量。
draw_plot_label(label, x = 0, y = 1, size = 16, ...)
- label:要绘制的标签向量
- x,y:分别包含标签的x和y位置的向量
- size:要绘制的标签的字体大小
例如,你可以组合多个具有特定位置和大小的图,如下所示:
library("cowplot")
ggdraw() +
  draw_plot(bxp, x = 0, y = .5, width = .5, height = .5) +
  draw_plot(dp, x = .5, y = .5, width = .5, height = .5) +
  draw_plot(bp, x = 0, y = 0, width = 1, height = 0.5) +
  draw_plot_label(label = c("A", "B", "C"), size = 15,
                  x = c(0, 0.5, 0), y = c(1, 1, 0.5))
-
使用gridExtra包
rangingGrop() [gridExtra包]函数有助于更改绘图的行、列跨度。
例如,使用下面的代码:
- 散点图(sp)将位于第一行并跨越两列
- 箱形图(bxp)和点形图(dp)将位于第二行,两个不同列中的两个图
library(gridExtra)
grid.arrange(sp,                             # 第一行,一个图跨越两列
             arrangeGrob(bxp, dp, ncol = 2), # 第二行,在2个不同的列中包含2个图
             nrow = 2)                       # 行数
也可以在grid.arrange()函数中使用参数layout_matrix来创建复杂的布局。
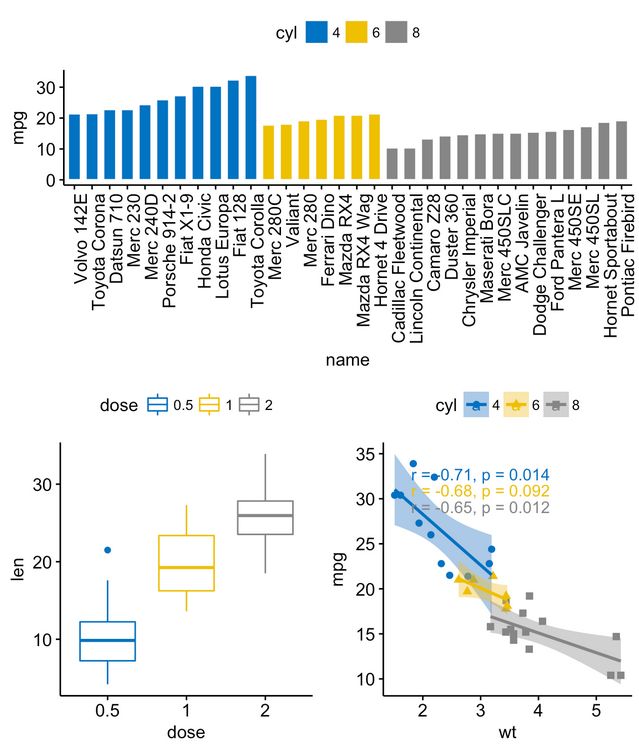
在layout_matrix下面的R代码中,是2x2矩阵(2列2行)。 第一行全为1,这是第一幅图所在的地方,横跨两列; 第二行包含图2和3,各占据一列。
grid.arrange(bp,                                    # 条形图横跨两列
             bxp, sp,                               # 箱形图和散点图
             ncol = 2, nrow = 2,
             layout_matrix = rbind(c(1,1), c(2,3)))
请注意,也可以使用辅助函数draw_plot_label()[cowplot包]注释grid.arrange()函数的输出。
为了轻松注释grid.arrange()/ rangeGrob()输出(一个gtable),你应该首先使用函数as_ggplot()[ggpubr包]将其转换为ggplot。 接下来,你可以使用函数draw_plot_label()[在cowplot中]对其进行注释。
library("gridExtra")
library("cowplot")
# 使用arrangeGrob排列图片
# 返回gtable (gt)
gt <- arrangeGrob(bp,                               #条形图跨越两列
             bxp, sp,                               # 箱线图和散点图
             ncol = 2, nrow = 2,
             layout_matrix = rbind(c(1,1), c(2,3)))
# Add labels to the arranged plots
p <- as_ggplot(gt) +                                     # 转换为ggplot
  draw_plot_label(label = c("A", "B", "C"), size = 15,
                  x = c(0, 0, 0.5), y = c(1, 0.5, 0.5))  # 添加标签
p
在上面的R代码中,我们使用rangingGrob()代替了grid.arrange()。
请注意,这两个函数之间的主要区别在于,grid.arrange()会自动输出排列图。
由于我们想在绘制图形之前对其进行注释,因此在这种情况下,最好使用函数arrangeGrob()。
-
使用grid 包
可以在grid.layout()函数的帮助下使用grid 包来创建复杂的布局。 它还提供了辅助函数viewport()来定义布局上的区域或视口。 函数print()用于将图放置在指定区域中。
不同的步骤可以总结如下:
- 创建图:p1,p2,p3,…
- 使用函数grid.newpage()移至网格设备上的新页面
- 创建一个布局2X2-列数= 2; 行数= 2
- 定义网格视口:图形设备上的矩形区域
- 将图打印到视口中
library(grid)
# 移至新页面
grid.newpage()
# 创建布局:nrow = 3,ncol = 2
pushViewport(viewport(layout = grid.layout(nrow = 3, ncol = 2)))
# 辅助功能,用于在布局上定义区域
define_region <- function(row, col){
  viewport(layout.pos.row = row, layout.pos.col = col)
}
# 排列图片
print(sp, vp = define_region(row = 1, col = 1:2))   # 横跨两列
print(bxp, vp = define_region(row = 2, col = 1))
print(dp, vp = define_region(row = 2, col = 2))
print(bp + rremove("x.text"), vp = define_region(row = 3, col = 1:2))
将通用图例用于组合的图.
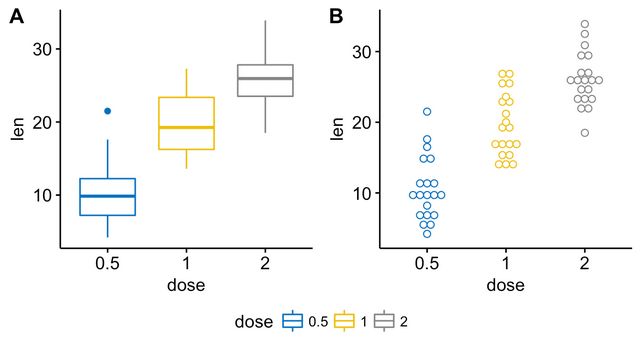
将共用图例放在排列图的边缘,可以将ggarrange()[ggggbr包]与以下参数一起使用:
- common.legend = TRUE:将公共图例放在页边
- legend:指定图例位置。 允许的值包括(“ top”,“ bottom”,“ left”,“ right”)之一
ggarrange(bxp, dp, labels = c("A", "B"),
          common.legend = TRUE, legend = "bottom")
具有边际密度图的散点图
# 按组 ("Species")着色散点图
sp <- ggscatter(iris, x = "Sepal.Length", y = "Sepal.Width",
                color = "Species", palette = "jco",
                size = 3, alpha = 0.6)+
  border()
# x(上图)和y(右图)的边际密度图
xplot <- ggdensity(iris, "Sepal.Length", fill = "Species",
                   palette = "jco")
yplot <- ggdensity(iris, "Sepal.Width", fill = "Species",
                   palette = "jco")+
  rotate()
# 清理
yplot <- yplot + clean_theme()
xplot <- xplot + clean_theme()
#排列图片
ggarrange(xplot, NULL, sp, yplot,
          ncol = 2, nrow = 2,  align = "hv",
          widths = c(2, 1), heights = c(1, 2),
          common.legend = TRUE)
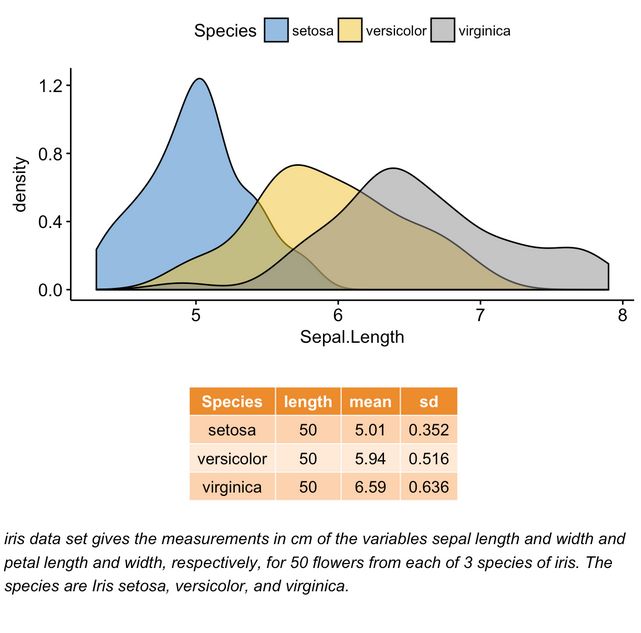
混排表格,文本和图片
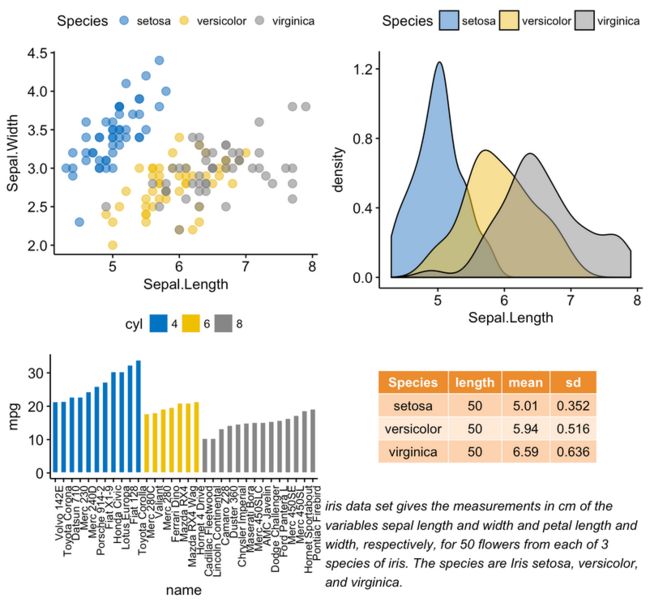
在本部分中,我们将展示如何在图表旁边绘制表格和文本。 使用 iris数据集。我们首先创建以下图:
- 变量“ Sepal.Length”的密度图。 R函数:ggdensity()[ggpubr包]
- 摘要表,其中包含Sepal.Length的描述统计量(平均值,标准差,…)。
- 用于计算描述性统计信息的R函数:desc_statby()[ggpubr包]。
- 用于绘制文本表的R函数:ggtexttable()[ggpubr包]。
- 文字段落。 R函数:ggparagraph[ggpubr包]。
我们使用函数ggarrang()[ggpubr包]来完成排列、组合三个图
# "Sepal.Length"密度图
#::::::::::::::::::::::::::::::::::::::
density.p <- ggdensity(iris, x = "Sepal.Length",
                       fill = "Species", palette = "jco")
#绘制Sepal.Length汇总表
#::::::::::::::::::::::::::::::::::::::
# 按组计算描述性统计
stable <- desc_statby(iris, measure.var = "Sepal.Length",
                      grps = "Species")
stable <- stable[, c("Species", "length", "mean", "sd")]
# 汇总表图,主题中橙色
stable.p <- ggtexttable(stable, rows = NULL,
                        theme = ttheme("mOrange"))
# 文本
#::::::::::::::::::::::::::::::::::::::
text <- paste("iris data set gives the measurements in cm",
              "of the variables sepal length and width",
              "and petal length and width, respectively,",
              "for 50 flowers from each of 3 species of iris.",
             "The species are Iris setosa, versicolor, and virginica.", sep = " ")
text.p <- ggparagraph(text = text, face = "italic", size = 11, color = "black")
#在同一页面上排列图
ggarrange(density.p, stable.p, text.p,
          ncol = 1, nrow = 3,
          heights = c(1, 0.5, 0.3))
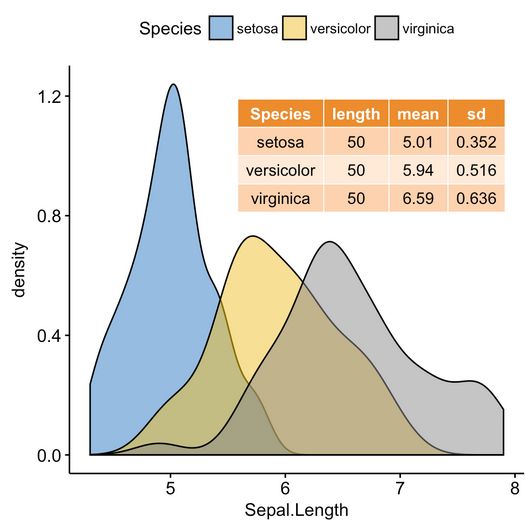
在图片中插入图形元素
ggplot2中的*annotation_custom() *可用于在ggplot的绘图区域内添加表、图片或其他基于网格的元素。 格式为:
annotation_custom(grob, xmin, xmax, ymin, ymax)
- grob:要显示的外部图形元素
- xmin,xmax:数据坐标中的x位置(水平位置)
- ymin,ymax:数据坐标中的y位置(垂直位置)
-
将表放在图中
我们将使用在上一节中创建的图表density.p和stable.p。
density.p + annotation_custom(ggplotGrob(stable.p),
                              xmin = 5.5, ymin = 0.7,
                              xmax = 8)
-
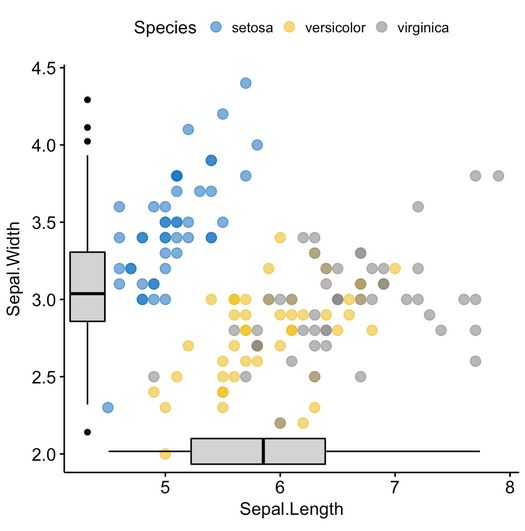
将箱形图放在图中
- 使用iris数据集创建y ="Sepal.Width"和x ="Sepal.Length"的散点图。 R函数ggscatter()[ggpubr包]
- 分别创建具有透明背景的x和y变量的箱形图。 R函数:ggboxplot()[ggpubr]。
将箱形图转换为在网格术语中称为“抓图”的图形对象。 R函数ggplotGrob()[ggplot2包]。- 将箱形图样图块放入散点图内。 R函数:annotation_custom()[ggplot2包]。
由于插入的箱线图与某些点重叠,因此箱线图使用透明背景。
# 按组("Species")着色散点图
#::::::::::::::::::::::::::::::::::::::::::::::::::::::::::
sp <- ggscatter(iris, x = "Sepal.Length", y = "Sepal.Width",
                color = "Species", palette = "jco",
                size = 3, alpha = 0.6)
# 创建x / y变量的箱线图
#::::::::::::::::::::::::::::::::::::::::::::::::::::::::::
# x变量的箱线图
xbp <- ggboxplot(iris$Sepal.Length, width = 0.3, fill = "lightgray") +
  rotate() +
  theme_transparent()
# y变量的箱线图
ybp <- ggboxplot(iris$Sepal.Width, width = 0.3, fill = "lightgray") +
  theme_transparent()
# 创建外部图形对象
#在Grid中称为"grop"
xbp_grob <- ggplotGrob(xbp)
ybp_grob <- ggplotGrob(ybp)
# 将箱线图放置在散点图内
#::::::::::::::::::::::::::::::::::::::::::::::::::::::::::
xmin <- min(iris$Sepal.Length); xmax <- max(iris$Sepal.Length)
ymin <- min(iris$Sepal.Width); ymax <- max(iris$Sepal.Width)
yoffset <- (1/15)*ymax; xoffset <- (1/15)*xmax
# 在散点图中插入xbp_grob
sp + annotation_custom(grob = xbp_grob, xmin = xmin, xmax = xmax,
                       ymin = ymin-yoffset, ymax = ymin+yoffset) +
  # 在散点图中插入ybp_grob
  annotation_custom(grob = ybp_grob,
                       xmin = xmin-xoffset, xmax = xmin+xoffset,
                       ymin = ymin, ymax = ymax)
-
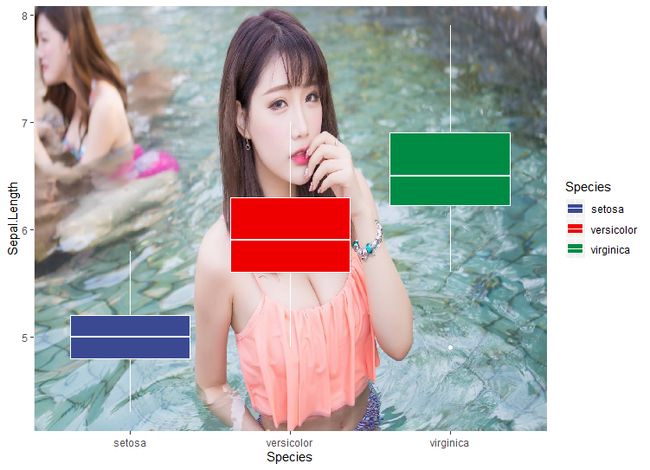
将背景图像添加到ggplot2图形
导入背景图像: 根据背景图像的格式,使用函数readJPEG()[jpeg包]或函数readPNG()[png包]。
为测试以下示例,请确保已安装png软件包。 您可以使用install.packages("png")命令进行安装。
# 导入图片
library(jpeg)
girl  <-  readJPEG("C:/Users/Administrator/Documents/jpeggirl01.jpg")
将ggplot与背景图像合并。 R函数:background_image()[ggpubr包]。
library(ggplot2)
library(ggpubr)
ggplot(iris, aes(Species, Sepal.Length))+
  background_image(girl)+
  geom_boxplot(aes(fill = Species), color = "white")+
  fill_palette("aaas")
通过指定参数alpha来更改箱线图填充颜色的透明度。 值应为[0,1],其中0为完全透明,1为不透明。
library(ggplot2)
library(ggpubr)
ggplot(iris, aes(Species, Sepal.Length))+
  background_image(img)+
  geom_boxplot(aes(fill = Species), color = "white", alpha = 0.5)+
  fill_palette("aaas")
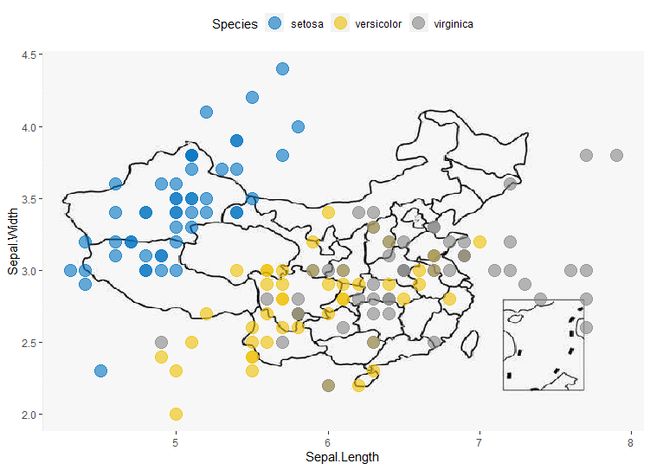
另一个示例,覆盖了China地图和ggplot2:
china <- readJPEG("C:/Users/Administrator/Documents/china.jpg")
ggplot(iris, aes(x = Sepal.Length, y = Sepal.Width)) +
  background_image(china)+
  geom_point(aes(color = Species), alpha = 0.6, size = 5)+
  color_palette("jco")+
  theme(legend.position = "top")
多页排图
如果有一系列图片,比如20个,需要排列这些图并将它们放置在多页上。 每页有4个地块,则需要5页才能容纳20个图。
函数ggarrange()[ggpubr包]提供了一种方便的解决方案,可以在多个页面上排列多个ggplots。 在指定参数nrow和ncol之后,函数ggarrange()会自动计算保存绘图列表所需的页数。 它返回一个排列好的图片列表。
例如以下R代码:
multi.page <- ggarrange(bxp, dp, bp, sp,
                        nrow = 1, ncol = 2)
返回两页的列表,每页两个图。 你可以按如下所示可视化每个页面:
multi.page[[1]] # 查看第一页
multi.page[[2]] # 查看第二页
您还可以使用函数ggexport()[ggpubr]将排列好的图导出到pdf文件:
ggexport(multi.page, filename = "multi.page.ggplot2.pdf")
请注意,也可以使用功能marrangeGrob()[gridExtra包]创建多页输出。
library(gridExtra)
res <- marrangeGrob(list(bxp, dp, bp, sp), nrow = 1, ncol = 2)
# 到处为pdf文件
ggexport(res, filename = "multi.page.ggplot2.pdf")
# 交互式可视化
res
使用ggarrange()嵌套布局
我们将重新排列在(@ref(mix-table-text-and-ggplot)) 和 (@ref(create-some-plots))部分中创建的绘图。
p1 <- ggarrange(sp, bp + font("x.text", size = 9),
                ncol = 1, nrow = 2)
p2 <- ggarrange(density.p, stable.p, text.p,
                ncol = 1, nrow = 3,
                heights = c(1, 0.5, 0.3))
ggarrange(p1, p2, ncol = 2, nrow = 1)
导出图片
R函数:ggexport()[ggpubr包]。
首先,在iris数据集中创建与变量Sepal.Length,Sepal.Width,Petal.Length和Petal.Width对应的4个图片。
plots <- ggboxplot(iris, x = "Species",
                   y = c("Sepal.Length", "Sepal.Width", "Petal.Length", "Petal.Width"),
                   color = "Species", palette = "jco"
                   )
plots[[1]]  # 打印第一张图
plots[[2]]  # 打印第二个图,依此类推...
接下来,您可以将单个图导出到文件(pdf,eps或png)(每页一个图)。 也可以每页2个排列的图片。
- 将单个图导出到pdf文件(每页一个图):
ggexport(plotlist = plots, filename = "test.pdf")
排列和导出。 在同一页面上指定nrow和ncol以展示多个图:
ggexport(plotlist = plots, filename = "test.pdf",
         nrow = 2, ncol = 1)
致谢
我们衷心感谢所有ggpubr依赖包的开发人员所做的努力:
- Baptiste Auguie (2016). gridExtra: Miscellaneous Functions for “Grid” Graphics. R package version 2.2.1. https://CRAN.R-project.org/package=gridExtra
- Claus O. Wilke (2016). cowplot: Streamlined Plot Theme and Plot Annotations for ‘ggplot2’. R package version 0.7.0. https://CRAN.R-project.org/package=cowplot
- H. Wickham. ggplot2: Elegant Graphics for Data Analysis. Springer-Verlag New York, 2009.

