在使用UIButton的时候正常设置文字和图片之后 ,图片和文字的位置默认的是并排水平居中button

image
这时需要使用
UIEdgeInsetsMake(CGFloat top, CGFloat left, CGFloat bottom, CGFloat right)
  button.imageEdgeInsets = UIEdgeInsetsMake(0, 0, 0, 0);
 button.titleEdgeInsets = UIEdgeInsetsMake(0, 0, 0, 0);
四个参数分别代表 距离button上,左,下,右的距离
我们调整下图片和文字的位置
leftWith 暂时表示屏幕宽度
24 是 图片的宽度
        button.imageEdgeInsets = UIEdgeInsetsMake(-3, (leftWith/3-24)/2, 15, 0);
        button.titleEdgeInsets = UIEdgeInsetsMake(27, -(leftWith/3-24)/2, 0, 0);
设置之后看下效果

image
另外有的时候button上面有文字 我们又想让文字在某一处折行
我们设置
    button.titleLabel.numberOfLines = 2;
    button.titleLabel.textAlignment = NSTextAlignmentCenter;
然后在你需要折行的地方加上'\n'
[button setTitle:@"蓝瘦\n香菇" forState:UIControlStateNormal];
我的实际项目中例子:
UIButton *addShoppingCart =[FactoryUI createButtonWithFrame:CGRectMake(leftWith, 0, rightWith*2/5, 49) title:@"¥66.00\n加入购物车" titleColor:[UIColor whiteColor] backgroundColor:RGB(255, 128, 147, 1) type:UIButtonTypeCustom target:self selector:@selector(addShopCart)];
    addShoppingCart.titleLabel.font = FONT(15);//title字体大小
    addShoppingCart.titleLabel.font = [UIFont boldSystemFontOfSize:15];
    addShoppingCart.titleLabel.numberOfLines = 2;
    addShoppingCart.titleLabel.textAlignment = NSTextAlignmentCenter
效果:

image
开发中常常遇到这种需求:

image
- 文字在左,图片在右
- 图片在左,文字在右
- 图片在上,文字在下
最简单,同时也是最笨的方法就是自己用两个控件UILabel和UIImageView来实现。
其实我们都知道,一个按钮控件就可以搞定,因为按钮里本身可以同时设置图片和文字,我们需要做的只是调整一下文字和图片的位置。
因为按钮默认的是“图片在左,文字在右”,所以下面我们只一步一步来实现“文字在左,图片在右”和“图片在上,文字在下”
/* 获取按钮文字的宽度 获取按钮图片和文字的间距 获取图片宽度 */
CGFloat    space = 5;// 图片和文字的间距
NSString    * titleString = [NSString stringWithFormat:@"我是测试我是测"];
CGFloat    titleWidth = [titleString sizeWithAttributes:@{NSFontAttributeName:[UIFont systemFontOfSize:14]}].width;
UIImage    * btnImage = [UIImage imageNamed:@"outspread"];// 11*6
CGFloat    imageWidth = btnImage.size.width;
/*当然,为了防止文字内容过多,要做一点预防*/
CGFloat    btnWidth = 200;// 按钮的宽度
if (titleWidth > btnWidth - imageWidth - space) {
    titleWidth = btnWidth- imageWidth - space;
}
创建按钮
UIButton   * testButton = [[UIButton alloc] initWithFrame:CGRectMake(10, 100, btnWidth, 40)];
testButton.titleLabel.font = [UIFont systemFontOfSize:14];
[testButton setBackgroundColor:[UIColor greenColor]];
[testButton setTitleColor:[UIColor blackColor] forState:UIControlStateNormal];
[testButton setTitle:titleString forState:UIControlStateNormal];
[testButton setImage:btnImage forState:UIControlStateNormal];
[self.view addSubview:testButton];
按钮本身默认的是:图片在左,文字在右。并且文字和图片的边缘是UIEdgeInsetsZero。
默认效果是:
image
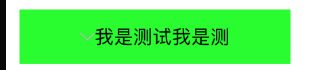
文字在左,图片在右:
 那么,想实现文字在左,图片在右,就需要文字向左边调整,图片向右边调整
 1.按钮文字向左边调整,就需要按钮文字左边扩展,右边收缩   按钮文字向左边扩展,即left方向需要扩展图片的宽度+间距*0.5; 按钮文字向右边需要收缩,即right方向需要收缩图片的宽度+间距*0.5;
 2.按钮图片向右边调整,就需要按钮图片右边扩展,左边收缩   按钮图片向右边扩展,即right方向需要扩展文字的宽度+间距*0.5; 按钮图片向左边收缩,即left方向需要搜索文字的宽度+间距*0.5

 PS:扩展就是设置负值。收缩就是设置正值

[testButton setTitleEdgeInsets:UIEdgeInsetsMake(0, -(imageWidth+space*0.5), 0, (imageWidth+space*0.5))];
[testButton setImageEdgeInsets:UIEdgeInsetsMake(0, (titleWidth + space*0.5), 0, -(titleWidth + space*0.5))];
运行效果:

image
图片在上,文字在下:
**需要先获取图片和文字的高度**
CGFloat    imageHeight = btnImage.size.height;
CGFloat    titleHeight = [titleString sizeWithAttributes:@{NSFontAttributeName:[UIFont systemFontOfSize:14]}].height;

 如果要实现上下,比如图片在上,文字在下:

 图片上移:顶部向上扩展,底部收缩 因为本身就是垂直居中的,所以移动的距离是:imageHeight*0.5 + space*0.5
 文字下移:顶部收缩,底部扩展 移动距离是:titleHeight*0.5 + space*0.5;

 这样做还不够,因为默认图片在左,文字在右。所以还要想办法让他们左右居中:
 1.图片左边收缩,右边扩展 移动的距离是:(titleWidth+imageWidth)*0.5-imageWidth*0.5 即 titleWidth*0.5;
 2.文字左边扩展,右边收缩 移动的距离是:(titleWidth+imageWidth)*0.5-titleWidth*0.5 即 imageWidth*0.5;

[testButton setImageEdgeInsets:UIEdgeInsetsMake(-(imageHeight*0.5 + space*0.5), titleWidth*0.5, imageHeight*0.5 + space*0.5, -titleWidth*0.5)];
[testButton setTitleEdgeInsets:UIEdgeInsetsMake(titleHeight*0.5 + space*0.5, -imageWidth*0.5, -(titleHeight*0.5 + space*0.5), imageWidth*0.5)];
运行效果:
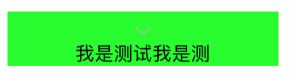
image