MyBatis学习笔记(七)——Spring集成MyBatis
前言
前几篇博客的总结内容,都是基于spring boot的配置,由于spring boot为我们屏蔽了一些细节,针对缓存的介绍并不是十分实用,这篇博客会在spring的基础上进行mybatis的集成,同时也会扫盲之前的遗留问题。
创建maven项目
创建maven项目是第一步,按理说这一步没什么可介绍的,但是有一些模块化的实用依旧需要总结一下。
1、普通maven项目
其实自己在使用idea的时候,之前想用现成的maven骨架进行项目创建,但是都没能成功。因此只能曲线救国,只能将普通的maven项目变成web项目。
这一步很简单,只需要指定groupId和artifactId就可以了。
2、普通maven项目变成web项目
web项目中最基本的就是有webapp文件夹和web.xml文件,只需要在普通maven项目中指定这两个文件就可以了。
1、在src/main目录下建立webapp文件夹,并在webapp文件夹下面建立WEB-INF文件夹,其中存放web.xml和不能直接访问的jsp文件。项目结构如下所示:
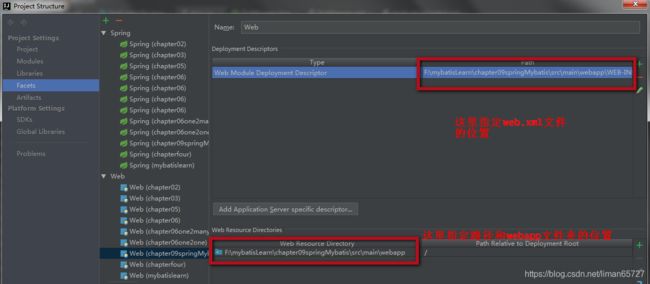
2、在facet中指定web.xml和webapp文件夹
3、Maven模块单独运行
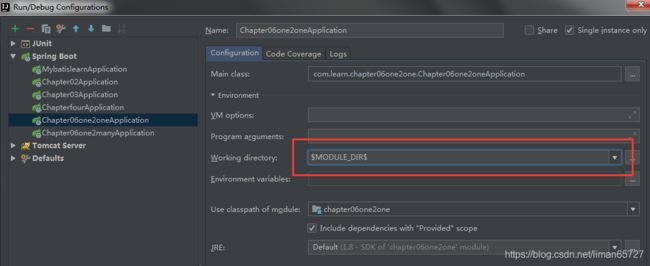
多个maven模块单独运行的时候,需要将maven模块项目运行的根目录修改一下
需要在run edit中指定working directory为$MODULE_DIR$
集成Spring和Spring MVC
这一步之前总结过很多次,但是一直不成体系,这里正好在这里梳理一遍,其实集成spring还是很方便的。
1、集成spring
导入相关引用
在pom.xml文件中增加spring-bom的依赖,这步操作之前忽略了,spring-framework-bom是spring的一个项目清单文件,由于集成spring的时候需要添加很多的spring组件依赖,为了避免使用不同版本的组件导致的版本不兼容的问题,就可以使用spring-framework-bom,在使用spring依赖时就不需要配置每个组件的版本了,这版本号就统一交给spring-framework-bom管理。
            org.springframework
            spring-framework-bom
            4.2.5.RELEASE
            pom
            import
之后再添加其他常见的spring组件,spring-context,spring jdbc,spring-tx,spring-aop,spring-aop
            org.springframework
            spring-context


            org.springframework
            spring-jdbc


            org.springframework
            spring-tx


            org.springframework
            spring-aop


            org.aspectj
            aspectjweaver
完成spring的配置文件
在resource中建立applicationContext.xml文件,spring默认的配置文件名称即为applicationContext.xml,文件内容如下:
classpath:mybatis/**/mapper/*.xml
context:component-scan这个只是配置spring的扫描包,spring会在spring指定的目录下面扫描并自动注入先关的bean
这里同时指定了mybatis的映射文件路径和mybatis的配置文件路径。并指定了mybatis的mapper接口的扫描目录。这两项后面在集成mybatis中详细讨论。
2、集成spring mvc
2.1加入spring-web和spring-mvc的引用
            org.springframework
            spring-web


            org.springframework
            spring-webmvc


            com.fasterxml.jackson.core
            jackson-databind
2.2 添加spring-mvc的配置文件
这里命名为mybatis-servlet.xml文件,在resource目录下建立该文件
mvc:annotation-driven,这个只是告知容器,项目启动Controller注解的支持
mvc:resources,这是一个可选项配置了一个简单的静态资源映射规则
context:component-scan,配置扫描controller的类,这个可以指定exclude忽略掉指定的包,也可以指定inclusion指定只扫描的包
InternalResourceViewResolver,将试图名映射成url文件,这个是试图解析器的一种。
2.3web.xml的配置
配置web.xml其实也就主要是告知web项目使用了spring和spring mvc框架,并做好相关请求数据的编码约定。
指定spring的ApplicationContext.xml文件
        contextConfigLocation
        classpath:applicationContext.xml


        org.springframework.web.context.ContextLoaderListener
指定spring-mvc的配置文件
        mybatis
        org.springframework.web.servlet.DispatcherServlet

            contextConfigLocation
            classpath:mybatis-servlet.xml

        1


        mybatis
        /
解决编码不一致的问题
        SpringEncodingFilter
        org.springframework.web.filter.CharacterEncodingFilter

            encoding
            UTF-8


            forceEncoding
            true


        SpringEncodingFilter
        /*
上述三个都加入web.xml文件即可
走到这一步了,现在可以加入一些controller测试一下,这里就不贴出测试代码了。
集成Mybatis
将mybatis集成到spring中需要使用mybatis-spring的相关内容,这里也需要加入该依赖
            org.mybatis
            mybatis-spring
            1.3.2
1、Mybatis的配置文件
同样在resource中配置mybatis-config.xml文件,文件内容如下:
这一步就类似之前在springboot的properties文件中配置mybatis的相关属性一样。
2、sqlSessionFactoryBean的配置
在spring的配置文件中配置sqlSessionFactory,具体的实现类由mybatis-spring中的SqlSessionFactoryBean实现。
classpath:mybatis/**/mapper/*.xml
在指定sqlSessionFactory的时候,指定了typeAliasesPackage,这个是用于指定实体映射的根目录。mapperLocation:配置sqlSessionFactory扫描xml映射文件的路径。
3、配置mybatis扫描Mapper接口
通过MapperScannerConfigurer类自动扫描所有的Mapper接口
basePackage:配置扫描的根目录
annotationClass:用户过滤被扫描的接口。
业务框架
到目前为止一些基本工作完成,可以开始设置填充业务逻辑。
1、基本准备
执行相关SQL
#加入字典表
DROP TABLE IF EXISTS sys_dict;
CREATE TABLE sys_dict(
id BIGINT(32) NOT NULL AUTO_INCREMENT COMMENT '主键',
CODE VARCHAR(64) NOT NULL COMMENT '类别',
NAME VARCHAR(64) NOT NULL COMMENT '字典名',
VALUE VARCHAR(64) NOT NULL COMMENT '字典值',
PRIMARY KEY (id)
)ENGINE=INNODB AUTO_INCREMENT=7 DEFAULT CHARSET=utf8;

INSERT INTO sys_dict VALUES ('1','性别','男','男');
INSERT INTO sys_dict VALUES ('2','性别','女','女');
INSERT INTO sys_dict VALUES ('3','季度','第一季度','l');
INSERT INTO sys_dict VALUES ('4','季度','第二季度','2');
INSERT INTO sys_dict VALUES ('5','季度','第三季度','3');
INSERT INTO sys_dict VALUES ('6','季度','第四季度','4');
2、三层架构搭建
Mapper层
package com.learn.chapter09.mapper;

import com.learn.chapter09.domain.POJO.SysDict;
import org.apache.ibatis.session.RowBounds;

import java.util.List;

/**
 * autor:liman
 * comment:sysDict对应的mapper
 */
public interface DictMapper {

    SysDict selectByPrimaryKey(Long id);

    List selectBySysDict(SysDict sysDict, RowBounds rowBounds);

    int insert(SysDict sysDict);

    int updateById(SysDict sysDict);

    int deleteById(Long id);

}
对应的DictMapper映射
insert into sys_dict(code,name,value) values (#{code},#{name},#{value})
update sys_dict
set code = #{code},
name = #{name},
value = #{value}
where id = #{id}
delete from sys_dict where id = #{id}
Service层:
package com.learn.chapter09.service.impl;

import com.learn.chapter09.domain.POJO.SysDict;
import com.learn.chapter09.mapper.DictMapper;
import com.learn.chapter09.service.DictService;
import org.apache.ibatis.session.RowBounds;
import org.springframework.beans.factory.annotation.Autowired;
import org.springframework.stereotype.Service;

import java.util.List;

/**
 * autor:liman
 * comment:
 */
@Service("dictService")
public class DictServiceImpl implements DictService {

    @Autowired
    private DictMapper dictMapper;

    @Override
    public SysDict findById(Long id) {
        return dictMapper.selectByPrimaryKey(id);
    }

    @Override
    public List findBySysDict(SysDict sysDict, Integer offset, Integer limit) {
        RowBounds rowBounds = RowBounds.DEFAULT;
        if(offset!=null && limit!=null){
            rowBounds = new RowBounds(offset,limit);
        }

        return dictMapper.selectBySysDict(sysDict,rowBounds);
    }

    @Override
    public boolean saveOrUpdate(SysDict sysDict) {
        if(sysDict.getId() == null){
            return dictMapper.insert(sysDict) == 1;
        }else{
            return dictMapper.updateById(sysDict) == 1;
        }
    }

    @Override
    public boolean deleteById(Long id) {
        return dictMapper.deleteById(id) == 1;
    }
}
Controller层:
package com.learn.chapter09.controller;

import com.learn.chapter09.domain.POJO.SysDict;
import com.learn.chapter09.service.DictService;
import com.sun.org.apache.xpath.internal.operations.Mod;
import org.springframework.beans.factory.annotation.Autowired;
import org.springframework.stereotype.Controller;
import org.springframework.ui.ModelMap;
import org.springframework.web.bind.annotation.RequestMapping;
import org.springframework.web.bind.annotation.RequestMethod;
import org.springframework.web.bind.annotation.RequestParam;
import org.springframework.web.servlet.ModelAndView;

import javax.jws.WebParam;
import java.util.List;

/**
 * autor:liman
 * comment:
 */
@Controller
@RequestMapping("/dicts")
public class DictController {

    @Autowired
    private DictService dictService;

    @RequestMapping
    public ModelAndView dicts(SysDict sysDict,Integer offset,Integer limit){
        ModelAndView mv = new ModelAndView();
        List dicts = dictService.findBySysDict(sysDict,offset,limit);
        mv.addObject("dicts",dicts);
        return mv;
    }

    @RequestMapping(value="add",method = RequestMethod.GET)
    public ModelAndView add(Long id){
        System.out.println(id);
        ModelAndView mv = new ModelAndView("dicts_add");
        SysDict sysDict;
        //如果id为空
        if(id == null){
            sysDict = new SysDict();
        }else{
            sysDict = dictService.findById(id);
        }
        mv.addObject("model",sysDict);
        return mv;
    }

    @RequestMapping(value="add",method = RequestMethod.POST)
    public ModelAndView save(SysDict sysDict){
        ModelAndView mv = new ModelAndView("dicts_add");
        try{
            dictService.saveOrUpdate(sysDict);
            mv.setViewName("redirect:/dicts");
        }catch (Exception e){
            mv.setViewName("dicts_add");
            mv.addObject("msg",e.getMessage());
            mv.addObject("model",sysDict);
        }
        return mv;
    }

    @RequestMapping(value = "delete",method = RequestMethod.POST)
    public ModelMap delete(@RequestParam Long id){
        ModelMap modelMap = new ModelMap();
        try{
            boolean success = dictService.deleteById(id);
            modelMap.put("success",success);
        }catch (Exception e){
            modelMap.put("success",false);
            modelMap.put("message",e.getMessage());
        }
        return modelMap;
    }
}
一些页面:
dicts.jsp
<%@ page language="java" contentType="text/html;charset=UTF8" pageEncoding="UTF8" %>
<%@ taglib prefix="fmt" uri="http://java.sun.com/jsp/jstl/fmt" %>
<%@ taglib prefix="c" uri="http://java.sun.com/jsp/jstl/core" %>
<%@ page import="java.util.Date" %>
<%
String path = request.getContextPath();
String basePath = request.getScheme() + "://" + request.getServerName() + ":" + request.getServerPort() + path + "/";
%>
<%----%>
字典信息
字典管理
类别名
字典名
字典值
操作[新增]
${dict.code}
${dict.name}
${dict.value}
[编辑]
[ 删除]
dicts_add.jsp
<%@ page language="java" contentType="text/html;charset=UTF8" pageEncoding="UTF8" %>
<%@ taglib prefix="fmt" uri="http://java.sun.com/jsp/jstl/fmt" %>
<%@ taglib prefix="c" uri="http://java.sun.com/jsp/jstl/core" %>
<%@ page import="java.util.Date" %>
<%
String path = request.getContextPath();
String basePath = request.getScheme() + "://" + request.getServerName() + ":" + request.getServerPort() + path + "/";
%>
<%----%>
字典维护
总结
这篇博客完成了spring中集成mybatis,为后面的学习缓存打下了基础,同时也梳理了如何完成集成spring等框架,但是没有集成缓存和日志工具,导致调试的时候日志信息不完全,因此后续还需优化,同时本文中大部分实例步骤均来自于《Mybatis从入门到精通》一书。源代码地址:源代码地址


