boundingrect java_OpenCV 学习笔记03 boundingRect、minAreaRect、minEnclosingCircle、boxPoints、int0、circle、re...
3 cv2.minEnclosingCircle
作用:使用迭代算法( iterative algorithm)查找包含2D点集的最小区域的圆(Finds a circle of the minimum area enclosing a 2D point set)。
cv2.minEnclosingCircle(points) -> center, radius
参数:
points - 2D点矢量(vector of 2D points)
返回值:
center - 圆心 (x, y)
radius - 半径 r
如:((426.0, 415.5), 321.7628173828125)
代码示例:
# calculate center and radius of minimum enclosing circle
# 会返回一个二元组,
# 第一个元素为圆心的坐标组成的元组,第二个元素为圆的半径值。
(x, y), radius = cv2.minEnclosingCircle(c)
# 转为整数 cast to integers
center =(int(x), int(y))
radius = int(radius)
# 绘圆 draw the circle
img = cv2.circle(img, center, radius, (0, 255, 0), 2)
或者
cen, rad = cv2.minEnclosingCircle(c)
cen =tuple(np.int0(cen))
rad = np.int32(rad)
img = cv2.circle(img, cen, rad, (0, 255, 0), 2)
运行
注意:
cv2.circle() 函数使用时,圆心参数不能是数列array,必须是元组tuple
绘制圆cv2.circle() 函数的使用方法。
3.1 附1:cv.circle()
作用:画圆环或实心圆
cv2.circle(img, center, radius, color[, thickness[, lineType[, shift]]]) -> img
参数:
img - 目标图像
center - int 圆心,必须是元组tuple形式、不能是列表 list,必须是整型int、不能是浮点型float;
radius - int 半径,必须是整型int、不接受浮点型float。
color - 圆的颜色
thickness - int thickness = 1 圆轮廓的厚度(正数 positive),若为负值(Negative values),意味全填充的实心圆。
lineType - int lineType = 8 圆轮廓的线性,
8 (or omitted) - 8-connected line.
4 - 4-connected line.
CV_AA - antialiased line.
shift - int shift = 0 help帮助文档直译 圆心、半径值的小数位(Number of fractional bits in the coordinates of the center and in the radius value),事实上,当执行代码时,貌似又不是这个意思 。
以上若不是整数int,则会报错 TypeError: integer argument expected, got float
示例代码如下
(x, y), radius = cv2.minEnclosingCircle(c)
center = (int(x), int(y))
radius = int(radius)
img = cv2.circle(
img, center, radius, (0, 255, 0),
thickness=2,
lineType=8,
# shift=0)
# shift=1)
# shift=2)
# shift=3)
# shift=4)
# shift=5)
shift=6)
分别运行,其结果:
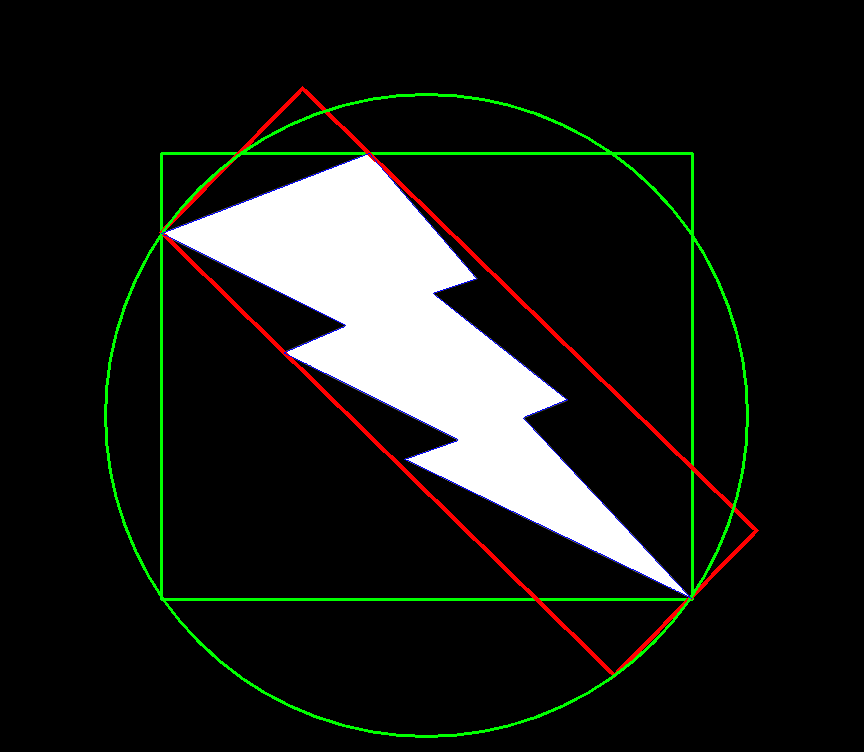
需要注意的是不同的图,其运行代码后的识别效果是不同的,我当时用 ppt 制备 闪电 lighning 时并没有在意图片格式,就造成了运行代码后的识别结果与别人的不一致,后来将图片保存成黑底白图,和别人的图像一致了。
说明:
1)在运行代码时图片没有红色边框,为了说明每一个图,后加上的红色图像边框。
2)a、b图的大小不一样,其运行后识别的结果不一样。
3)b、d图的背底和图案颜色正好相反,其由于函数 cv2.threshold()的参数一致,所以其结果也不一致。
4)c、d图的是有无背底,其运行后识别结果也有所区别。
以上只是说明同一个代码,针对图的稍微差别,其识别结果也会存在差别。以后注意这方面内容就行。暂不深究。
4 cv2.rectangle
作用:绘制一个矩形轮廓或一个填充矩形。
cv2.rectangle(img, pt1, pt2, color[, thickness[, lineType[, shift]]]) -> img
参数:
img - 待rectangle函数处理的图像
pt1 - 矩形的顶点
pt2 - 矩形的另一个顶点(但该顶点与pt2顶点相对)
color - 矩形的颜色或亮度(灰度图像)
thickness - 矩形边框的粗细,若为负值,则矩形为全填充的。int thickness=1。
lineType - Type of the line. See #LineTypes。int lineType=8。
shift - Number of fractional bits in the point coordinates.。int shift=0。
返回值:
img - 被rectangle处理过的图像。
该函数还可以直接输入矩形来替代pt1、pt2 对角点,代码如下:
cv2.rectangle(img, rec, color[, thickness[, lineType[, shift]]]) -> img
参数:
rec - 矩形,
代码示例:
# 计算出一个简单的边界框,
# 参数c为图像轮廓findContours返回值
x, y, w, h = cv2.boundingRect(c)
# 绘制矩形
# 将轮廓信息转换成(x, y)坐标,并加上矩形的高度和宽度
cv2.rectangle(img, (x,y), (x+w, y+h), (0, 255, 0), 2)
运行结果:
5 全代码分析
将上述函数中代码整理,所有的代码如下
import cv2
import numpy as np
img = cv2.imread('lightning.png',cv2.IMREAD_UNCHANGED)
# img = cv2.pyrUp(img)
img_gray = cv2.cvtColor(img.copy(), cv2.COLOR_BGR2GRAY)
ret, re_img = cv2.threshold(img_gray, 127, 255, cv2.THRESH_BINARY)
contours, hierarchy = cv2.findContours(re_img, cv2.RETR_EXTERNAL, cv2.CHAIN_APPROX_SIMPLE)
for c in contours:
# 查找矩形边界 find bounding box coordinates
# 计算出简单的边界框,返回顶点坐标、宽、高
x,y,w,h = cv2.boundingRect(c)
# 它将轮廓信息转换程(x,y)坐标,并加上矩形的高度和宽度
cv2.rectangle(img,(x,y),(x+w, y+h),(0,255,0),2)
# find minimum area
# 计算出包围目标的最小矩形区域
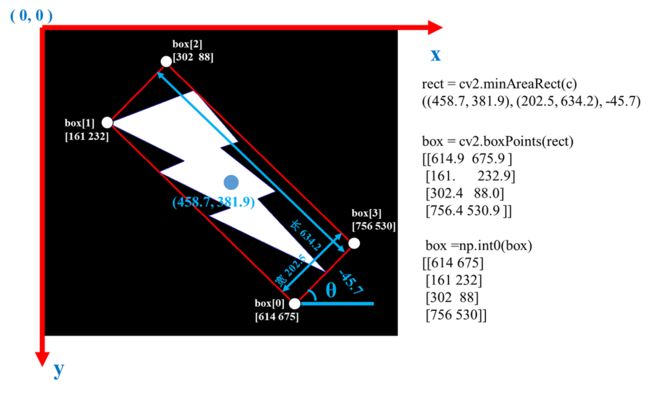
rect = cv2.minAreaRect(c)
# calculate coordinates of the minimum area rectangle
# 计算矩形的 4 个坐标点,float形式
box = cv2.boxPoints(rect)
# normalize coordinates to integers
# 将坐标值整数化
box = np.int0(box)
# draw contours
# opencv没有函数能直接从轮廓信息中计算出最小矩形顶点的坐标。
# 所以需要计算出最小矩形区域,然后计算这个矩形的顶点。
# 计算出的顶点坐标都是浮点型,而所有像素的坐标值都是整数,
# 所以需要做转换整数,然后画出这个矩形
cv2.drawContours(img, [box], 0, (0,0,255), 3)
# calculate center and radius of minimum enclosing circle
# 大多数绘图函数把绘图颜色和密度thickness放在最后两个参数里
# 最后检查的边界轮廓为最小闭圆
# minEnclosingCircle函数返回一个二元组,
# 第一个元数为圆心,第二个元素为半径
(x,y), radius = cv2.minEnclosingCircle(c)
# cast to integers
center = (int(x),int(y))
radius = int(radius)
# draw the circle
img = cv2.circle(img,center,radius,(0,255,0),2, lineType=8, shift=6)
cv2.drawContours(img,contours, -1, (255,0,0), 1)
cv2.imshow("contours",img)
cv2.waitKey()
运行:
参考:


