前言
今天手把手来教大家如何搭建基于Maven的SpringMVC WEB项目。
正文
开发环境介绍
IDE: MyEclipse 2014
jdk: 1.7
maven:apache-maven-3.1.1
好了,基本环境只要上面这些就行,maven不需要安装,只要有解压包就行。MyEclipse 2014有自带的插件,我们只要指定下路径就行。
MyEclipse 2014中Maven的配置
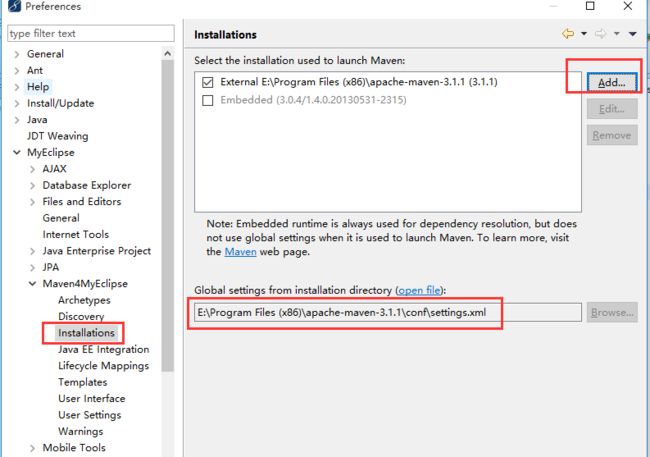
打开myeclipse中的 Window=>Preferences=>Myeclipse=>Maven4Myeclipse
配置jdk,这里我们选择1.7
配置好maven路径,也就是你之前存放maven解压包的路径
指定User Settings,对应settings.xml以及本地仓库地址,我这边是建在盘,路径为E:\m2\repository。
创建WEB项目
新建一个web项目
配置项目基本信息,项目名,java EE,java版本,其中记得要勾上Add maven support,这样才会生成带有maven的工程。
创建成功后出正确的项目结构应该是这样
配置需要的安装包
下面列出目前需要用到包,直接在pom.xl里面添加就行
  4.0.0
  SpringMVCMybatis
  SpringMVCMybatis
  0.0.1-SNAPSHOT
  war
  SpringMVCMybatis


        UTF-8
          4.1.1.RELEASE
          2.7.15
        1.7.12
        1.2.17
        3.3.0
        1.2.3


        log4j
        log4j
        ${log4j-version}


        org.slf4j
        slf4j-log4j12
        ${slf4j-version}


        org.slf4j
        slf4j-api
        ${slf4j-version}


        javax.servlet
        javax.servlet-api
        3.1.0


       org.apache.commons
       commons-lang3
       3.3


       com.alibaba
       fastjson
       1.2.1


        com.mchange
        c3p0
        0.9.5.1


        mysql
        mysql-connector-java
        5.1.37


        org.mybatis
        mybatis-spring
        ${mybatis-spring-version}


        org.mybatis
        mybatis
        ${mybatis-version}


        org.mybatis.generator
        mybatis-generator-core
        1.3.2


        org.springframework
        spring-web
        ${spring.version}


        org.springframework
        spring-core
        ${spring.version}


        org.springframework
        spring-context
        4.1.1.RELEASE


        org.springframework
        spring-beans
        ${spring.version}


        org.springframework
        spring-jdbc
        ${spring.version}


        org.springframework
        spring-webmvc
        ${spring.version}


        org.springframework
        spring-tx
        ${spring.version}


        junit
        junit
        4.11
        test


        org.springframework
        spring-test
        4.1.1.RELEASE
        test


      javax
      javaee-api
      7.0
      provided


      org.glassfish.web
      javax.servlet.jsp.jstl
      1.2.2


        maven-compiler-plugin
        2.3.2

          1.7
          1.7


        maven-war-plugin
        2.2

          3.1
          false
配置SpringMVC需要的配置文件
xml配置,注意里面配置springMvc需要用到的DispatcherServlet,指向的地址是classpath:spring/applicationContext.xml,当然此时还没创建这个applicationCVontext.xml,下一个步骤来创建。
    springmvctouchbaidu

        springmvctouchbaidu
        org.springframework.web.servlet.DispatcherServlet

            contextConfigLocation
            classpath:spring/applicationContext.xml

        1


        springmvctouchbaidu
        /


        encodingFilter
        org.springframework.web.filter.CharacterEncodingFilter

            encoding
            UTF-8


            forceEncoding
            true


        encodingFilter
        /*


        60
在src/main/resources下面创建个spring目录用来存放applicationContext.xml
后期会用的的配置很多,所以我一般会根据不同用途创建不同别名的spring配置文件,然后用applicationContext.xml统一起来。
这里我创建了 applicationContext.xml以及applicationContext-mvc.xml
applicationContext.xml配置:
applicationContext-mvc.xml配置:
                        text/plain;charset=utf-8
                        application/json;charset=utf-8
                        application/x-www-form-urlencoded
其中一些重要的配置下篇文章详细的说明
context:component-scan 用来扫描指定的路径下的包,来加载组件用的
mvc:resources 指定静态资源路径
实现一个简单的springMVC请求
配置文件配置好了,我们就来测试一下,写一个controller来实现前后台交互
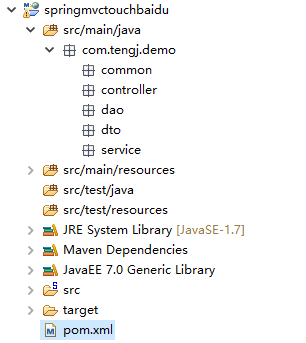
在src/main/java下面创建如下格式的文件夹。这是我习惯的写法。
common用来存放公共的类
controller控制层
service层用来处理业务逻辑
dao层用来处理数据库操作
dto层用来存放mybatis根据表自动生成的实体对象
具体结构如下图:
在controller包下面创建一个类SendToBaiduController
package com.tengj.demo.controller;
import org.springframework.stereotype.Controller;
import org.springframework.web.bind.annotation.RequestMapping;
import org.springframework.web.bind.annotation.RequestMethod;

@Controller
@RequestMapping(value="/sendBaidu")
public class SendToBaiduController {
    @RequestMapping(value="/view",method = RequestMethod.GET)
    public String index(){
        System.out.println("进来了");
        return "index";
    }

}
index.jsp代码:
<%@ page language="java" import="java.util.*" pageEncoding="UTF-8"%>
<%
String path = request.getContextPath();
String basePath = request.getScheme()+"://"+request.getServerName()+":"+request.getServerPort()+path+"/";
%>


    My JSP 'index.jsp' starting page


        跳转进来,表示springMVC流程成功!
部署到tomcat启动服务看看 输入地址是否控制台会打印“进来了”这3字,并跳转到index界面
http://localhost:8080/springmvctouchbaidu/sendBaidu/view
大家看,如图表示springMVC整体流程成功了
总结
到此,基于Maven的SpringMVC WEB项目搭建算是成功了,后续会基于这个基础添加其他的功能,比如整合数据库框架mybatis,多数据源处理,定时任务等等。下篇文章将整体上介绍springMVC的配置文件以及注解标签的使用。
一直觉得自己写的不是技术,而是情怀,一篇篇文章是自己这一路走来的痕迹。靠专业技能的成功是最具可复制性的,希望我的这条路能让你少走弯路,希望我能帮你抹去知识的蒙尘,希望我能帮你理清知识的脉络,希望未来技术之巅上有你也有我。


