一直在做一款教务系统的移动端应用,先前做的课程表控件不太满意,最近又在布局和功能上稍作调整。实现方式很普通,可以说是low,但效果如期就好,下面就开始给大家介绍此布局如何实现。
1.还是先看效果:
在电脑上显示效果不太好,部署到真机上,还是蛮不错的。
真机录完转GIF不清楚,来看大图:
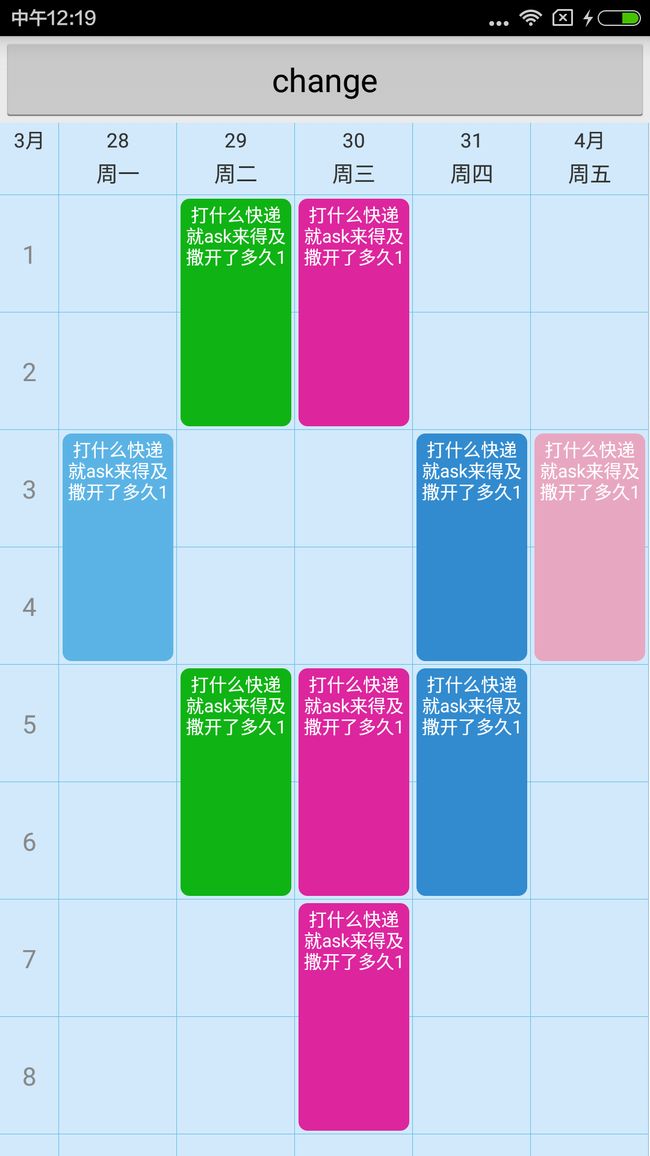
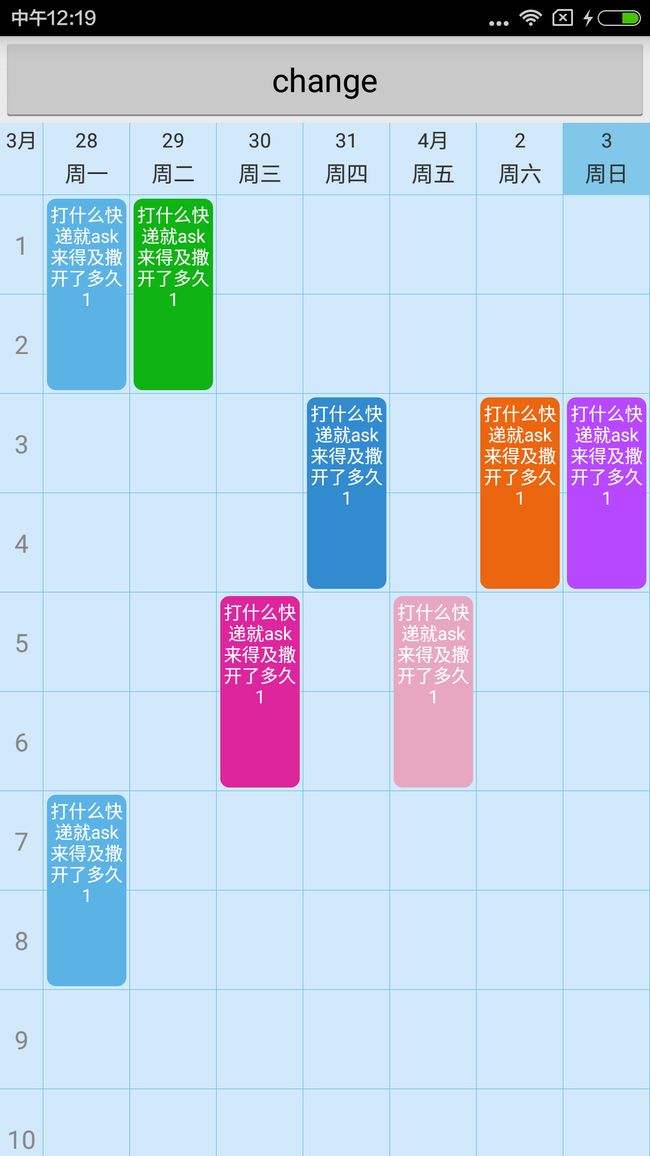
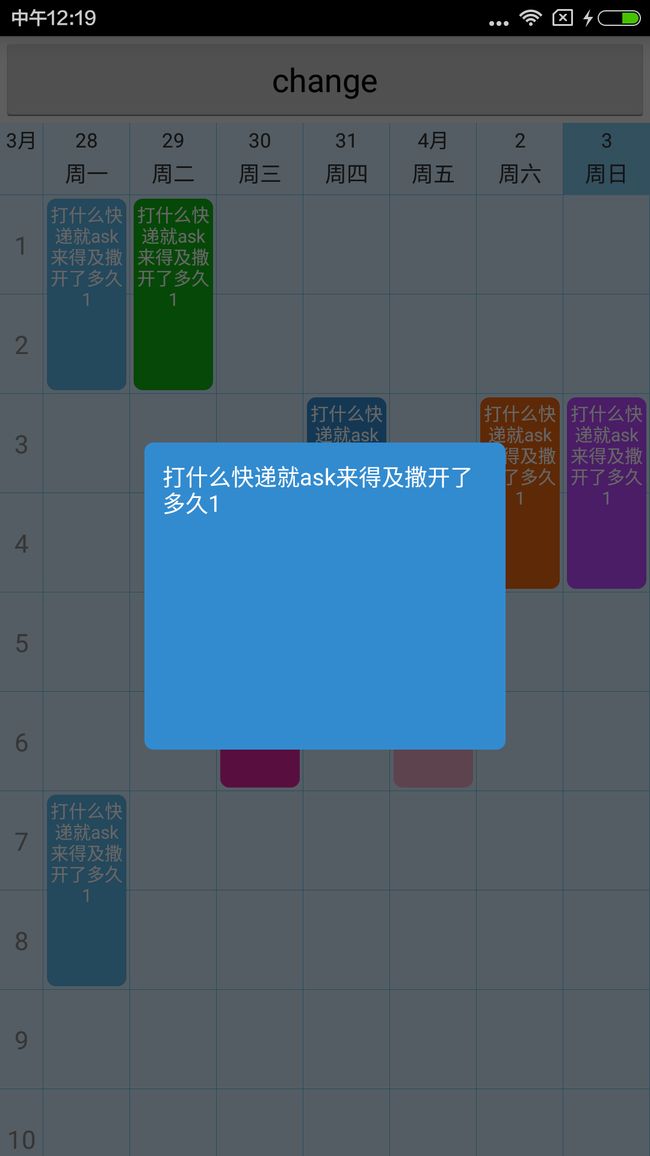
此自定义布局直接继承自RelativeLayout,思路就是动态计算尺寸,add布局。缺点:因为是业务需要,所以就没有考虑扩展性,比如:表格里的View自定义之类的。但作为一个课程表控件,我觉得他应该满足了大部分需求。
2.分析
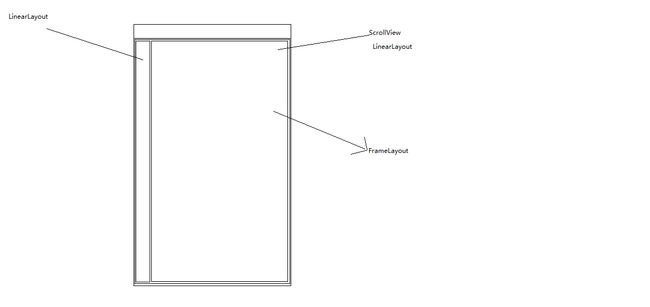
该组合布局总体分为4个部分:
(1).左上角单独的一个TextView,作为布局的标杆,后续的布局以其id设置位置。
(2).上方右侧部分的星期数,采用的是LinearLayout 包裹上下两个TextView,根据id,动态设置其位置。
(3).下方的节次和课程绘制区域,整体使用ScrollView包裹,使用LinearLayout划分左右区域。左边显示节次(垂直LinearLayout),右边是课程绘制区域(Framelayout)
(4).绘制浮在最上层的课程格子(FrameLayout+TextView)
描述的不是很清楚,那么上一张图吧^ ^
3.实现
在写之前,还有必要提一个非常重要的角色,就是本例使用的数据结构(javaBean),结构如下:
public class Course {
  /**
   * 课程开始的节次
   */
  private int jieci;
  private int day;
  private String des;
  private int spanNum = 2;// 默认跨越两节
  public Course(int jieci, int day, String des) {
    this.jieci = jieci;
    this.day = day;
    this.des = des;
  }
  public Course() {
  }
  //省略Get,Set方法...
}
既然摸清了这个布局的来龙去脉,那么就可以按照分析中的步骤,一步步实现这个自定义课程表布局。
3.1 创建View,在构造方法中定义Init方法。
public class TimeTableLayout extends RelativeLayout {

    //今天周几(中国的周日=0,周一=1..... 周六=6)此处是减了1的,方便数组中对应上
    private int todayNum;
    //和中国星期数对应上
    private int[] US_DAYS_NUMS = { 7, 1, 2, 3, 4, 5, 6 };
    //星期数对应在这个月是几号(具体看下面介绍)
    private String[] datesOfMonth;

    public TimeTableLayout(Context context, AttributeSet attrs, int defStyleAttr) {
        super(context, attrs, defStyleAttr);
        //对相关变量进行初始化以及绘制的课程表布局框架
        init();
    }

    public TimeTableLayout(Context context, AttributeSet attrs) {
        this(context, attrs, 0);
    }

    public TimeTableLayout(Context context) {
        this(context, null);
    }
    private void init() {
        Calendar toDayCal = Calendar.getInstance();
        //设置为今天
        toDayCal.setTimeInMillis(System.currentTimeMillis());
        //得到今天是周几,注意此处的周几是美历的,不是中国的。
        //toDayCal.get(Calendar.DAY_OF_WEEK)返回(1~7)之中的数
        //中国的周日=1,周一=2..... 周六=7
        todayNum = toDayCal.get(Calendar.DAY_OF_WEEK)-1;
        //得到这一周所对应的日期(day of month)
        datesOfMonth = getOneWeekDatesOfMonth();
        //绘制整个课程表布局框架
        drawFrame();
    }
}
在init方法中,我们先拿到今天是周几(美历),然后需要动态的根据今天计算出这周的其他日期,我们看先看getOneWeekDatesOfMonth():
//默认共有几天
private int totalDay = 7;
//左上角的TextView显示的月份,即周一所对应的月份
private String preMonth;
/**
 * 获取以今天为基准 ,星期一到星期日在这个月中是几号
 * @return
 */
private String[] getOneWeekDatesOfMonth() {
    Calendar tempCal= Calendar.getInstance();
    //存储日期
    String[] temp = new String[totalDay];
    //获得中国的周几
    int b = US_DAYS_NUMS[todayNum];
    //如果今天不是周日,也就是说美历的下周还没开始,则直接设置为本周周一
    if (b != 7) {
        tempCal.set(Calendar.DAY_OF_WEEK, Calendar.MONDAY);
    } else {
        //如果是周日的话,已经是美历的下周的周一了,所以上先跳到上周。
        tempCal.add(Calendar.WEEK_OF_MONTH, -1);
        //跳到上周后再设置为周一
        tempCal.set(Calendar.DAY_OF_WEEK, Calendar.MONDAY);
    }
    int ds = 0;//此临时变量记录周一为几号
    for (int i = 1; i < totalDay; i++) {
        if (i == 1) {//如果为周一
            ds = tempCal.get(Calendar.DAY_OF_MONTH);
            //设置周一为几号
            temp[i - 1] = tempCal.get(Calendar.DAY_OF_MONTH) + "";
            //记录一下周一所对应的月份
            preMonth = (tempCal.get(Calendar.MONTH) + 1) + "月";
        }
        //往后加一天
        tempCal.add(Calendar.DATE, 1);
        //如果这天比先前记录的日期号小,说明进入到了下一个月份
        if (tempCal.get(Calendar.DAY_OF_MONTH) < ds) {
            //则不显示日期号,显示这天的月份
            temp[i] = (tempCal.get(Calendar.MONTH) + 1) + "月";
            //重新对ds赋值
            ds = tempCal.get(Calendar.DAY_OF_MONTH);
        } else {
            //其他情况均显示这天所对应的日期数
            temp[i] = tempCal.get(Calendar.DAY_OF_MONTH) + "";
        }
    }
    //将结果数组返回,可能的格式:{"30","31","9月","2","3","4","5"}
    return temp;
}
好的,下一个方法drawFrame(),绘制布局框架:
private void drawFrame() {
    //初始化格子宽高大小
    initSize();
    // 绘制第一行
    drawFirstRow();
    // 绘制下面的东西,整个下面是一个ScrollView包裹一个LinearLayout
    addBottomRestView();
}
看初始化格子大小的方法,此处还需要引入几个成员变量:
如图:
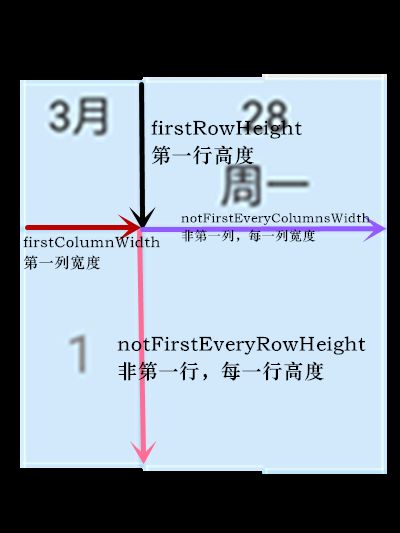
//原谅我当时命名有点啰嗦(现在懒得改了)
//第一行的高度
private int firstRowHeight;
//非第一行 每一行的高度
private int notFirstEveryRowHeight;
//第一列的宽度
private int firstColumnWidth;
//非第一列 每一列的宽度
private int notFirstEveryColumnsWidth;

private void initSize() {
    int screenWidth = getScreenWidth();
    int screenHeight = getScreenHeight();
    //第一行高度为40dp,这个dp->px工具方法在上一篇有用到
    firstRowHeight = DensityUtils.dip2px(getContext(), 40);
    //此处解一个方程,设第一行非第一列格子宽度为x,最左边的格子为x/2,则totalDay*x+x/2 = screenHeight ;
    //x=notFirstEveryColumnsWidth ;
    notFirstEveryColumnsWidth = screenWidth * 2 / (2 * totalDay + 1);
    //第一列的宽度为x的一半
    firstColumnWidth = notFirstEveryColumnsWidth / 2;
    //非第一行,每一行的高度为屏幕的高度除以总节次+5dp
    notFirstEveryRowHeight = (screenHeight - firstRowHeight) / totalJC + DensityUtils.dip2px(getContext(), 5);
}

private int getScreenWidth() {
    DisplayMetrics displayMetrics = new DisplayMetrics();
    WindowManager wm = (WindowManager) getContext().getSystemService(Context.WINDOW_SERVICE);
    wm.getDefaultDisplay().getMetrics(displayMetrics);
    return displayMetrics.widthPixels;
}

private int getScreenHeight() {
    DisplayMetrics displayMetrics = new DisplayMetrics();
    WindowManager wm = (WindowManager) getContext().getSystemService(Context.WINDOW_SERVICE);
    wm.getDefaultDisplay().getMetrics(displayMetrics);
    return displayMetrics.heightPixels;
}
ok,变量都初始化了大小,我们就可以正式绘制我们的课程表啦!!按步骤,首先绘制第一行drawFirstRow():
/**
 * 绘制第一行
 */
private void drawFirstRow() {
    //绘制左上角的TextView
    initFirstTv();
    //绘制余下的内容,实际上并不是TextView,是LinearLayout包裹的
    initRestTv();
}

/**
 * 起始的第一个TextView
 */
private TextView firstTv;
//2dp
private int twoW = DensityUtils.dip2px(getContext(), 2);
//1dp
private int oneW = DensityUtils.dip2px(getContext(), 1);

private static final int FIRST_TV = 555;

private void initFirstTv() {
    firstTv = new TextView(getContext());
    //设置一个Id,和布局文件里的Id一个意思
    firstTv.setId(FIRST_TV);
    //设置布局参数,其实就是设置宽高,我们在刚刚都算出来了
    RelativeLayout.LayoutParams rlp = new RelativeLayout.LayoutParams(firstColumnWidth, firstRowHeight);
    firstTv.setBackgroundResource(R.drawable.course_table_bg);
    firstTv.setText(preMonth);
    firstTv.setGravity(Gravity.TOP | Gravity.CENTER_HORIZONTAL);
    firstTv.setTextSize(TypedValue.COMPLEX_UNIT_SP, 11);
    firstTv.setPadding(oneW, twoW, oneW, twoW);
    firstTv.setLayoutParams(rlp);
    addView(firstTv);
}
第一个TextView绘制完毕,这里顺便给大家背景边框的资源文件,放置在drawable目录中:
-
-
那么接着绘制剩下的View,方法有些长,没有抽出,很多都是参数设置,关键代码就几句:
private static final int FIRST_ROW_TV_QZ = 3;

private void initRestTv() {
    LinearLayout linearLayout;
    RelativeLayout.LayoutParams rlp;
    TextView textView
    for (int i = 0; i < totalDay; i++) {
        //这使用LinearLayout(垂直)包裹两个TextView
        linearLayout = new LinearLayout(getContext());
        linearLayout.setOrientation(LinearLayout.VERTICAL);
        //设置一个Id,加上前缀以防止重复(突然发现不加也行)
        linearLayout.setId(FIRST_ROW_TV_QZ + i);
        //设置宽高
        rlp = new RelativeLayout.LayoutParams(notFirstEveryColumnsWidth,
                firstRowHeight);
        //如果是第一个,则在左上角的TextView右侧
        if (i == 0)
            rlp.addRule(RelativeLayout.RIGHT_OF, firstTv.getId());
        //剩余的则后一个在前一个右侧
        else
            rlp.addRule(RelativeLayout.RIGHT_OF, FIRST_ROW_TV_QZ + i - 1);
        linearLayout.setBackgroundResource(R.drawable.course_table_bg);
        linearLayout.setLayoutParams(rlp);
        LinearLayout.LayoutParams llp = new LinearLayout.LayoutParams(LayoutParams.MATCH_PARENT,
                LayoutParams.WRAP_CONTENT);
        //上方的显示日期的TextView
        textView = new TextView(getContext());
        textView.setText(datesOfMonth[i]);
        textView.setLayoutParams(llp);
        textView.setGravity(Gravity.CENTER);
        textView.setPadding(twoW, twoW, twoW, twoW);
        textView.setTextSize(TypedValue.COMPLEX_UNIT_SP, 11);
        linearLayout.addView(textView);
        llp = new LinearLayout.LayoutParams(LayoutParams.MATCH_PARENT, LayoutParams.MATCH_PARENT);
        //下方的显示星期数的TextView
        textView = new TextView(getContext());
        textView.setLayoutParams(llp);
        textView.setText(DAYS[i]);
        textView.setGravity(Gravity.CENTER | Gravity.BOTTOM);
        //此处在今天这个格子中做高亮处理
        if (US_DAYS_NUMS[todayNum] - 1 == i) {
            linearLayout.setBackgroundColor(0x77069ee9);
        }
        textView.setPadding(twoW, 0, twoW, twoW * 2);
        textView.setTextSize(TypedValue.COMPLEX_UNIT_SP, 12);
        linearLayout.addView(textView);
        addView(linearLayout);
    }
}
添加完整个上方的区域后,接着添加下方的区域,为了可以使布局滚动,我们在最外层使用到了ScrollView作为跟布局,其再包裹一个LinearLayout的水平布局:
//课程格子View的父布局
private FrameLayout flCourseContent;

private void addBottomRestView() {
    ScrollView sv = new ScrollView(getContext());
    LayoutParams rlp = new LayoutParams(LayoutParams.MATCH_PARENT, LayoutParams.WRAP_CONTENT);
    //其位置在左上角的TextView下面
    rlp.addRule(RelativeLayout.BELOW, firstTv.getId());
    sv.setLayoutParams(rlp);
    //隐藏滚动条
    sv.setVerticalScrollBarEnabled(false);

    //包裹的LinearLayout(默认水平)
    LinearLayout llBottom = new LinearLayout(getContext());
    ViewGroup.LayoutParams vlp = new ViewGroup.LayoutParams(LayoutParams.MATCH_PARENT, LayoutParams.WRAP_CONTENT);
    llBottom.setLayoutParams(vlp);

    //左侧使用LinearLayout(垂直),包裹节次的TextView
    LinearLayout llLeftCol = new LinearLayout(getContext());
    LinearLayout.LayoutParams llp1 = new LinearLayout.LayoutParams(firstColumnWidth, LayoutParams.WRAP_CONTENT);
    llLeftCol.setLayoutParams(llp1);
    llLeftCol.setOrientation(LinearLayout.VERTICAL);

    //初始化左侧显示节次的TextView
    initLeftTextViews(llLeftCol);
    llBottom.addView(llLeftCol);

    flCourseContent = new FrameLayout(getContext());
    LinearLayout.LayoutParams llp2 = new LinearLayout.LayoutParams(LayoutParams.MATCH_PARENT,
            LayoutParams.MATCH_PARENT);
    flCourseContent.setLayoutParams(llp2);
    //这句是先添加课程格子边框
    drawCourseFrame();
    llBottom.addView(flCourseContent);

    sv.addView(llBottom);

    addView(sv);
}
接下来便是添加左侧的节次TextView,其实也很简单,一个循环搞定,看initLeftTextViews(llLeftCol):
//默认节次最大12
private int totalJC = 12;

private void initLeftTextViews(LinearLayout llLeftCol) {
    LinearLayout.LayoutParams rlp = new LinearLayout.LayoutParams(firstColumnWidth, notFirstEveryRowHeight);
    TextView textView;
    for (int i = 0; i < totalJC; i++) {
        textView = new TextView(getContext());
        textView.setLayoutParams(rlp);
        textView.setBackgroundResource(R.drawable.course_table_bg);
        //显示节次
        textView.setText("" + (i + 1));
        textView.setGravity(Gravity.CENTER);
        textView.setTextColor(Color.GRAY);
        llLeftCol.addView(textView);
    }
}
然后便是右侧的FrameLayout和添加课程格子的边框,其实也很简单:
private void drawCourseFrame() {
    FrameLayout fl;
    FrameLayout.LayoutParams flp;
    for (int i = 0; i < totalDay * totalJC; i++) {
        int row = i / totalDay;
        int col = i % totalDay;
        fl = new FrameLayout(getContext());
        //设置格子的大小
        flp = new FrameLayout.LayoutParams(notFirstEveryColumnsWidth,
                notFirstEveryRowHeight);
        fl.setBackgroundResource(R.drawable.course_table_bg);
        //这里采用设置Margin值来确定每个格子的背景的位置
        //col(列数) * 列宽为格子左侧偏移量
        //row(行数) * 行高为格子上方偏移量
        //这样就可以确定格子的位置(后面添加课程信息 也用的此种方式)
        flp.setMargins(col * notFirstEveryColumnsWidth, row * notFirstEveryRowHeight, 0, 0);
        fl.setLayoutParams(flp);
        flCourseContent.addView(fl);
    }
}
以上,课程表布局的框架就完成了,下面所要做的就是接收数据,显示课程信息View。
3.2对外提供接口,添加课程信息
我们给外部提供的方法名称叫做updateTimeTable(),看代码:
//用来保存课程信息
private List coursesData;

//带参数的更新课程信息的方法
public void updateTimeTable(List coursesData) {
    this.coursesData = coursesData;
    updateCourseViews();
}
//不带参数的更新方法,需保证持有的List引用和外部一致
public void updateTimeTable() {
    updateCourseViews();
}
这个updateCourseViews方法就是真正来添加课程信息的(方法有些长,但多数是参数设置):
// 课程格子的背景图(下方有示例背景xml)
private static final int[] COURSE_BG = { R.drawable.course_info_light_blue, R.drawable.course_info_green,
        R.drawable.course_info_red, R.drawable.course_info_blue, R.drawable.course_info_yellow,
        R.drawable.course_info_orange, R.drawable.course_info_purple };

private OnCourseItemClickListener onCourseItemClickListener;

public void setOnCourseItemClickListener(OnCourseItemClickListener onCourseItemClickListener) {
    this.onCourseItemClickListener = onCourseItemClickListener;
}
//点击课程信息的监听事件
public interface OnCourseItemClickListener {
    void onCourseItemClick(TextView tv, int jieci, int day, String des);
}

/**
 * 保存View 方便Remove
 */
private List myCacheViews = new ArrayList();

private void updateCourseViews() {
    //在每次做更新操作时,先清除一下当前的已经添加上去的View
    clearViewsIfNeeded();
    FrameLayout fl;
    FrameLayout.LayoutParams flp;
    TextView tv;
    for (final Course c : coursesData) {
        //拿到节次(相当于行)
        final int jieci = c.getJieci();
        //拿到星期(相当于列)
        final int day = c.getDay();
        //外层包裹一个FrameLayout 方便为TextView设置padding,保证课程信息与边框有一定距离(2dp)
        fl = new FrameLayout(getContext());
        //设置课程信息的宽高,宽度就是列宽,高度是行高 * 跨度
        flp = new FrameLayout.LayoutParams(notFirstEveryColumnsWidth,
                notFirstEveryRowHeight * c.getSpanNum());
        //设置横向和纵向的偏移量,和上面介绍的一致,但day和jieci都是从1开始的,需减1.
        flp.setMargins((day - 1) * notFirstEveryColumnsWidth, (jieci - 1) * notFirstEveryRowHeight, 0, 0);
        fl.setLayoutParams(flp);
        fl.setPadding(twoW, twoW, twoW, twoW);

        tv = new TextView(getContext());
        flp = new FrameLayout.LayoutParams(LayoutParams.MATCH_PARENT, LayoutParams.MATCH_PARENT);
        tv.setText(c.getDes());
        tv.setTextColor(Color.WHITE);
        tv.setGravity(Gravity.TOP | Gravity.CENTER_HORIZONTAL);
        tv.setPadding(twoW, twoW, twoW, twoW);
        tv.setTextSize(TypedValue.COMPLEX_UNIT_SP, 10);
        //显示不下的话,尾部以"..."显示
        tv.setEllipsize(TruncateAt.END);
        //设置最大显示7行
        tv.setLines(7);
        tv.setBackgroundResource(COURSE_BG[day - 1]);
        tv.setLayoutParams(flp);
        tv.setOnClickListener(new OnClickListener() {
            @Override
            public void onClick(View v) {
                //为课程信息设置点击事件监听
                if (onCourseItemClickListener != null)
                    onCourseItemClickListener.onCourseItemClick((TextView) v, jieci, day, c.getDes());
            }
        });
        fl.addView(tv);
        //对每个添加到布局中的课程信息View做一个保存,方便下次清除
        myCacheViews.add(fl);
        flCourseContent.addView(fl);
    }
}

private void clearViewsIfNeeded() {
    if (myCacheViews == null || myCacheViews.isEmpty())
        return;

    for (int i = myCacheViews.size() - 1; i >= 0; i--) {
        flCourseContent.removeView(myCacheViews.get(i));
        myCacheViews.remove(i);
    }
}
以下是课程信息背景的xml代码,定义7个不同颜色的背景资源即可:
至此为止,我们的TimeTableLayout就已经可以出色的完成一个课程表该具有的职责了~我后面还加了动态变换节次和星期,感觉用处不大,一并贴出来:
public TimeTableLayout(Context context, AttributeSet attrs, int defStyleAttr) {
    super(context, attrs, defStyleAttr);
    //自定义属性的模板代码,须在value目录下建立名为attr的xml文件
    final TypedArray ta = context.getTheme().obtainStyledAttributes(attrs, R.styleable.CourseTable, defStyleAttr,
            0);
    totalDay = ta.getInt(R.styleable.CourseTable_totalDays, 7);
    totalJC = ta.getInt(R.styleable.CourseTable_totalJC, 12);
    ta.recycle();
    init();
}
看value目录下的attr.xml:
在布局文件中就可以这么用:
在代码中设置更改节次和星期数,提供了相应的set方法:
public void setTotalJC(int totalJC) {
    this.totalJC = totalJC;
    refreshCurrentLayout();
}
public void setTotalDay(int totalDay) {
    this.totalDay = totalDay;
    refreshCurrentLayout();
}
private void refreshCurrentLayout() {
    removeAllViews();
    init();
    drawFrame();
    updateCourseViews();
}
4.总结一下
这个布局其实技术上没有什么难度,就是把布局文件中的代码移到了java文件中,从静态到动态,需要事先把所有尺寸定义计算好,然后通过addView不断组合添加,最终实现我们想要的效果。这个布局应用的范围很窄,可扩展性也不高,目的是让大家不光只会在布局文件中写布局,使用java代码一样能写出精准的布局来。
这几天媳妇来了,陪她玩了几天,没有学习好难受,这几天要把攒的干货一一消灭掉!
Git地址(里面有demo): https://github.com/chen2174471/TimeTableLayout