Python 零基础入门到实战(四)笔记:标准库和第三方包、模块、文件读写、捕获异常处理、总结
Python 零基础入门到实战(四)笔记:标准库和第三方包、模块、文件读写、捕获异常处理、总结
- Python常用模块
-
- 标准库和第三方包
- 模块
- 包
-
- 安装、发布包
- 文件读写IO操作一般方法
-
- txt文件
- csv文件
- 读写Excel
- 异常处理
-
- 1/0
- 总结:
Python常用模块
标准库和第三方包
import moduel
from module import XXX
import module as other_name
>>> import math
>>> math.pow(2,3)
8.0
>>> from math import pow
>>> pow(2,3)
8.0
>>> from math import *
>>> import math as sx
>>> sx.pow(2,3)
8.0 #本地库
>>> import numpy as np
>>> import pandas as pd #第三方包
第三方包安装: pip install package_name(^D退出层级)
来源:https://pypi.org/
pip连接超时可以使用国内的源(镜像)例如:pypi镜像
临时使用:pip install -i https://pypi.tuna.tsinghua.edu.cn/simple some-package
模块
Python 模块(Module),是一个 Python 文件,以 .py 结尾,包含了 Python 对象定义和Python语句。
模块让你能够有逻辑地组织你的 Python 代码段。
把相关的代码分配到一个模块里能让你的代码更好用,更易懂。
模块能定义函数,类和变量,模块里也能包含可执行的代码。
模块中可加上 ,“main”
class S:
    xxxx

if__ name__=="__main__":
    xxxx #主函数
在执行py时候,底下语句会执行,在import模块后语句不会执行
>>> import sys
>>> sys.path
['', 'C:\\Users\\ASUS\\AppData\\Local\\Programs\\Python\\Python39\\python39.zip', 'C:\\Users\\ASUS\\AppData\\Local\\Programs\\Python\\Python39\\DLLs', 'C:\\Users\\ASUS\\AppData\\Local\\Programs\\Python\\Python39\\lib', 'C:\\Users\\ASUS\\AppData\\Local\\Programs\\Python\\Python39', 'C:\\Users\\ASUS\\AppData\\Local\\Programs\\Python\\Python39\\lib\\site-packages']
以上是import时会去搜寻的路径,也可以手动添加路径
>>> import sys
>>>> sys.path.append('C:\Users\ASUS\Desktop\MLCode\python')
  File "", line 1
    sys.path.append('C:\Users\ASUS\Desktop\MLCode\python')
                                                         ^
SyntaxError: (unicode error) 'unicodeescape' codec can't decode bytes in position 2-3: truncated \UXXXXXXXX escape
发现出错,原因是在windows系统当中读取文件路径可以使用,但是在python字符串中\有转义的含义,需要使用些方法使得\不被解读为转义字符。有3种解决方案
例如在路径前面加r,即保持字符原始值的意思。
sys.path.append(r’c:\Users\ASUS\Desktop\MLCode\python’)
或将\替换为双反斜杠或替换为正斜杠,路径添加成功后代码如下
>>> sys.path.append(r'C:\Users\ASUS\Desktop\MLCode\python')
>>> sys.path
['', 'C:\\Users\\ASUS\\AppData\\Local\\Programs\\Python\\Python39\\python39.zip', 'C:\\Users\\ASUS\\AppData\\Local\\Programs\\Python\\Python39\\DLLs', 'C:\\Users\\ASUS\\AppData\\Local\\Programs\\Python\\Python39\\lib', 'C:\\Users\\ASUS\\AppData\\Local\\Programs\\Python\\Python39', 'C:\\Users\\ASUS\\AppData\\Local\\Programs\\Python\\Python39\\lib\\site-packages', 'C:\\Users\\ASUS\\Desktop\\MLCode\\python']
然后就可以import 模块名 了
包
包是一个分层次的文件目录结构,它定义了一个由模块及子包,和子包下的子包等组成的 Python 的应用环境。
简单来说,包就是文件夹,但该文件夹下必须存在 __init__.py 文件, 该文件的内容可以为空。__init__.py 用于标识当前文件夹是一个包。
考虑一个在 package_runoob 目录下的 runoob1.py、runoob2.py、init.py 文件,test.py 为测试调用包的代码,目录结构如下:
test.py
package_runoob
|-- __init__.py
|-- runoob1.py
|-- runoob2.py
安装、发布包
后续
文件读写IO操作一般方法
txt文件
写入文件:
C:\Users\ASUS>
C:\Users\ASUS>python
Python 3.9.4 (tags/v3.9.4:1f2e308, Apr  6 2021, 13:40:21) [MSC v.1928 64 bit (AMD64)] on win32
Type "help", "copyright", "credits" or "license" for more information.
>>> import os#引入os模块、查看工作路径
>>> os.getcwd()
'C:\\Users\\ASUS'#获取路径
>>> os.chdir(r'C:\Users\ASUS\Desktop\MLCode')#修改路径
>>> os.getcwd()#修改后的路径
'C:\\Users\\ASUS\\Desktop\\MLCode'
>>> f=open("fileTest.txt","w")#第一个参数是文本文件,按照默认的工作路径保存、第二个参数是文件名称,说明有写入权限。如果本来有文件会覆盖,若无,会新建!
>>> f.write('This is python')#
14# 字符串长度#此时只是在内存中写好了,并未写到硬盘。接下来用f所引用的文件写入内容、
>>> f.close() #在执行完close()会保存到本地的目录里、
>>> f=open('fileTest.txt')#打开
>>> f.read()#读
'This is python'
>>> dir(f)
['_CHUNK_SIZE', '__class__', '__del__', '__delattr__', '__dict__', '__dir__', '__doc__', '__enter__', '__eq__', '__exit__', '__format__', '__ge__', '__getattribute__', '__gt__', '__hash__', '__init__', '__init_subclass__', '__iter__', '__le__', '__lt__', '__ne__', '__new__', '__next__', '__reduce__', '__reduce_ex__', '__repr__', '__setattr__', '__sizeof__', '__str__', '__subclasshook__', '_checkClosed', '_checkReadable', '_checkSeekable', '_checkWritable', '_finalizing', 'buffer', 'close', 'closed', 'detach', 'encoding', 'errors', 'fileno', 'flush', 'isatty', 'line_buffering', 'mode', 'name', 'newlines', 'read', 'readable', 'readline', 'readlines', 'reconfigure', 'seek', 'seekable', 'tell', 'truncate', 'writable', 'write', 'write_through', 'writelines']
常用的文件打开方式如下:

读取文件
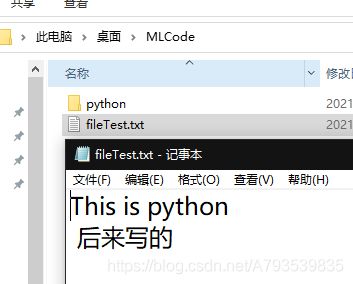
>>> with open('fileTest.txt','a')as f:
...     f.write("\n 后来写的")
...
6
>>> f=open("fileTest.txt")
>>> for line in f:
...     print(line)
...
This is python

 后来写的
>>> for line in f:
...    print(line,end=' ')#数不出来是因为指针已经到最后位
...
>>> f.seek(0)#iter指针归零
0
>>> for line in f:
...    print(line,end=' ')
...
This is python
  后来写的 >>>
写入成功
csv文件
>>> import csv
>>> data=[['name','number'],['python',111],['java',222],['php',333]]
>>> with open('csvfile.csv','w') as f:
...      writer= csv.writer(f)
...      writer.writerows(data)
...
>>> f=open('csvfile.csv')
>>> reader=csv.reader(f)
>>> for row in reader:
...     print(row)
...
['name', 'number']
['python', '111']
['java', '222']
['php', '333']
读写Excel
在这一部分中需要用到openpyxl模块,打开cmd.exe进行安装
pip install openpyxl
提示
Collecting openpyxl
  Downloading openpyxl-3.0.7-py2.py3-none-any.whl (243 kB)
     |████████████████████████████████| 243 kB 4.6 kB/s
Collecting et-xmlfile
  Downloading et_xmlfile-1.0.1.tar.gz (8.4 kB)
Using legacy 'setup.py install' for et-xmlfile, since package 'wheel' is not installed.
Installing collected packages: et-xmlfile, openpyxl
    Running setup.py install for et-xmlfile ... done
Successfully installed et-xmlfile-1.0.1 openpyxl-3.0.7
WARNING: You are using pip version 20.2.3; however, version 21.0.1 is available.
You should consider upgrading via the 'c:\users\asus\appdata\local\programs\python\python39\python.exe -m pip install --upgrade pip' command.
提示pip版本是20.2.3,然而版本21已经是可获得的了、在这里需要做一个pip更新
下载速度可能会比较慢,因为服务器在境外、于是乎经过了我耐心的等待,成功了、
昨天试过都是不成功的,这个时候你可以通过国内镜像进行下载:python -m pip install --upgrade pip -i https://pypi.douban.com/simple
C:\Users\ASUS>python -m pip install --upgrade pip
Collecting pip
  Downloading pip-21.1-py3-none-any.whl (1.5 MB)
     |████████████████████████████████| 1.5 MB 6.1 kB/s
Installing collected packages: pip
  Attempting uninstall: pip
    Found existing installation: pip 20.2.3
    Uninstalling pip-20.2.3:
      Successfully uninstalled pip-20.2.3
Successfully installed pip-21.1
准备工作做好了
接下来上代码
>>> import openpyxl
>>> from openpyxl import Workbook
>>> wb=Workbook()
>>> ws=wb.active
>>> ws.title
'Sheet'
>>> ws.title='Python'
>>> ws.title
'Python'
>>> ws2=wb.create_sheet('C++')
>>> ws2
<Worksheet "C++">
>>> wb.sheetnames
['Python', 'C++']
>>> ws['E1']=111
>>> ws.cell(row=2,column=2,value=222)
<Cell 'Python'.B2>
>>> wb.save('example.xlsx')
>>> import os#看看保存到哪了
>>> os.getcwd()
'C:\\Users\\ASUS'

正如我们创建的、对sheet1,2和E1,2行2列的命名都成功了

异常处理
try/except语句用来检测try语句块中的错误,从而让except语句捕获异常信息并处理。
代码结构
try:
<语句>        #运行别的代码
except <名字>:
<语句>        #如果在try部份引发了'name'异常
except <名字>,<数据>:
<语句>        #如果引发了'name'异常,获得附加的数据
else:
<语句>        #如果没有异常发生
1/0
如果你不想在异常发生时结束你的程序,只需在try里捕获它。
接下来就拿1/0来举例子,代码如下
while(1):
    try:
        a=float(input('分子:'))
        b=float(input('分母:'))
        r=a/b
        print("{0}/{1}={2}".format(a,b,r))
        break
    except ZeroDivisionError:
        print("分母不为0,重新输入")
    except ValueError:
        print("输入数值:")
    except:
        print("成功")
        break
结果:
分子:1
分母:2
1.0/2.0=0.5
#
分子:1
分母:0
分母不为0,重新输入
分子:0
分母:2
0.0/2.0=0.0
总结:
基础仍有不足,将以实际需求,应用为基准、继续学习!
Python是一门很灵活,强大的语言、且工具库众多,可以用于不同领域的研究和使用、十分方便
至于爬虫和连接MySQL的小案例较为基础, 都是模块的引入和使用、在此不再赘述、后续有机会再继续写、感谢屏幕前你的每一次阅读!~