CenterNet: object as points分析
文章目录
- 前言
- 网络结构
- 数据加载器
- 损失函数
-
- 目标中心的损失
- 目标中心的偏置损失
- 目标大小的损失
- Reference
前言
anchor-free目标检测属于anchor-free系列的目标检测,相比于CornerNet做出了改进,使得检测速度和精度相比于one-stage和two-stage的框架都有不小的提高,尤其是与YOLOv3作比较,在相同速度的条件下,CenterNet的精度比YOLOv3提高了4个左右的点。
CenterNet不仅可以用于目标检测,还可以用于其他的一些任务,如肢体识别或者3D目标检测等等,但这篇博文只介绍目标检测部分。
CenterNet的优点:
- 与faster rcnn 相比,CenterNet简单并且容易理解,若是适当的训练,其精度超过faster rcnn;
- CenterNet的“anchor”仅仅会出现在当前目标的位置处而不是整张图上撒,所以也没有所谓的box overlap大于多少多少的算positive anchor这一说,也不需要区分这个anchor是物体还是背景;
- 因为每个目标只对应一个“anchor”,这个anchor是从heatmap中提取出来的,所以不需要NMS再进行来筛选;
- CenterNet的输出分辨率的下采样因子是4,比起其他的目标检测框架算是比较小的(Mask-Rcnn最小为16、SSD为最小为16)。由于是单阶段检测器,CenterNet简单并且快速。
PS:还有一篇paper叫做CenterNet: Keypoint Triplets for Object Detection与这篇文章的网络名称冲突了。
网络结构
CenterNet可归为编解码结构,主要是backbone+上采样模块+head输出。
文中给出了以下三种backbone:
- Resnet-18 with up-convolutional layers : 28.1% coco and 142 FPS
- DLA-34 : 37.4% COCOAP and 52 FPS
- Hourglass-104 : 45.1% COCOAP and 1.4 FPS
上采样模块:可以用图像插值或是反卷积的方法。
head输出:每个网络内部的结构不同,但是在模型的最后都是加了三个网络构造来输出预测值,默认是80个类、2个预测的中心点坐标、2个中心点的偏置。
(hm): Sequential(
(0): Conv2d(64, 64, kernel_size=(3, 3), stride=(1, 1), padding=(1, 1))
(1): ReLU(inplace)
(2): Conv2d(64, 80, kernel_size=(1, 1), stride=(1, 1))
)
(wh): Sequential(
(0): Conv2d(64, 64, kernel_size=(3, 3), stride=(1, 1), padding=(1, 1))
(1): ReLU(inplace)
(2): Conv2d(64, 2, kernel_size=(1, 1), stride=(1, 1))
)
(reg): Sequential(
(0): Conv2d(64, 64, kernel_size=(3, 3), stride=(1, 1), padding=(1, 1))
(1): ReLU(inplace)
(2): Conv2d(64, 2, kernel_size=(1, 1), stride=(1, 1))
)
数据加载器
除去原图外,还需生成这五个部分:hm为热力图, wh为长宽的回归, reg为缩放坐标的偏移,ind为二维heatmap中对应的一维索引,reg_mask为目标mask数组,是否包含目标0/1
class WheatDataset(torch.utils.data.Dataset):
    def __init__(self, img_id, labels, config, mode='train', gaussian=True):
        self.img_id = img_id
        self.labels = labels
        self.config = config
        self.mode = mode
        self.gaussian = gaussian

        self.num_classes = config.num_classes
        self.img_size = {
     'h': self.config.input_size, 'w': self.config.input_size}
        self.fmap_size = {
     'h': self.config.input_size // self.config.down_ratio,
                          'w': self.config.input_size // self.config.down_ratio}
        self.gaussian_iou = 0.7
        self.max_objs = 128
        if self.mode == 'train':
            self.transform = get_train_transforms()
        else:
            self.transform = None
        self.normalize = Normalize()

    def __len__(self):
        return len(self.img_id)

    def __getitem__(self, idx):
        img = cv2.imread(os.path.join(DATA_PATH, "train", self.img_id[idx] + ".jpg"))
        target = self.labels[self.labels['image_id'] == self.img_id[idx]]
        boxes = target[['x', 'y', 'w', 'h']].values
        num_objects = len(boxes)
        if num_objects==0:
            boxes = np.array([[0., 0., 0., 0.]], dtype=np.float32)
            labels = np.array([0])
        else:
            # [x, y, w, h] to [x1, y1, x2, y2]
            boxes[:, 2:] += boxes[:, :2]
            # there is only one class
            labels = np.ones([num_objects], dtype=np.uint8)

        # randomly flip image and bboxes
        if self.mode == 'train' and np.random.uniform() > 0.5:
            img[:] = img[:, ::-1, :]
            boxes[:, [0, 2]] = img.shape[1] - boxes[:, [2, 0]] - 1

        if self.transform:
            sample = self.transform(image=img)
            img = sample['image']

        # resize image and bbox
        height, width = img.shape[:2]
        img = cv2.resize(img, (self.img_size['w'], self.img_size['h']))
        # boxes[:, 0::2] *= self.img_size['w'] / width
        # boxes[:, 1::2] *= self.img_size['h'] / height


        heatmap_size = self.config.input_size / self.config.down_ratio
        # heatmap
        hm = np.zeros((self.num_classes, self.fmap_size['h'], self.fmap_size['w']), dtype=np.float32)
        # withd and hight
        wh = np.zeros((self.max_objs, 2), dtype=np.float32)
        # regression
        reg = np.zeros((self.max_objs, 2), dtype=np.float32)
        # index in 1D heatmap
        ind = np.zeros((self.max_objs), dtype=np.int)
        # 1=there is a target in the list 0=there is not
        reg_mask = np.zeros((self.max_objs), dtype=np.uint8)
        # get the absolute ratio
        w_ratio = self.config.input_size / width / self.config.down_ratio
        h_ratio = self.config.input_size / height / self.config.down_ratio

        img = self.normalize(img)
        img = img.transpose([2, 0, 1])

        for i, (bbox, label) in enumerate(zip(boxes, labels)):
            label -= 1
            bbox = bbox[0] * w_ratio, bbox[1] * h_ratio, bbox[2] * w_ratio, bbox[3] * h_ratio
            width, height = bbox[2] - bbox[0], bbox[3] - bbox[1]
            # center point(x,y)
            center = np.array([(bbox[0] + bbox[2]) / 2, (bbox[1] + bbox[3]) / 2], dtype=np.float32)
            center_int = center.astype(np.int)
            reg[i] = center - center_int
            wh[i] = 1. * width, 1. * height
            reg_mask[i] = 1
            ind[i] = center_int[1] * heatmap_size + center[0]
            radius = gaussian_radius((height, width))
            # 半径保证为整数
            radius = max(0, int(radius))
            draw_gaussian(hm[label], center_int, radius)

        return (img, hm, wh, reg, ind, reg_mask)
关键点热力图可视化

损失函数
目标中心的损失
重点看一下中心点预测的损失函数,原始论文中因为篇幅关系将第二个otherwise的公式挤一块了,这里我们展平看一下就比较清爽:

其中\alphaα和\betaβ是Focal Loss的超参数,NN是图像II的的关键点数量,用于将所有的positive focal loss标准化为1。在这篇论文中\alphaα和\betaβ分别是2和4。这个损失函数是Focal Loss的修改版,适用于CenterNet。
目标中心的偏置损失
因为上文中对图像进行了R=4R=4的下采样,这样的特征图重新映射到原始图像上的时候会带来精度误差,因此对于每一个中心点,额外采用了一个local offset去补偿它。所有类cc的中心点共享同一个offset prediction,这个偏置值(offset)用L1 loss来训练:

# ct 即 center point reg是偏置回归数组,存放每个中心店的偏置值 k是当前图中第k个目标
reg[k] = ct - ct_int
# 实际例子为
# [98.97667 2.3566666] - [98  2] = [0.97667, 0.3566666]
目标大小的损失
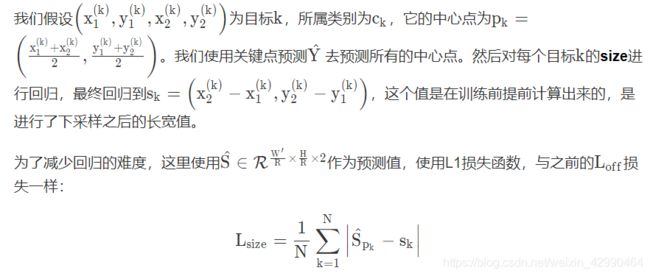
整体的损失函数为物体损失、大小损失与偏置损失的和,每个损失都有相应的权重。

论文中所使用的backbone都有三个head layer,分别产生[1,80,128,128]、[1,2,128,128]、[1,2,128,128],也就是每个坐标点产生C+4个数据,分别是类别以及、长宽、以及偏置。
Reference
https://oldpan.me/archives/anchor-free-ture-centernet
https://www.kaggle.com/kyoshioka47/centernet-starterkit-pytorch