CentOS 7.3在线yum安装Nginx1.14.2+MySQL5.7.25+PHP7.2.17
服务器:腾讯云CentOS7.3
一:安装Nginx(yum在线安装)
1、关闭 seLinux \ 初始化等 见 https://blog.csdn.net/niuxitong/article/details/85240689
2、查看是否已经安装nginx
# rpm -qa | grep nginx   查看是否使用yun安装过,返回空说明没有安装,
(如果已经安装,使用 yum  remove nginx进行卸载)

# yum install -y mlocate && updatedb && locate nginx | more   针对编译安装,查看 /usr/bin/ 或 /usr/sbin/ 或 /usr/local/之类的路径下有没有 nginx的执行程序。
2、安装依赖:
# yum -y install gcc gcc-c++ make libtool zlib zlib-devel openssl openssl-devel pcre pcre-devel 出现complete! 依赖安装成功
3、安装Nginx1.14.2 (yum在线安装)
(1)安装nginx的yum源(默认yum里没有nginx)
#yum localinstall http://nginx.org/packages/centos/7/noarch/RPMS/nginx-release-centos-7-0.el7.ngx.noarch.rpm 出现complete! 依赖安装成功
(2)安装nginx
# yum -y install nginx出现:
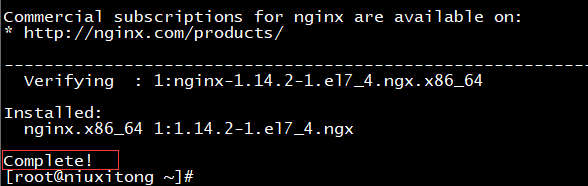
再次使用
# rpm -qa | grep nginx
出现:
说明安装成功
几个常用命令
# nginx -v  (小写的v)                 //查看nginx版本
# nginx -V  (大写的V)                 //查看nginx的安装配置信息

# systemctl status nginx.service        //查看当前nginx状态
    出现Active: inactive (dead) 表示停止:
    出现Active: active (running) since Fri 2019-04-12 17:33:14 CST; 6s ago 表示正在运行

# systemctl start nginx.service         //开启服务
# systemctl stop nginx.service          //停止服务
# systemctl restart nginx.service       //重启服务

# systemctl enable nginx.service        //设置开机自启动(只适用于yum安装的nginx)
# systemctl disable nginx.service       //停止开机自启动(只适用于yum安装的nginx)
开启后,在浏览器访问 http://118.24.241.124
出现: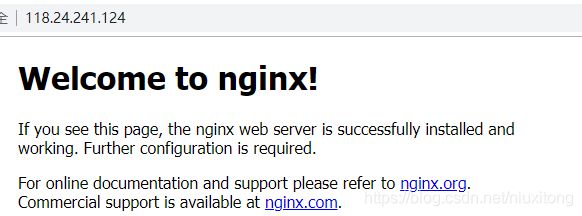 就可以访问了。
4、设置开机重启
方法一 (此方法只用于使用 yum install安装的nginx)
由于我们采用的是yum install直接安装的nginx ,yum命令会自动创建nginx.service文件,此文件于:/etc/systemd/system/multi-user.target.wants/目录下:(其实是个软连接)
执行命令 # systemctl enable nginx.service 即可 (只适用于yum安装的nginx)
出现 Created symlink from /etc/systemd/system/multi-user.target.wants/nginx.service to /usr/lib/systemd/system/nginx.service.
测试
# shutdown -r now 重启服务器,再次访问 http://118.24.241.124/ 仍然可以访问,OK成功
方法二:针对手工编译安装的,需要自己创建自启动文件 /etc/init.d/nginx 文件(详见编译安装nginx部分)
5、默认安装路径分析
通过# nginx -V 我们可以看到如下配置:
nginx -V
nginx version: nginx/1.14.2
built by gcc 4.8.5 20150623 (Red Hat 4.8.5-28) (GCC)
built with OpenSSL 1.0.2k-fips  26 Jan 2017
TLS SNI support enabled
configure arguments: --prefix=/etc/nginx --sbin-path=/usr/sbin/nginx --modules-path=/usr/lib64/nginx/modules --conf-path=/etc/nginx/nginx.conf --error-log-path=/var/log/nginx/error.log --http-log-path=/var/log/nginx/access.log --pid-path=/var/run/nginx.pid --lock-path=/var/run/nginx.lock --http-client-body-temp-path=/var/cache/nginx/client_temp --http-proxy-temp-path=/var/cache/nginx/proxy_temp --http-fastcgi-temp-path=/var/cache/nginx/fastcgi_temp --http-uwsgi-temp-path=/var/cache/nginx/uwsgi_temp --http-scgi-temp-path=/var/cache/nginx/scgi_temp --user=nginx --group=nginx --with-compat --with-file-aio --with-threads --with-http_addition_module --with-http_auth_request_module --with-http_dav_module --with-http_flv_module --with-http_gunzip_module --with-http_gzip_static_module --with-http_mp4_module --with-http_random_index_module --with-http_realip_module --with-http_secure_link_module --with-http_slice_module --with-http_ssl_module --with-http_stub_status_module --with-http_sub_module --with-http_v2_module --with-mail --with-mail_ssl_module --with-stream --with-stream_realip_module --with-stream_ssl_module --with-stream_ssl_preread_module --with-cc-opt='-O2 -g -pipe -Wall -Wp,-D_FORTIFY_SOURCE=2 -fexceptions -fstack-protector-strong --param=ssp-buffer-size=4 -grecord-gcc-switches -m64 -mtune=generic -fPIC' --with-ld-opt='-Wl,-z,relro -Wl,-z,now -pie'
--prefix=/etc/nginx 安装位置目录
--sbin-path=/usr/sbin/nginx 可执行目录
--modules-path=/usr/lib64/nginx/modules 扩展模块目录
--conf-path=/etc/nginx/nginx.conf 默认配置文件
--error-log-path=/var/log/nginx/error.log 错误日志
--http-log-path=/var/log/nginx/access.log 执行日志
--user=nginx 用户 (通过# cat /etc/passwd 文件可以查看到已经添加了一个nginx的用户)
--group=nginx 用户组
如何查看 http://118.24.241.124/ 默认站点的nginx配置文件和所在目录?
通过 # vim /etc/nginx/nginx.conf
可以看到 此文件的最后一行 include /etc/nginx/conf.d/*.conf; 表示加载/etc/nginx/conf.d/目录下的所有的以 .conf为后缀的配置文件,进入此目录
# cd /etc/nginx /conf.d/
# ls -al
# vim default.conf 可以看到
说明默认站点目录位于 /usr/share/nginx/html/下。
二:安装MySQL5.7.25(yum在线安装)
1、准备
下载yum源下的rpm包
[root@niuxitong /]# cd mydata
[root@niuxitong mydata]# wget http://dev.mysql.com/get/mysql57-community-release-el7-8.noarch.rpm

[root@niuxitong mydata]# ls
mysql57-community-release-el7-8.noarch.rpm    //已经下载成功
安装mysql的yum源
[root@niuxitong mydata] # yum localinstall mysql57-community-release-el7-8.noarch.rpm
检查mysql源是否安装成功
# yum repolist enabled | grep "mysql.*-community.*"
2、安装mysql-community-server 服务器端
# yum install mysql-community-server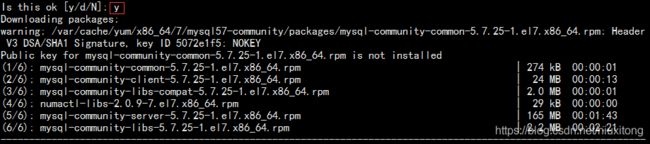
继续:

已完成
3、安装 MySQL-devel 服务
# yum install mysql-community-devel过程有点慢,大约5分钟
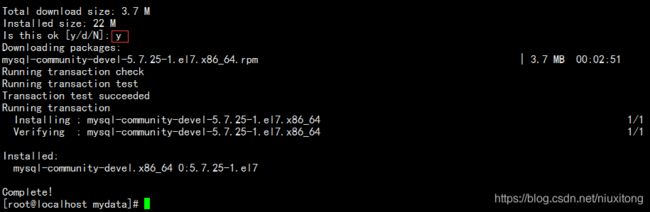
OK 安装完成
4、常用操作命令
# mysql --version 查看版本号
# mysql -V 查看版本号
# systemctl status  mysqld.service  (查看状态 service mysqld status)
# systemctl start  mysqld.service  (开启服务 service mysqld start)
# systemctl stop  mysqld.service   (停止服务 service mysqld stop)
# systemctl restart mysqld.service (重启服务 service mysqld restart)

# systemctl enable mysqld    设置开机启动(只对yum安装的有效)
# systemctl daemon-reload    取消开机重启

#登录mysql
# mysql -u root  -p
Enter password:     输入密码

# mysql> select version();
+-----------+
| version() |
+-----------+
| 5.7.25    |
+-----------+
5、设置开启重启msyql
# systemctl enable mysqld 设置开机启动(只对yum安装的有效)
6、重置初始密码
# grep 'temporary password' /var/log/mysqld.log 获取初始密码![]()
可以看出初始密码是 5ThbdQ.u3lus
用初始密码登录
// 更换密码
> mysql> ALTER USER 'root'@'localhost' IDENTIFIED BY '新密码';
注意:这里的新密码必须包含数字、小写或大写字母、特殊字符串。这个密码的复杂程度,和validate_password_policy的值有关。
mysql>
mysql> ALTER USER 'root'@'localhost' IDENTIFIED BY 'niu123456'; //新密码设置为niu123456
ERROR 1819 (HY000): Your password does not satisfy the current policy requirements //这里提示新密码过于简单。
mysql>
mysql> set global validate_password_policy=0; 降低密码的复杂度 默认是1,即MEDIUM。如果想要降低密码复杂度,可以进入mysql后设置
Query OK, 0 rows affected (0.00 sec)
mysql>
mysql> ALTER USER 'root'@'localhost' IDENTIFIED BY 'niu123456'; 再次设置
Query OK, 0 rows affected (0.00 sec) //OK 新密码修改成功
mysql> quit;
Bye
[root@localhost mydata]#
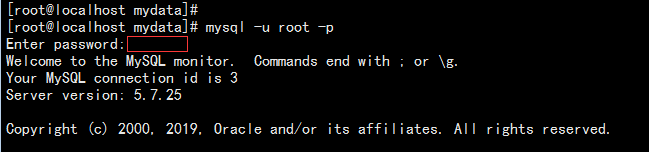
[root@localhost mydata]# mysql -u root -p
Enter password: 用新密码登录
Welcome to the MySQL monitor. Commands end with ; or \g.
OK 新密码设置成功7、设置远程访问
#  mysql -u root -p
Enter password:
# mysql> show databases;
# mysql> use mysql;
# mysql> GRANT ALL PRIVILEGES ON *.* TO 'root'@'%' IDENTIFIED BY 'niu123456' WITH GRANT OPTION;
ERROR 1819 (HY000): Your password does not satisfy the current policy requirements
(同样提示密码过于简单,要么密码复杂一点,要么降低复杂程度。我们选择后者)

# mysql> set global validate_password_policy=0;   //降低密码复杂程度
Query OK, 0 rows affected (0.00 sec)

mysql> GRANT ALL PRIVILEGES ON *.* TO 'root'@'%' IDENTIFIED BY 'niu123456' WITH GRANT OPTION;
Query OK, 0 rows affected, 1 warning (0.00 sec)
GRANT ALL PRIVILEGES ON *.* TO 'root'@'%' IDENTIFIED BY 'niu123456' WITH GRANT OPTION;
"%"表示任何主机都可以远程登录到该服务器上访问。如果要限制只有某台机器可以访问,将其换成相应的IP即可,如:
GRANT ALL PRIVILEGES ON *.* TO root@"172.168.193.25" IDENTIFIED BY "root";
select * from user where user='root';
查看是否有%这条记录
OK 到此已经 可以用远程工具链接了。(因为服务器已经开启了3306端口)
也可以用 >mysql –u root –h 192.168.1.123 –p 进行测试 192.168.1.123就是你本地电脑IP
如果没开启,接着设置如下步骤
- 开启3306端口
- # 在 Centos 7 或 RHEL 7 或 Fedora 中防火墙由 firewalld 来管理,而不是 iptables。
# systemctl start firewalld.service 开启firewalld服务
# firewall-cmd --zone=public --add-port=3306/tcp –-permanent在public中永久打开3306端口 出现success
# firewall-cmd –reload 出现success
附:
# firewall-cmd --list-all-zones #查看所有的zone信息
# firewall-cmd --get-default-zone #查看默认zone是哪一个
# firewall-cmd --zone=internal --change-zone=p3p1 #临时修改接口p3p1所属的zone为internal
# firewall-cmd --add-service=http #暂时开放http
# firewall-cmd --permanent --add-service=http #永久开放http
# firewall-cmd --zone=public --add-port=80/tcp --permanent #在public中永久开放80端口
# firewall-cmd --permanent --zone=public --remove-service=ssh #从public zone中移除服务
# firewall-cmd --reload #重新加载配置
8、mysql的基本配置
默认yum安装的mysql,其路径如下
/etc/my.cnf                //msyql主配置文件
# vim  /etc/my.cnf  可以看出
datadir=/var/lib/mysql         //数据库目录,所有数据库目录都在这里
socket=/var/lib/mysql/mysql.sock       //mysql.sock路径
log-error=/var/log/mysqld.log         //msyql错误日志
如果不是默认yum安装的,使用如下命令查找
第一步:# which mysqld 查找mysqld命令的所在路径
![]()
第二步:执行# /usr/sbin/mysqld --verbose --help | grep -A 1 'Default options'

就找到了各个配置文件的路径所在。
9 修改默认字符集
首先查看现在的默认编码:
# mysql> show variables like '%char%';

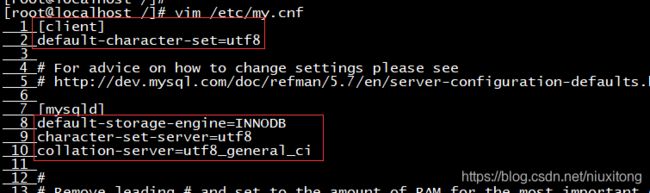
# vim /etc/my.cnf
修改如下
在此文件顶端新加两行
[client]
default-character-set=utf8
在[mysqld]下面新加三行
default-storage-engine=INNODB
character-set-server=utf8
collation-server=utf8_general_ci
如下图所示
# 重启mysql
# systemctl restart mysqld.service;
再次查看字符集:

OK 完成
三: 安装PHP
1、下载安装包
# cd /mydata
# wget https://www.php.net/distributions/php-7.2.17.tar.gz
注意:一定要下载完整,不能有报错。
2、安装依赖
# yum -y install libxml2 libxml2-devel openssl openssl-devel bzip2 bzip2-devel libcurl libcurl-devel libjpeg libjpeg-devel libpng libpng-devel freetype freetype-devel gmp gmp-devel libmcrypt libmcrypt-devel readline readline-devel libxslt libxslt-devel3、编辑安装php
# tar -zxvf php-7.2.17.tar.gz
# cd php-7.2.17/
# 编辑PHP的配置项
# ./configure --prefix=/usr/local/php --with-config-file-path=/etc --enable-fpm --with-fpm-user=nginx --with-fpm-group=nginx --enable-inline-optimization --disable-debug --disable-rpath --enable-shared --enable-soap --with-libxml-dir --with-xmlrpc --with-openssl --with-mhash --with-pcre-regex --with-sqlite3 --with-zlib --enable-bcmath --with-iconv --with-bz2 --enable-calendar --with-curl --with-cdb --enable-dom --enable-exif --enable-fileinfo --enable-filter --with-pcre-dir --enable-ftp --with-gd --with-openssl-dir --with-jpeg-dir --with-png-dir --with-zlib-dir --with-freetype-dir  --enable-gd-jis-conv --with-gettext --with-gmp --with-mhash --enable-json --enable-mbstring --enable-mbregex --enable-mbregex-backtrack --with-libmbfl --with-onig --enable-pdo --with-mysqli=mysqlnd --with-pdo-mysql=mysqlnd --with-zlib-dir --with-pdo-sqlite --with-readline --enable-session --enable-shmop --enable-simplexml --enable-sockets --enable-sysvmsg --enable-sysvsem --enable-sysvshm --enable-wddx --with-libxml-dir --with-xsl --enable-zip --enable-mysqlnd-compression-support --with-pear --enable-opcache --disable-fileinfo
注意这里配置了PHP的安装目录、PHP的用户为nginx、用户组为nginx 。和上面安装的nginx的用户、用户组一定要相同。
如果出现如下报错:
configure: WARNING: unrecognized options: --with-mcrypt, --enable-gd-native-ttf
说明此版本不再支持 --with-mcrypt, --enable-gd-native-ttf 这两个选项, 直接删除,重新编辑即可。
4、make && make install
[root@localhost php-7.2.17]# make
最新出现
make: *** [ext/fileinfo/libmagic/apprentice.lo] Error 1
是因为服务器内存不足1G。只需要在配置命令中添加 --disable-fileinfo即可。
再次执行
[root@localhost php-7.2.17]# ./configure .....  --disable-fileinfo

再次执行
[root@localhost php-7.2.17]# make

。。。
最后出现
invertedregexiterator.inc
pharcommand.inc
directorytreeiterator.inc
directorygraphiterator.inc
clicommand.inc
phar.inc

Build complete.
Don't forget to run 'make test'.

继续:

# make install
最后出现:

安装成功!
5、添加环境变量到PHP中
没有添加之前:

添加环境变量:
方法一:所有用户永久生效(推荐使用这种方式)
# vim /etc/profile

在此文件的最后添加如下两行
PATH=$PATH:/usr/local/php/bin
export PATH

# source /etc/profile  使配置立即生效
再次检查:
# php -v
# echo $PATH
OK 已经配置成功
6、配置PHP-fpm 并设置开启重启
进入php的安装包(注意是解压出来的那个安装包,而不是安装目录)
# cd /mydata/php-7.2.17/
# ls -al
可以找到两个 php.ini-development(测试配置文件) php.ini-production生产环境配置文件
复制以下四个文件。
# cp php.ini-production /etc/php.ini      //设置PHP启动文件
# cp sapi/fpm/init.d.php-fpm /etc/init.d/php-fpm  //把php-fpm放入系统管理配置项中
# chmod +x /etc/init.d/php-fpm    //为其添加可执行权限

# cp /usr/local/php/etc/php-fpm.conf.default /usr/local/php/etc/php-fpm.conf
# cp /usr/local/php/etc/php-fpm.d/www.conf.default /usr/local/php/etc/php-fpm.d/www.conf

添加到环境系统启动项
# chkconfig --add php-fpm             //添加到开机重启

查看是否添加成功
# chkconfig --list
......
bcm-agent       0:off   1:off   2:on    3:on    4:on    5:on    6:off
hosteye         0:off   1:off   2:on    3:on    4:on    5:on    6:off
mysqld          0:off   1:off   2:on    3:on    4:on    5:on    6:off
netconsole      0:off   1:off   2:off   3:off   4:off   5:off   6:off
network         0:off   1:off   2:on    3:on    4:on    5:on    6:off
nginx           0:off   1:off   2:on    3:on    4:on    5:on    6:off
php-fpm         0:off   1:off   2:on    3:on    4:on    5:on    6:off  --- php-fpm 添加成功
# chkconfig php-fpm on
# /etc/init.d/php-fpm start
出现 Starting php-fpm  done
# /etc/init.d/php-fpm  status     //查看PHP(也就是php-fpm)运行状态
php-fpm (pid 2306) is running...   运行成功
8、常用命令(启动PHP 也就是 php-fpm)
/etc/init.d/php-fpm  start    开启服务
/etc/init.d/php-fpm  stop    停止服务
/etc/init.d/php-fpm  status    查看状态
/etc/init.d/php-fpm  restart    重启服务
9、PHP安装路径
# netstat -ntpl 查看9000端口是否开启(PHP使用的是9000端口)
/etc/init.d/php-fpm php启动文件
/usr/local/php PHP安装目录
/usr/local/php/bin/ 可执行目录
/etc/php.ini PHP配置文件
四:创建站点,让nginx支持php
1、让nginx的默认站点支持php
(1)在默认站点目录下创建 index.php
# vim /usr/shar/nginx/html/index.php
内容如下:
phpinfo();
?>
(2)修改默认站点的配置文件
#vim /etc/nginx/conf.d/default.conf
修改如下两处

(3)重启nginx
# systemctl restart nginx.service
访问:http://118.24.241.124/index.php
OK PHP可以正常在nginx服务器运行了
2、上传phpmyadmin 让nginx、mysql、php协调运行
(1)把phpmyadmin.tar.gz 上传到 /usr/share/nginx/html/ 并解压 # tar -zxvf phpinfomyadmin.tar.gz
(2)http://118.24.241.124/phpmyadmin/index.php 输入用户名root 密码niu123456 登录,出现如下:
现在报错 mysqli_real_connect(): (HY000/2002): No such file or directory,错误原因默认php中配置的mysqli没有与实际的mysql.sock对应正确;
首先找到mysql.sock的正确路径:
vim /etc/my.cnf 大约28行: socket=/var/lib/mysql/mysql.sock //
或者 执行:
mysql -u root -p
mysql> status;

都能找到此路径为 /var/lib/mysql/mysql.sock
#vim /etc/php.ini
大约1040行

大约1186行

重启php
# /etc/init.d/php-fpm restart;
再次登录 http://118.24.241.124/phpmyadmin/index.php

OK 成功
4、配置虚拟站点支持ThinkPHP5.1
(1)创建虚拟站点
# cd /home/
# mkdir -p wwwroot/niuxitong
# cd wwwroot/niuxitong
(2)使用composer下载TP5.1
composer 的安装见 https://blog.csdn.net/niuxitong/article/details/89315461
# composer create-project topthink/think=5.1.x-dev tp5  (如果不成功,就多下载几次)
# cd tp5/
# mv ./*  ../    //将内容全部移植到  ./niuxitong/目录下
(3)设置配置文件
# cd /etc/nginx/conf.d/
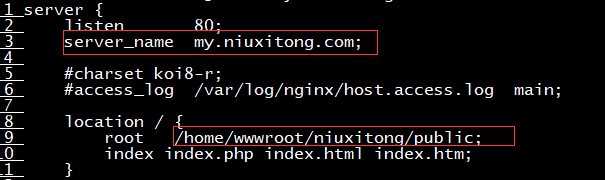
# cp default.conf my.niuxitong.com.conf
# vim my.niuxitong.com.conf做如下修改:


(4)重启nginx # systemctl restart nginx.service
(5)本地C:\Windows\System32\drivers\etc\hosts 添加域名
118.24.241.124 my.niuxitong.com

到此, 整个LNMP 全部安装配置完成!!