intent详解(一)、intent详解(二)
1、获取图片
1、相册
以隐氏intent的方式打开系统默认的图库,需要传入mimeType

代码如下:
//打开图片
Intent galleryIntent = new Intent(Intent.ACTION_PICK);
//Intent galleryIntent = new Intent(Intent.ACTION_GET_CONTENT);
galleryIntent.setType("image/*");
startActivityForResult(galleryIntent, REQUEST_GALLERY);
1、ACTION_PICK、ACTION_GET_CONTENT可以完成相似的功能
2、mimeType:该activity可以处理的文件类型,形式:[type]/[subtype]。 Android MimeType的用途以及所有类型
在onActivityResult中,可以通过以下方法得到Uri:
Uri uri = data.getData();
2、相机
同样使用隐式的intent,打开系统的相机

1、使用默认的返回路径
代码如下:
Intent cameraIntent=new Intent(MediaStore.ACTION_IMAGE_CAPTURE);
startActivityForResult(cameraIntent,REQUEST_CAMERA);

所以,在onActivityResult中,可以通过以下方法得到图片:
Bundle bundle=data.getExtras();
Bitmap bitmap= (Bitmap) bundle.get("data");
imageView.setImageBitmap(bitmap);
但是,camera应用程序,不会将全尺寸的图片传递给主调程序:系统为了防止应用内存占用过大,对于在应用内通过相机拍摄的图片最终返回来的结果进行了压缩,压缩后的图片变得很小,如下:

2、传递给camera应用程序,一个路径
为了得到期望的图片,可以为camera应用程序,传递一个附加值,这个附加值的名称在MediaStore中指定:EXTRA_OUTPUT,以URI的形式指示捕获的图像放置的位置(imgUri)

//传递给camera应用程序,一个附加值
Intent intent=new Intent(MediaStore.ACTION_IMAGE_CAPTURE);
intent.putExtra(MediaStore.EXTRA_OUTPUT, imgUri);
startActivityForResult(intent,REQUEST_CAMERA);
- 创建Uri
- 1、使用ContentResolver,因为是添加图片,用insert
Uri imgUri = getContentResolver().insert(MediaStore.Images.Media.EXTERNAL_CONTENT_URI, new ContentValues()); - 2、 android文件存储路径
String imgPath= Environment.getExternalStorageDirectory().getAbsolutePath()+"/_"+System.currentTimeMillis();
Uri uri=Uri.parse(imgPath);
注意:权限,android.permission.WRITE_EXTERNAL_STORAGE

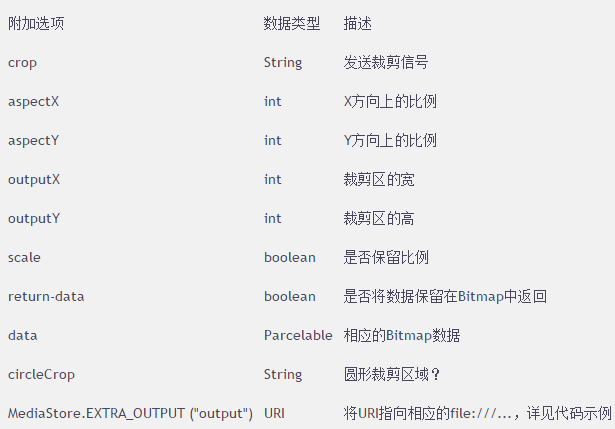
2、裁剪
可以在onActivityResult中调用裁剪图片的intent,如下:
Intent cropIntent=new Intent("com.android.camera.action.CROP");
cropIntent.setDataAndType(srcUri,"image/*");
cropIntent.putExtra("scale", true);
cropIntent.putExtra(MediaStore.EXTRA_OUTPUT,imgUri);
startActivityForResult(cropIntent,IMG_CROP);
3、onActivityResult中的回调
不管是拍照还是通过相册,总有办法得到Uri,通过这个Uri就可以取得bitmap或者imgPath
取得bitmap:
Bitmap bitmap = BitmapFactory.decodeStream(getContentResolver().openInputStream(imgUri), null, null);
或者
Bitmap bitmap= MediaStore.Images.Media.getBitmap(getContentResolver(),imgUri);
或者
Bitmap bitmap= BitmapFactory.decodeFile(imgPath, null);
取得imgPath:
    /**
     * 根据Uri转变成真实路径
     */
    public String getRealFilePath(Uri uri) {
        String scheme=uri.getScheme();
        if(scheme==null || scheme.equals(ContentResolver.SCHEME_FILE)){
            String p= uri.getPath();
            return p;
        }
        Cursor cursor = context.getContentResolver().query(uri, new String[]{MediaStore.Images.Media.DATA}, null, null, null);
        if (cursor == null) {
            return null;
        }
        if (cursor.moveToFirst()) {
            String path = cursor.getString(cursor.getColumnIndex(MediaStore.Images.Media.DATA));
            cursor.close();
        }
        return null;
    }
之后,对得到的bitmap进行压缩:
4、压缩
图片有三种存在形式:硬盘上时是file,网络传输时是stream,内存中是stream或bitmap
质量压缩,它其实只能实现对file的影响,你可以把一个file转成bitmap再转成file,或者直接将一个bitmap转成file时,这个最终的file是被压缩过的,但是中间的bitmap并没有被压缩(或者说几乎没有被压缩,我不确定),因为bigmap在内存中的大小是按像素计算的,也就是width * height,对于质量压缩,并不会改变图片的像素,所以就算质量被压缩了,但是bitmap在内存的占有率还是没变小,但你做成file时,它确实变小了;
尺寸压缩,由于是减小了图片的像素,所以它直接对bitmap产生了影响,当然最终的file也是相对的变小了;
- 质量压缩
public String qualityCompressImg(Bitmap bitmap, String outPath, int maxSize) {
    ByteArrayOutputStream byteArrayOutputStream = new ByteArrayOutputStream();
    float option = 100f;
    bitmap.compress(Bitmap.CompressFormat.JPEG, (int) option, byteArrayOutputStream);
    while (byteArrayOutputStream.toByteArray().length / 1024 > maxSize) {
        byteArrayOutputStream.reset();
        option *= 0.9f;
        if(option<1){
            break;
        }
        bitmap.compress(Bitmap.CompressFormat.JPEG, (int) option, byteArrayOutputStream);
    }
    try {
        FileOutputStream outputStream = new FileOutputStream(outPath);
        outputStream.write(byteArrayOutputStream.toByteArray());
        outputStream.flush();
        outputStream.close();
    } catch (IOException e) {
        e.printStackTrace();
    }
   return outPath;
}
- 尺寸压缩
public Bitmap ratioBitmap(String path, int viewWidth, int viewHeight) {
    BitmapFactory.Options options = new BitmapFactory.Options();
    options.inSampleSize = 1;
    options.inJustDecodeBounds = true;
    options.inPreferredConfig = Bitmap.Config.RGB_565;
    BitmapFactory.decodeFile(path, options);
    int h = options.outHeight;
    int w = options.outWidth;
    int inSampleSize = (int) Math.max(h * 1.0 / viewWidth, w * 1.0 / viewHeight);
    if (inSampleSize <= 0) {
        inSampleSize = 1;
    }
    options.inJustDecodeBounds = false;
    options.inSampleSize = inSampleSize;
    return BitmapFactory.decodeFile(path, options);
}
5、操作Exif信息
为什么在有些手机上拍摄的照片看起来方向不对?
用相机拍摄出来的照片含有EXIF信息,ExifInterface.TAG_ORIENTATION指的就是EXIF中的orientation信息。如果我们忽略orientation信息,直接去获取图片的bitmap,得到的结果会旋转(90°、180°、270°)。所以在onActivityResult方法获取到照片数据后,读取exif信息,将照片旋转到正确的方向(Matrix)。
什么是Exif?
Exif是一种图像文件格式,是在JPEG格式头插入了照片的信息。通过ExifInterface类可以操作图片的Exif信息,其中定义了一些字符串的静态常量:
TAG_APERTURE:光圈值。
TAG_DATETIME:拍摄时间,取决于设备设置的时间。
TAG_EXPOSURE_TIME:曝光时间。
TAG_FLASH:闪光灯。
TAG_FOCAL_LENGTH:焦距。
TAG_IMAGE_LENGTH:图片高度。
TAG_IMAGE_WIDTH:图片宽度。
TAG_ISO:ISO。
TAG_MAKE:设备品牌。
TAG_MODEL:设备型号,整形表示,在ExifInterface中有常量对应表示。
TAG_ORIENTATION:旋转角度,整形表示,在ExifInterface中有常量对应表示。
使用setAttribute()设置Exif信息,将不会写入到目标图片中,只有在改变Exif信息后,调用saveAttribute()才可以把新的Exif写入到目标图片中。
代码如下:
读取exif信息:
ExifInterface oldExif=new ExifInterface(pathImage);
Class exifInterfaceClass=ExifInterface.class;
Field[] fields=exifInterfaceClass.getFields();
for(int i=0;i
旋转图片:
    public String rotateImg(String imgPath, int maxSize) {
        Bitmap bitmap=BitmapFactory.decodeFile(imgPath, null);
        int rotate=0;
        try {
            ExifInterface old = new ExifInterface(imgPath);
            int orientation=old.getAttributeInt(ExifInterface.TAG_ORIENTATION,0);
            if(orientation==ExifInterface.ORIENTATION_ROTATE_90){
                rotate=90;
            }else if(orientation==ExifInterface.ORIENTATION_ROTATE_270){
                rotate=270;
            }else if(orientation==ExifInterface.ORIENTATION_ROTATE_180){
                rotate=180;
            }
        } catch (IOException e) {
            e.printStackTrace();
        }
        Matrix matrix=new Matrix();
        matrix.setRotate(rotate, bitmap.getWidth()/2,bitmap.getHeight()/2);
        Bitmap tempBitmap=Bitmap.createBitmap(bitmap,0,0,bitmap.getWidth(),bitmap.getHeight(),matrix,true);

        if(tempBitmap!=bitmap){
            bitmap.recycle();
        }

        return qualityCompressImg(tempBitmap, imgPath, maxSize);
    }
如果rotate=0,recycle(),会有问题?
因为 tempBitmap和bitmap可能会是同一个

http://www.cnblogs.com/plokmju/p/android_exif.html
http://blog.csdn.net/berber78/article/details/39778181
http://blog.csdn.net/u012816041/article/details/50602246
6、七牛 上传图片
new Thread(new Runnable() {
            @Override
            public void run() {
                try {
                    URL url=new URL("http://101.201.211.229/zbhq/Home/BabyShow/upToken");
                    HttpURLConnection connection= (HttpURLConnection) url.openConnection();
                    connection.connect();
                    if(connection.getResponseCode()==200){
                        InputStream inputStream=connection.getInputStream();
                        ByteArrayOutputStream outputStream=new ByteArrayOutputStream();
                        byte[] buff=new byte[1024];
                        int len=0;
                        while ((len=inputStream.read(buff))!=-1){
                            outputStream.write(buff,0,len);
                        }
                        String jsonString=outputStream.toString();
                        outputStream.close();
                        inputStream.close();
                        JSONObject jsonObject=new JSONObject(jsonString);
                        final String code=jsonObject.getString("code");
                        final String uptoken=jsonObject.getString("uptoken");
                        UploadManager uploadManager=new UploadManager();
                        String key="babyShow/" +System.currentTimeMillis();
                        uploadManager.put(uploadPath, key, uptoken, new UpCompletionHandler() {
                            @Override
                            public void complete(String key, ResponseInfo info, JSONObject response) {
                                final String path="http://7xrpiy.com1.z0.glb.clouddn.com/"+key;
                                text2.setText(code + ":" + path);
                                new Thread(new Runnable() {
                                    @Override
                                    public void run() {
                                        try {
                                            URL url1=new URL(path);
                                            HttpURLConnection connection1= (HttpURLConnection) url1.openConnection();
                                            if(connection1.getResponseCode()==200){
                                                InputStream inputStream1=connection1.getInputStream();
                                                final Bitmap bitmap=BitmapFactory.decodeStream(inputStream1);
                                                runOnUiThread(new Runnable() {
                                                    @Override
                                                    public void run() {
                                                        imageView2.setImageBitmap(bitmap);
                                                    }
                                                });
                                                inputStream1.close();
                                            }
                                        } catch (MalformedURLException e) {
                                            e.printStackTrace();
                                        } catch (IOException e) {
                                            e.printStackTrace();
                                        }
                                    }
                                }).start();
                            }
                        }, null);
                    }
                } catch (MalformedURLException e) {
                    e.printStackTrace();
                } catch (IOException e) {
                    e.printStackTrace();
                } catch (JSONException e) {
                    e.printStackTrace();
                }

            }
        }).start();

代码:
https://coding.net/u/hongji/p/TakePictureDemo/git
参考:
http://blog.csdn.net/jdsjlzx/article/details/44228935
http://blog.csdn.net/floodingfire/article/details/8144604