目录
本专题博客已共享在(这个可能会更新的稍微一些)
https://code.csdn.net/yangwei19680827/maven_sshm_blog
1,从零开始搭建SSHM开发框架(环境准备)
2,从零开始搭建SSHM开发框架(集成Spring+JPA)
3,从零开始搭建SSHM开发框架(集成Spring MVC)
(还在写呢。。。)4,从零开始搭建SSHM开发框架(集成DWZ+Spring Security)
(还在写呢。。。)5,从零开始搭建SSHM开发框架(DWZ的使用)
(还在写呢。。。)6,从零开始搭建SSHM开发框架(集成Ehcache)
(还在写呢。。。)7,从零开始搭建SSHM开发框架(集成activemq)
(还在写呢。。。)8,从零开始搭建SSHM开发框架(集成Mybatis)
(还在写呢。。。)9,从零开始搭建SSHM开发框架(集成Redis)
1.修改pom.xml,增加spring-mvc 的依赖
    4.0.0
    com.wiker
    sshm
    war
    1.0-SNAPSHOT
    sshm Maven Webapp
    http://maven.apache.org


        5.1.0.Final
        4.2.5.RELEASE
        1.2.17
        2.7.3

        UTF-8
        1.8


            org.hibernate
            hibernate-core
            ${hibernate-version}


            org.hibernate
            hibernate-entitymanager
            ${hibernate-version}


            mysql
            mysql-connector-java
            5.1.38


            org.springframework
            spring-context
            ${spring-version}


            org.springframework
            spring-aop
            ${spring-version}


            org.springframework
            spring-context-support
            ${spring-version}


            org.springframework
            spring-jdbc
            ${spring-version}


            org.springframework.data
            spring-data-jpa
            1.9.4.RELEASE


            org.springframework
            spring-orm
            ${spring-version}


            org.springframework
            spring-web
            ${spring-version}


            org.springframework
            spring-webmvc
            ${spring-version}


            com.alibaba
            druid
            1.0.22


            log4j
            log4j
            ${log4j-version}


            com.fasterxml.jackson.core
            jackson-databind
            ${jack-json-version}


            com.fasterxml.jackson.core
            jackson-core
            ${jack-json-version}


            com.fasterxml.jackson.core
            jackson-annotations
            ${jack-json-version}


            commons-fileupload
            commons-fileupload
            1.3.1


            javax.servlet
            jstl
            1.2


            javax.servlet
            jsp-api
            2.0
            provided


            javax.servlet
            servlet-api
            2.5
            provided


            javax.servlet
            javax.servlet-api
            4.0.0-b01
            provided


            javax.servlet
            servlet-api
            2.5
            provided


            org.springframework
            spring-test
            ${spring-version}
            test


            junit
            junit
            4.11
            test


        sshm
主要新增了如下选项
            org.springframework
            spring-webmvc
            ${spring-version}


            com.fasterxml.jackson.core
            jackson-databind
            ${jack-json-version}


            com.fasterxml.jackson.core
            jackson-core
            ${jack-json-version}


            com.fasterxml.jackson.core
            jackson-annotations
            ${jack-json-version}


            commons-fileupload
            commons-fileupload
            1.3.1
2.增加spring-mvc.xml
文件放到WEB-INF/下,如果你的包名和我的不一样,需要修改一下base-package="com.wiker" 中的包名
                            text/plain;charset=UTF-8


                            text/json;charset=UTF-8
3.修改web.xml
        javax.servlet.jsp.jstl.fmt.localizationContext
        messages


        contextConfigLocation

            classpath:/applicationContext-service.xml


        spring.profiles.default
        production


        org.springframework.web.context.ContextLoaderListener


        encodingFilter
        org.springframework.web.filter.CharacterEncodingFilter

            encoding
            UTF-8


            forceEncoding
            true


        springServlet
        org.springframework.web.servlet.DispatcherServlet

            contextConfigLocation
            /WEB-INF/spring-mvc.xml

        1


        springServlet
        /

  Archetype Created Web Application
4.给Service加一个删除的方法
package com.wiker.service;

import java.util.List;

import org.springframework.beans.factory.annotation.Autowired;
import org.springframework.stereotype.Service;
import org.springframework.transaction.annotation.Transactional;

import com.wiker.entity.TestEntity;
import com.wiker.repository.TestDao;

@Service
@Transactional(readOnly = true)
public class TestService {

    @Autowired
    private TestDao testDao;

    @Transactional(readOnly=false)
    public TestEntity add(TestEntity t){
        return testDao.save(t);
    }

    @Transactional(readOnly=false)
    public void del(long id){
        testDao.delete(id);
    }

    public List getAll(){
        return (List) testDao.findAll();
    }
}
5.测试Controller
TestController.java
package com.wiker.controller;

import java.util.HashMap;
import java.util.List;
import java.util.Map;

import org.springframework.beans.factory.annotation.Autowired;
import org.springframework.stereotype.Controller;
import org.springframework.ui.Model;
import org.springframework.web.bind.annotation.RequestMapping;
import org.springframework.web.bind.annotation.RequestMethod;
import org.springframework.web.bind.annotation.ResponseBody;

import com.wiker.entity.TestEntity;
import com.wiker.service.TestService;

//要使用Controller 必须加@Controller注解也可以用@Controller("path")这里面的path相当于本Controller的根路径
//如果配置成@Controller("path"),那么访问的地址应该是:http://localhost:8080/path/test
@Controller
public class TestController {

    //映射JSP测试
    @RequestMapping(value = "test", method = {
            RequestMethod.GET, RequestMethod.POST
        })
    public String test(Model model,String name) {
        model.addAttribute("name", name);
        return "index";
    }

    //测试自动转JSON
    @RequestMapping(value = "test.json", method = {
            RequestMethod.GET, RequestMethod.POST
        })
    @ResponseBody
    public Map testJson(Model model,String name) {
        Map map = new HashMap();
        map.put("name", name);
        return map;
    }

    //和Service结合,实现数据库操作。这里是注入的Service,其实直接注入Dao也是可以的
    //TIPS:Service使用了事务,所以不要直接try catch,不然事务会失效
    @Autowired
    private TestService testService;

    //获取列表
    @RequestMapping(value = "testGetAll", method = {
            RequestMethod.GET, RequestMethod.POST
        })
    public String testGetAll(Model model,String name) {
        List list = testService.getAll();
        model.addAttribute("list", list);
        return "testList";
    }

    //添加操作,添加后返回列表页面,这里为了简单演示就直接通过redirect的方式
    //真实情况应该是根据业务需求来是重定向还是直接刷新页面等
    @RequestMapping(value = "testAdd", method = {
            RequestMethod.GET, RequestMethod.POST
        })
    public String testGetAll(Model model,TestEntity entity) {
        testService.add(entity);
        List list = testService.getAll();
        model.addAttribute("list", list);
        return "redirect:/testGetAll";
    }

    //添加操作,添加后返回列表页面,这里为了简单演示就直接通过redirect的方式
    //真实情况应该是根据业务需求来是重定向还是直接刷新页面等
    @RequestMapping(value = "testDel", method = {
            RequestMethod.GET, RequestMethod.POST
        })
    public String testDel(Model model,long id) {
        testService.del(id);
        return "redirect:/testGetAll";
    }
}
6.新增测试的JSP
testList.jsp
<%@ page contentType="text/html;charset=UTF-8" isELIgnored="false" %>
<%@ taglib prefix="c" uri="http://java.sun.com/jsp/jstl/core" %>


测试数据库操作


ID
Content
操作


${item.id }
${item.content }

删除
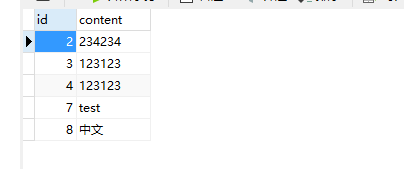
7.来几张效果图
7.Spring mvc扩展用法
上面已经介绍了@ResponseBody,还有其它注解如:
- @PathVariable 用于REST风格
@RequestMapping(value = "test/{name}", method = {
            RequestMethod.GET, RequestMethod.POST
        })
public String test(Model model,@PathVariable String name) {
    model.addAttribute("name", name);
    return "index";
}
那么访问的url就是:http://localhost:8080/test/wiker
- @RequestParam 用于参数绑定
@RequestMapping(value = "test", method = {
            RequestMethod.GET, RequestMethod.POST
        })
public String test(Model model,@RequestParam("testName")String name) {
    model.addAttribute("name", name);
    return "index";
}
那么访问URL就必须改成:http://localhost:8080/test?testName=test
- @RequestMapping 中也有很多高级的用法,比如多个URL映射同一个URL,而且支持正则等。注解中的method属性表示用哪些方法可以方法,GET,POST,DELETE,PUT等都支持,还有一些其它属性,如图:
eclipse 上的maven这点比较方便,想看某个类的源码,Ctrl+点击进去便可以看到,如果没有下载,会自动下载源到到本地的仓库,而且是有注释的源码。IDEA虽然也能下源码,但是点进去看没有注释,不知道是不是我设置的不对~~~
- @InitBinder 可以用于数据精确的绑定
日期转换,这样如果数据提交的是yyyy--MM-dd格式的将自动转换为Date类型。例:
    @InitBinder
    protected void initBinder(WebDataBinder binder) {
        SimpleDateFormat dateFormat = new SimpleDateFormat("yyyy-MM-dd");
        CustomDateEditor editor = new CustomDateEditor(dateFormat, true);
        binder.registerCustomEditor(Date.class, editor);
    }
也可以手动自编写其它的类型,只需要继承PropertyEditorSupport类便可。需要的同学可以网上搜索一下使用方法
本章程序源码下载地址
http://download.csdn.net/detail/yangwei19680827/9593646


