基于人脸识别的考勤记录(Python项目)
写在前面,通过小项目来驱动学习和实践是一种进步很快的方法,本文就是介绍一个基于人脸识别的考勤小项目(Python)。
项目学习自一位Youtuber。
1.前期知识
1)了解face_recognition库
首先,face_recognition是一个基于Python 的人脸识别库,它提供了一个命令行工具和大量的人脸识别相关的工具与方法,让你可以对图像进行人脸识别的操作。
其次,使用了dlib最先进的人脸识别技术构建而成并具有深度学习功能,该模型在Labeled Faces in the Wild基准中的准确率为99.38%。
1.人脸识别原理官方说明可参考:
https://face-recognition.readthedocs.io/en/latest/readme.html
2.face_recognition方法详解:
https://face-recognition.readthedocs.io/en/latest/face_recognition.html
3.使用Python的代码可参考:
https://www.pyimagesearch.com/2018/06/18/face-recognition-with-opencv-python-and-deep-learning/
2)所用face_recognition的方法
1.face_locations(img,number_of_times_to_upsample = 1,model ='hog' )
参数说明:
- img:图像源(二维数组)
- number_of_times_to_upsample = 1:对图像进行人脸向上采样的次数。数字越大,面孔越小。
- model =‘hog’:使用hog模型
返回值
- 以css(上,右,下,左)顺序找到的脸部位置的元组列表
PS:
本项目只用到img参数。模型默认为“hog”,“ hog”准确性较差,但在CPU上速度较快。“ cnn”是经过GPU / CUDA加速(如果可用)的更准确的深度学习模型。默认值为“ hog”
2.face_encodings(face_image,known_face_locations = None,num_jitters = 1,model ='small' )
参数说明:
- face_img:可以为一个或者多个图像
- known_face_locations :可选-每张脸的边界框(如果您已经知道的话)
- num_jitters –计算编码时对面部重新采样的次数。越高越准确,但越慢(即100慢100倍)
- model =‘small’:可选-使用哪种模型。“大”或“小”(默认)仅返回5点,但速度更快。
返回值
PS:
本项目只用到img参数。
3.compare_faces(known_face_encodings,face_encoding_to_check,tolerance = 0.6 )
参数说明:
- known_face_encodings:已知人脸编码列表
- face_encoding_to_check :与列表进行比较的单一面部编码
- tolerance = 0.6:认为相匹配的面孔之间的距离有多大。越低越严格。0.6是典型的最佳性能。
返回值
- 真/假值列表,指示哪些known_face_encodings与面部编码匹配以进行检查
PS:
本项目默认容忍度为0.6,及大于0.6为匹配失败,小于0.6匹配成功,且注意known_face_encodings是列表形式
4.face_distance(face_encodings,face_to_compare )
参数说明:
- face_encodings :要比较的面部编码列表
- face_to_compare :要比较的人脸编码
返回值
- 一个numpy ndarray,每个面的距离与“ faces”数组的顺序相同
PS:
给定面部编码列表,将其与已知的面部编码进行比较,并获得每个比较面部的欧几里得距离。距离告诉您面孔的相似程度。越小越匹配。
2.项目环境
- 系统:win10
- 编辑器:pycharm
- 版本:python3.9.1
- 所用库安装:
numpy , dlib19.18 ,opencv-python, cmake,face-recognition
PS:
安装过程可能较慢,建议在管理储存库添加国内镜像:
http://pypi.douban.com/simple/

3.项目内容
1.学习运用人脸检测
人脸识别方框检测
step1:
在项目中建立ImagesBasic文件夹,里面存放若干已知图像和一张待检测图像:
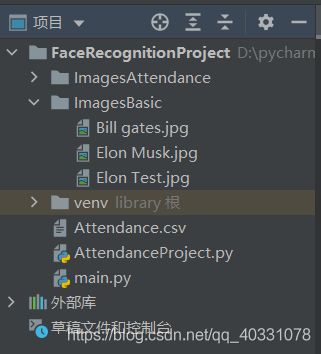
step2:
代码(代码已给出详细注释,这里不再过多描述):
import cv2
import numpy as np
import face_recognition

#step1
imgElon = face_recognition.load_image_file('ImagesBasic/Elon Musk.jpg')
imgElon = cv2.cvtColor(imgElon,cv2.COLOR_BGR2RGB)
imgTest = face_recognition.load_image_file('ImagesBasic/Bill gates.jpg')
imgTest = cv2.cvtColor(imgTest,cv2.COLOR_BGR2RGB)

#step2
#人脸识别,用方框选中Elon
faceLoc = face_recognition.face_locations(imgElon)[0]  #获得图片中脸部方框的坐标(98, 366, 284, 180)(x1,y1,x2,y2)
encodeElon = face_recognition.face_encodings(imgElon)[0]
cv2.rectangle(imgElon,(faceLoc[3],faceLoc[0]),(faceLoc[1],faceLoc[2]),(255,0,255),2)
#print(faceLoc)
#人脸识别,用方框选中Test
faceLocTest = face_recognition.face_locations(imgTest)[0]
encodeTest = face_recognition.face_encodings(imgTest)[0]
cv2.rectangle(imgTest,(faceLocTest[3],faceLocTest[0]),(faceLocTest[1],faceLocTest[2]),(255,0,255),2)

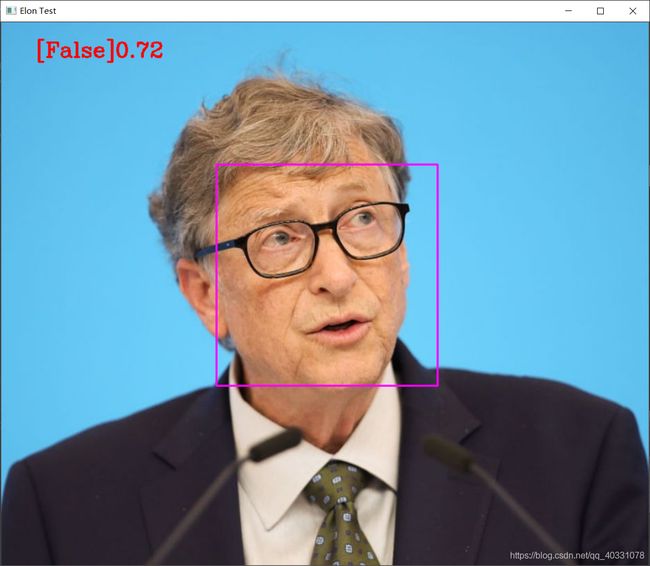
results = face_recognition.compare_faces([encodeElon],encodeTest) #比较两幅图相似性,如果是同一个人则返回[true],如果不是一个人返回[false]
faceDis = face_recognition.face_distance([encodeElon],encodeTest) #返回两个图像中的脸的距离
print(results,faceDis)
cv2.putText(imgTest,f'{results}{round(faceDis[0],2)}',(50,50),cv2.FONT_HERSHEY_COMPLEX,1,(0,0,255),2)#图片,添加的文字,左上角坐标,字体,字体大小,颜色,字体粗细 其中字体可以选择 FONT_HERSHEY_SIMPLEX,round(faceDis[0],2)代表保留两位
cv2.imshow('Elon Musk',imgElon)
cv2.imshow('Elon Test',imgTest)
cv2.waitKey(0)
2.基于人脸识别的考勤小项目
在如上学习的基础上可以完成此项目
step1:
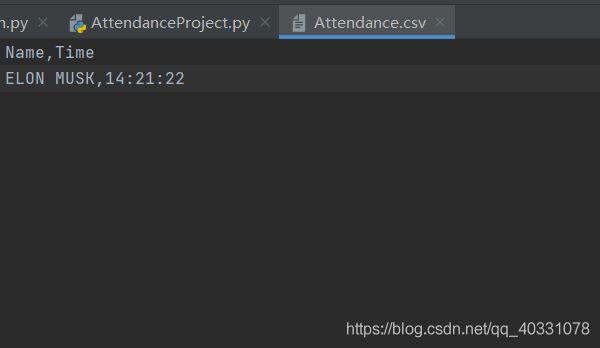
在项目中建立ImagesAttendance文件夹,里面存放若干已知图像,建立一个Attendance.csv用于存放出勤姓名和时间。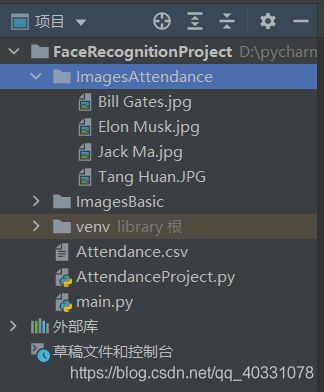
step2:
首先,导入所需要用到的库:
import cv2
import numpy as np
import face_recognition
import os
from datetime import datetime
初始化图片序列,通过系统文件路径获得文件下的文件名和扩展文件名,分别存至:classNames和myList
path = 'ImagesAttendance'
images = []
classNames = []
myList = os.listdir(path) #获得ImagesAttendance下个文件的名字,存在myList下['Bill Gates.jpg', 'Elon Musk.jpg', 'Jack Ma.jpg']
print(myList)
for cl in myList:
    curImg = cv2.imread(f'{path}/{cl}')
    images.append(curImg)
    classNames.append(os.path.splitext(cl)[0]) #获得'Bill Gates'而不是‘Bill Gates.jpg’
print(classNames)  #输出了['Bill Gates', 'Elon Musk', 'Jack Ma']
#自定义一个找到images中各图像编码的函数,返回一个具有各个图像的编码的列表
效果展示:

然后自定义一个找到images中各图像编码的函数,返回一个具有各个图像的编码的列表:
def findEncodings(images):
    encodeList =[] #初始化图像编码空列表
    for img in images:
        img = cv2.cvtColor(img,cv2.COLOR_BGR2RGB)
        encode = face_recognition.face_encodings(img)[0]
        encodeList.append(encode)
    return encodeList
encodeListKnown = findEncodings(images)
#print(len(encodeListKnown)) #有三个编码3
自定义一个记录出勤名字和时间的函数,当某个人(name)出现,则,以name,time的形式记录在csv文件中:
def markAttendance(name):
    with open('Attendance.csv','r+') as f:
        myDataList = f.readlines()
        nameList = []
        for line in myDataList:
            entry = line.split(',') #entry=['name','time']
            #print(entry[0])
            nameList.append(entry[0])
        if name not in nameList:
            now = datetime.now()
            dtString =now.strftime('%H:%M:%S')
            f.writelines(f'\n{name},{dtString}')
或许网络摄像头逐帧读取:
cap = cv2.VideoCapture(0)
while True:
    success,img =cap.read()
    imgS = cv2.resize(img,(0,0),None,0.25,0.25)
    imgS = cv2.cvtColor(imgS,cv2.COLOR_BGR2RGB)

    facesCurFrame = face_recognition.face_locations(imgS) #获得当前帧的面部坐标
    encodesCurFrame = face_recognition.face_encodings(imgS,facesCurFrame) #获得图片坐标下的编码
从每一帧图像中与已知图像进行匹配人脸检测框选,并且标注上姓名:
    for encodeFace , faceLoc in zip(encodesCurFrame,facesCurFrame):
        matches = face_recognition.compare_faces(encodeListKnown,encodeFace)
        faceDis = face_recognition.face_distance(encodeListKnown,encodeFace)
       # print(faceDis) 显示匹配值
        matchIndex = np.argmin(faceDis) #matchIndex是获取faceDis最小的下标,即找到最匹配的那个图片的坐标

        #如果捕获的与图片是匹配的,输出所匹配图片的名字
        if matches[matchIndex]:
            name =classNames[matchIndex].upper()
            #print(name)
            y1,x2,y2,x1 =faceLoc

            y1,x2,y2,x1 = y1*4,x2*4,y2*4,x1*4  ##之前的脸部坐标缩小了4倍,现在扩回来
            cv2.rectangle(img,(x1,y1),(x2,y2),(0,255,0),2)
            cv2.rectangle(img,(x1,y2-35),(x2,y2),(0,255,0),cv2.FILLED)
            cv2.putText(img,name,(x1+6,y2-6),cv2.FONT_HERSHEY_COMPLEX,1,(255,255,255),2)
            markAttendance(name)
这样一个完整的考勤项目就完成了。
这里给出AttendanceProject.py完整代码:
import cv2
import numpy as np
import face_recognition
import os
from datetime import datetime

path = 'ImagesAttendance'
images = []
classNames = []
myList = os.listdir(path) #获得ImagesAttendance下个文件的名字,存在myList下['Bill Gates.jpg', 'Elon Musk.jpg', 'Jack Ma.jpg']
print(myList)
for cl in myList:
    curImg = cv2.imread(f'{path}/{cl}')
    images.append(curImg)
    classNames.append(os.path.splitext(cl)[0]) #获得'Bill Gates'而不是‘Bill Gates.jpg’
print(classNames)  #输出了['Bill Gates', 'Elon Musk', 'Jack Ma']
#自定义一个找到images中各图像编码的函数,返回一个具有各个图像的编码的列表
def findEncodings(images):
    encodeList =[] #初始化图像编码空列表
    for img in images:
        img = cv2.cvtColor(img,cv2.COLOR_BGR2RGB)
        encode = face_recognition.face_encodings(img)[0]
        encodeList.append(encode)
    return encodeList

#自定义一个记录出勤名字和时间的函数,当某个人(name)出现,则,以name,time的形式记录在csv文件中
def markAttendance(name):
    with open('Attendance.csv','r+') as f:
        myDataList = f.readlines()
        nameList = []
        for line in myDataList:
            entry = line.split(',') #entry=['name','time']
            #print(entry[0])
            nameList.append(entry[0])
        if name not in nameList:
            now = datetime.now()
            dtString =now.strftime('%H:%M:%S')
            f.writelines(f'\n{name},{dtString}')
encodeListKnown = findEncodings(images)
#print(len(encodeListKnown)) #有三个编码3

print('Encoding Complete')
#从镜头捕获照片
cap = cv2.VideoCapture(0)

while True:
    success,img =cap.read()
    imgS = cv2.resize(img,(0,0),None,0.25,0.25)
    imgS = cv2.cvtColor(imgS,cv2.COLOR_BGR2RGB)

    facesCurFrame = face_recognition.face_locations(imgS) #获得当前帧的面部坐标
    encodesCurFrame = face_recognition.face_encodings(imgS,facesCurFrame) #获得图片坐标下的编码

    for encodeFace , faceLoc in zip(encodesCurFrame,facesCurFrame):
        matches = face_recognition.compare_faces(encodeListKnown,encodeFace)
        faceDis = face_recognition.face_distance(encodeListKnown,encodeFace)
       # print(faceDis) 显示匹配值
        matchIndex = np.argmin(faceDis) #matchIndex是获取faceDis最小的下标,即找到最匹配的那个图片的坐标

        #如果捕获的与图片是匹配的,输出所匹配图片的名字
        if matches[matchIndex]:
            name =classNames[matchIndex].upper()
            #print(name)
            y1,x2,y2,x1 =faceLoc
            y1,x2,y2,x1 = y1*4,x2*4,y2*4,x1*4  ##之前的脸部坐标缩小了4倍,现在扩回来
            cv2.rectangle(img,(x1,y1),(x2,y2),(0,255,0),2)
            cv2.rectangle(img,(x1,y2-35),(x2,y2),(0,255,0),cv2.FILLED)
            cv2.putText(img,name,(x1+6,y2-6),cv2.FONT_HERSHEY_COMPLEX,1,(255,255,255),2)
            markAttendance(name)
    cv2.imshow('Wecam',img)
    cv2.waitKey(1)
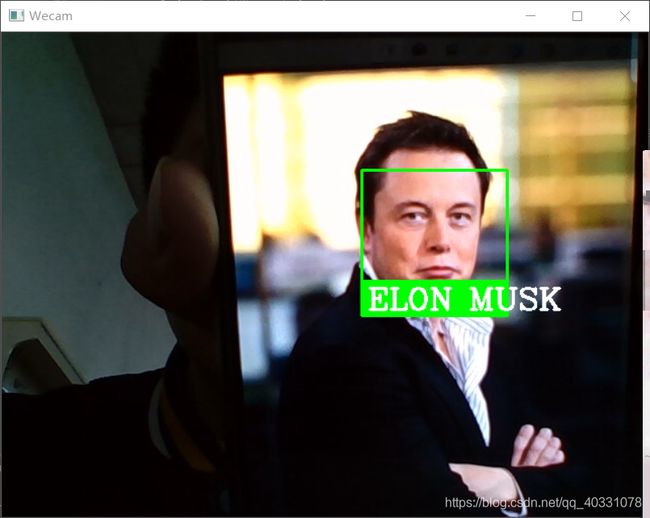
效果展示:
检测人脸
考勤文件:
参考文献:
1.https://face-recognition.readthedocs.io/en/latest/face_recognition.html
2.https://face-recognition.readthedocs.io/en/latest/readme.html
3.https://www.jb51.net/article/182659.htm
4.https://www.cnblogs.com/wjw1014/p/10259180.html


