优化next和自定义
next官方文档
站点配置文件
__config.yml文件
language: zh-Hans
url: http://zl7.xin
root: /ram/
theme: next
添加about个人页面
为了使about页面不显示右侧文章目录sidebar,可以使用如下两种方法
方法一
页面内不要使用#这种标题的形式
方法二
修改代码
路径:next/layout/_macro/sidebar.swig文件
//line 15
{% if display_toc and toc(page.content).length > 1 and page.type != 'about' %}
//line 26
{% if not display_toc or toc(page.content).length <= 1 or page.type == 'about' %}
//line 127
{% if display_toc and toc(page.content).length > 1 and page.type != 'about' %}
每篇文章末尾统一添加“本文结束”标记
新建passage-end-tag-swig文件
在路径 \themes\next\layout\_macro中添加 passage-end-tag.swig
文件,其内容为:
    {% if not is_index %}
        ------本文结束感谢阅读------
    {% endif %}
修改 post.swig 文件
在 \themes\next\layout\_macro\post.swig中, post-body之后, post-footer之前添加如下代码(post-footer之前两个DIV):
{% if not is_index %} {% include 'passage-end-tag.swig' %} {% endif %}
在主题配置文件 _config.yml中添加以下字段开启此功能:
# 文章末尾添加“本文结束”标记
passage_end_tag: enabled: true
完成以上设置之后,在每篇文章之后都会添加“本文结束”标记。
添加点击love背景动画
loveJs文件下载地址
把 js 文件love.js放在\themes\next\source\js\src文件目录下更更新\themes\next\layout\_layout.swig文件,在末尾(在前面引用会出现找不到的bug)添加以下 js 引入代码:
  {%
    set scripts = [
      'src/love.js',
      'src/catch.js'
    ]
  %}

  {% for script in scripts %}

  {% endfor %}
添加动态titile---崩溃欺骗
新建js文件,并添加如下代码
var OriginTitile = document.title;
 var titleTime;
 document.addEventListener('visibilitychange', function () {
     if (document.hidden) {
         $('[rel="icon"]').attr('href', "/img/TEP.ico");
         document.title = '╭(°A°`)╮ 页面崩溃啦 ~ | 量子广告!';
         clearTimeout(titleTime);
     }
     else {
         $('[rel="icon"]').attr('href', "/favicon.ico");
         document.title = '(ฅ>ω<*ฅ) 噫又好了~' + OriginTitile;
         titleTime = setTimeout(function () {
             document.title = OriginTitile;
         }, 2000);
     }
 });
引入方式同上添加点击love背景动画
增加algolia搜索功能
用npm安装插件hexo-algolia
npm install --save hexo-algolia
这里需要注意一下,要安装1.0以下版本,因为1,0以下和1.0以上版本是不同的引入方式
这里以0.2版本作为案例:
"hexo-algolia": "^0.2.0"
注册algolia
注册algolia
新建index页面

获取各种key

配置hexo-algolia
站点配置下__config.yml文件下
把刚才新建的index页面名称填入下方,各种key对应填入
#algolia:
algolia:
  applicationID: xxx
  apiKey: xxx
  adminApiKey: xxx
  indexName: xxx
  chunkSize: 5000
在主题配置文件中__config.yml
# Algolia Search
algolia_search:
  enable: true
  hits:
    per_page: 10
  labels:
    input_placeholder: Search for Posts
    hits_empty: "We didn't find any results for the search: ${query}"
    hits_stats: "${hits} results found in ${time} ms"
以上完成后,操作你的命令行
hexo clean
hexo algolia
上传成功则表示完成,否则请检查重试以上步骤
更新FontAwesome 4.0
FontAwesome下载4.0文件,解压后得到

分别把上面文件对应放到
themes/next/source/lib/font-awesome的文件夹里
重启
hexo s --debug即可
添加favicon.ico
在跟目录的source目录下添加一个favicon.ico下图标即可
并在主题配置文件__config.yml配置
favicon: /favicon.ico
使用内建标签
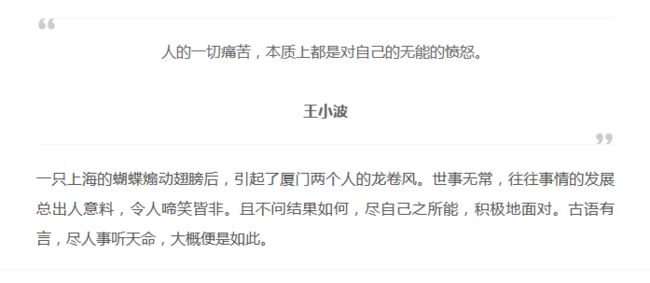
此标签将生成一个带上下分割线的引用,同时引用内文本将自动居中。 文本居中时,多行文本若长度不等,视觉上会显得不对称,因此建议在引用单行文本的场景下使用。 例如作为文章开篇引用 或者 结束语之前的总结引用。
使用方式
HTML方式:使用这种方式时,给 img 添加属性 class="blockquote-center" 即可。
标签方式:使用 centerquote 或者 简写 cq。
此标签要求 NexT 的版本在 0.4.5 或以上。 若你正在使用的版本比较低,可以选择使用 HTML 方式。
blah blah blah


{% centerquote %}blah blah blah{% endcenterquote %}


{% cq %} blah blah blah {% endcq %}
效果示例:
这里收集了几个其他人优化的方案
量子广告