WPF SDK研究 之 数据绑定
本章共计27个示例,全都在VS2008下.NET3.5测试通过,点击这里下载:ConnectedData.rar
1.ShowDataWithoutBinding
注:
 <?
Mapping XmlNamespace="local" ClrNamespace="TestBinding"
?>
 xmlns:local="clr-namespace:TestBinding"
这个例子讲的是在WPF中使用传统的绑定方式
数据绑定,就是要保持数据对象和UI界面的同步。
.NET事件绑定是基于Observer模式的。在.NET2.0中,对Observer进行了一次包装,可以引用System.Component命名空间,实现INotifyPropertyChanged接口,可以获得事件PropertyChanged,以及PropertyChangedEventArgs。于是在这套体系下,事件机制事先搭建好了。接口如下:
 namespace
System.ComponentModel
 {
{ public delegate void PropertyChangedEventHandler(object sender, PropertyChangedEventArgs e);
 public interface INotifyPropertyChanged
 {
{ event PropertyChangedEventHandler PropertyChanged;
 }
}
 public class PropertyChangedEventArgs : EventArgs
 {
{ public PropertyChangedEventArgs(string propertyName);
 public virtual string PropertyName { get; }
 }
} }
}
从数据对象到UI界面:
当实现了INotifyPropertyChanged接口的对象有所改变时,会激发OnPropertyChanged这个接口方法,该方法保证了UI界面的数据同步。
从UI界面到数据对象:
在控件的事件方法中,改变数据对象。原理同上,由于使用了控件内嵌的事件机制,从而更加简单了。
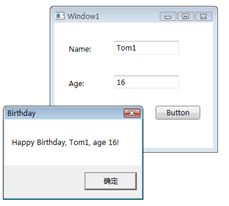
示例1正是这种绑定方式的展现。现在的代码量还可以容忍,当对象数量的增加或者对象属性的增加时,我们就要额外添加更多的代码。这就造成了代码爆炸。所以,我们需要一种更灵活的绑定方式。
2.ShowDataWithBinding
绑定有两种情形,一种是绑定一个对象到一个简单控件,另一种是绑定一组数据到一个数据列表控件。
这个例子讲的是前者。
WPF的数据绑定机制既保证了数据的同步性,又使得数据类型的相应转换正常进行。如下所示:

左边是XMAL的UI元素,右边是C#程序中的Object,中间是数据绑定层,将左右两层连接起来。
那么, 两个层次的语法如下:
UI层,有3种表示方式:
方法1:
 <
TextBox
Text
="
{Binding Path=Age}
"
/>
方法2:
 <
TextBox
Text
="
{BindingAge}
"
/>
方式3:
 <
TextBox
Width
="100"
Height
="25"
>
 <
TextBox.Text
>
 <
Binding
Source
="
{StaticResource myDataSource}
"
Path
="Age"
/>
 </
TextBox.Text
>
 </
TextBox
>

注:绑定后从底层向上开始找数据源,直到发现位置为止,最上层是<Window>
Object层,要设置数据源:
 grid1.DataContext
=
person;
//
person为对象,可写在XAML的资源中而省略这句,见下
相应前面的XAML中的TextBox控件:<TextBox Text="{Binding Age}" />,于是可以看到显示的是person对象的Age属性
结合Resource技术,可以全都写在XAML中而不用编写后台程序,这样做的前提是这个Object,在这里是Person,有一个用来初始化的构造函数。这时,DataContext绑定的是静态资源{StaticResource Tom},Tom是资源的Key:
 <
Window
 xmlns:local
="clr-namespace:ShowDataWithBinding"
>

 <
Window.Resources
>
 <
local:Person
x:Key
="Tom"
Name
="Tom"
Age
="9"
/>
 </
Window.Resources
>
 <
Grid
DataContext
="
{StaticResource Tom}
"
>
 <
TextBlock
 >
Name:
</
TextBlock
>
>
Name:
</
TextBlock
>
 <
TextBox
 Text
="
{Binding Path=Name}
"
/>
 <
TextBlock
 >
Age:
</
TextBlock
>
>
Age:
</
TextBlock
>
 <
TextBox
 Text
="
{Binding Age}
"
/>
 <
Button
 x:Name
="birthdayButton"
>
Birthday
</
Button
>
 </
Grid
>
 </
Window
>

当然,按下Button后,后台还是有代码的:
 public
partial
class
Window1 : Window
{
 void birthdayButton_Click(object sender, RoutedEventArgs e) {
 Person person = (Person)this.FindResource("Tom"));
 ++person.Age;
 MessageBox.Show();
 }
} }
}
注意这个FindResource()方法,找到key为Tom的资源后,强制类型转换为Person
以上介绍的都是隐式的数据源,因为只有一个DataSource,所以可以不指定Source属性;当数据源多于1个的时候,这时要指定具体绑定那一个数据源了——称之为显示数据源,关键的是Source属性
<TextBox Text="{Binding Path=Name, Source={StaticResource Tom}}" />
绑定其他类型数据
以上介绍的都只是文本。接下来说的是如何绑定ForeColor这样的类型数据。
现在考虑的是如果 Age〉25,则名字显示为红色。ForeColor是Brush类型,Age为整型。
WPF提供了接口IValueConverter,只要实现了该接口的两个方法,就可以完成这件工作:一个是Convert,另一个是ConvertBack,分别控制正反两个方向的转换。对于当前情况,新建一个类AgeToForegroundConverter,实现如下:
 public
class
AgeToForegroundConverter : IValueConverter
 {
{ public object Convert(object value, Type targetType, object parameter, System.Globalization.CultureInfo culture)
 {
{ Debug.Assert(targetType == typeof(Brush));
 // DANGER! After 25, it's all down hill
 int age = int.Parse(value.ToString());
 return (age > 25 ? Brushes.Red : Brushes.Black);
 }
}
 public object ConvertBack…
 }
}
于是,在XAML中添加这个类AgeToForegroundConverter的资源,并设置相应的Convert属性即可:
 <
Window.Resources
>
 <
local:AgeToForegroundConverter
x:Key
="ATFC"
/>
 </
Window.Resources
>
 <
TextBox
…Text
="
{Binding Age}
"
 Foreground
="
{Binding Path=Age,Converter={StaticResource ATFC}}
"
/>

总结,以上介绍的技术,只限于单独一个对象的绑定,可以取代前面介绍的INotifyPropertyChanged实现模式。
3.ShowDataWithMultiBinding
这个例子讲的是多笔数据绑定。为此,将上节的Person聚集为泛型People类:
class People : List<Person> { }
Window1展示的是如何显示当前项:
通过在XAML资源中添加数据源:
 <
Window.Resources
>
 <
local:People
x:Key
="Family"
>
 <
local:Person
Name
="Melissa"
Age
="36"
/>
 <
local:Person
Name
="Tom"
Age
="9"
/>
 <
local:Person
Name
="John"
Age
="11"
/>
 </
local:People
>
 </
Window.Resources
>
于是,可以直接绑定:
 <
Grid
DataContext
="
{StaticResource Family}
"
Name
="grid1"
>
 <
TextBox
Name
="nameTextBox"
Text
="
{Binding Path=Name}
"
/>
注意,这次Grid绑定的是Famliy这个集合对象,因为只有一个TextBox,所以默认显示第一项"Melissa"。
为了遍历这个数据集合,我们在其上建立view,重写按钮的Click方法:
 private
void
birthdayButton_Click(Object sender, RoutedEventArgs e)
 {
{ People people = (People)this.FindResource("Family");
 ICollectionView view = CollectionViewSource.GetDefaultView(people);
 Person person = (Person)view.CurrentItem;
 ++person.Age;
 MessageBox.Show(string.Format("Happy Birthday, {0}, age {1}!", person.Name, person.Age), "Birthday");
 }
}
也就是通过CollectionViewSource类的静态GetDefaultView方法访问这个数据上的视图,获取到当前项,显示在UI上。
Window2展示的是向前和向后移动当前项。
将Window1的一些公用语句抽象成GetFamilyView方法:
 ICollectionView GetFamilyView()
 {
{ People people = (People)this.FindResource("Family");
 return CollectionViewSource.GetDefaultView(people);
 }
}
观察新添加的Back按钮事件方法:
 private
void
backButton_Click(
object
sender, RoutedEventArgs e)
 {
{ ICollectionView view = GetFamilyView();
 view.MoveCurrentToPrevious();
 if (view.IsCurrentBeforeFirst)
 {
{ view.MoveCurrentToFirst();
 }
} }
}
为了方式越界,在移动前要判断是否到了尽头。
Prev的方法与Back方法大同小异。
Window3展示了如何把多笔数据绑定到列表控件,如ListBox。
<ListBox… ItemsSource="{Binding}" IsSynchronizedWithCurrentItem="True" />
这里没有Path属性,意为绑定到当前的所有对象。
ItemsSource属性设为"{Binding}",不用设置具体是哪一个Source,默认为找到的第一个数据源。
IsSynchronizedWithCurrentItem属性设置为True,保证了自身选项变化,其他绑定控件也相应跟着改变。这里,当点击Back按钮,ListBox的当前选中项也会随着一起改变。
遗憾的是,显示的并不是我们需要的数据,而是直接把每个Object的Type输出了。
Window4使用了数据模板,解决了Window3窗体遗留的问题,
<ListBox …ItemsSource="{Binding}" IsSynchronizedWithCurrentItem="True">
<ListBox.ItemTemplate>
<DataTemplate>
<StackPanel Orientation="Horizontal">
<TextBlock Text="{Binding Path=Name}" />
<TextBlock Text=" (age: " />
<TextBlock Text="{Binding Path=Age}"
Foreground="{Binding Path=Age, Converter={StaticResource ATFC}}" />
<TextBlock Text=")" />
</StackPanel>
</DataTemplate>
</ListBox.ItemTemplate>
</ListBox>
通过设置ItemTemplate属性,可以显示任何形式的数据。使用方法很像ASP.NET中的ListBox模板。
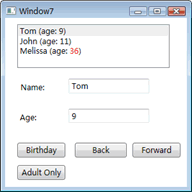
Window5把Window4使用的数据模板放置在Window资源中,从而
<Window.Resources>
<DataTemplate DataType="{x:Type local:Person}">
<StackPanel Orientation="Horizontal">
…
</DataTemplate>
</Window.Resources>
使用标签的DataType属性标志这个数据模板是类型化的。现在,除非另外通知,每当WPF看到Person对象的一个实例:
<ListBox… ItemsSource="{Binding}" IsSynchronizedWithCurrentItem="True" />
就会应用相应的数据模板。注意这个ItemTemplate属性。
Window6展示了排序技术
我们在前面使用到了ICollectionView接口view,可以对其进行排序,每种排序规则都是一个SortDescription对象。如Sort按钮事件方法:
private void sortButton_Click(object sender, RoutedEventArgs e)
{
ICollectionView view = GetFamilyView();
if (view.SortDescriptions.Count == 0)
{
view.SortDescriptions.Add(
new SortDescription("Name", ListSortDirection.Ascending));
view.SortDescriptions.Add(
new SortDescription("Age", ListSortDirection.Descending));
}
else
{
view.SortDescriptions.Clear();
}
}
Window7也是排序,但是排序规则是自定义的
实现IComparer接口的Compare(x, y)方法,可以自定义排序类,并赋给view的CustomSort属性:
class PersonSorter : IComparer
{
public int Compare(object x, object y)
{
Person lhs = (Person)x;
Person rhs = (Person)y;
// Sort Name ascending and Age descending
int nameCompare = lhs.Name.CompareTo(rhs.Name);
if (nameCompare != 0) return nameCompare;
return rhs.Age - lhs.Age;
}
}
下面我们使用这个新的排序规则,重写Sort按钮事件方法:
private void sortButton_Click(object sender, RoutedEventArgs e)
{
ListCollectionView view = (ListCollectionView)GetFamilyView();
if (view.CustomSort == null)
{
view.CustomSort = new PersonSorter();
}
else
{
view.CustomSort = null;
}
}
这时候,我们使用的是ListCollectionView,而不再是ICollectionView。ListCollectionView是WPF提供的类,已经实现了ICollectionView接口。
Window8展示了过滤技术
WPF使用Delegate来完成数据过滤功能。如Sort按钮事件方法:
ICollectionView view = GetFamilyView();
if (view.Filter == null)
{
view.Filter = delegate(object item)
{
return ((Person)item).Age >= 18;
};
}
else
{
view.Filter = null;
}
这样就找到大于18岁的所有人——那个item对象很神奇的。
注:查了一下Filter属性的类型:Predicate<object> Filter;而Predicate是一个委托:
public delegate bool Predicate<T>(T obj);
这就说明了Filter属性需要一个bool类型的回调方法,来逐项判断是否符合条件。
4.ShowDataWithMultiBindingAddNewData
不知道读者发现没有,示例3中Birthday按钮不能保证数据同步,这是因为Person没有实现INotifyPropertyChanged接口。
而为了实现添加新数据的功能,还要让People集合派生于ObservableCollection<Person>基类,而不再是List<Person>。这样,就可以添加一笔数据并保证同步了:
private void addButton_Click(object sender, RoutedEventArgs e)
{
People people = (People)this.FindResource("Family");
people.Add(new Person("Chris", 35));
}
注:INotifyPropertyChanged 适用于单个的类属性,ObservableCollection适用于监视某一堆的数据是否发生变化(add/remove),这是二者的区别。
接下来我们从数据源角度出发,研究数据绑定。
5.SimpleBinding
这个例子讲的是对象数据源ObjectDataSource。
<ObjectDataSource x:Key="myDataSource" TypeName="namespace.class" Asynchronous="True" />语法已经改变为:
<ObjectDataProvider x:Key="myDataSource" ObjectType="{x:Type src:class}" IsAsynchronous="True" />
其中x:Key是绑定源的名称,而ObjectType指出了要绑定到哪一个类,而这个类所在命名空间在这个XAML的开始位置指定。
而绑定的方式和正常绑定机制一样:
<Binding Source="{StaticResource myDataSource}" Path="Name"/>
注:数据绑定一般要在XAML中引用数据类的命名空间,如:
xmlns:src="clr-namespace: namespace "
6.SimpleBindingCompact
这个例子是数据绑定的另一种便捷写法,直接在控件上使用DataContext绑定数据源,而不用再指定Binding的Source属性。
见Window1窗体:
<DockPanel DataContext="{StaticResource myDataSource}">
<TextBlock… Text="{Binding Path=SimpleProperty, Mode=OneTime}"/>
</DockPanel>
如果XAML就是以DockPanel开始的,那么就不能在这个顶级标签上直接指定DataContext,改写如下:
<DockPanel>
<DockPanel.Resources>
<ObjectDataProvider x:Key="myDataSource" ObjectType="{x:Type src:SimpleBinding}" />
</DockPanel.Resources>
<DockPanel.DataContext>
<Binding Source="{StaticResource myDataSource}"/>
</DockPanel.DataContext>
<TextBlock Width="200" Text="{Binding Path=SimpleProperty, Mode=OneTime}"/>
</DockPanel>
可见,条条大路通罗马,更加体现了Binding的灵活性,但对阅读者的要求更高了,至此最少介绍了有5种绑定方式。(另外三种见示例2)
注:Mode=OneTime的使用参见下面的例子。
7.PropertyChangeNotification
This sample shows how to create data items that implement the INotifyPropertyChanged interface to enable propagating changed data to the binding target.
这个示例是示例4的改版。使用了同样的技术,只是这里在BidCollection数据集合中额外添加了计时器,时刻改变集合中元素的值。
8.ObservableCollection
This sample shows how to code the ObservableCollection and bind to elements in the collection.
此例仍然是示例4的改版,使用了同样的技术,只是逻辑上的不同,但是架构与示例4是一样的。
注意按钮事件,将sender装换为控件的基类FrameworkElement,这个类是具有DataContext属性的。
FrameworkElement fe = (FrameworkElement)sender;
NumberList nl = (NumberList)fe.DataContext;
9.ADODataSet
This sample shows how to implement data binding when the data being bound to is in an ADO DataSet. Demonstrates filling the DataSet by connecting to an Access .mdb file. Techniques are shown in both markup and code.
注:请把示例中的数据库文件BookData.mdb复制到C盘根目录下,才能确保正常运行。
ItemContainerStyle
这个例子讲的是WPF如何绑定Access数据库,当然推而广之,绑定到到其它数据库。
仍然使用System.Data.OleDb,仍然将数据集装入到DataSet的名为"BookTable"的DataTable中,然后将其绑定到ListBox:
lb.DataContext = _dataSet; //这里lb是一个ListBox控件
这样,就形成了一个层次关系:
dataSet数据集——"BookTable"数据表——列属性(Title、NumPages和ISBN)
那么在XAML中的绑定,ListBox的ItemsSource属性可以直接指向"BookTable"数据表:
<ListBox Name="lb" Height="500" Width="400"
ItemsSource="{Binding Path=BookTable}"
ItemTemplate ="{StaticResource BookItemTemplate}"
ItemContainerStyle="{StaticResource liStyle}" />
而数据模板中的可以绑定列的名字。
注意,这个ListBox使用了ItemContainerStyle属性,它指定了所有数据项的样式:
<Style x:Key="liStyle" TargetType="{x:Type ListBoxItem}">
<Setter Property="Width" Value="Auto"/>
</Style>
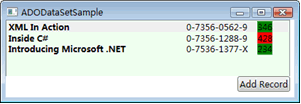
还有就是Click按钮的点击事件,添加了一笔数据,由于绑定是同步于数据对象和UI的,所以对dataSet数据集的修改能立刻反映到UI界面——多了一个ListBoxItem项。当然我们还可以进一步把这笔数据添加到Access数据库中。
10.BindConversionMarkup
This sample shows how to add a value converter to a binding using Extensible Application Markup Language (XAML).
这个例子演示了如何自定义一个转换器。在示例1中已经介绍过。这里再详细说一下这个Convert方法,它的这几个参数的用法:
public object Convert(object o, Type type, object parameter, CultureInfo culture)
{
DateTime date = (DateTime)o;
switch (type.Name)
{
case "String":
return date.ToString("F", culture);
case "Brush":
return Brushes.Red;
default:
return o;
}
}
我们的目标很明确,就是将绑定的数据,根据一些逻辑判断转换成我们需要的新类对象,正如示例1:大于20的数字为红色。或者无需逻辑判断,对这个数据直接进行一些加工,如本例。
其中Object参数是绑定的数据,而type则是我们想要输出的新类型。
parameter是我们提供给转换逻辑的参数,这个值在XAML中表现如下:
<Binding Path="TheDate" Converter="{StaticResource MyConverterReference}" ConverterParameter="parameter" ConverterCulture="en-US" />
有关parameter的用法详见于示例——MultiBinding。
也许我们需要一些文化信息,就是这个culture参数,如果不指定就会从操作系统中得到。
11.MultiBinding
This sample shows how to implement parameterized multibinding. Techniques are shown in both markup and code.
这个示例是上一个例子BindConversionMarkup的继续。还记得上个例子仅仅是把数据源的一个属性进行转换,接口IValue的方法Convert的第一个参数为object o;当我们需要把数据源的多个属性同时进行转换,就需要实现IMultiValueConverter接口了。
object Convert(object[] values, Type targetType, object parameter, CultureInfo culture);
与IValue唯一的不同是,这里Convert方法的第一个参数是values对象数组(另一个不同是ConvertBack的第二个参数,但这不是主要的)。
于是我们可以根据数据源的多个属性,来决定转换为什么样的新数据。对于这个示例,我们看到,由于parameter值的不同,values数组元素的组合方式也不一样,从而返回的name值也不同。
public object Convert(object[] values, Type targetType, object parameter, CultureInfo culture)
{
string name;
switch ((string)parameter)
{
case "FormatLastFirst":
name = values[1] + ", " + values[0];
break;
case "FormatNormal":
default:
name = values[0] + " " + values[1];
break;
}
return name;
}
为此,在XAML中的数据绑定部分,要相应的使用MultiBinding标签,而不是简单的Binding:
<MultiBinding Converter="{StaticResource NameConverter}"
ConverterParameter="FormatNormal">
<Binding Path="firstName"/>
<Binding Path="lastName"/>
</MultiBinding>
——可以看到ConverterParameter参数的用法,以及添加两个Binding子元素。
12.BindDPtoDP
This sample shows how to implement data binding between dependency properties and how to bind to an attached property. Techniques are shown in both markup and code.
这个例子讲的是将一个控件的属性绑定到另一个控件的属性,这样做的前提是,这些属性都是依赖属性dependency properties,从而保证了两个控件属性的同步。控件大多数的属性都是依赖属性,所以我们可以放心的使用Binding的ElementName来进行设置。
<TextBlock Name="Text1"…… Foreground="Green">
<TextBlock.Text>
Click the Button to Change this Initial Text Value in this Source Element
</TextBlock.Text>
</TextBlock>
<TextBox DockPanel.Dock="Top" Height="30" Foreground="Blue">
<TextBox.Text>
<Binding ElementName="Text1" Path="Text"/>
</TextBox.Text>
</TextBox>
可以看到,TextBox的Text属性绑定到TextBlock的Text属性上,于是两个控件显示同样的文字。又如:
<Canvas Name="Canvas1" Canvas.Top="10" Height="30" Width="70" Left="0" >
<Canvas.Background>
<Binding ElementName="Text1" Path="Foreground"/>
</Canvas.Background>
</Canvas>
Canvas的背景色与TextBox的前景色绑定在一起,具有相同的颜色值。又如:
<TextBlock Name="Text2" Canvas.Left="170"
Canvas.Top="{Binding ElementName=Canvas1, Path=Top}"
Foreground="Black">Text1</TextBlock>
这个名为Text2的控件与名为Canvas1的控件具有相同的Canvas.Top属性。
当然,也可以将两个不同类型的属性绑定在一起,如将下拉列表myComboBox的选项从Red改为Green,同时使Canvas的背景色也改为绿色,可能就要这么写:
<Canvas.Background>
<Binding ElementName="myComboBox" Path="SelectedItem.Content"/>
</Canvas.Background>
按钮的点击事件,告诉我们改变绑定中的其中一个属性,另一个控件的属性也会同时变动。
注:ElementName的另外一个用法。
尽管事先指定了DataContext,但是我们还是有机会为其中的子控件重新指定数据源,这时候,可以选择Source、RelativeSource或ElementName作为绑定数据源的语法,注意,只能使用其中一个,否则会报错的。
这里详细介绍RelativeSource——指的是绑定到一个相对数据源。我查了一下MSDN,如下:
<Style x:Key="textBoxInError" TargetType="{x:Type TextBox}">
……
<Setter Property="ToolTip" Value="{Binding RelativeSource={x:Static RelativeSource.Self},
Path=(Validation.Errors)[0].ErrorContent}"/>
……
</Style>
我们看到这个Style应用于所有TextBox,那么RelativeSource.Self就表示绑定到自身——应用了样式的TextBox。
再有就是这段代码:
Binding myBinding = new Binding();
myBinding.RelativeSource = new RelativeSource(
RelativeSourceMode.FindAncestor, typeof(ItemsControl), );
返回向上路径上遇到的第二个 ItemsControl,该路径起始于绑定的目标元素
13.BindNonTextProperty
This sample shows how to use a binding to set a non-text property, such as a color or style property.
有趣的是,Button的Background这个属性,除了可以指定一个#000001这样的Color类型,还可以指定Red这样的字符串,由于Color中内嵌了这种转换,所以在外界这两种类型都是可以绑定到Background属性的。
这个例子就是把把Red绑定到Background属性——我们可以认为就是简单地绑定字符串。
14.BindValidation
This sample shows how to provide for data validation during binding.
这个例子演示了如何自定义一个验证控件:
1)不能输入非数字,否则有ToolTip提示及红色警告!
2)输入的数字要在21到130间,否则会有ToolTip提示及红色警告!
——看上去有点像ASP.NET的验证控件。
为此,我们要实现ValidationRule抽象类的Validate方法。
public override ValidationResult Validate(object value, CultureInfo cultureInfo)
仔细看这个Validate方法的实现:
public override ValidationResult Validate(object value, CultureInfo cultureInfo)
{
int age = 0;
try
{
if (((string)value).Length > 0)
age = Int32.Parse((String)value);
}
catch (Exception e)
{
return new ValidationResult(false, "Illegal characters or " + e.Message);
}
if ((age < Min) || (age > Max))
{
return new ValidationResult(false,
"Please enter an age in the range: " + Min + " - " + Max + ".");
}
return new ValidationResult(true, null);
}
通过对参数value的逻辑判断,返回一个ValidationResult对象,其中
return new ValidationResult(true, null);
表示验证通过;而
return new ValidationResult(false, "Illegal characters or " + e.Message);
则表示未能通过验证,并返回一些错误信息。
对于要验证的属性,如果是自定义类型,要派生于这个ValidationRule类;对于基本属性如int,则要自定义一个派生于ValidationRule的基类,作为这个基本属性的包装——本例就是将Age这个整型包装为AgeRangeRule类
相应的,在XAML中,看一下这个需要验证的TextBox:
<TextBox Name="tbAge" Width="50" Height="30"
Validation.ErrorTemplate="{StaticResource validationTemplate}"
Style="{StaticResource tbInError}">
<TextBox.Text>
<Binding Path="Age" Source="{StaticResource ods}" UpdateSourceTrigger="PropertyChanged" >
<Binding.ValidationRules>
<c:AgeRangeRule Min="21" Max="130"/>
</Binding.ValidationRules>
</Binding>
</TextBox.Text>
</TextBox>
它将自定义规则AgeRangeRule作为验证规则,并设定了验证范围:21-130;并且指定了发生错误后显示的数据模板validationTemplate。那么在数据源属性的变化传递到控件之前,会先进行验证工作。
15.CodeOnlyBinding
This sample shows how to code basic user interface (UI) binding using C#. For more information, see How to: Create a Binding in Code.
这是一个完全以C#代码形式展示绑定技术的例子,代码都在binding.cs这个文件中。这并不是完全可取的,所以被我注释掉了。同时,我将其改造为UI代码用XAML表示,而绑定代码则使用C#,主要体现在两个按钮的事件上,
首先是Show按钮方法:
MyData myChangedDataObject = new MyData(DateTime.Now);
Binding secondbinding = new Binding("MyDataProperty");
secondbinding.Mode = BindingMode.TwoWay;
secondbinding.Source = myChangedDataObject;
if (myTextBlock.GetBindingExpression(TextBlock.TextProperty) == null)
{
//binding has been cleared, remake it; else the old binding is still there
myTextBlock.SetBinding(TextBlock.TextProperty, secondbinding);
}
依次建立了指定了数据源的Binding对象,并在绑定之前先检测是否已经绑定。
其次是Clear按钮方法:
BindingOperations.ClearBinding(myTextBlock, TextBlock.TextProperty);
将myTextBlock控件上的绑定清空。
16.CollectionViewSource
This sample shows how to use CollectionViewSource to sort and group data in markup.
这个例子展示了如何在XAML中使用CollectionViewSource对数据进行排序和分组(如何在C#代码中使用CollectionViewSource请参见示例2)。
为了在XAML中使用CollectionViewSource,我们要添加以下引用,其中前两个来自WPF:
xmlns:scm="clr-namespace:System.ComponentModel;assembly=WindowsBase"
xmlns:dat="clr-namespace:System.Windows.Data;assembly=PresentationFramework"
xmlns:src="clr-namespace:CollectionViewSource"
下面我们要对Places集合的一组Place数据进行排序和分组:
之前我们介绍的排序技术是在C#代码中实现的,现在我们是用XAML标记:
<CollectionViewSource.SortDescriptions>
<scm:SortDescription PropertyName="CityName" Direction="Ascending" />
</CollectionViewSource.SortDescriptions>
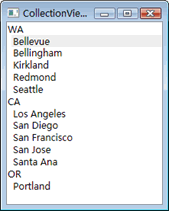
而分组技术是这样的,如图,按照state将这个Places集合分为3组:
<CollectionViewSource.GroupDescriptions>
<dat:PropertyGroupDescription PropertyName="State" />
</CollectionViewSource.GroupDescriptions>
值得关注的是下面对ListBox的定义:
<ListBox ItemsSource="{Binding Source={StaticResource cvs}}" DisplayMemberPath="CityName">
<ListBox.GroupStyle>
<x:Static Member="GroupStyle.Default"/>
</ListBox.GroupStyle>
</ListBox>
这里不再使用数据模板,而是通过指定DisplayMemberPath="CityName",使得显示的是城市名,达到同样的显示效果。
ListBox作为一个数据列表,可以使用ListBox.GroupStyle语法,并设定
<x:Static Member="GroupStyle.Default"/>
表示按照默认样式进行分组。x:Static的语法见其他笔记。
最后就是,State是不可以选择的,它们只是显示的分组名称。
17.CollectionViewSourceGrouping
这个例子演示了如何在C#代码中对数据进行分组。
ItemsControl也是一个列表控件,于是可以使用ItemsControl.GroupStyle的语法:
<ItemsControl.GroupStyle>
<GroupStyle>
<GroupStyle.HeaderTemplate>
<DataTemplate>
<TextBlock FontWeight="Bold" FontSize="15"
Text="{Binding Path=Name}"/>
</DataTemplate>
</GroupStyle.HeaderTemplate>
</GroupStyle>
</ItemsControl.GroupStyle>
在此,我们对分类名称进行绑定——在GroupStyle.HeaderTemplat中使用了数据模板。
我们可以在XAML中设定DisplayMemberPath属性,也可以在C#中实现:
CollectionView myView;
myView = (CollectionView)CollectionViewSource.GetDefaultView(myItemsControl.ItemsSource);
if (myView.CanGroup == true)
{
PropertyGroupDescription groupDescription
= new PropertyGroupDescription("@Type");
myView.GroupDescriptions.Add(groupDescription);
}
取消分组的操作很像取消排序的语法:
myView.GroupDescriptions.Clear();
18.Colors
This sample shows the coding of various Windows Presentation Foundation technologies with a special focus on Data Services. The sample displays a list of the system colors and lets you sort the list in several ways. You can also add new colors to the list and modify properties of the new colors.
这是一个看似很复杂的例子,主要意图是把系统颜色全都显示在ListBox中,选定每一个颜色,它的ARGB和AHS的等数字值都会标记在Slider上。
为此我们写了四个实现了IValueConverter接口的类:
DoubleToStringCvt 将Double转换为String,保留小数点后两位小数:
String.Format("{0:f2}", o)
用于控制Slider的enabled属性,用来控制HSLV四个属性的显示。
SourceToBoolCvt 将ColorItem.Sources转换为bool,用于控制Slider的enabled属性,如果是ColorItem.Sources.BuiltIn这些内嵌颜色,Slider的enabled属性就为false。
LuminanceToBrushCvt 将double转换为Brush,用于控制列表框中的项,luminance〉0.5的项前景色都为黑色;否则为黑色。
ByteToDoubleCvt 在Double和Byte间互相转换,用于所有的Slider控件
其中,最后一个类ByteToDoubleCvt值得关注,它实现了ConvertBack方法,将Slider提供的double数值转换成0-255的Byte类型。为什么要在这里实现这个方法呢?这是因为Slider是一个互动性的控件,拖动它的控制条会同时改变绑定它的数据源,从而需要反向转换——一般而言,IValueConverter接口只需要实现它的Convert方法就够了。
对于ColorItem这个实体类,它实现了RGB到AHS的转换,是可以重用于很多地方的。
而ColorItemList泛型集合则在构造函数中把141种系统颜色作为ColorItem类型加载到自身的集合中。
这个例子的其它技术都是基于CollectionView的,请参见相关章节。
19.CompositeCollections
This sample shows how to implement data binding using collections composed of mixed types of data. Techniques are shown in both markup and code.
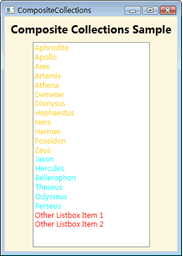
这个例子将3种不同类型的数据源绑定到一个DataList中,所以不必事先指定DataContext:
<ListBox.ItemsSource>
<CompositeCollection>
<CollectionContainer Collection="{Binding Source={StaticResource GreekGodsData}}" />
<CollectionContainer Collection="{Binding Source={StaticResource GreekHeroesData}}" />
<ListBoxItem Foreground="Red">Other Listbox Item 1</ListBoxItem>
<ListBoxItem Foreground="Red">Other Listbox Item 2</ListBoxItem>
</CompositeCollection>
</ListBox.ItemsSource>
可以看到,使用CompositeCollection将GreekGodsData、GreekHeroesData这两个数据源和ListBoxItem捆绑在一起。
注意到,由于GreekHeroesData是一个内嵌XML数据源,它的XPath指向了"GreekHeroes/Hero",
这里Hero是内嵌XML的一个子标签,所以我们认为Hero是一个类型:
<DataTemplate DataType="Hero">
<TextBlock Text="{Binding XPath=@Name}" Foreground="Cyan"/>
</DataTemplate>
于是上面这个模板将适用于所有Hero类型。
20.DataTemplateSelector
This sample shows how apply data templates based on custom logic by creating a DataTemplateSelector class and overriding the SelectTemplate method.
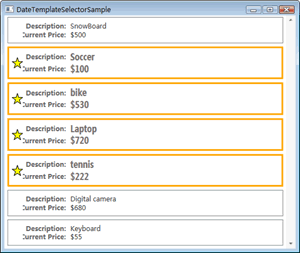
这个例子讲的是如何自定义一个数据模板DataTemplate。
有关CollectionViewSource的技术见示例-CollectionViewSource。
ItemsControl控件绑定了一个有7笔AuctionItem数据的集合,由于这些数据存储在App资源中,所有要将Source指定到Application.Current。
<CollectionViewSource x:Key="items_list"
Source="{Binding Source={x:Static Application.Current}, Path=AuctionItems}"/>
绑定的同时要为每个数据项选择模板ItemTemplateSelector,
ItemTemplateSelector="{StaticResource auctionItemDataTemplateSelector}"
对应到App资源中的
<src:AuctionItemDataTemplateSelector x:Key="auctionItemDataTemplateSelector" />
从而会触发AuctionItemDataTemplateSelector:DataTemplateSelector的SelectTemplate方法。
public override DataTemplate SelectTemplate(object item, DependencyObject container)
其中item来自每一个绑定项,在这个实例中为AuctionItem。于是会根据每个AuctionItem的SpecialFeatures枚举值决定使用哪一个数据模板
21.DataTrigger
This sample shows how to implement data binding and use both single and multiple data triggers. Techniques are shown in both markup and code.
仔细看这个例子,会发现这是两部分独立的技术。
首先数据绑定到ListBox,这在示例3中已经介绍过。
另外,就是数据触发器的使用。数据触发器有两种:单条件和多条件(and关系)
单条件触发器:
<Style TargetType="{x:Type ListBoxItem}">
<Style.Triggers>
<DataTrigger Binding="{Binding Path=State}" Value="WA">
<Setter Property="Foreground" Value="Red" />
</DataTrigger>
</Style.Triggers>
</Style>
——表明每一个State属性为WA的ListBoxItem,其前景色都是红色
多个单条件触发器连着写,就构成了多条件触发器(or关系)
多条件触发器(and关系):
<Style TargetType="{x:Type ListBoxItem}">
<Style.Triggers>
<MultiDataTrigger>
<MultiDataTrigger.Conditions>
<Condition Binding="{Binding Path=Name}" Value="Portland" />
<Condition Binding="{Binding Path=State}" Value="OR" />
</MultiDataTrigger.Conditions>
<MultiDataTrigger.Setters>
<Setter Property="Background" Value="Cyan" />
</MultiDataTrigger.Setters>
</MultiDataTrigger>
</Style.Triggers>
</Style>
——表明每一个ListBoxItem,必须同时满足Name="Portland"以及State="OR",其背景色才是青色
22.DirectionalBinding
This sample shows how to use the OneTime, OneWay, and TwoWay binding modes.
BindingMode有5个枚举值:
Default:取决于控件的自身默认绑定模式。
OneTime:只绑定一次,之后数据不再改变
OneWay:当改变目标属性时,同时改变源属性——适用于绑定控件的只读属性
OneWayToSource:当目标属性改变时,同时改变源属性。
TwoWay:目标属性和源属性任何一方改变,都会通知另一方。
使用BindingMode时,数据源一定要实现INotifyPropertyChanged接口。
目标属性的改变(适用于OneWayToSource和TwoWay),通过使用UpdateSourceTrigger触发器,设定源数据发生改变的“时机”,这是一个枚举,包括:
Default:
对于大多数控件,默认事件为LostFocus;
例外:TextBox的默认事件为PropertyChanged。
PropertyChanged:
当目标数据源的属性发生改变时。
LostFocus:
当目标数据源——也就是控件失去焦点时。
Explicit:
当调用BindingExpression实例的UpdateSource方法时。这个属性将在示例-UpdateSource中介绍。
回过头来看我们示例中的5个TextBox,注意到TextBox的默认绑定模式为TwoWay,而TextBlock默认为OneWay:
Total是OneTime的,所以以后不会再改变:
Text="{Binding Path=TotalIncome, Mode=OneTime}"
Rent,这里涉及到NotifyOnTargetUpdated属性,决定是否激发TargetUpdated事件——当有从源数据到目标数据的改动时:
Text="{Binding Path=Rent, Mode=OneWay, NotifyOnTargetUpdated=True}"
TargetUpdated="OnTargetUpdated"
Foot,一个TextBox的默认TwoWay绑定模式
Text="{Binding Path=Food, UpdateSourceTrigger=PropertyChanged}"
Miscellaneous,一个TextBox的默认TwoWay绑定模式:
Text="{Binding Path=Misc}"
Savings,一个TextBlock的默认OneWay绑定模式:
Text="{Binding Path=Savings}"
注意到,同样是TwoWay绑定,在Foot文本框中的内容有改动时就会激发事件,而Miscellaneous则在文本框失去焦点时才激发事件。
23.HierarchicalDataTemplate
This sample shows how to use hierarchical data templates, which are designed for displaying hierarchical data, such as a list that contains other lists.
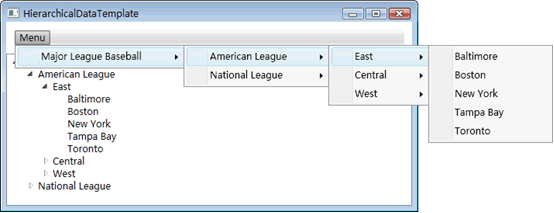
HierarchicalDataTemplate——派生于DataTemplate,专门用来绑定TreeViewItem或MenuItem的层次化数据:
<HierarchicalDataTemplate DataType = "{x:Type src:League}"
ItemsSource = "{Binding Path=Divisions}">
<TextBlock Text="{Binding Path=Name}"/>
</HierarchicalDataTemplate>
用法完全同DataTemplate,只是展示的样式不一样。
24.MasterDetail
This sample shows how to code the master-detail paradigm using an ObjectDataSource.
这个例子讲的是主从关系的数据绑定,基于ObjectDataSource。
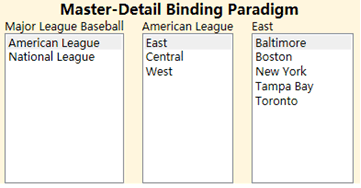
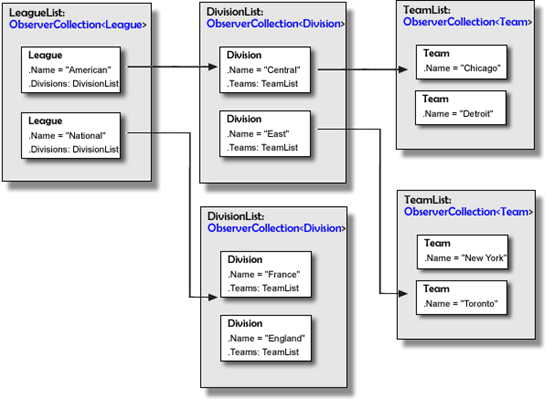
首先关注一下数据间的从属关系:
在StackPanel中通过资源直接绑定LeagueList
<ObjectDataProvider x:Key="LeaguesDSO" ObjectType="{x:Type src:LeagueList}" />
<DockPanel Name="dpMain" DataContext="{Binding Source={StaticResource LeaguesDSO}}">
所有列表框使用同样的数据模板LBDataTemplate,也就是说都显示Name属性
<DataTemplate x:Key="LBDataTemplate">
<TextBlock Text="{Binding Path=Name}" />
</DataTemplate>
从左数第一个列表框,使用默认的绑定——LeagueList:
<ListBox… ItemsSource="{Binding}" ItemTemplate="{DynamicResource LBDataTemplate}"/>
中间列表框上的TextBlock,图中显示为“American League”,其中American这个字符串是根据左边列表框的选中项的改变而相应改变的,所以这也是个动态绑定,将其绑定到默认LeagueList的Name属性上:
<TextBlock… Text="{Binding Path=Name}"/>
中间列表框绑定到默认LeagueList的Divisions属性:
<ListBox…ItemsSource="{Binding Path=Divisions}"
ItemTemplate="{DynamicResource LBDataTemplate}" />
右边列表框上的TextBlock,图中显示为“East”,其中East这个字符串是根据中间列表框的选中项的改变而相应改变的,所以这也是个动态绑定,将其绑定到默认LeagueList的Divisions属性——也就是DivisionList集合的每一项Division的Name属性上:
<TextBlock…Text="{Binding Path=Divisions/Name}/>
右边列表框绑定到默认LeagueList的Divisions属性——也就是DivisionList集合的每一项Division的Teams属性上,这也是一个集合:
<ListBox… ItemsSource="{Binding Path=Divisions/Teams}"
ItemTemplate="{DynamicResource LBDataTemplate}" />
在上述5个绑定中,主要的技术在于ItemsSource的设定,其中Path是关键,要想好层级层次。默认LeagueList在这里是省略的,因为是顶级集合。之后列表控件绑定集合,TextBlock控件绑定Name属性。在“孙子”级别(或者是更深级别),要使用集合(如Divisions)来表明级别层次。
25.MasterDetail2
这个例子是MasterDetail的变型,不在后台C#代码中初始化设值,而是通过在XAML中初始化设值。
为此,要给所有的属性设置为可写——MasterDetail示例中都是只读的,因为直接在构造函数中就设置了属性值——而这里,需要在XAML中以写的方式设置所有属性,如下片断:。
<src:LeagueList x:Key="myDataSource">
<src:League Name="American League">
<src:League.Divisions>
<src:DivisionList>
<src:Division Name="East">
<src:Division.Teams>
<src:TeamList>
<src:Team Name="Baltimore" />
这种方法的原理,与上一个示例是一样的。
注:在将属性配置为可写时。我犯了一个搞笑的错误,就是把字段名和value写反了:
set { value = description; } //错误
set { description = value; } //正确
于是绑定不显示数据,还以为是绑定设置错了,为此付出了2个小时的Debug时间。
26.MasterDetailXml
This sample shows how to code the master-detail paradigm using an XMLDataSource.
这个例子是示例MasterDetail2的继续,这次不再将数据放置在XAML中,而是放在了一个外部的xml文件中。
关于XMLDataSource的技术,请参见示例-XmlDataSource。
注意到,由于使用了XML绑定,所以显示属性可以全都写为:
<TextBlock…… Text="{Binding XPath=@name}"/>
而不用再考虑层次关系。
27.PriorityBinding
This sample shows how to implement multiple bindings that go into effect based on their place in a priority order. The techniques are shown in both markup and code.
这个示例讲的是绑定优先级的技术。
为此我们使用PriorityBinding语法,并在其中嵌入若干Binding。
<PriorityBinding FallbackValue="defaultvalue">
<Binding Path="SlowestDP" />
<Binding Path="SlowerDP" />
<Binding Path="FastDP" />
</PriorityBinding>
这样,会优先绑定这组Binding最先出现的一个:在这里也就是Path="SlowestDP"的绑定,如果这个不能正确绑定,那么就会是下一个Path="SlowerDP"的绑定——如此直到最后一个。如果最后一个也是不正确的,就会返回PriorityBinding的FallbackValue值,这里是defaultvalue——这表示这个依赖属性是DependencyProperty.UnsetValue的。
此外,PriorityBinding会侦听这组Binding的变动,任何高优先级却未能绑定的Binding,一旦有事件激发了这个Binding,从而返回了有效的绑定值,那么会立刻改变当前的绑定值。例如,
<PriorityBinding FallbackValue="defaultvalue">
<Binding Path="SlowestDP" IsAsync="True"/>
<Binding Path="SlowerDP" IsAsync="True"/>
<Binding Path="FastDP" />
</PriorityBinding>
具有高优先级的SlowestDP和SlowerDP,因为在属性的读操作中分别延迟了5秒和3秒:
Thread.Sleep(3000);
所以会先绑定FastDP;3秒后,SlowerDP绑定可以获取到值了,于是被绑定到控件;5秒后,则绑定SlowestDP。
为了模拟这个延迟,我们使用了异步机制,将前两个绑定设置为IsAsync="True"。我们可以测试一下,去掉SlowestDP中的IsAsync="True"。这将导致程序窗体很久才加载显示,这是因为后台将会采取同步机制,先休眠5秒,在此期间不会做任何事情。
28.SortFilter
This sample shows how to use the collection view to apply a sort order and filtering.
这个例子由于使用了DockPanel而不是Page作为XAML页头,所以对MyCollectionView这个ListCollectionView MyCollectionView实例的初始化,是在DockPanel控件的DataContextChanged事件中进行的,这个事件在页面加载时就会被激发——因为数据是从无到有的。这样做的效果和在一个Page或Window页面中使用OnLoad事件是一样的。
由于有多个排序按钮,所以在点击排序按钮的时候,先清除之前的排序规则,再添加新的排序规则。
MyCollectionView.SortDescriptions.Clear();
MyCollectionView.SortDescriptions.Add(new SortDescription("order", ListSortDirection.Ascending));
至于其它技术,之前的例子都有介绍。
29.UpdateSource
This sample shows how to explicitly update binding sources in a form submit scenario. The techniques are shown in both markup and code.
这个例子介绍了UpdateSourceTrigger=Explicit的用法。
以TBoxItemName文本框为例:
<TextBox…… Text="{Binding Path=ItemName, UpdateSourceTrigger=Explicit}" />
为了使数据源发生改变,我们要调用BindingExpression实例的UpdateSource方法:
BindingExpression be;
be= TBoxItemName.GetBindingExpression(TextBox.TextProperty);
be.UpdateSource();
这个BindingExpression实例来自需要改变的控件TBoxItemName,以及绑定的依赖属性TextBox.TextProperty。
注:数据绑定的另一种写法,将数据源放入资源,然后在DataContext中指向这个资源。
<DockPanel Name="RootElem" Background="white">
<DockPanel.Resources>
<c:UserProfile x:Key="myDataSource"/>
</DockPanel.Resources>
<DockPanel.DataContext>
<Binding Source="{StaticResource myDataSource}"/>
</DockPanel.DataContext>
30.XmlDataSource
This sample shows how to define XML data sources and how to bind to the data in them. For more information, see How to: Bind to XML Data Using an XMLDataProvider and XPath Queries.
注:XmlDataSource标记已经升级为XMLDataProvider。
这个例子讲的是绑定一个外部XML数据源。
首先看这个XML的结构:
<?xmlversion="1.0"encoding="utf-8" ?>
<Booksxmlns="">
<BookISBN="0-7356-0562-9"Stock="in">
<Title>XML in Action</Title>
<Summary>XML Web Technology</Summary>
</Book>
……
</Books>
为此在XAML资源中添加XmlDataProvider数据源:
<XmlDataProvider x:Key="BookData" Source="data"bookdata.xml" XPath="Books"/>
这里指定了XML文件的相对位置,以及XPath定向到Books标签:于是这个源就是一组Book数据的列表。
于是在ListBox中指定ItemsSource为XML数据源BookData,以及它的XPath为每一笔Book数据。
<ListBox ……
ItemsSource="{Binding Source={StaticResource BookData}, XPath=Book}"
ItemTemplate="{StaticResource BookDataTemplate}"/>
这里指定数据模板:
<DataTemplate x:Key="BookDataTemplate">
<TextBlock FontSize="12" Foreground="Red">
<TextBlock.Text>
<Binding XPath="@ISBN"/>
</TextBlock.Text>
</TextBlock>
</DataTemplate>
取代以在Binding标签中使用Path,在XML数据源中,我们使用XPath,并为其指定XPath的语法:@ISBN表示当前标签(这里为Book)的属性。
这里的语法比较灵活,我们可以将XmlDataProvider的XPath指向更深一级,注意XPath中使用“/”作为层次分隔符:
<XmlDataProvider x:Key="BookData" Source="data"bookdata.xml" XPath="Books/Book"/>
这样,在ListBox就不用再指定XPath了:
<ListBox ……
ItemsSource="{Binding Source={StaticResource BookData}}" />
注意:如果不使用数据模板,也不ListBoxItem指定XPath属性,那么不会在列表中显示ListBoxItem的数据类型——就像前面介绍的示例2的窗体Window3,而是显示XML数据项中的所有属性拼接在一起的字符串。
31.XmlDataSource2
This sample shows how to define XML data sources with their data in an embedded XML file.
这个例子仍然使用XmlDataProvider,只是这次的XML数据内嵌在XAML中——所谓的“数据岛”技术。
这里,将数据岛内嵌在XmlDataProvider标签的<x:XData>标记中:
<XmlDataProvider x:Key="myDataSource" XPath="Books">
<x:XData>
<Books xmlns="">
<Book ISBN="0-7356-0562-9" Stock="in" Number="9">
<Title>XML in Action</Title>
<Summary>XML Web Technology</Summary>
</Book>
……
</Books>
</x:XData>
</XmlDataProvider>
在ListBox的绑定如下:
<ListBox……>
<ListBox.ItemsSource>
<Binding Source="{StaticResource myDataSource}" XPath="*[@Stock='out'] | *[@Number>=8 or @Number=3]"/>
</ListBox.ItemsSource>
<ListBox.ItemTemplate>
<DataTemplate>
<TextBlock FontSize="12" Foreground="Red">
<TextBlock.Text>
<Binding XPath="Title"/>
</TextBlock.Text>
</TextBlock>
</DataTemplate>
</ListBox.ItemTemplate>
</ListBox>
这里并没有把ItemsSource作为属性写在ListBox中,是因为XPath比较复杂,需要添加很多转义字符,所以提取出来作为<ListBox.ItemsSource>标签。
这里的XPath比较有趣,意思是Books集合中所有Stock属性为out或Number属性为3或Number属性大于等于8的Book数据项。
还有就是,在数据模板ItemTemplate中,指定的XPath为"Title"标记,而不再是"@Title"属性。
32.XmlnsBind
This sample shows how to bind to data in XML data sources while using XML namespaces.
这个例子仍然是使用XmlDataProvider,这次将数据源定位到外部的XML,而且是Internet上的RSS聚合XML文件。指定了XPath="rss/channel",说明绑定的数据源是一组item对象——这个对象由title和dc:date两个属性。
<XmlDataProvider Source="http://msdn.microsoft.com/subscriptions/rss.xml"
XmlNamespaceManager="{StaticResource mapping}" XPath="rss/channel" x:Key="provider"/>
察看这个外部的RSS聚合:http://msdn.microsoft.com/subscriptions/rss.xml
我们要表现的就是其中item中的所有数据,包括title和dc:date。
这里的关键是XmlDataProvider的XmlNamespaceManager属性引用了资源:
<XmlNamespaceMappingCollection x:Key="mapping">
<XmlNamespaceMapping Uri="http://purl.org/dc/elements/1.1/" Prefix="ttt" />
</XmlNamespaceMappingCollection>
XmlNamespaceMappingCollection用来提供一个URI,来解析这个RSS,这个URI一定要与RSS聚合页面指定的一致:
<rss version="2.0" xmlns:dc="http://purl.org/dc/elements/1.1/">
从而在XmlNamespaceMappingCollection中指定的前缀Prefix="ttt",就可以取代RSS中指定的前缀dc。XmlNamespaceMappingCollection起到了将二者做一个映射的作用。于是RSS中的dc:date可以在我们的程序中写为ttt:date
注:如果再细说下去,就要讲WPF是怎么在内部将RSS序列化为新的格式(包括命名空间)。详细技术请参见《Visual Basic.NET 串行化参考手册》。
