React 学习笔记(二):生命周期;axios
React学习笔记(一):JSX;工厂函数组件、ES6类组件;三大属性(state、props、refs)
学习视频源自:https://www.bilibili.com/video/BV1Et41137Sb?p=4
UP 主:Java基基
机构:尚硅谷
文章目录
-
- 四、React 面向组件编程(续)
-
- 4.3 组合组件-ing(P10)
-
- 4.3.1 初始化显示
- 4.3.2 获取表单数据
- 4.4 生命周期
-
- 4.4.1 生命周期
-
- 1. 组件的三个生命周期
- 2. React 为每个状态提供的勾子(hook)函数
- 3. 生命周期流程
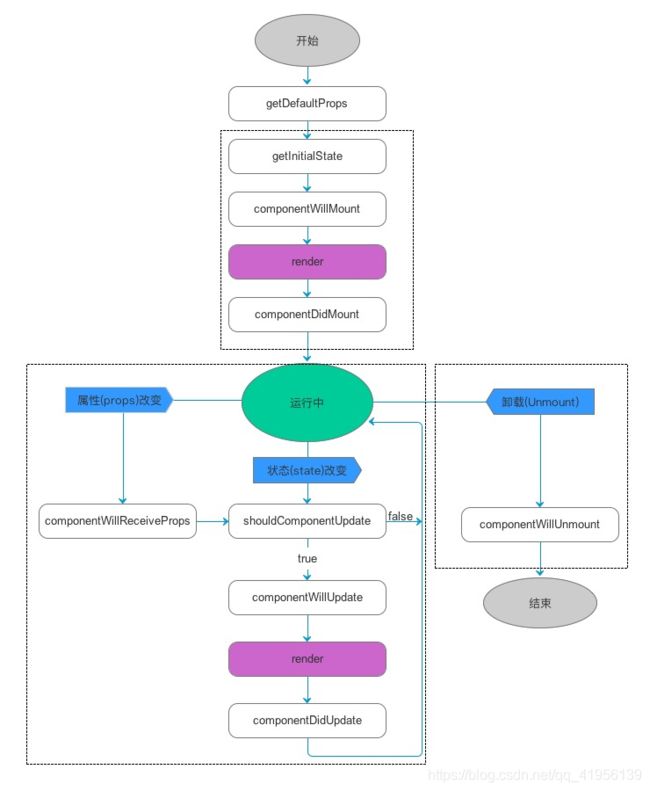
- 4.4.2 流程图解
- 4.4.3 小案例
- 4.4.4 重要的钩子
- 五、虚拟DOM和Diff算法
- 六、脚手架应用分析
-
- 6.1 项目结构
- 6.2 使用 create-react -app 创建 react 应用
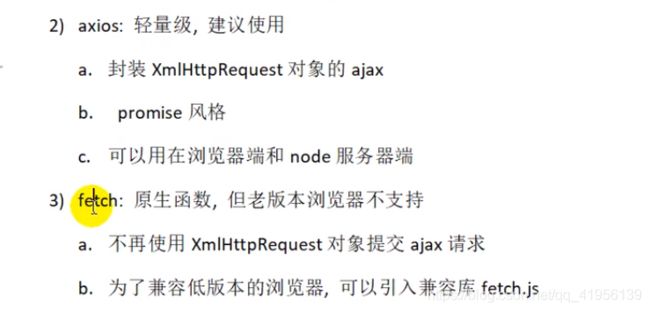
- 七、Axios 的使用
-
- 7.1 小案例
- 7.2 get 请求,post 请求,fetch 请求
- 7.3 小案例--用户搜索
-
- 1、父组件
- 2、搜索子组件
- 3、列表子组件
补充:State 与 Props 区别
- 组件通过属性(props) 和 状态(state)传递数据
- props 是组件对外的接口,state 是组件对内的接口
上层组件通过下层组件的props属性向下层组件传递数据或方法(state是从上到下单向流动的,从父级到子元素)
换言之,
下层组件通过 props 属性获取上层组件的数据或方法 - props 是只读的
- state 更新是异步的
四、React 面向组件编程(续)
面向对象->面向模块->面向组件
4.3 组合组件-ing(P10)
组合组件官方说明
4.3.1 初始化显示
问题1:数据应该保存在哪个组件内?
回答:若是某个组件需要,则写在该组件内;若是多个组件需要,则写在这些组件共同的父组件内。
问题2:如何在子组件中修改父组件的数据状态?
回答:子组件中不能直接改变父组件中的state状态;状态在哪个组件,更新状态的行为就定义在哪个组件
解决方案:父组件中定义行为函数,并将函数传递给子组件,子组件通过调用该函数(传参)来达到修改状态
这里的父子组件不是继承关系,而是嵌套关系??(如:
// 需要引入react、react-dom、babel、prop-types

// 父组件
class App extends React.Component{

	constructor(props) {

		super(props)
		this.state = {

			todos: ['吃饭', '睡觉', '敲代码']
		}
		this.addTodo = this.addTodo.bind(this)
	}
	// 定义修改状态的行为
	addTodo(todo) {

		// this.state.todos.unshift(todo) // 错误写法:不能直接修改状态,必须通过setState方法
		const {
      todos } = this.state
		todos.unshift(todo) // unshift在数组开头添加元素todo,直接修改原有的数组
		this.setState({
     todos}) // 更新状态
	}
	render() {

		const {
      todos } = this.state
		return(
			<div><h1>Simple TODO List</h1>
				<Add count={
      todos.length } addTodo={
      this.addTodo }/> // 向子组件传递addTodo方法
				<list todos={
      todos }/> // 向子组件传数据
			</div>
		)
	}
}
// 子组件
class Add extends React.Component{

	constructor(props) {

		super(props)
		this.add = this.add.bind(this) // 给add方法的this强制绑定为当前实例
	}
	add() {

		// 1.读取输入的数据
		const todo = this.todoInput.value.trim()
		// 2.检查合法性
		if(!todo) {
      return }
		// 3.添加
		this.props.addTodo(todo)
		// 4.清空输入框
		this.todoInput.value = ''
	}
	render() {

		return(
			<div><input ref={
      input => this.todoInput=input } type="text"/>
				<button onClick={
      this.add }><add #{
     this.props.count+1}</button>
			</div>
		)
	}
}
// 声明
Add.proptypes = {

	count: PropTypes.number.isRequired,
	addTodo: PropTypes.func.isRequired
}
// 子组件
class List extends React.Component{

	render() {

		const {
      todos } = this.props
		return(
			<ul>
				{
      // 循环创建
					todos.map(
						(todo, index) => <li key="index">{
     todo}</li>
					)
				}
			</ul>
		)
	}
}
// 指定List的数据类型:数组类型
List.propTypes = {

	todos: PropTypes.array.isRequired
}
// 渲染
ReactDOM.render(<App />, document.getElementById('example'))
4.3.2 获取表单数据
- 受控组件
- 非受控组件
1、非受控组件
ref={ input => this.nameInput=input},前一个input是形参,可以自定义,和最后的input一致;nameInput也是自定义
2、受控组件
在组件中:
<input value={
     this.state.value} onChange={
     this.handleChange} type="password" />
在方法中:
handleChange(event) {

	const psw = event.target.value
	this.setState({
      psw: psw })
}
完整代码:
<div id="example">/<div>
<script type="text/babel">
	class Loginform extends React.Component {

		constructor(props) {

			super(props)
			this.state = {

				psw: ''
			}
			this.handleSubmit = this.handleSubmit.bind(this)
			this.handleChange = this.handleChange.bind(this)
		}
		handleSubmit(event) {

			// 获取数值:非受控组件方式
			const name = this.nameInput.value
			// 阻止事件默认行为:该事件默认行为是提交
			event.preventDefault()
		}
		handleChange(event) {

			// 获取数值:受控组件方式(配合onChange事件使用,否则无法输入数据,原因在于始终绑定的是state中的psw,而state没有改变)
			const psw = event.target.value
			this.setState({
      psw: psw })
		}
		render() {

			return(
				<form action="/test" onSubmit="handleSubmit">
					用户名:<input ref={
     input => this.nameInput=input} type="text" />
					密码:<input value={
     this.state.value} onChange={
     this.handleChange} type="password" />
					<input type="submit" value="登录" />
				</from>
			)
		}
	}
	ReactDOM.render(<Loginform/>, document.getElementById('example'))
</script>
4.4 生命周期
4.4.1 生命周期
注意:
React 是单页面的,即所有组件都是在初始化创建的时候全部被创建的(包括弹框),只是通过属性来显示和隐藏组件,并不会销毁和重建组件。
因此,在子组件中,可以通过更新state时会触发的回调函数来做一些操作,如componentWillUpdate();但是若是在componentWillMount()做了一些操作的话,那么这些操作便只会触发一次,更新state或是显示出该组件(如弹框组件)时都不会触发这些操作,因为它们所在的回调函数在生命周期中只触发一次。
1. 组件的三个生命周期
Mount:插入真实DOM
Update:被重新渲染
Unmount:被移除真实DOM
2. React 为每个状态提供的勾子(hook)函数
componentWillMount()
componentDidMount()
componentWillUpdate()
componentDidUpdate()
componentWillUnmount()
3. 生命周期流程
1、第一次初始化渲染显示:ReactDOM.render()
- constructor():创建对象初始化 state
- componentWillMount():将要插入回调
render():用于插入虚拟DOM回调–每更新一次状态,调用一次- componentDidMount():已经插入回调
2、每次更新 state:this.setState()
- componentWillUpdate():将要更新回调
- render():更新(重新渲染)
- componentDidUpdate():已经更新回调
3、移除组件:ReactDOM.unmountComponentAtNode(containerDOM)
- componentWillUnmount():组件将要被移除回调
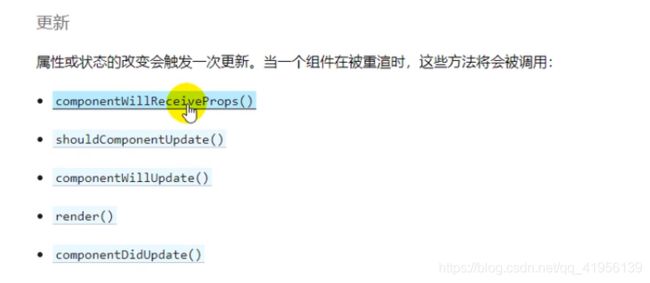
4.4.2 流程图解
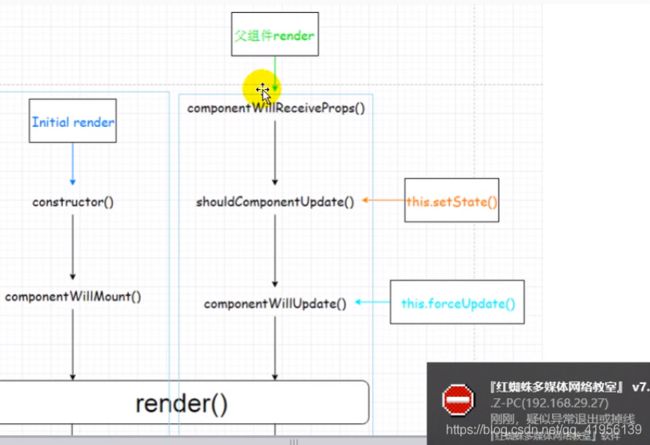
- initial render
- constructor()
- componentWillMount()
- render()
- componentDidMount()
- componentWillUnmount()
- 父组件 render
- componentWillReceiveProps():组件将要接收到新属性,第一次接收属性的时候不调用
- shouldComponentUpdate()–this.setState()
- componentWillUpdate()–this.forceUpdate()
- render()
- componentDidUpdate()
- componentWillUnmount()
4.4.3 小案例
<div id="example">/<div>
<script type="text/babel">
	class Life extends React.Component {

		constructor(props) {

			super(props)
			this.state = {

				opcity: 1
			}
			this.destroyComponent = this.destroyComponent.bind(this)
		}
		omponentDidMount() {

			// 启动循环定时器
			this.intervalID = setInterval(function() {

				let {
     opcity} = this.state
				opcity -= 0.1
				if(opcity<=0) {

					opcity = 1
				}
				this.setState({
     opcity})
			}.bind(this),200) // 绑定this为当前react实例
			// 使用箭头函数解决this问题
			// setInterval(()=>{

			// 	this.setState({date: new Date()})
			// }, 1000)
		}
		// 销毁组件前
		componentWillUnmount() {

			clearInterval(this.intervalID) // 清理定时器,参数为定时器id
		}
		// 销毁组件Life
		destroyComponent() {

			ReactDOM.unmountComponentAtNode(document.getElementById('example'))
		}
		render() {

			const {
      opcity } = this.state
			return(
				<div>
					<h2 style={
     {
     opcity: opcity}}>{
     this.props.msg}</h2>
					<button @click="destroyComponent">销毁组件</button>
				</div>
			)
		}
	}
	ReactDOM.render(<Life msg="React生命周期"/>, document.getElementById('example'))
</script>
4.4.4 重要的钩子
| 钩子 | 作用 |
|---|---|
| render() | 初始化渲染或更新渲染调用 |
| componentDidMount() | 开启监听,发送 ajax 请求(初始化的异步操作) |
| componentWillUnmount() | 做一些收尾工作,如:清理定时器 |
| componentWillReceiveProps() | 当组件接收到新的属性时回调 |
五、虚拟DOM和Diff算法
最小化页面重绘
六、脚手架应用分析
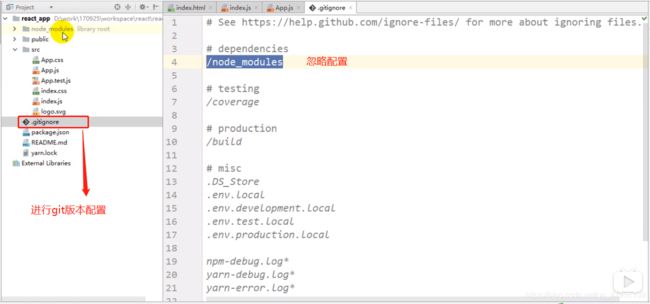
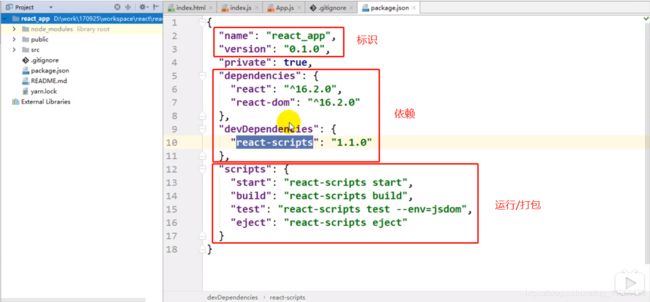
6.1 项目结构
1、.gitignore
2、package.json
包括三部分:标识、依赖、运行/打包命令
6.2 使用 create-react -app 创建 react 应用
七、Axios 的使用
7.1 小案例
class MostStarRepo extends React.Component{

	state={

		repoName: '',
		repoUrl: ''
	}
	componentDidMount() {

		const searchKey = r // 查询关键字
		const url = `https://api.github.com.search/repositories?q=&{searchKey}&sort=starts`
		// 发送异步请求--axios--需要先引入axios
		axios.get(url).then(response => {

			const result = response.data
			const {
     name, html_url} = result.items[0]
			this.setState({
     repoName: name, repoUrl: html_url}).catch((error) => {

				console.log(error.message)
			})
		})
		// 发送异步请求--fetch
		fetch(url).then(response => {

			return response.json()
		}).then(data => {

			const {
     name, html_url} = data.items[0]
			this.setState({
     repoName: name, repoUrl: html_url})
		})
	}
	render() {

		const {
     repoName, repoUrl} = this.state
		if(!repoName) {

			return <h2>loading...</h2>
		} else {

			return <h2>星星最多的是:<a href={
     repoUrl}>{
     repoName}</a></h2>
		}
	}
}
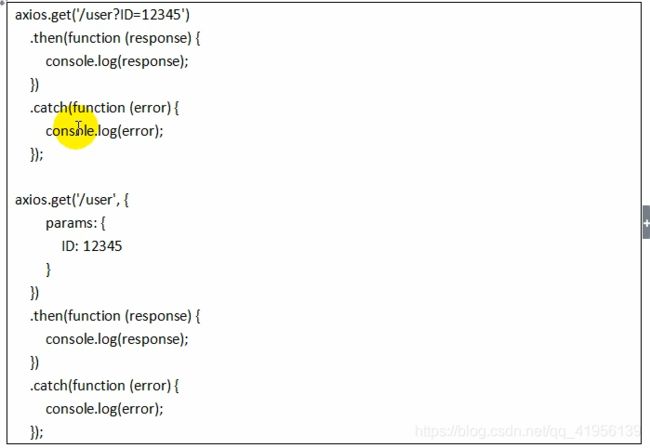
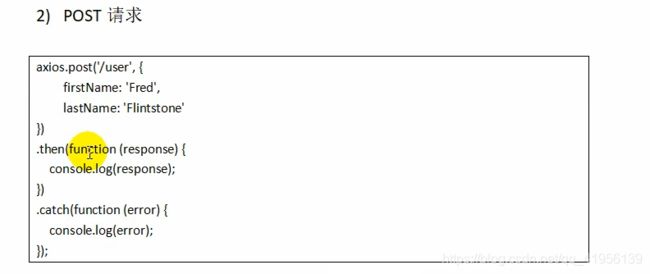
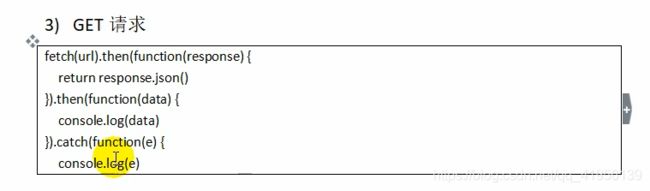
7.2 get 请求,post 请求,fetch 请求
1、get 请求
2、post 请求
3、fetch 请求
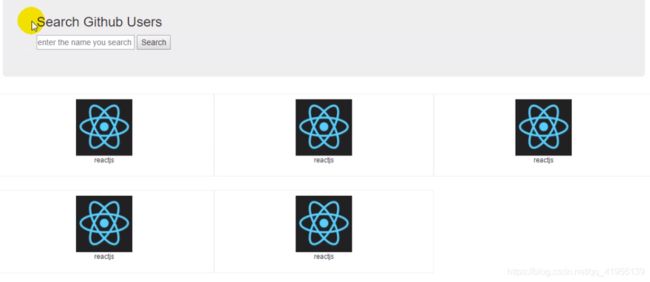
7.3 小案例–用户搜索
效果:
生命周期:
根据效果图,可以考虑将页面分为三个组件来呈现:父组件(整个页面的容器)、搜索子组件、列表子组件
实现分析:数据需要在父组件、搜索子组件、列表子组件中流动
- 搜索框内容:搜索子组件传给父组件,在
父组件中进行state更新 - 搜索点击事件:在父组件中实现–首先,接收搜索子组件传来的搜索信息;然后,将该搜索信息传递给列表子组件;最后,列表子组件获取父组件中的搜索信息,进行接口请求,接收并将返回数据展示出来
总结:父组件充当媒介,用于更新那些跨组件流动的数据、实现那些跨组件的方法(自己总结的,不知道对不对,曲有误,周郎顾)
- 搜索输入和点击都在搜索子组件中触发
- 在列表子组件中发起 axios 请求和显示数据
1、父组件
index.jsx
import React, {
      Component } from 'react'
import Search from './search'
import Main from './main'

export default class Index extends Component {

  state = {

    searchName: ''
  }
  setSearchName = (searchName) => {

    this.setState({
      searchName })
  }

  render() {

    <div className="container">
      <Search setSearchName={
     this.setSearchName} /> // 把方法传递给搜索子组件
      <Main searchName={
     this.state.searchName} /> // 把搜索值传递给列表子组件:作请求参数
    </div>
  }
}

/**
 * searchName的流动过程
 * searchName:Index组件(setSearchName方法) -> Search组件(search方法) -> Index组件(searchName属性) -> Main组件
 */
2、搜索子组件
search.jsx
import React, {
      Component } from 'react'
import PropTypes from 'prop-types'

export default class Search extends Component {

  static propTypes = {

    setSearchName: PropTypes.func.isRequired // 接收父组件的方法
  }
  search = () => {

    const searchText = this.input.value.trim()
    if (searchText) {

      this.props.setSearchName(searchText) // **搜索值传给父组件**
    }
  }
  render() {

    return (
      <section className="jumbotron">
        <h3>搜索Github用户</h3>
        <div>
          <input ref={
     input => this.input = input} type="text" placeholder="请输入" />
          <button onClick={
     this.search}>Search</button>
        </div>
      </section>
    )
  }
}
3、列表子组件
main.jsx
import React, {
      Component } from 'react'
import PropTypes from 'prop-types'
import axios from 'axios'

export default class Main extends Component {

  static propTypes = {

    searchName: PropTypes.string.isRequired // 接收父组件的参数:搜索值
  }
  state = {
      // 本组件内的state
    initView: true,// 初始化页面时显示
    loading: false,// 搜索加载时显示
    users: null,// 搜索成功时显示
    errorMsg: null// 搜索失败时显示
  }
  // 当组件接收到新的属性时回调:指定了新的searchName,需要发送请求
  componentWillReceiveProps(newProps) {

    const {
     searchName} = newProps
    // 更新状态
    this.setState({

      initView: false,
      loading: true
    })
    // 请求
    const url = `https://api.github.com/search/users?q=${
       searchName}`
    axios.get(url).then(response => {

      // 请求
      const result = response.data
      const users = result.items.map(item => {

        return {

          name: item.login, url: item.html_url, avatarUrl: item.avatar_url
        }
      })
      // 更新
      this.setState({
     users, loading: false})
    }).catch(error => {

      this.setState({
     errorMsg: error.message, loading: false})
    })
  }

  render() {

    const {
      initView, loading, user, errorMsg } = this.state
    const {
      searchName } = this.props

    if (initView) {

      return <h2>请输入关键字进行查询</h2>
    } else if (loading) {

      return <h2>正在请求。。。</h2>
    } else if (errorMsg) {

      return <h2>{
     errorMsg}</h2>
    } else {

      return (
        <div className="row">
          {

            user.map((user, index) => (
              <div className="card" key={
     index}>
                <a href={
     user.url} target="_blank">
                  <img src={
     user.avatarUrl} style={
     {
      width: 100 }} />
                </a>
                <p className="card-text">{
     user.name}</p>
              </div>
            ))
          }
        </div>
      )
    }

  }
}