Android笔记----导航栏
Android导航栏
** 源码**
Android Studio导入Android项目需要删除的文件
1、.idea文件夹
2、.gradle文件夹
3、所有的build文件夹
4、所有的.iml文件
5、local.properties文件。
废话不多说,直接上代码
java代码
Mainactivity
package com.example.ex04;//修改为自己的包名


import android.os.Bundle;
import android.view.MenuItem;

import androidx.annotation.NonNull;
import androidx.appcompat.app.AppCompatActivity;
import androidx.fragment.app.Fragment;
import androidx.fragment.app.FragmentTransaction;

import com.google.android.material.bottomnavigation.BottomNavigationView;

public class MainActivity extends AppCompatActivity {


    private BottomNavigationView navigationView;

    //创建四个Fragment和存放他们的数组
    private Fragment Fragment1;
    private Fragment Fragment2;
    private Fragment Fragment3;
    private Fragment Fragment4;
    public Fragment[] fragmentlist;

    //用于标识上一个fragment
    private int lastFragment;

    @Override
    protected void onCreate(Bundle savedInstanceState) {

        super.onCreate(savedInstanceState);
        setContentView(R.layout.activity_main);
        //fragment初始化
        initFragment();
    }

    /**
     * 初始化fragment,并将Fragment1显示出来
     */
    private void initFragment() {

        navigationView = findViewById(R.id.bnv_main);
        //配置菜单按钮显示图标
        navigationView.setItemIconTintList(null);
        //将三个fragment先放在数组里
        Fragment1 = new Fragment1();
        Fragment2 = new Fragment2();
        Fragment3 = new Fragment3();
        Fragment4 = new Fragment4();
        fragmentlist = new Fragment[]{
     Fragment1, Fragment2, Fragment3, Fragment4};
        lastFragment = 0;
        //为navigationView设置点击事件
        navigationView.setOnNavigationItemSelectedListener(mOnNavigationItemSelectedListener);

        //设置默认页面为Fragment1
        getSupportFragmentManager().beginTransaction().replace(R.id.fl_main, Fragment1)
                .show(Fragment1).commit();
        navigationView.setSelectedItemId(R.id.navigation_home);
    }

    /**
     * 给BottomNavigationView添加按钮的点击事件
     */
    private BottomNavigationView.OnNavigationItemSelectedListener mOnNavigationItemSelectedListener
            = new BottomNavigationView.OnNavigationItemSelectedListener() {


        @Override
        public boolean onNavigationItemSelected(@NonNull MenuItem item) {

            //每次点击后都将所有图标重置到默认不选中图片
            resetToDefaultIcon();

            switch (item.getItemId()) {

                case R.id.navigation_home:
                    //判断要跳转的页面是否是当前页面,若是则不做动作
                    if (lastFragment != 0) {

                        switchFragment(lastFragment, 0);
                        lastFragment = 0;
                    }
                    //设置按钮
                    item.setIcon(R.drawable.homea);
                    return true;
                case R.id.navigation_buy:
                    if (lastFragment != 1) {

                        switchFragment(lastFragment, 1);
                        lastFragment = 1;
                    }
                    item.setIcon(R.drawable.shopa);
                    return true;
                case R.id.navigation_user:
                    if (lastFragment != 2) {

                        switchFragment(lastFragment, 2);
                        lastFragment = 2;
                    }
                    item.setIcon(R.drawable.usera);
                    return true;
                case R.id.navigation_love:
                    if (lastFragment != 3) {

                        switchFragment(lastFragment, 3);
                        lastFragment = 3;
                    }
                    item.setIcon(R.drawable.lovea);
                    return true;
            }
            return false;
        }
    };

    /**
     * @param lastFragment 表示点击按钮前的页面
     * @param index        表示点击按钮对应的页面
     */
    private void switchFragment(int lastFragment, int index) {

        FragmentTransaction transaction = getSupportFragmentManager().beginTransaction();
        //隐藏上个Fragment
        transaction.hide(fragmentlist[lastFragment]);

        //判断transaction中是否加载过index对应的页面,若没加载过则加载
        if (fragmentlist[index].isAdded() == false) {

            transaction.add(R.id.fl_main, fragmentlist[index]);
        }
        //根据角标将fragment显示出来
        transaction.show(fragmentlist[index]).commitAllowingStateLoss();
    }


    /**
     * 重新配置每个按钮的图标
     */
    private void resetToDefaultIcon() {

        navigationView.getMenu().findItem(R.id.navigation_home).setIcon(R.drawable.homeb);
        navigationView.getMenu().findItem(R.id.navigation_buy).setIcon(R.drawable.shopb);
        navigationView.getMenu().findItem(R.id.navigation_love).setIcon(R.drawable.loveb);
        navigationView.getMenu().findItem(R.id.navigation_user).setIcon(R.drawable.userb);
    }

}
创建四个布局文件和java文件
Fragment1.java + fragment_head.xml
Fragment2.java + fragment_order.xml
Fragment3.java + fragment_love.xml
Fragment4.java + fragment_user.xml
这里我就贴出来其中的一个,其他Java代码和相应的布局文件都是一样的,修改修改就行了
Fragment1.java
package com.example.ex04;

import android.os.Bundle;
import android.view.LayoutInflater;
import android.view.View;
import android.view.ViewGroup;
import android.widget.TextView;
import androidx.annotation.Nullable;
import androidx.fragment.app.Fragment;

public class Fragment1 extends Fragment {

    @Nullable
    @Override
    public View onCreateView(LayoutInflater inflater, @Nullable ViewGroup container, @Nullable Bundle savedInstanceState) {

        //该View表示该碎片的主界面,最后要返回该view
        View view=inflater.inflate(R.layout.fragment_head,container,false);
        //fragment_head为对应的布局文件

        //注意:因为主界面现在是view,所以在找寻控件时要用view.findViewById

        TextView textView=view.findViewById(R.id.tv1);
       //tv1为对应的布局文件文本框名

        return view;
    }
}
fragment_head.xml
 <ScrollView  xmlns:android="http://schemas.android.com/apk/res/android"
 xmlns:tools="http://schemas.android.com/tools"
 android:layout_width="match_parent"
 android:layout_height="match_parent">

 <TextView
     android:id="@+id/tv1"
     android:layout_width="wrap_content"
     android:layout_height="wrap_content"
     android:layout_centerInParent="true"
     android:text="我是首页"
     android:textSize="30dp" />

 ScrollView >
还有一个activity_main.xml文件
<RelativeLayout xmlns:android="http://schemas.android.com/apk/res/android"
    xmlns:tools="http://schemas.android.com/tools"
    android:layout_width="match_parent"
    android:layout_height="match_parent"
    xmlns:app="http://schemas.android.com/apk/res-auto"
    android:orientation="vertical"
    tools:context="com.example.ex04.MainActivity">


    <FrameLayout
        android:id="@+id/fl_main"
        android:layout_width="match_parent"
        android:layout_height="match_parent"
        android:layout_above="@id/bnv_main"/>

    <com.google.android.material.bottomnavigation.BottomNavigationView
        android:id="@+id/bnv_main"
        android:layout_width="match_parent"
        android:layout_height="wrap_content"
        android:layout_alignParentBottom="true"
        app:menu="@menu/navigation"/>
RelativeLayout>
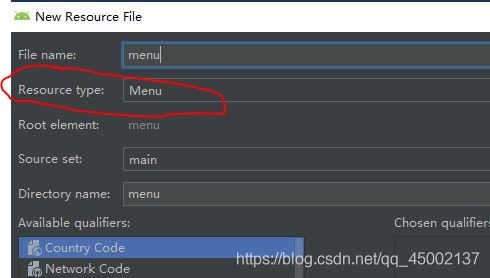
在res下新建一个menu文件夹navigation.xml

最后别忘在AndroidManifest.xml里面注册活动,我把相应的代码贴出来仅供参考
<manifest xmlns:android="http://schemas.android.com/apk/res/android"
    package="com.example.ex04">

    <application
        android:allowBackup="true"
        android:icon="@mipmap/ic_launcher"
        android:label="@string/app_name"
        android:roundIcon="@mipmap/ic_launcher_round"
        android:supportsRtl="true"
        android:theme="@style/AppTheme">
        <activity android:name=".MainActivity">
            <intent-filter>
                <action android:name="android.intent.action.MAIN" />

                <category android:name="android.intent.category.LAUNCHER" />
            intent-filter>
        activity>

        <activity android:name=".Fragment1">activity>
        <activity android:name=".Fragment2">activity>
        <activity android:name=".Fragment3">activity>
        <activity android:name=".Fragment4">activity>
    application>

manifest>


