《Java并发编程详解》读书笔记
嗯,书是假期开始看的感觉,虽然部分知识以前学过,但是在学一次巩固一下。嗯,加油生活。摘一句子,^_^
有一天,突然发现自己没有热爱的东西了。就这样进入浪费时间的年代。秋天一到,候鸟南飞,一旦动身,从此都是客途,只有落叶能接到你的影子。 ---------张嘉佳
第一章,快速认识线程
1,线程的简述
线程:程序执行的路径,每个线程都有自己的程序计数器,局部变量表,各自的生命周期,当启动一个JVM时,操作系统会创建一个JVM进程,
2,快速创建一个线程
1)尝试并行运行;
试图让看新闻和但听音乐同时进行
package com.liruilong.concurrent;
import java.util.concurrent.TimeUnit;
/**
 * @Author: Liruilong
 * @Date: 2019/7/15 9:04
 */
public class TryConcurrency {

    private static void browseNews(){
        for (;;){
            System.out.println("看新闻");
            sleep(1);
        }
    }
    private static void enjoyMusic(){
        for (;;){
            System.out.println("听音乐");
            sleep(1);
        }
    }
    /**
     * @Author Liruilong
     * @Description
     * @Date 11:21 2019/7/15
     * @Param [seconds]
     * @return void
     **/
    private static void sleep(int seconds){
        try{
            /*TimeUnit.SECONDS.sleep(seconds);是对Thread.sleep方法的包装,
            实现是一样的,只是多了时间单位转换和验证,然而TimeUnit枚举成员的方法却提供更好的可读性,*/
            TimeUnit.SECONDS.sleep(seconds);
        }catch (InterruptedException e){
            e.printStackTrace();
        }
    }
    public static void main(String[] args) {
        browseNews();
        enjoyMusic();
    }
}
2)并发运行交替输出:
改变MIan方法添加一个线程,
    public static void main(String[] args) {
        // 方法一
       // new Thread(() -> enjoyMusic()).start();
        // 方法二
        new Thread(TryConcurrency::enjoyMusic).start();
        browseNews();
    }
}
3,线程的生命周期详解
线程具有生命周期:包含5种状态(出生状态(New),就绪状态(Runnable),运行状态(Running),阻塞状态(Blocked)和死亡状态(Dead)).1
1)出生状态:
就是线程被创建时处于的状态(即使用new后),仅有JVM为其分配内存并初始化。在用户使用该线程实例调用start()方法之前线程都处于出生状态:
2)就绪状态(可执行状态):
在用户使用该线程实例调用start()方法之后,调度程序就可以把CPU分配给该线程,JVM会为该线程创建方法调用栈和程序计数器。处于就绪状态的线程并没有开始运行,只是表示该线程准备就绪等待执行。(只能对新建状态的线程调用start()方法,即new完一个线程,只能调用一次start()方法。否则引发IllegalThreadStateException异常)。一但线程进入可执行状态,它就会在就绪与运行状态下转换,同时也可能进入等待,休眠,阻塞,或死亡状态。处于就绪的方法(调用sleep(),wait(),IO完成)
如果调用start()方法后需要线程立即开始执行,可以使用Thread.sleep(1)来让当前运行的主线程休眠1毫秒,此时处于空闲的CPU会去执行处于就绪状态的线程,这样就可以让子线程立即执行了。
3)运行状态:
处于就绪状态的线程获得CPU后,开始执行run()方法的线程执行体,此时该线程处于运行状态(Running),如果计算机的CPU是单核的,则在任何时候只能有一个线程处于运行状态,一个线程开始运行后,不可能一直处于运行状态,除非线程的执行体足够短。瞬间结束。(就绪到运行)
线程在运行过程中被中断使其他的线程获得执行的机会,线程调度的细节取决于底层平台所采用的策略,对于采用抢占式策略会为每个线程分配一小段CPU时间片,UNIX采用时间片算法,Windows采用抢占式策略,小型设备则采用协作式调度策略。
4)死亡状态:
当线程结束,线程进入死亡状态。线程执行run()和call()方法,正常结束,抛出一个未捕获的Exception或Error;不要对处于死亡状态的线程调用start()方法,程序只能对新建的线程调用。
5)阻塞状态(进入):
休眠状态,主动放弃被 占用的资源。等待状态。调用一个阻塞式IO方法,在该方法返回之前,线程被阻塞。线程试图获得一个同步的监视器,但该监视器正被其他线程所持有。程序调用线程的suspend()方法将该线程挂起,但该方法容易导致死锁。被阻塞的线程阻塞解除后会进入就绪状态而不是运行状态,必须重新等待线程调度器再次调度。
解除阻塞(进入)就绪状态:调用sleep()方法经过指定的时间。线程调用的阻塞的IO方法已经返回。线程成功地获得了试图取得的同步监视器。线程处于等待状态,其他线程调用notify()或notifyAll()方法发出一个通知时,则线程就回到就绪状态。处于挂起状态的线程被调用resume()恢复方法.
如果一个线程包含了 很长的循环,在循环的每次迭代之后把该线程切换到sleep休眠状态是一种很好的策略,这可以保证其他线程不必等待很长时间就能轮到处理器执行。
等待状态:在运行状态下的线程调用Thread类中的wait()方法,该线程进入等待状态。必须调用Thread类中的notify()方法才能被唤醒。(所有线程被唤醒)
休眠状态:当线程调用Thread的sleep()方法时,进入休眠状态。在使用sleep()方法时,该方法声明了InterrupteException异常并处理,要么在该方法使用throws显示声明抛出的异常。
主线程结束时,其他的子线程并不受影响,并不会随主线程的结束而借宿,一旦子线程启动起来,子线程就拥有和主线程相同的地位,不受影响。
线程的中断:如果线程使用sleep()或wait()方法进入就绪状态,可以使用Thread类 的interrupt()方法使线程离开run()方法,同时结束线程,担程序会抛出InterruptedException异常。可以在处理异常的块中实现线程的中断业务处理。
4,线程的start方法剖析:模板设计模式在Thread中的应用。
1)Thread类,start方法源码:
    public synchronized void start() {

        if (threadStatus != 0)
            throw new IllegalThreadStateException();
        group.add(this);

        boolean started = false;
        try {
            start0();
            started = true;
        } finally {
            try {
                if (!started) {
                    group.threadStartFailed(this);
                }
            } catch (Throwable ignore) {
            }
        }
    }
start方法核心的部分是start0()本地方法,也就是JNI方法:
private native void start0();- 在开始执行线程时,JVM会调用该线程的run方法,即run()方法是被JNI方法start0()方法调用的
- Thread被构造之后进入NEW状态否则就会出现 java.lang.IllegalThreadStateException异常;
- 线程启动后将会被加入到ThreadGroup中。
- 一个线程结束,即到了TERMINATED状态,在次调用start方法是不允许的。即不能回到可执行状态和运行状态。
2)模板设计模式在Thread中的应用
Thread的run()和start()方法就是一个典型的模板设计模式,父类编写算法结构,子类实现逻辑细节,
package com.liruilong.concurrent;

/**
 * @Author: Liruilong
 * @Date: 2019/7/15 22:27
 */
public class TemplateMethod {

    /**
     * @Author Liruilong
     * @Description 模板方法,确定算法结构代码,类似与start方法。
     * @Date 22:28 2019/7/15
     * @Param [message]
     * @return void
     **/

    public final void print(String message){
        System.out.println("&&&&&&&&&&&&&&&&&&");
        wrapPrint(message);
        System.out.println("&&&&&&&&&&&&&&&&&&");
    }

    /**
     * @Author Liruilong
     * @Description 子类方法,重写实现逻辑细节。类似与run() Method
     * @Date 22:29 2019/7/15
     * @Param [message]
     * @return void
     **/

    protected void wrapPrint(String message) {
    }

    public static void main(String[] args) {
        TemplateMethod templateMethod = new TemplateMethod(){
          @Override
          protected void wrapPrint(String message) {
              System.out.println("@  "+message+"  @");
          }
        };
        templateMethod.print("Hello Thread");

        TemplateMethod templateMethod1 = new TemplateMethod(){
            @Override
            protected void wrapPrint(String message) {
                System.out.println("$  "+message+"   $");
            }
        };
        templateMethod1.print("Hello Thread");
    }
}

运行结果:
&&&&&&&&&&&&&&&&&&
@  Hello Thread  @
&&&&&&&&&&&&&&&&&&
&&&&&&&&&&&&&&&&&&
$  Hello Thread   $
&&&&&&&&&&&&&&&&&&
5,Runnable接口的引用以及策略模式在Thread中的应用。
1)使用Thred模拟营业大厅叫号机模式,没有使用Runnable接口,顺序号采用静态修饰实现类共享顺序号:
package com.liruilong.concurrent;

/**
 * @Author: Liruilong
 * @Date: 2019/7/15 23:14
 */
public class TicketWindow extends Thread {

    //柜台名称  final 变量可以不指定初值,但是必须在有参构造方法中初始化;
    private final String name;
    //最多受理50笔业务
    private static final int MAX = 50;
    private volatile static int index = 1;

    public TicketWindow(String name) {
        this.name = name;
    }

    @Override
    public void run(){
        while (index <= MAX){
            System.out.println("柜台:"+name+"当前的号码是:"+(index++));
        }
    }

    public static void main(String[] args) {
        TicketWindow ticketWindow1 = new TicketWindow("1");
        ticketWindow1.start();
        TicketWindow ticketWindow2 = new TicketWindow("2");
        ticketWindow2.start();
        TicketWindow ticketWindow3 = new TicketWindow("3");
        ticketWindow3.start();
        TicketWindow ticketWindow4 = new TicketWindow("4");
        ticketWindow4.start();

    }
}
@FunctionalInterface
public interface Runnable {

    public abstract void run();
}

 @Override
    public void run() {
        if (target != null) {
            target.run();
        }
    }
Runnable接口的run方法及Thread方法的run方法。Thread类也实现了Runnable接口。
无论是 Runnable 的 run() 方法,还是 Thread 类本身的 run() 方法(事实上 Thread 类也是实现了 Runnable 接口)都是想将线程的控制本身和业务逻辑的运行分离开来,达到职责分明、功能单一的原则,这一点与 GoF 设计模式中的策略设计模式很相似。这个 Runnable 就是策略接口,针对不同的策略实现,执行相应的方法。这样对策略进行不同的实现即可。
2)策略模式在Thread中的应用。
将线程的控制和业务逻辑的运行彻底分离,策略模式和模板设计模式的区别。
- 策略模式的定义
策略模式定义了算法族,分别封装起来,让它们之间可以互相替换,此模式让算法的变化独立于使用算法的客户。 - 模板方法模式定义
模板方法模式在一个方法中定义一个算法骨架,而将一些步骤延迟到子类中。模板方法使得子类可以在不改变算法结构的情况下,重新定义算法中的某些步骤。
重写Thread类的run方法和实现Runnable接口的run方法不同,Thread的run方法是不能共享的 ,即线程A不能把线程B当做自己得执行单元,而使用Runnable接口很容易就能实现这一点。使用同一个Runnnable实例可以构造不同的Thread实例。
package com.liruilong.concurrent;

import java.util.concurrent.TimeUnit;

/**
 * @Author: Liruilong
 * @Date: 2019/7/15 23:14
 */
public class TicketWindow implements Runnable {
    //最多受理50笔业务
    private static final int MAX = 50;
    private  volatile int index = 1;

    @Override
    public void run(){

        while (index <= MAX){
            System.out.println("柜台:"+Thread.currentThread()+"当前的号码是:"+(index++));
            try {
                TimeUnit.NANOSECONDS.sleep(100);
            }catch( InterruptedException e){
                e.printStackTrace();
            }
        }
    }

    public static void main(String[] args) {
        final TicketWindow task = new TicketWindow();

        Thread thread1 = new Thread(task,"1");
        Thread thread2 = new Thread(task,"2");
        Thread thread3 = new Thread(task,"3");
        Thread thread4 = new Thread(task,"4");
        thread1.start();
        thread2.start();
        thread3.start();
        thread4.start();

    }
}
如何在多个线程之间共享数据:
Java里进行多线程共享的方式主要是共享内存的方式实现的,共享内存主要关注可见性和原子性,Java内存模型解决了可讲性和原子性,而所解决了原子性,
package com.liruilong.concurrent.ThreadShare;

/**
 * @Description :
 * @Author: Liruilong
 * @Date: 2019/9/21 16:00
 */
public class MyDate {
    private  int j = 0;
    public  synchronized  void add(){
        j++;
        System.out.println("线程"+ Thread.currentThread().getName() + "j为:" + j);
    }
    public synchronized void dec(){
        j--;
        System.out.println("线程"+ Thread.currentThread().getName() + "j为:" + j);
    }
    public int getDatr(){
        return j;
    }
}

package com.liruilong.concurrent.ThreadShare;

/**
 * @Description :
 * @Author: Liruilong
 * @Date: 2019/9/21 16:03
 */
public class AddRunnable implements Runnable {

    MyDate myDate;

    public AddRunnable(MyDate myDate) {
        this.myDate = myDate;
    }

    @Override
    public void run() {
        myDate.add();
    }
}


package com.liruilong.concurrent.ThreadShare;

/**
 * @Description :
 * @Author: Liruilong
 * @Date: 2019/9/21 16:05
 */
public class DecRunnable implements Runnable{

    MyDate myDate;

    public DecRunnable(MyDate myDate) {
        this.myDate = myDate;
    }

    @Override
    public void run() {
        myDate.dec();
    }


}
package com.liruilong.concurrent.ThreadShare;

/**
 * @Description :
 * @Author: Liruilong
 * @Date: 2019/9/21 16:06
 */
public class Mian {


    public static void main(String[] args) {
        // 将数据抽象成一个类,并将数据的操作为这个类的同步方法.
        // 使用同一数据构造不同的runnable 接口.
        MyDate myDate = new MyDate();
        Runnable add = new AddRunnable(myDate);
        Runnable dec = new DecRunnable(myDate);
        for (int i = 0; i < 2; i++){
            new Thread(add).start();
            new Thread(dec).start();
        }
    }

    public static void Main(){
        MyDate myDate = new MyDate();
        for (int i = 0; i < 2; i++){
            // 将Runnable接口作为匿名内部类,通过Lambda表达式实现.
            new Thread(() ->myDate.add()).start();
            new Thread(() ->myDate.dec()).start();
        }
    }
}
第二章,深入理解Thread构造函数
1,线程的命名:
1)通过没有String的构造函数可以实现线程的线程使用默认名
public Thread() {
        init(null, null, "Thread-" + nextThreadNum(), 0);
    }
public Thread(Runnable target) {
        init(null, target, "Thread-" + nextThreadNum(), 0);
    }
public Thread(ThreadGroup group, Runnable target) {
        init(group, target, "Thread-" + nextThreadNum(), 0);
    }

private static int threadInitNumber;
    private static synchronized int nextThreadNum() {
        return threadInitNumber++;
    }
如果没有显示指定一个名字,那么线程将会以 “Thread-” 作为前缀与一个自增数字进行组合,这个自增数字在JVM进程是不断自增的。
import java.util.stream.IntStream;

public class Main {

    public static void main(String[] args) {

        IntStream.range(0,5).boxed()
                .map(i -> new Thread( () -> System.out.println(Thread.currentThread().getName())))
                .forEach(Thread::start);
    }
    /*static IntStream range(int startInclusive, int endExclusive)
    返回有序的顺序 IntStream从 startInclusive (含)至 endExclusive通过增量步骤(不含) 左开右闭。
    Stream boxed()
    返回一个 Stream组成的这个流的元素,每个盒装到一个 Integer
    IntStream map(IntUnaryOperator mapper)
    返回由给定函数应用于此流的元素的结果组成的流,
    即该方法会迭代流中的元素,并为每个元素应用一个方法,然后返回应用后的流。
*/


}

运行结果:
Thread-0
Thread-1
Thread-2
Thread-3
Thread-4

Process finished with exit code 0
2)可以通过构造函数命名:
public Thread(String name) {
        init(null, null, name, 0);
    }
public Thread(ThreadGroup group, String name) {
        init(group, null, name, 0);
    }

public Thread(Runnable target, String name) {
        init(null, target, name, 0);
    }
 public Thread(ThreadGroup group, Runnable target, String name) {
        init(group, target, name, 0);
    }
 public Thread(ThreadGroup group, Runnable target, String name,
                  long stackSize) {
        init(group, target, name, stackSize);
    }
import java.util.stream.IntStream;

public class Main {

    private final static String PREFIX = "ALEX_";
    public static void main(String[] args) {

            IntStream.range(0, 5)
                    .mapToObj(Main::createThread)
                    .forEach(Thread::start);
    }
    private static Thread createThread(final int intName){

        return new Thread(() -> System.out.println(Thread.currentThread().getName()),PREFIX + intName);
    }


}
3)修改线程的名字:
public final synchronized void setName(String name) {
        checkAccess();
        this.name = name.toCharArray();
        if (threadStatus != 0) {
            setNativeName(name);
        }
    }


//查看类所有方法 Alt+7 或者 Ctrl+F12
2,线程的父子关系:
Thread的所有的构造函数都会调用静态方法init,在init方法分析,在创建一个线程都会调用其父线程;
private void init(ThreadGroup g, Runnable target, String name,
                      long stackSize, AccessControlContext acc) {
        if (name == null) {
            throw new NullPointerException("name cannot be null");
        }

        this.name = name.toCharArray();
        Thread parent = currentThread();//获取当前线程父线程
        SecurityManager security = System.getSecurityManager();
        if (g == null) {

            if (security != null) {
                g = security.getThreadGroup();
            }
            if (g == null) {
                g = parent.getThreadGroup();
            }
        }
………………- 一个线程的创建肯定是由另一个线程完成的。
- 被创建的线程的父线程是创建的
3,Thread与TheradGroup:
package com.liruilong.concurrent;

/**
 * @Author: Liruilong
 * @Date: 2019/7/17 11:24
 */
public class ThreadConstruction {
    public static void main(String[] args) {

        Thread thread1 = new Thread("thread1");

        ThreadGroup group = new ThreadGroup("TestGroup");

        Thread thread2 = new Thread(group,"thread2");
        ThreadGroup mainThreadGroup = Thread.currentThread().getThreadGroup();
        System.out.println("主函数的线程组为i:"+mainThreadGroup.getName());
        System.out.println("thread1 and main belong  the same Threadgeouop:"
                + (mainThreadGroup == thread1.getThreadGroup()));
        System.out.println("thread2 Thread Group not belong main Group: "
                +(mainThreadGroup == thread2.getThreadGroup()));
        System.out.println("thread2 thread group belong main TestGrooup:"
                +(group == thread2.getThreadGroup()));
    }
}
  SecurityManager security = System.getSecurityManager();
        if (g == null) {

            if (security != null) {
                g = security.getThreadGroup();
            }
            if (g == null) {
                g = parent.getThreadGroup();
            }
        }
- main线程所在ThreadGroup称为main。
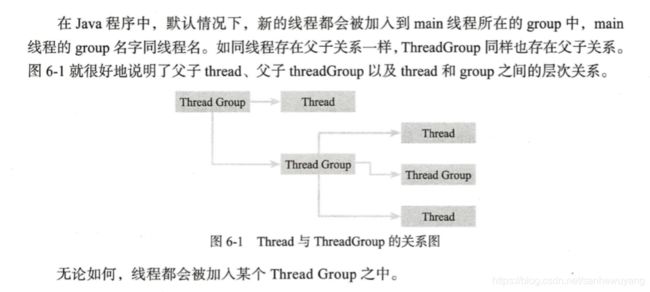
- 构造一个线程,如果没有显示的指定ThreadGroup,那么他将会和父线程同属一个ThreadGroup。
4,Thread与Runnable:
1)Thread负责线程本身相关的职责和控制,而Runnable则负责逻辑执行单元的部分。
5,Thread与JVM虚拟机栈:
1)Thread与Stacksize
一般情况下,创建线程的时候不会手动指定栈内存的地址空间字节数组,统一通过xss参数设定,stacksize越大则代表着正在线程内方法调用递归的深度就越深,stacksize越小就代表着创建的线程数量越多。
2)JVM 内存结构:https://blog.csdn.net/sanhewuyang/article/details/95380620
3)Thread与虚拟机栈:可以粗略的认为Java进程的内存大小为:堆内存+线程数量*栈内存。
package com.liruilong.concurrent;

import java.util.concurrent.TimeUnit;
import java.util.concurrent.atomic.AtomicInteger;

/**
 * @Author: Liruilong
 * @Date: 2019/7/26 19:41
 */
public class ThreadCounter extends Thread {
    // 可以用原子方式更新的 int 值。
    final static AtomicInteger counter = new AtomicInteger(0);
    @Override
    public void run(){
        try{
            System.out.println("The" + counter.getAndDecrement() + "therad be ctrate.");// 以原子方式将当前值减 1。
            TimeUnit.MINUTES.sleep(10);//休眠10分钟

        }catch (InterruptedException e){
            e.printStackTrace();
        }
    }
    public static void main(String[] args){
        try{
            while (true){
                new ThreadCounter().start();
            }
        }catch (Throwable e){
            System.out.println("failed At=>"+ counter.get());// 获取当前值。
        }
    }
}
线程数量 = 最大地址空间(MaxProcessMemory) - JVM 堆内存 - 系统保留内存(ReservedOsMemory)/ThreadStackSize(XSS)
6,守护线程
1)什么是守护线程
守护线程的设置调用setDaemon方法,true代表守护线程,false代表正常线程。线程的守护属性与父子关系有关,即父线程为正常线程那么子线程即为正常线程,反之亦然。setDaemon方法可以只在线程启动之前生效。
通常由JVM启动,运行在后台处理任务,比如垃圾回收等,用户启动线程执行结束或者JVM结束时,会等待所有的非守护线程执行结束,但是不会因为守护线程的存在而影响关闭。
创建两个线程,一个由JVM启动的main线程,一个自己创建,当不设置为守护线程时,进程不会退出,当设置之后,程序会退出。
package com.liruilong.concurrent;

import java.util.concurrent.TimeUnit;

/**
 * @Author: Liruilong
 * @Date: 2019/7/26 21:27
 */
public class DaemonThread {
    // InterruptedException 当线程在活动之前或活动期间处于正在等待、休眠或占用状态且该线程被中断时,抛出该异常。
    public static void main(String[] args)throws InterruptedException {

        Thread thread = new Thread(() -> {
                while (true){
                    try{
                        TimeUnit.MILLISECONDS.sleep(1);
                    }catch (InterruptedException e){
                        e.printStackTrace();
                    }
                }
        });
       // thread.setDaemon(true);
        thread.start();
        TimeUnit.SECONDS.sleep(2);

    }
}
2)守护线程的作用
如果在JVM中进程中没有一个非守护线程,那么JVM会退出,即守护线程具备自动结束生命周期的特性,一般用于执行后台任务,也被称为后台线程。
第三章,Thread API的详细介绍
1,线程的sleep方法
1)sleep方法
public static native void sleep(long millis) throws InterruptedException
public static void sleep(long millis, int nanos) throws InterruptedException
sleep方法会使当前线程进入指定的毫秒数的休眠,暂停执行,并且不会放弃monitor锁的所有权,Thread.sleep只会导致当前线程进入指定的休眠。
3)使用TimeUnit替代Thread.sleep方法
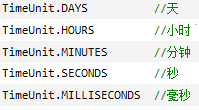 在JDK1.5后引入了一个枚举类TimeUnit,对sleep方法提供了很好的封装。
2,线程的yield方法
1)yield方法
属于一种启发式方法,即提醒调度器我愿意放弃当前的CPU资源,如果cup的资源不紧张,会忽略,即会使当前线程从Running状态到Runnable状态。
2)yield与sleep方法的区别:
- sleep会导致当前线程暂停指定的时间,没有CPU的时间消耗
- yield只会对CUP调度器进行建议,如果没有忽略,会导致线程上下文切换。
- sleep会使线程短暂的block,会在给定的时间内释放CUP资源。
- yield会使Running 状态的线程到达Runnable状态。(没有忽略)
- 一个线程sleep另一个线程调用interrupt会捕捉到终断的信号,yield不会。
3,设置线程的优先级
public final void setPriority(int newPriority)
public final int getPriority() 1)线程的优先级:
线程的优先级不能小于1也不能大于10,如果指定的线程优先级大于线程所在的group的优先级,那么指定优先级失效,变成GROUP的最大优先级,
package com.liruilong.concurrent;

import javax.security.auth.callback.Callback;

/**
 * @Author: Liruilong
 * @Date: 2019/7/27 10:59
 */
public class ThreadPriority {

    public static void main(String[] args) {


        Thread threads = Thread.currentThread();
        ThreadGroup threadGroup = threads.getThreadGroup();
        threadGroup.setMaxPriority(5);
        System.out.println("主线程的优先级:"+threads.getPriority());
        Thread thread =new Thread(threadGroup,() ->{
            System.out.println("测试线程优先级:");
        });
        thread.setPriority(10);
        thread.start();

        System.out.println("优先级是否相等:"+(threads.getPriority()==thread.getPriority()));
        System.out.println("是否为同一个组:"+(thread.getThreadGroup()==threads.getThreadGroup()));
    }
}
线程的默认优先级和它的父类保持一致,一般情况下为5,
4,获取线程的Id
public long getId()线程的Id在整个JVM进程中都是唯一的。
5,获取当前线程
public static native Thread currentThread();
//即返回当前执行线程的引用,
package com.liruilong.concurrent;

/**
 * @Author: Liruilong
 * @Date: 2019/7/27 11:32
 */
public class currentThread {

    public static void main(String[] args) {

        Thread thread = new Thread(){
            @Override
            public void run(){
                System.out.println(Thread.currentThread() == this);
            }
        };
        thread.start();
        String name = Thread.currentThread().getName();
        System.out.println("main".equals(name));
    }
}
6,设置线程上下文类加载器
//获取线程上下文的类加载器  如果没有修改线程的上下文的类加载器,则保持与父线程同样的类加载器
public ClassLoader getContextClassLoader()
//设置该线程的类加载器
public void setContextClassLoader(ClassLoader cl)
7,线程的interrupt方法
private native void interrupt0();

public void interrupt()

public static boolean interrupted()

public boolean isInterrupted()
1)interrupt方法
调用一些方法(也称可中断方法)会使的当前线程进入阻塞状态,而调用当前线程的interrupt方法就可以打断阻塞。并不是等于该线程结束,仅仅是打断了当前线程的阻塞状态。线程阻塞被打断会抛出InterruptException异常。
- Object 的wait()方法
- Thread的sleep()方法
- Thread的join()方法
- InterruptibleChannel的io操作。
- Selector的Warkeup方法。
- 其他方法
package com.liruilong.concurrent;

import java.util.concurrent.TimeUnit;

/**
 * @Author: Liruilong
 * @Date: 2019/7/28 12:43
 */
public class ThreadInterrupt {

    public static void main(String[] args)throws  InterruptedException{
        Thread thread = new Thread(() ->{
            try{
                TimeUnit.MINUTES.sleep(1);
            }catch (InterruptedException e){
                e.printStackTrace();
            }
        });
        thread.start();
        TimeUnit.MILLISECONDS.sleep(2);
        thread.interrupt();
    }
}
在一个线程内部存在一个名为interrupt flag的标识,如果一个线程被interrupt,那么他的flag将被设置,但是如果当前线程正在执行可中断方法被阻塞,调用interrupt方法将其中断,则会导致flag被清除。如果一个线程已经是死亡状态,那么尝试对其的interrupt会被直接忽略。
2)isIntrrupted
用于判断当前线程是否被中断,即该方法仅是对interrupt标识的一个判断,并不会影响标识发生的任何改变,
3)interrupted
interrupted是一个静态方法,虽然也用于判断当前线程是否被中断,但是他和成员方法isInterrupted有很大的区别,调用该方法会直接擦除掉线程的interrupted标识,如果当前线程被打断了,那么第一次调用interrupted方法会返回true。并且立即擦除了interrupt标识,,第二次包括以后都会返回false。除非被在次打断。
package com.liruilong.concurrent;

import java.util.concurrent.TimeUnit;

/**
 * @Author: Liruilong
 * @Date: 2019/7/28 23:02
 */
public class Threadinterrupted {

    public static void main(String[] args)throws InterruptedException {

        Thread thread = new Thread(){
            @Override
            public void run(){
                while (true){
                    System.out.println(Thread.interrupted());
                }
            }
        };
        thread.setDaemon(true);
        thread.start();
        TimeUnit.MILLISECONDS.sleep(2);
        thread.interrupt();
    }
}

//运行结果
false
false
false
false
true
false
false
false
如果一个线程在没有执行可中断方法之前就被打断,那么其接下来将执行可中断方法会立即中断,
package com.liruilong.concurrent;

import java.io.PrintWriter;
import java.util.concurrent.TimeUnit;

/**
 * @Author: Liruilong
 * @Date: 2019/7/28 23:02
 */
public class Threadinterrupted {

    public static void main(String[] args)throws InterruptedException {

        System.out.println(Thread.interrupted());
        Thread.currentThread().interrupt();
        System.out.println(Thread.currentThread().isInterrupted());
        try{
        TimeUnit.MINUTES.sleep(1);
        }catch (InterruptedException e){

            e.printStackTrace();
        }

    }
}
运行结果
false
true
java.lang.InterruptedException: sleep interrupted
	at java.lang.Thread.sleep(Native Method)
	at java.lang.Thread.sleep(Thread.java:340)
	at java.util.concurrent.TimeUnit.sleep(TimeUnit.java:386)
	at com.liruilong.concurrent.Threadinterrupted.main(Threadinterrupted.java:32)
8,线程的join
是一个可中断方法,即有线程执行了对当前线程的interrupt操作,它也会捕捉到终断信号,并且擦除线程的interrup1t标识,抛出异常。
public final void join() throws InterruptedException

public final synchronized void join(long millis, int nanos)
    throws InterruptedException

public final synchronized void join(long millis)
throws InterruptedException 1)线程的Join方法:
join线程A,会使当前线程进入B进入等待状态,知道线程A结束生命周期,或者到达给定的时间,那么这期间B线程一直处于BLOCKED状态。二而不是线程A。
package com.liruilong.concurrent;

import java.util.List;
import java.util.concurrent.TimeUnit;
import java.util.stream.Collectors;
import java.util.stream.IntStream;

/**
 * @Author: Liruilong
 * @Date: 2019/7/30 8:35
 */
public class TreadJoin {

    /**
     * @Author Liruilong
     * @Description 构造一个简单的线程,每个线程实现简单的输出
     * @Date 8:40 2019/7/30
     * @Param [seq]
     * @return java.lang.Thread
     **/
    private static Thread create(int seq){

        return new Thread(() ->{
            for (int i = 0; i < 10; i++){
                System.out.println(Thread.currentThread().getName()+"#"+i);
                shortSleep();
            }
        },String.valueOf(seq));
    }

    /**
     * @Author Liruilong
     * @Description 线程休眠
     * @Date 8:40 2019/7/30
     * @Param []
     * @return void
     **/
    private static void shortSleep() {
        try{
            TimeUnit.SECONDS.sleep(1);
        }catch (InterruptedException e){
            e.printStackTrace();
        }
    }


    public static void main(String[] args) throws InterruptedException {
        // collect对此流的元素执行mutable reduction操作。 可变减少是减少值是可变结果容器的缩减值,
        // 例如ArrayList ,并且通过更新结果的状态而不是通过替换结果来合并元素。
        List threads = IntStream.range(1,3).mapToObj(TreadJoin::create).collect(Collectors.toList());
        threads.forEach(Thread::start);
        for (Thread thread : threads){
            thread.join();
        }
        for (int i = 0; i < 10; i++){
            System.out.println(Thread.currentThread().getName()+"#"+i);
            shortSleep();
        }
    }
}
Join方法实战:
有三个线程T1,T2,T3,怎么确保他们按顺序执行。利用join方法
public static void main(String[] args) throws InterruptedException {
        Thread thread0 = new Thread(){
            @Override
            public void run(){
                System.out.println(this.getName());
            }
        };
        Thread thread1 = new Thread(){
            @Override
            public void run(){
                try {
                    thread0.join();
                } catch (InterruptedException e) {
                    e.printStackTrace();
                }
                System.out.println(this.getName());
            }
        };
        Thread thread2 = new Thread(){
            @Override
            public void run(){
                try {
                    thread1.join();
                } catch (InterruptedException e) {
                    e.printStackTrace();
                }
                System.out.println(this.getName());
            }
        };
        thread2.start();
        thread1.start();
        thread0.start();
    }
9,如何关闭一个线程
1)正常的关闭
- 线程运行结束生命周期正常结束,
- 捕获中断信号,关闭线程
package com.liruilong.concurrent; import com.sun.scenario.animation.shared.TimerReceiver; import java.sql.Time; import java.util.concurrent.TimeUnit; /** * @Author: Liruilong * @Date: 2019/7/30 10:05 */ public class InterruptThreadExit { public static void main(String[] args)throws InterruptedException { Thread t = new Thread(){ @Override public void run(){ System.out.println("I will start work"); while (!isInterrupted()){ System.out.println("// working!!!!"); // working!!!! } System.out.println(" I will be exiting."); } }; t.start(); TimeUnit.MILLISECONDS.sleep(3); System.out.println("system will be shutdow."); t.interrupt(); } } - 使用volition开关控制。当interrupt flag标识被擦除时,或者逻辑单元中不会调用任何可中断的方法,使用volition修饰的开关flag关闭线程。
package com.liruilong.concurrent;

import java.util.concurrent.TimeUnit;
/**
 * @Author: Liruilong
 * @Date: 2019/7/30 10:32
 */
public class FlagThreadExit {

    static  class MyTask extends Thread{
        private volatile  boolean closed = false;
        @Override
        public void run(){
            System.out.println("I will start work");
            while (!closed && !isInterrupted()){
                System.out.println("runing");
            }
            System.out.println("exit runing");
        }
        public void close(){
            this.closed = true;
            this.interrupt();
        }
        public static void main(String[] args)throws InterruptedException {
            MyTask myTask = new MyTask();
            myTask.start();
            TimeUnit.MILLISECONDS.sleep(1);
            System.out.println("system will be shutdow!");
            myTask.close();
        }
    }
}
2)异常退成
在一个线程的执行单元中,是不允许抛出checked异常的,无论Thread的run方法,还是Runnable都不行。将checked异常封装为unchecked异常(RuntimeException)抛出而结束线程的生命周期。
3)进程假死
第四章,线程安全与数据同步
1,数据同步
2,初识synchronization关键字
1)什么是synchronization
synchroniztion提供一种排他机制,也就是说同一时间只能有一个线程执行某些操作。
- synchronization提供一种锁的机制,能够共享变量的互斥访问,从而防止数据不一致的问题,
- synchronization关键字包括monitor exit 和monitor enter两个JVM指令,它能够保证在任何情况下monitor enter 成功之前都必须从主内存中获取数据,而不是从缓存中,在monitor exit 运行成功后,共享变量被更新后的值将被刷入主内存。
- synchronization的指令严格遵守java happens-before规则,一个monitor exit指令之前必须有一个monitor enter。
2)synchronization关键字的用法:
synchronization能够对方法和代码块进行修饰,而不能对class以及变量进行修饰。
- 同步方法
- 同步代码块
package com.liruilong.concurrent;

import java.util.concurrent.TimeUnit;

/**
 * @Author: Liruilong
 * @Date: 2019/7/15 23:14
 */
public class TicketWindow implements Runnable {
    //最多受理50笔业务
    private static final int MAX = 50;
    private   int index = 1;
    private final static Object MUTEX = new Object();
    @Override
    public void run(){

        synchronized (MUTEX){
        while (index <= MAX){
            System.out.println("柜台:"+Thread.currentThread()+"当前的号码是:"+(index++));
            try {
                TimeUnit.NANOSECONDS.sleep(100);
            }catch( InterruptedException e){
                e.printStackTrace();
            }
        }
        }
    }

    public static void main(String[] args) {
        final TicketWindow task = new TicketWindow();

        Thread thread1 = new Thread(task,"1");
        Thread thread2 = new Thread(task,"2");
        Thread thread3 = new Thread(task,"3");
        Thread thread4 = new Thread(task,"4");
        thread1.start();
        thread2.start();
        thread3.start();
        thread4.start();

    }
}
3,深入synchronization关键字
1)线程堆栈分析,
synchronized关键字提供一种互斥机制,也就是在同一时刻,只能由一个线程访问同步资源,很多资料,书籍将synchronization称为锁。即线程获取和与mutex关联的monitor锁。
2)JVM指令分析
使用JDK命令javap反编译,发现monitor enter和monitor exit 是成对现的,
- Monitorenter:每个对象都与一个monitor相关联,一个monitor的lock的锁只能被一个线程在同一时间获得。在一个线程尝试获得与对象关联的monitor的所有权时
- 如果monitor的计数器为零,则意味着monitor的lock还没有被获得,如果被某个线程获得,就计数器加一。该线程就是这个monitor的所有者了,
- 如果一个已经拥有该monitor所有权上的线程重入,会导致monitor计数器被再次累加。
- 如果monitor已经被其他线程所拥有,在其他线程尝试获取该monitor的所有权的时候,会被陷入阻塞状态,直到计数器为0,才会尝试获取monitor的所有权。
- Monitorexit,释放monitor的所有权,
- 想要释放对某个对象的关联的monitor的所有权的前提是曾经获得过monitor的所有权,
- 释放monitor的所有权,将monitor的计数器减一,如果计数器为0时,即线程不在拥有该monitor的所有权。
- 释放掉monitor后,被monitor block线程将再次获的monitor的所有权。
3)使用synchronization需注意的问题:
- 与monitor关联的对象不能为空。
- synchronization的作用域不能太大。
- 不同的monitor企图锁相同的方法。
package com.liruilong.concurrent; /** * @Description : * @Author: Liruilong * @Date: 2019/8/2 16:40 */ public class Task implements Runnable{ private final Object MUTEX = new Object(); @Override public void run() { synchronized (MUTEX){} } public static void main(String[] args) { for (int i = 0; i < 5; i++){ new Thread(Task::new).start(); } } } - 多个锁的交叉导致死锁
4,This Monitor和Class Monitor详细简绍
1)this monitor:synchronized关键字修饰同一个实例的不同方法,那么与之对应的monitor也是同一个。
package com.liruilong.concurrent;


import java.util.concurrent.TimeUnit;

import static  java.lang.Thread.currentThread;
/**
 * @Description :
 * @Author: Liruilong
 * @Date: 2019/8/21 8:45
 */
public class ThisMonitor {

    public static void main(String[] args) {
        ThisMonitor thisMonitor = new ThisMonitor();
        new Thread(thisMonitor::method1, "T1").start();
        new Thread(thisMonitor::method2, "T2").start();
    }

    public synchronized void  method1()  {

        System.out.println(currentThread().getName() +" enter to method1");
        try {
            TimeUnit.MINUTES.sleep(10);
        } catch (InterruptedException e) {
            e.printStackTrace();
        }
    }

    public synchronized  void  method2() {

        System.out.println(currentThread().getName() + "enter to method2");
        try {
            TimeUnit.MINUTES.sleep(10);
        } catch (InterruptedException e) {
            e.printStackTrace();
        }
    }
}
package com.liruilong.concurrent;
import java.util.concurrent.TimeUnit;
import static java.lang.Thread.currentThread;
/**
* @Description :
* @Author: Liruilong
* @Date: 2019/8/21 8:45
*/
public class ThisMonitor {
public static void main(String[] args) {
ThisMonitor thisMonitor = new ThisMonitor();
new Thread(thisMonitor::method1, "T1").start();
new Thread(thisMonitor::method2, "T2").start();
}
public synchronized void method1() {
System.out.println(currentThread().getName() +" enter to method1");
try {
TimeUnit.MINUTES.sleep(10);
} catch (InterruptedException e) {
e.printStackTrace();
}
}
public void method2() {
synchronized (this) {
System.out.println(currentThread().getName() + "enter to method2");
try {
TimeUnit.MINUTES.sleep(10);
} catch (InterruptedException e) {
e.printStackTrace();
}
}
}
}
使用synchronized关键字同步类的不同的实例方法,争抢的是同一个monitor的lock。而关联的引用则是ThisMonitor的实例引用。
2)class monitor:两个类方法静态方法分别使用synchronized进行同步。
package com.liruilong.concurrent;

import java.util.concurrent.TimeUnit;

import static java.lang.Thread.currentThread;

/**
 * @Description : 基于Classmonitor的实例
 * @Author: Liruilong
 * @Date: 2019/8/21 10:14
 */
public class ClassMonitor {

    public static void main(String[] args) {
        new Thread(ClassMonitor::method1).start();
        new Thread(ClassMonitor::method2).start();
    }
    public static synchronized void  method1()  {
        System.out.println(currentThread().getName() +" enter to method1");
        try {
            TimeUnit.MINUTES.sleep(10);
        } catch (InterruptedException e) {
            e.printStackTrace();
        }
    }
    public static  synchronized void  method2() {
        synchronized (ClassMonitor.class) {
            System.out.println(currentThread().getName() + "enter to method2");
            try {
                TimeUnit.MINUTES.sleep(10);
            } catch (InterruptedException e) {
                e.printStackTrace();
            }
        }
    }
}
package com.liruilong.concurrent;

import java.util.concurrent.TimeUnit;

import static java.lang.Thread.currentThread;

/**
 * @Description : 基于Classmonitor的实例
 * @Author: Liruilong
 * @Date: 2019/8/21 10:14
 */
public class ClassMonitor {

    public static void main(String[] args) {
        new Thread(ClassMonitor::method1).start();
        new Thread(ClassMonitor::method2).start();
    }
    public static synchronized void  method1()  {
        System.out.println(currentThread().getName() +" enter to method1");
        try {
            TimeUnit.MINUTES.sleep(10);
        } catch (InterruptedException e) {
            e.printStackTrace();
        }
    }
    public static  void  method2() {
        synchronized (ClassMonitor.class) {
            System.out.println(currentThread().getName() + "enter to method2");
            try {
                TimeUnit.MINUTES.sleep(10);
            } catch (InterruptedException e) {
                e.printStackTrace();
            }
        }
    }
}
使用synchronized同步的某个类的静态方法争抢的也是同一个monitor的lock,该monitor关联的引用是ClassMonitor.class实例。
5,程序死锁的元婴以及如何诊断。
1)程序死锁
- 交叉锁可导致程序出现死锁。线程A持有R1的锁等待获取R2的锁,线程B持有的R2的锁等待获取R1的锁,
-
package com.liruilong.concurrent; import static java.lang.Thread.currentThread; /** * @Description : * @Author: Liruilong * @Date: 2019/8/24 15:42 */ public class DeadLock { private final Object MUTEX_READ = new Object(); private final Object MUTEX_WRITE = new Object(); public void read(){ synchronized (MUTEX_READ){ System.out.println(currentThread().getName() + " get read lock"); synchronized (MUTEX_WRITE){ System.out.println(currentThread().getName() + " get wried lock"); } System.out.println(currentThread().getName() + " release WRITE lock"); } System.out.println(currentThread().getName() + " release READ lock"); } public void wried(){ synchronized (MUTEX_WRITE){ System.out.println(currentThread().getName() + " get wried lock"); synchronized (MUTEX_READ){ System.out.println(currentThread().getName() + " get read lock"); } System.out.println(currentThread().getName() + " release READ lock"); } System.out.println(currentThread().getName() + " release WRITE lock"); } public static void main(String[] args) { final DeadLock deadLock = new DeadLock(); new Thread(() ->{ while (true){ deadLock.read(); } },"READ_Thread").start(); new Thread(() ->{ while (true){ deadLock.wried(); } }, "WEIED_Thread").start(); } } - 内存不足,两个线程T1和T2,执行某个任务,如果每个线程的执行单元都需要30Mb的内存,T1已经获取10MB,T2已经获取20MB,那么两个线程有可能都在等待彼此能够释放内存资源。
- 一问一答的数据交换:服务器开启某个端口,等待客户端访问,客户端发送请求立即等待接受,由于某种原因服务器错过了客户端的请求,任然在等待一问一答的交互模式,此时服务器和客户端都在等待发送请求。
- 数据库锁:某个线程执行了for update语句退出了事务,其他的线程访问该数据库时将陷入死锁。
- 文件锁:某线程获得了文件锁意外退出,其他读取文件的线程也将会进入死锁直到系统释放文件句柄资源。
- 死循环引起的死锁:程序进入自循环,cpu占有率居高不下,这种死锁一般称为系统假死。
2)程序死锁举例
package com.liruilong.concurrent;

import com.HashMap_Demo.HashMap;

/**
 * @Description :
 * @Author: Liruilong
 * @Date: 2019/8/24 16:02
 */
public class HashMapDeadLock {
    private final HashMap map = new HashMap<>();
    public void add(String key, String vlaue){
        this.map.put(key, vlaue)
    }

    public static void main(String[] args) {
        final  HashMapDeadLock html = new HashMapDeadLock();
        for (int x = 0; x < 2; x++){
            new Thread( () -> {
                for (int i = 1; i < Integer.MAX_VALUE; i++){
                    html.add(String.valueOf(i), String.valueOf(i));
                }
            }).start();
        }
    }
}
第五章,线程间的通行
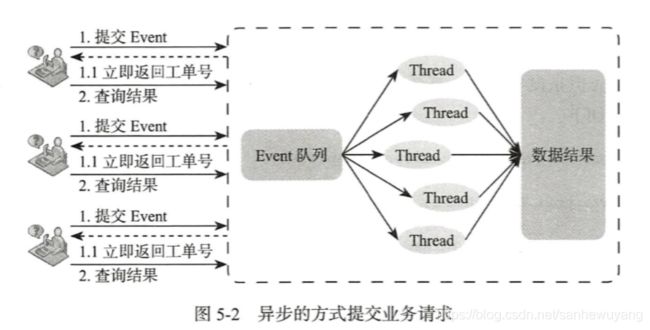
1,同步阻赛与异步非阻塞
1)同步阻塞消息处理
2)异步非阻塞消息处理
2,单线程间通信
package com.liruilong.concurrent;

import java.util.LinkedList;
import static java.lang.Thread.currentThread;
/**
 * @Description : 实现一个事件队列,
 * @Author: Liruilong
 * @Date: 2019/8/24 16:42
 */
public class EventQueue {
    private final int max;
    static class Event{}
    private final LinkedList eventQueue = new LinkedList<>();

    private  final static int DEFAULT_MAX_EVENT = 10;
    public EventQueue(){
       this(DEFAULT_MAX_EVENT);
    }
    public EventQueue(int max){
        this.max = max;
    }
    public void offer(Event event){
        synchronized (eventQueue){
            // 如果队列满了,进入   wait set 线程休息室或线程池。释放eventQueue锁。
            if (eventQueue.size() >= max){
                try {
                    console("the queue is empty.");
                    eventQueue.wait();
                }catch (InterruptedException e){
                    e.printStackTrace();
                }
            }
            console("the new event is submitted");
            // 在最后添加
            eventQueue.addLast(event);
            eventQueue.notify();
        }
    }
   //
    public  Event take(){
        synchronized (eventQueue){
            // 如果evenQueue为空,进入等待状态, 进入 wait set 里。
            if (eventQueue.isEmpty()){
                try{
                    console("the    queue is empty.");
                    eventQueue.wait();
                }catch (InterruptedException e){
                    e.printStackTrace();
                }
            }
            // 在开头移除
            Event event = eventQueue.removeFirst();
            // 唤醒等待锁的其他线程进入
            this.eventQueue.notify();
            console("the event " + event + "is handled");
            return event;
        }
    }
    private  void console(String message){
        System.out.printf("%s:%s\n",  currentThread().getName(), message );
    }

}


package com.liruilong.concurrent;

import java.util.concurrent.TimeUnit;

/**
 * @Description : 线程测试
 * @Author: Liruilong
 * @Date: 2019/8/24 17:12
 */
public class EventClient {
    public static void main(String[] args) {
        final  EventQueue eventQueue = new EventQueue();
        new Thread(() ->{
           for (;;){
               eventQueue.offer(new EventQueue.Event());
           }
        }, "Producre").start();
        new Thread( () -> {
            for (;;){
                eventQueue.take();
                try {
                    TimeUnit.MILLISECONDS.sleep(10);
                }catch (InterruptedException e){
                    e.printStackTrace();
                }
            }
        }, "Consumer").start();
    }
}
3,多线程间通信
1)生产者消费者模式。不使用阻塞队列实现
package com.liruilong.concurrent;

import java.util.LinkedList;
import static java.lang.Thread.currentThread;
/**
 * @Description : 实现一个事件队列,
 * @Author: Liruilong
 * @Date: 2019/8/24 16:42
 */
public class EventQueue {
    private final int max;
    static class Event{}
    private final LinkedList eventQueue = new LinkedList<>();

    private  final static int DEFAULT_MAX_EVENT = 10;
    public EventQueue(){
       this(DEFAULT_MAX_EVENT);
    }
    public EventQueue(int max){
        this.max = max;
    }

    public void offer(Event event){
        synchronized (eventQueue){
            // 如果队列满了,进入   wait set 线程休息室或线程池。释放eventQueue锁。
            while (eventQueue.size() >= max){
                try {
                    console("the queue is empty.");
                    eventQueue.wait();
                }catch (InterruptedException e){
                    e.printStackTrace();
                }
            }
            console("the new event is submitted");
            // 在最后添加
            eventQueue.addLast(event);
            eventQueue.notifyAll();
        }
    }
   //
    public  Event take(){
        synchronized (eventQueue){
            // 如果evenQueue为空,进入等待状态, 进入 wait set 里。
            while (eventQueue.isEmpty()){
                try{
                    console("the    queue is empty.");
                    eventQueue.wait();
                }catch (InterruptedException e){
                    e.printStackTrace();
                }
            }
            // 在开头移除
            Event event = eventQueue.removeFirst();
            // 唤醒等待锁的其他线程进入
            this.eventQueue.notifyAll();
            console("the event " + event + "is handled");
            return event;
        }
    }
    private  void console(String message){
        System.out.printf("%s:%s\n",  currentThread().getName(), message );
    }

}


package com.liruilong.concurrent;

import java.util.concurrent.TimeUnit;

/**
 * @Description : 线程测试
 * @Author: Liruilong
 * @Date: 2019/8/24 17:12
 */
public class EventClient {
    public static void main(String[] args) {
        final  EventQueue eventQueue = new EventQueue();
        new Thread(() ->{
           for (;;){
               eventQueue.offer(new EventQueue.Event());
           }
        }, "Producre").start();
        new Thread( () -> {
            for (;;){
                eventQueue.take();
                try {
                    TimeUnit.MILLISECONDS.sleep(10);
                }catch (InterruptedException e){
                    e.printStackTrace();
                }
            }
        }, "Consumer").start();
    }
}
2)使用阻塞队列实现
package com.liruilong.concurrent.Producer_Consuner;

import java.util.concurrent.BlockingQueue;

/**
 * @Description : 消费者
 * @Author: Liruilong
 * @Date: 2019/8/22 7:56
 */
public class Consumer  implements Runnable{

    private final  BlockingQueue queue;
    public Consumer(BlockingQueue queue) {
        this.queue = queue;
    }
    @Override
    public void run() {
        try {
            // 队列为空,阻塞当前线程
            String temp = queue.take();
            System.out.println("消费产品:" + temp);
        }catch (InterruptedException e){
            e.printStackTrace();
        }
    }
}


package com.liruilong.concurrent.Producer_Consuner;

import javax.swing.text.StyledEditorKit;
import java.util.concurrent.BlockingQueue;

/**
 * @Description : 生产者
 * @Author: Liruilong
 * @Date: 2019/8/22 7:24
 */
public class Producer implements Runnable{

    private final   BlockingQueue queue;

    public Producer(BlockingQueue queue){
        this.queue = queue;
    }
    @Override
    public void run() {
        try {
            String temp = "产品:"+Thread.currentThread().getName();
            System.out.println("生产产品:  "+Thread.currentThread().getName());
            queue.put(temp); //队列已满,阻塞队列。
        }catch (InterruptedException e){
            e.printStackTrace();
        }
    }
}


package com.liruilong.concurrent.Producer_Consuner;

import java.util.concurrent.BlockingQueue;
import java.util.concurrent.LinkedBlockingQueue;

/**
 * @Description :  生产者消费者测试
 * @Author: Liruilong
 * @Date: 2019/8/22 8:01
 */
public class Test {
    public static void main(String[] args) {
        // 一个基于已链接节点的、任选范围的阻塞双端队列。
        BlockingQueue  query = new LinkedBlockingQueue<>(2);
        Consumer consumer = new Consumer(query);
        Producer producer = new Producer(query);
        for (int i = 0; i < 5; i ++){
            new Thread(producer,"Producer" + (i + 1)).start();

            new Thread(consumer, "Consumer" + (i + 1)).start();
        }
    }


}
3)jkd 1.6API例子
package com.liruilong.concurrent.Producer_Consuner;

import java.util.concurrent.BlockingQueue;
import java.util.concurrent.LinkedBlockingDeque;

/**
 * @Description :
 * @Author: Liruilong
 * @Date: 2019/8/22 8:43
 */
@SuppressWarnings("all")
public class Code {

    public static void main(String[] args) {

        new Code().new Setup().main();
    }

    class Producer implements Runnable {
        private final BlockingQueue queue;
        Producer(BlockingQueue q) { queue = q; }
        public void run() {
            try {
                while(true) {
                    queue.put(produce());
                }
            } catch (InterruptedException ex) {
                ex.printStackTrace();
            }
        }
        Object produce() {
            System.out.println("生产商品啦!");
            return "商品";
        }
    }
    class Consumer implements Runnable {
        private final BlockingQueue queue;
        Consumer(BlockingQueue q) { queue = q; }
        public void run() {
            try {
                while(true) {
                    consume(queue.take());
                }
            } catch (InterruptedException ex) {
                ex.printStackTrace();
            }
        }
        void consume(Object x) {

            System.out.println("商品被消费掉啦!");
        }
    }
    class Setup {
        void main() {
            BlockingQueue q = new LinkedBlockingDeque(4);
            // 生产者
            Producer p = new Producer(q);
            // 消费者
            Consumer c1 = new Consumer(q);
            Consumer c2 = new Consumer(q);

            Thread threadProducer = new Thread(p);
            // while ( !threadProducer.isInterrupted()) {
                while ( !Thread.interrupted()) {
                // 生产商品
                threadProducer.start();
                // 消费商品
                new Thread(c1).start();
                new Thread(c2).start();
                threadProducer.interrupt();
            }
        }
    }

}
4)线程休息室wait set:
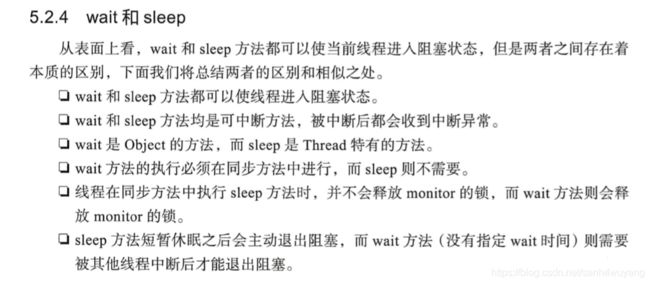
线程在调用某个对象的wait方法之后都会被加入与该对象monitor关联的wait set中,并且释放monitor的所有权。若干个线程调用该monitor的notify方法之后,其中一个线程会从wait set中弹出。
4,自定义的显示锁BoolenLock
synchronized关键字提供了一种排他式的数据同步机制,某个线程在获取monitor lock可能会被阻塞,他只允许线程串行通过。缺陷:
- 无法控制阻塞的时长
- 阻塞不可中断。
第六章,ThreadGroup详细讲解
1,Thread与ThreadGroup
2,创建ThreadGroup
 // 获取当前线程组
            ThreadGroup currentGroup = Thread.currentThread().getThreadGroup();
        // 创建一个线程组
            ThreadGroup group = new ThreadGroup("Group1");
            System.out.println("当前父线程组为cuurentGroup:"+(group.getParent() == currentGroup));
            // 创建指定Group为当前线程组的父线程组
            ThreadGroup group1 = new ThreadGroup(group,"Group");
            System.out.println( "当前" +( group1.getParent() == group));
3,复制Thread数组和ThreadGroup数组
ThreadGroup mainGroup = Thread.currentThread().getThreadGroup();
             // activeCont()获取当前活动线程的数量
            Thread[] list = new Thread[mainGroup.activeCount()];
             // 将当前组的全部线程复制到线程组list里。
            int recurseSize = mainGroup.enumerate(list);
            System.out.println(recurseSize);
            // 会将ThreadGroup中的active线程全部复制到Thread数组中,
            recurseSize = mainGroup.enumerate(list,false);
            System.out.println(recurseSize);
4,ThreadGroup操作
// 获取活跃线程
            mainGroup.activeCount();
            // 获取活跃group中活跃的group
            mainGroup.activeGroupCount();
            // 获取/设置 group的优先级
            mainGroup.setMaxPriority(2);
            mainGroup.getMaxPriority();
            // 获取组名
             mainGroup.getName();
            // 获取父组
            mainGroup.getParent();
            // 输出活跃线程信息
            mainGroup.list();
第七章, Hook线程以及捕获线程执行异常
1,获取线程运行时异常
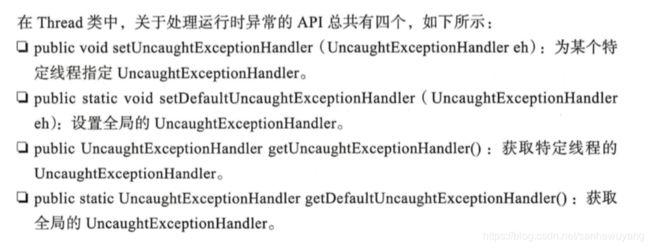
线程在执行单元中是不允许抛出checked异常的,线程运行是在自己的上下文,派生它的线程将无法直接获取出现的异常信息。Java提供了UncaughtExceptionHandler接口,当线程在运行时出现异常时,会回调UncaughtExceptionHandl接口,
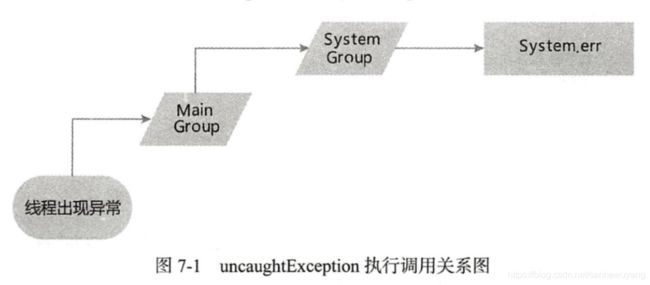
线程出现异常时,会向上寻找组的uncaughtException方法。
2,注入钩子线程
JVM进程退出是由于JVM进程中没有活跃的非守护线程,或者受到系统中断信号,向JVM程序中注入Hook线程,在JVM进程退出时候Hook线程会启动执行,通过Runtime可以注入多个Hook线程。
package com.liruilong.concurrent;

import java.util.concurrent.TimeUnit;

/**
 * @Description :  Hook 线程
 * @Author: Liruilong
 * @Date: 2019/8/25 15:11
 */
public class ThreadHook {
    public static void main(String[] args) {
        // 向Java代码注入Hook线程
        Runtime.getRuntime().addShutdownHook(new Thread(){
            @Override
            public  void run(){
                try{
                    System.out.println("The hook thread 1 is running.");
                    TimeUnit.SECONDS.sleep(1);
                }catch (InterruptedException e){
                    e.printStackTrace();
                }
                System.out.println("The hook thread 1 will exit.");
            }
        });

    }
}
第八章,线程池原理以及自定义的线程池
1,线程池原理
所谓线程池,通俗的讲就是有一个池子,里面存放创建好的线程,当有任务提交给线程池执行时,池子中的某个线程会自动执行该任务。
即一个完整的线程池应该要有:任务队列:
- 用于缓存提交的任务,
- 线程数量管理功能,一个线程池必须能够管理和控制线程数量,创建线程池的初始化的线程数量init,线程池自动扩充时最大的线程数量max,在线程池空闲时需要释放线程但是也要维护一定数量的活跃线程数量。
- 任务拒绝策略:如果线程数量以达到上限且任务队列已满,则需要有相应的拒绝策略来通知提交者
- 线程工厂,主要用于指定个性化的制定线程,比如线程名,所属组等。
- QueneSize:任务队列主要用与存放提交的Runnnable,但是为了防止内存溢出,需要使用linit数量对其进行控制。
- Keepedlive时间:该时间主要用于决定线程各个重要参数的维护时间。
2,线程池实现
3,线程池的应用
package com.liruilong.concurrent.ExcutorTest;

import java.util.concurrent.ExecutorService;
import java.util.concurrent.Executors;
import java.util.concurrent.ThreadPoolExecutor;
import java.util.concurrent.atomic.AtomicInteger;
/**
 * @Description :
 * @Author: Liruilong
 * @Date: 2019/8/25 20:31
 */
public class ExectorTest {

    private static boolean exeflag = true;

    public static void main(String[] args) {
        // 创建ExecutotService连接池创建固定的10个人初始的线程。
        ExecutorService executorService = Executors.newFixedThreadPool(2);
        // 单个后台线程,
        ExecutorService executorService1 = Executors.newSingleThreadExecutor();
        //
        ExecutorService executorService2 = Executors.newCachedThreadPool();
        AtomicInteger atomicInteger = new AtomicInteger();

        while (exeflag){
            if (atomicInteger.get() <= 100){
                executorService.execute(new Runnable() {
                    @Override
                    public void run() {
                        System.out.println("爬去了第"+ atomicInteger.get()+"网页》》》");
                        atomicInteger.getAndDecrement();
                    }
                });
            }else {
                if(((ThreadPoolExecutor)executorService).getActiveCount() == 0){
                    executorService.shutdown();
                    exeflag = false;
                    System.out.println("爬虫任务完成");
                }
            }
        }
    }
}
第九章,类的加载过程
第十章,JVM类加载器
第十一章,线程上下文类加载器
第十二章,volatile关键字的介绍
1)初始volatile关键字:volatile关键字只能修饰类变量和实例变量,对于方法参数,局部变量已及实例常量,类常量都不能进行修饰。
2)Java内存模型:
- 共享变量存储与主内存之中,每个变量都可以访问。
- 每个线程都有私有的工作内存空间,或者称本地内存空间,
- 工作内存只存储该线程对共享变量的副本
- 线程不能直接操作主内存,只有先操作了工作内存之后才能写入主内存。
3)并发编程的三个重要的特性:原子性,有序性和可见性。
- 原子性:要么全部执行,要么全部不执行

- 有序性:Java在运行期会对代码进行优化,执行顺序未必就是编顺序,volatile具有保证原子性的语义。

- 可见性:当一个线程对共享变量进行了修改,那么另一个变量可以立即看到。volatile具有保证可见性的语义。

第十三章,深入volatile关键字的介绍
1)被volatile关键字修饰的实例变量或者类变量具备两层语义:
- 保证了不同线程之间对共享变量的可见性,
- 禁止对volatile变量进行重排序。
2)volatile和synchronized区别
- 使用上区别:
- volatile关键字只能用来修饰实例变量或者类变量,不能修饰方法已及方法参数和局部变量和常量。
- synchronized关键字不能用来修饰变量,只能用于修饰方法和语句块。
- volatile修饰的变量可以为空,同步块的monitor不能为空。
- 对原子性的保证
- volatile无法保证原子性
- synchronizde能够保证。因为无法被中途打断。
- 对可见性的保证
- 都可以实现共享资源的可见性,但是实现的机制不同,synchronized借助于JVM指令monitor enter 和monitor exit ,通过排他的机制使线程串行通过同步块,在monitor退出后所共享的内存会被刷新到主内存中。volatile使用机器指令(硬编码)的方式,“lock”迫使其他线程工作内存中的数据失效,不得不主内存继续加载。
- 对有序性的保证
- volatile关键字禁止JVM编译器已及处理器对其进行重排序,能够保证有序性。
- synchronized保证顺序性是串行化的结果,但同步块里的语句是会发生指令从排。
- 其他:
- volatile不会使线程陷入阻塞
- synchronized会会使线程进入阻塞。
第十四章,7种单例设计模式的设计
一,饿汉式
* @Description 饿汉式单例
* 饿汉式单例关键在于singleton作为类变量并且直接得到了初始化,即类中所有的变量都会被初始化
* singleton作为类变量在初始化的过程中会被收集进
* 但是因为不是懒加载,singleton被加载后可能很长一段时间不被使用,即实例所开辟的空间会存在很长时间
* 虽然可以实现多线程的唯一实例,但无法进行懒加载;
package com.liruilong.singleton;

/**
 * @Author: Liruilong
 * @Date: 2019/7/20 17:55
 */

// final 不允许被继承
public final class Singleton {
    // 实例变量
    private byte[] bate = new byte[1024];
    // 私有的构造函数,即不允许外部 new
    private Singleton(){ }

/**
     * @Author Liruilong
     * @Description 饿汉式单例
     * 饿汉式单例关键在于singleton作为类变量并且直接得到了初始化,即类中所有的变量都会被初始化
     * singleton作为类变量在初始化的过程中会被收集进()方法中,该方法能够百分之百的保证同步,
     * 但是因为不是懒加载,singleton被加载后可能很长一段时间不被使用,即实例所开辟的空间会存在很长时间
     * 虽然可以实现多线程的唯一实例,但无法进行懒加载;
     * @Date 17:14 2019/7/26
     * @Param []
     * @return com.liruilong.singleton.Singleton
     **/
    private  static final Singleton singleton1 = new Singleton();
    public static  Singleton getInstance1(){
        return singleton1;
    }
二,懒汉式
* @Description 懒汉式单例模式
* 可以保证懒加载,但是线程不安全
* 当有两个线程访问时,不能保证单例的唯一性
package com.liruilong.singleton;

/**
 * @Author: Liruilong
 * @Date: 2019/7/20 17:55
 */

// final 不允许被继承
public final class Singleton {
    // 实例变量
    private byte[] bate = new byte[1024];
    // 私有的构造函数,即不允许外部 new
    private Singleton(){ }

    /**
     * @Author Liruilong
     * @Description 懒汉式单例模式
     * 可以保证懒加载,但是线程不安全
     * 当有两个线程访问时,不能保证单例的唯一性
     * @Date 17:06 2019/7/26
     * @Param []
     * @return com.liruilong.singleton.Singleton
     **/
    private static  Singleton singleton =null;
    public static  Singleton getInstance(){
            if (singleton == null) {
                singleton = new Singleton();
            }
                return singleton;
    }
三,懒汉式加同步方法
* @Description 懒汉式+同步方法单例模式
* 即能保证懒加载,又可以保证singleton实例的唯一性,但是synchronizeed关键字的排他性导致
* getInstance0()方法只能在同一时间被一个线程访问。性能低下。
package com.liruilong.singleton;

/**
 * @Author: Liruilong
 * @Date: 2019/7/20 17:55
 */

// final 不允许被继承
public final class Singleton {
    // 实例变量
    private byte[] bate = new byte[1024];
    // 私有的构造函数,即不允许外部 new
    private Singleton(){ }
/**
     * @Author Liruilong
     * @Description 懒汉式+同步方法单例模式
     * 即能保证懒加载,又可以保证singleton实例的唯一性,但是synchronizeed关键字的排他性导致
     * getInstance0()方法只能在同一时间被一个线程访问。性能低下。
     * @Date 14:11 2019/7/27
     * @Param []
     * @return com.liruilong.singleton.Singleton
     **/
    private static  Singleton singleton =null;
    public static synchronized Singleton getInstance0(){
        if (singleton == null) {
            singleton = new Singleton();
        }
        return singleton;
    }
四,双重效验锁单例
* @Description 双重校验锁单例(Double-Check)+Volatile
* 对懒汉-同步方法的改进,当有两个线程发现singleton为null时,只有一个线程可以进入到同步代码块里。
* 即满足了懒加载,又保证了线程的唯一性
* 不加volition的缺点,有时候可能会报NPE,(JVM运行指令重排序)
* 有可能实例对象的变量未完成实例化其他线程去获取到singleton变量。
* 未完成初始化的实例调用其方法会抛出空指针异常。
package com.liruilong.singleton;

/**
 * @Author: Liruilong
 * @Date: 2019/7/20 17:55
 */

// final 不允许被继承
public final class Singleton {
    // 实例变量
    private byte[] bate = new byte[1024];
    // 私有的构造函数,即不允许外部 new
    private Singleton(){ }
/**
     * @Author Liruilong
     * @Description 双重校验锁单例(Double-Check)+Volatile
     *  对懒汉-同步方法的改进,当有两个线程发现singleton为null时,只有一个线程可以进入到同步代码块里。
     *  即满足了懒加载,又保证了线程的唯一性
     *  不加volition的缺点,有时候可能会报NPE,(JVM运行指令重排序)
     *  有可能实例对象的变量未完成实例化其他线程去获取到singleton变量。
     *  未完成初始化的实例调用其方法会抛出空指针异常。
     * @Date 18:20 2019/7/26
     * @Param
     * @return
     **/

    private  static volatile Singleton singleton2 = null;
    public static Singleton getInstance4() {

        if (singleton2 == null){
            synchronized (Singleton.class){
                if (singleton2 ==null){
                    singleton2 = new Singleton();
                }
            }
        }
        return singleton2;
    }
五,静态内部类单例
* @Description 静态内部类的单例模式
* 在Singleton类初始化并不会创建Singleton实例,在静态内部类中定义了singleton实例。
* 当给静态内部类被主动创建时则会创建Singleton静态变量,是最好的单例模式之一
package com.liruilong.singleton;

/**
 * @Author: Liruilong
 * @Date: 2019/7/20 17:55
 */

// final 不允许被继承
public final class Singleton {
    // 实例变量
    private byte[] bate = new byte[1024];
    // 私有的构造函数,即不允许外部 new
    private Singleton(){ }
/**
     * @Author Liruilong
     * @Description 静态内部类的单例模式
     * 在Singleton类初始化并不会创建Singleton实例,在静态内部类中定义了singleton实例。
     * 当给静态内部类被主动创建时则会创建Singleton静态变量,是最好的单例模式之一
     * @Date 17:26 2019/7/26
     * @Param []
     * @return com.liruilong.singleton.Singleton
     **/

    private  static class Singtetons{
        private static  Singleton SINGLETON = new Singleton();
       /* static {
             final Singleton SINGLETON = new Singleton();
        }*/

    }
    public static  Singleton getInstance2(){
        return Singtetons.SINGLETON;
    }
六,枚举类单例
* @Description 基于枚举类线程安全
* 枚举类型不允许被继承,同样线程安全的,且只能被实例化一次。
package com.liruilong.singleton;

/**
 * @Author: Liruilong
 * @Date: 2019/7/20 17:55
 */

// final 不允许被继承
public final class Singleton {
    // 实例变量
    private byte[] bate = new byte[1024];
    // 私有的构造函数,即不允许外部 new
    private Singleton(){ }
/**
     * @Author Liruilong
     * @Description 基于枚举类线程安全
     * 枚举类型不允许被继承,同样线程安全的,且只能被实例化一次。
     * @Date 17:33 2019/7/26
     * @Param []
     * @return com.liruilong.singleton.Singleton
     **/
    private enum Singtetonss {
        SINGTETONSS; //实例必须第一行,默认 public final static修饰
        private Singleton singleton;

        Singtetonss() { //构造器。默认私有
            this.singleton = new Singleton();
        }
        public static Singleton getInstance() {
            return SINGTETONSS.singleton;
        }
    }
    public static  Singleton getInstance3(){
        return Singtetonss.getInstance();
    }
第十五章,监控任务的生命周期
第十六章,Single Thread Execution设计模式
第十七章,读写锁分离设计模式
第十八章,不可变对象的设计模式
第十九章,Future设计模式


